Impressive effort, Herman!
-

Win a Free Custom Engraved Brass Coin!!!
As a way to introduce our brass coins to the community, we will raffle off a free coin during the month of August. Follow link ABOVE for instructions for entering.
-

PRE-ORDER SHIPS IN SCALE TODAY!
The beloved Ships in Scale Magazine is back and charting a new course for 2026!
Discover new skills, new techniques, and new inspirations in every issue.
NOTE THAT OUR FIRST ISSUE WILL BE JAN/FEB 2026
You are using an out of date browser. It may not display this or other websites correctly.
You should upgrade or use an alternative browser.
You should upgrade or use an alternative browser.
The appearance of the sanded nails is very very nice and subtle, Herman.Still nailing.
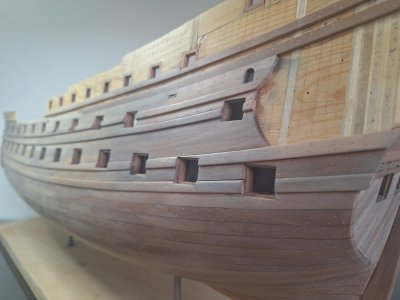
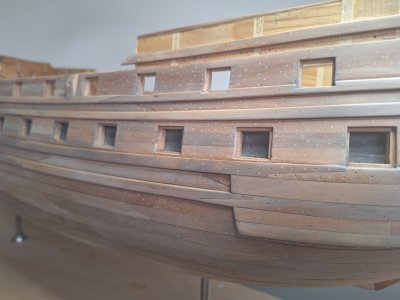
Extra nails were inserted, as @Maarten suggested, where the part of the frames overlap each other and form an almost closed wooden wall.
Below the wales the nailing is completed and that part was sanded again.
On the port side the holes for the wooden nails were drilled and all wooden nails are now inserted there. I have enclosed pictures where you can see the new forest of nails and the result of the nailing below the wales.
View attachment 524548
View attachment 524549
View attachment 524553
View attachment 524550
View attachment 524552
View attachment 524551
Regards, Peter
- Joined
- Sep 10, 2024
- Messages
- 1,007
- Points
- 393

Herman, very nice work! Do you trim those with flush-cutters or a saw before sanding?The appearance of the sanded nails is very very nice and subtle, Herman.
Regards, Peter
Witaj
Bardzo żmudna praca z kołkowaniem ale piękny efekt Hermanie ,podziwiam . Pozdrawiam Mirek
Dziękuję, Mirku. To rzeczywiście bardzo pracochłonne zajęcie, ale myślę, że warto poświęcić na to dodatkowy wysiłek.
Thank you Mirek. It is indeed very labor intensive, but I think it is worth the extra effort.
Impressive effort, Herman!
Thank you Paul.
And after this side is finished there is still one side left to do above the wales.
The appearance of the sanded nails is very very nice and subtle, Herman.
Regards, Peter
Thank you Peter.
I too like the end effect. It was a pity making nails from pearwood was too labor intensive as the wood burned quickly and the needle got clogged. I made about 100 pear nails (in a week time) some of which I later used in the crown of the figurehead.
With pear, the nails would have been somewhat darker instead of lighter.
I somewhat tried to fix that by -at the end after sanding- making the wood wet and at the same time polishing the hull/nails with steelwool untill the wood was dry again. It might be my imagination but it gave me the impression the circumference of the nails darkened somewhat.
My running count totaled over 13000 treenails on the Kingfisher (inside and out - but only one side had planking) so I feel your pain!Thank you Paul.
And after this side is finished there is still one side left to do above the wales.
Herman, very nice work! Do you trim those with flush-cutters or a saw before sanding?
First of all thank you for visiting my build log Russ.
A very good question, let me explain why. I used flush cutters, but did my best not to cut the nails flush with the hull because that might damage the nails at the heigth of the hull. I leave them somewhat protruding (I enclose here a picture of some cut nails)

and later sand them down. I think that gives the best result.
I will show you where I, let me use a friendly term, delivered a somewhat inferior quality of work with the nailing of the stern. At the time an other expression came to mind.

Although I made a test piece to judge the outcome of nailing before starting nailing on the model, I think what happened here was damaging the nails on the stern when cutting them flush with a chisel too quickly. Something I did not test out. As it is my first model I am bound to make rookie mistakes. I considered ripping the planks from the stern and start over again but that might cause further damage to the surrounding wood, so I add it to the list of learning mistakes.
Last edited:
Yeah it takes some perseverance. I estimate I made about 10000 nails originally and am now almost out of stock. In the process of nailing I could re-use a considerable amount of what was left over from cut nails. So I lost counting.My running count totaled over 13000 treenails on the Kingfisher (inside and out - but only one side had planking) so I feel your pain!
- Joined
- Jan 21, 2022
- Messages
- 859
- Points
- 403

A very beautiful hedgehog. The amount of work you put in is totally justified by the end result. I still don't know how you counted the nails, but I believe you. I only had the perseverance to pound the nails, counting them is out of optionStill nailing.
Extra nails were inserted, as @Maarten suggested, where the part of the frames overlap each other and form an almost closed wooden wall.
Below the wales the nailing is completed and that part was sanded again.
On the port side the holes for the wooden nails were drilled and all wooden nails are now inserted there. I have enclosed pictures where you can see the new forest of nails and the result of the nailing below the wales.
View attachment 524548
View attachment 524549
View attachment 524553
View attachment 524550
View attachment 524552
View attachment 524551
- Joined
- Sep 10, 2024
- Messages
- 1,007
- Points
- 393

A very good question, let me explain why. I used flush cutters, but did my best not to cut the nails flush with the hull because that might damage the nails at the heigth of the hull. I leave them somewhat protruding
Yes, that is why I was asking. Flush cutters would be the answer, but I was concerned about crushing them as you described. Leaving them a little proud and then sanding is a good solution.
As it is my first model...
First model!?! Now I'm really impressed! Well done!
A very beautiful hedgehog. The amount of work you put in is totally justified by the end result. I still don't know how you counted the nails, but I believe you. I only had the perseverance to pound the nails, counting them is out of option
Thank you Wojtas.
You pobably meant it rhetorical, but first I counted the number of frames and looked how many nails per set of frames were approximately needed. All very rough considering the difference between the front and aft part of the ship and adding some nails for the stern.
When making them I counted the number of rows x the average number of nails per piece of wood. All estimates but originally needed about 9.000 and made about 10.000 (some of which can be used twice).
Love the chaos.Still nailing.
Extra nails were inserted, as @Maarten suggested, where the part of the frames overlap each other and form an almost closed wooden wall.
Below the wales the nailing is completed and that part was sanded again.
On the port side the holes for the wooden nails were drilled and all wooden nails are now inserted there. I have enclosed pictures where you can see the new forest of nails and the result of the nailing below the wales.
View attachment 524548
View attachment 524549
View attachment 524553
View attachment 524550
View attachment 524552
View attachment 524551
It is a bit of an organised chaos as only extra nails were added between my originally planed pattern of nails. But I am grateful for your suggestion. It looks so much better.Love the chaos.
Ditto.The appearance of the sanded nails is very very nice and subtle, Herman.
Regards, Peter
A majestic accomplishment, my friend. And now what can be done about the steel wool graying. I have found it doesn't just blow off or wipe off...
Thank you my dear friend. One time consuming job.excellent planking, Dear Herman


