
Looking good Don! You got it figured out buddy.

-

SUBSCRIBE TO SHIPS IN SCALE TODAY!
The beloved Ships in Scale Magazine is back and charting a new course for 2026!
Discover new skills, new techniques, and new inspirations in every issue.
NOTE THAT OUR NEXT ISSUE WILL BE July/August 2026 -

Win a Free Custom Engraved Brass Coin!!!
As a way to introduce our brass coins to the community, we will raffle off a free coin during the month of August. Follow link ABOVE for instructions for entering.
- Home
- Forums
- Ships of Scale Group Builds and Projects
- Group Build Archives
- Blandford Cross Section PoF Group Build
You are using an out of date browser. It may not display this or other websites correctly.
You should upgrade or use an alternative browser.
You should upgrade or use an alternative browser.

THANKS MIKE. Don
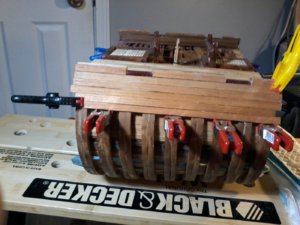
more progress, spirkiting dry fitted using red gum, 1 coat of tung oil and one coat of wipe on poly, maybe need a second coat not sure, first exterior plank dry fitted out of cherry, next to install the items already made the bitts, elm pump and finsh up the gun carriages( NQUESTION ON THE GUNS I GOT MINE FROM THE LUMBERYARD I REALLY LIKE THE GUNS AS IS BUT WOULD LIKE TO DO A PROTECTION FROM SCRATCHES ANY BODY WITH IDEAS) picture tomorrow, now to install the rails made off model
OOPS HERE ARE THE PICTURES![20190721_202739[6317].jpg](https://shipsofscale.com/sosforums/data/attachments/90/90962-522361731871c8526474cba1461523d7.jpg?hash=UiNhcxhxyF "20190721_202739[6317].jpg")
![20190721_202943[6316].jpg](https://shipsofscale.com/sosforums/data/attachments/90/90963-bf9bf93507548cfde5ec8e6386e26656.jpg?hash=v5v5NQdUjP "20190721_202943[6316].jpg")
![20190721_203419[6315].jpg](https://shipsofscale.com/sosforums/data/attachments/90/90964-3a60b6036b7a0ae528e55a656c96c5fa.jpg?hash=OmC2A2t6Cu "20190721_203419[6315].jpg")
![20190717_025204[6274].jpg](https://shipsofscale.com/sosforums/data/attachments/90/90965-bec02e5e84f4c45ebd2788715991922c.jpg?hash=vsAuXoT0xF "20190717_025204[6274].jpg")
![20190721_202943[6323].jpg](https://shipsofscale.com/sosforums/data/attachments/90/90966-bf9bf93507548cfde5ec8e6386e26656.jpg?hash=v5v5NQdUjP "20190721_202943[6323].jpg")
![20190721_203050[6322].jpg](https://shipsofscale.com/sosforums/data/attachments/90/90967-ed00222afc2a9b33faf6152b1081646b.jpg?hash=7QAiKvwqmz "20190721_203050[6322].jpg")
![20190721_203419[6321].jpg](https://shipsofscale.com/sosforums/data/attachments/90/90968-3a60b6036b7a0ae528e55a656c96c5fa.jpg?hash=OmC2A2t6Cu "20190721_203419[6321].jpg")
![20190722_042958[6329].jpg](https://shipsofscale.com/sosforums/data/attachments/90/90969-8c0773eef2a86a8ad0ec2aa5ba5ccdb6.jpg?hash=jAdz7vKoao "20190722_042958[6329].jpg")

Hi all, I am in a dilema right now and need some advice, I am using 3/16 inch for exterior planking tried the 1/8 inch but decided to go with the 3/16 did I make a mistake. THANKS Don
I'm not sure I understand your question, Don. For the 1/32 scale external planking, the plans specify each plank should be 1/16" thick and 9/32" wide. That's 9 scale inches wide, which is OK for the early-to-mid 18th century, but wider would be OK too. A plank 1/8 wide is too narrow...only 4 scale inches and 3/16" is only 6 scale inches wide. Where did you come up with those measurements?
Hi Doc, I have not got the faintest idea how I came up with the thickness dimension, my the sample plank that I used was 3/16 thick instead of 1/16 X 9/32 so my question is as I have just the top plank installed on both port and starboard side I can take them off i just thought a little thicker then 1/16 easier to work with, but no problem taking off the first plank that is the one that i cut for the gunports I think I showed a picture in my log how i fit it, WHAT DO YOU THINK ABOUT THE THICKNESS DIMENSION. Don
3/16” is too thick for the planking. 1/16”, or 2 scale inches is right.
THANKS DOC, WILL DO MY SILLY MISTAKE BUT I DID FIND IT OUT BEFORE MORE WAS DONE> AS ALWAYS THANKS Don
more progress pictures nearing completion and will give a recap in about a week from what i have learned,,,, showing the bitts in place the elm pump done in place (A THOUGHT ABOUT THE ELM PUMP I WOULD NEVER HAVE ATTEMPTED THIS A COUPLE OF MONTHS AGO) THIS IS MY PROGRESS,, also showing the exterior upper planking, glad to see these ugly frames diappear next the wales and amplanking all the way to the keel upper planking in cherry the lower planking will be boxwood and the wales american walnut,(ABOUT THE PLANKING NOTICE THE CHANGE FROM PREVIOUS POST TO THIS FOR SOME REASON I USED A 3/16 inch THICKNESS but with a explanation from DOC i changed it to 1/16 inch as the plans call for) finally showing the rail assemblies complete but not installed will be the last item to go on


Attachments
ALL COMMENTS SOUGHT AFTER AND APPRECIATED

Great job Don. Looks really good. In my book, Doc is the expert on this build.
Great work, Don! It’s really coming along!
HI ALL PROGRESS BEING MADE, EXTERIOR PLANKING PORT AND STAR BOARD ( THANK THE LORD MY BADLY DONE FRAMES ARE COVERED) IT HAS 1 COAT OF TUNG OIL< WITH ANOTHER TO PUT ON WITH A COAT OF WIPE ON POLY, THE RAILS, FENDERS, PORT SILLS BALLAST PORTS ARE ALL DONE WAITING TO MOUNT ON MODEL AS WELL AS THE MAST, THE ONLY THING LEFT TO MAKE IS THE STEPS WICH COULD BE A PROBLEM FOR ME,,,,,ALSO THE UPPER PLANKS ARE CHERRY, THE WALES ARE AMERICAN WALNUT, THE LOWER PLANKS ARE BOXWOOD, AGAIN ALL COMMENTS APPRECIATED

Good work, Don!
THANKS DOC. A LOT OF HELP FROM A LOT OF PEOPLE. Don PS I WILL START STATING WHAT I HAVE LEARNED FROM THE LOWER DECK TO THE UPPER DECK
Hi Don. Looking very good!. However, I wouldn't be honest, if I will not make my comments about the boxwood planking. It is possible, that the picture was taken from the bad angle. However, it looks like the planks are not even in thickness and made a 'clinker' appearance. Please take a look at my red arrows.
It can be corrected easy by sending planks and make them even.

It can be corrected easy by sending planks and make them even.
YES I AM GOING TO USE A SCRAPER THE REASON IS THE FRAMES SO I WILL BE SCRAPING THEM. Don
This is a good example of learning exercise....... for your next scratch built Rochefort project.YES I AM GOING TO USE A SCRAPER THE REASON IS THE FRAMES SO I WILL BE SCRAPING THEM. Don
Prepare, cut and glue each single frame in correct way - less sanding of the outside of the frames after they are installed on the keel.
Take more time for the sanding of the frames in order to get a smooth surface for the hull-planking. Otherwise you get some bumps and gaps.
Otherwise you have to correct the hull surface latest with scraping and sanding of the planks.
This is learning by doing
