Endurance 2nd build

Joined
Apr 19, 2022
Messages
194
Points
113

Location
Spain
And so it begins...
I finally completed the Candelaria. Very proud that I found the patience and determination to finish it. Not proud of the detail and mistakes made through lack of experience but looking forward to doing better this time.
I have started this log in the hope that you guys can point me in the right direction when I stay off course, hopefully before I make irreversible mistakes.
So I bought Occre's Endurance. Mainly because it's very different to the Candelaria.
I found the kit in a great little shop in València, MAQUETAS CASA GIMENEZ together with some tools and gear that I need.
I bought the Candelaria over 6 years ago and it seems that Occre have upped the game a bit with overall quality and, most importantly for a beginner like me, the instructions. If I had had the YouTube videos last time things would have been very different.
No unboxing pictures, sorry to those who like them, but it all seems to be there and if not I know now that Occre have good customer service.
Anyway off to a good start...
IMG_20220702_180314.jpg

IMG-20220630-WA0000.jpeg

IMG_20220702_163753.jpg
 
Many Thanks for starting your building log of your Endurance .... :cool:
 
I just started the Endurance as my second build as well (OcCre Albatros was my first), so I'll be watching your build log every step of the way. I'll start posting a build log soon. I decided to start my Endurance by working on the boats. For 2 reasons. One, was I thought the boats would be a good way to slowly get back into building since finishing the Albatros, and because I don't see myself working on it as much during the summer. And two, my biggest disappointment with the Albatros was the little metal boat they supplied. The Endurance boats are builds, and I'm having a good time building them.
 
My first build was the Candelaria which also had a small metal die-cast boat.
So far I am more happy with this Occre kit.
Not much progress to report this week. I've been practicing with an air brush for the first time ever and trying other deck planking methods.
 
Now many kits are made with MDF and that is very dangerous, even if you work with a mask, since it is a toxic material.
I know from my own experience.
I advise tracing the pieces in wood and cutting again to avoid diseases, as happened to me
 
Now many kits are made with MDF and that is very dangerous, even if you work with a mask, since it is a toxic material.
I know from my own experience.
I advise tracing the pieces in wood and cutting again to avoid diseases, as happened to me
As far as I can tell just the board with the cut outs for the small boats is MDF. All the others are plywood.
Thanks for the heads up on this subject. I will proceed with caution.
 
Procrastination is the thief of time they say...
I spent a week trying to decide whether to follow the instructions or follow Bill Hine's lead and open up the bow bulkhead as the actual ship. He also added bead board cladding to the bulkheads and midships deck cabin. I liked the idea but this is only my second build and perhaps I should not start "bashing" kits just yet. I'll get more experience before I to much of that.
I did, however, deviate from the book by cutting 60mm planks for the decking rather than draw the pattern and nails on with pencil. IMG_20220712_155257.jpg
I toyed with the idea of trying to run the boards continuously on to the deck cabin roof. I am sure the overhanging planks would not survive my clumsy fingers until I get the cabin installed so that idea also got binned. IMG_20220712_132516.jpg
 
So finally, after a week of not much visible progression:View attachment 318277
Another coat or two of white paint then I can glue the decks.
I thought I wasn't going to get past all of the coats of white paint needed early in the build!

Good to see you got the last large bulkhead installed correctly as opposed to the way a couple of us did it initially.
 
Procrastination is the thief of time they say...
I spent a week trying to decide whether to follow the instructions or follow Bill Hine's lead and open up the bow bulkhead as the actual ship. He also added bead board cladding to the bulkheads and midships deck cabin. I liked the idea but this is only my second build and perhaps I should not start "bashing" kits just yet. I'll get more experience before I to much of that.
I did, however, deviate from the book by cutting 60mm planks for the decking rather than draw the pattern and nails on with pencil. View attachment 318275
I toyed with the idea of trying to run the boards continuously on to the deck cabin roof. I am sure the overhanging planks would not survive my clumsy fingers until I get the cabin installed so that idea also got binned. View attachment 318276
Did you use a pencil for the nailheads? I like that you cut the planks. Did you use anything to simulate caulking between the planks?
 
I thought I wasn't going to get past all of the coats of white paint needed early in the build!

Good to see you got the last large bulkhead installed correctly as opposed to the way a couple of us did it initially.
Could have easily gone bad. Thanks to you I was pre-warned of the trip point and wrote "This way up" on the deck and "bow" and "stern" on the bulkhead right at the beginning.
 
Did you use a pencil for the nailheads? I like that you cut the planks. Did you use anything to simulate caulking between the planks?
No, I drilled the nail holes using my newly bought drill press and a jig. 4 boards stacked, drill one hole, flip the stack, drill 2nd hole then repeat for the other end.
For the chalking I clamped a few boards together and rubbed a soft pencil on the edges and ends.
I would love to claim originality for this idea but learnt it from STGCS's build log of his, now brilliantly completed, Endurance.
 
I had a lot of time over the last couple of days to dedicated to my hobby so got on well with the Endurance.
Completed the deck planking with primer/sealer then finished off with matt varnish. IMG_20220713_153510.jpgIMG_20220714_092139.jpg
With the decks now glued in place I started on faring. Mostly satisfied with the result but will look at it again when I'm less tired.
 
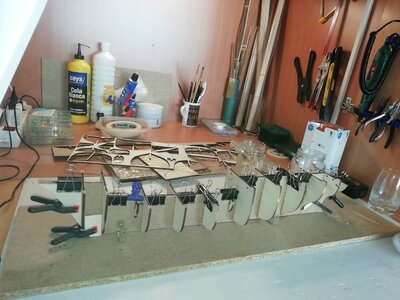
A word about my workspace...
I live in a flat by the sea in Spain, I love it but it does restrict indoor activities.
I converted a redundant cupboard into what my wife calls my "man cave" with a pull-out work top. It's small size restricted my choice of build to ships under 90 cm but has the advantage of being compact which forces me to be more organised than is natural for me. It also stops me buying all sorts of tools that "might" be useful but, if I am honest, I really don't need. IMG_20220713_153734.jpgIMG_20220713_153805.jpg
Already the dedicated work area has helped me a lot and having everything within reach makes finding tools and patience so much easier.
Will be away in Valencia for a few days so no more progress until next week.
 
A word about my workspace...
I live in a flat by the sea in Spain, I love it but it does restrict indoor activities.
I converted a redundant cupboard into what my wife calls my "man cave" with a pull-out work top. It's small size restricted my choice of build to ships under 90 cm but has the advantage of being compact which forces me to be more organised than is natural for me. It also stops me buying all sorts of tools that "might" be useful but, if I am honest, I really don't need. View attachment 318529View attachment 318527
Already the dedicated work area has helped me a lot and having everything within reach makes finding tools and patience so much easier.
Will be away in Valencia for a few days so no more progress until next week.
Very nice and organized workspace...but where does the wine or beer refrigerator go?!
 
A word about my workspace...
I live in a flat by the sea in Spain, I love it but it does restrict indoor activities.
I converted a redundant cupboard into what my wife calls my "man cave" with a pull-out work top. It's small size restricted my choice of build to ships under 90 cm but has the advantage of being compact which forces me to be more organised than is natural for me. It also stops me buying all sorts of tools that "might" be useful but, if I am honest, I really don't need. View attachment 318529View attachment 318527
Already the dedicated work area has helped me a lot and having everything within reach makes finding tools and patience so much easier.
Will be away in Valencia for a few days so no more progress until next week.
Good morning. You have chosen a lovely ship to build with some exciting History. On my list to do one day. Your tree nails and deck is looking really good. Respect for working is a small space...I am way too untidy to manage that. Cheers Grant
 
Back
Top