FLYING DUTCHMAN

When I was watching a DVD to draw a drawing of a rat (held wheel), PART 41


FD1-72-41-001.jpg

I found that there were various mistakes and strange things...
Well, that's what movies are like.
Now, in my mistake, it's the gangway rope handling. I used to tie it directly
to the pole of the handrail on the bow side, but in reality, the pole had a
ring pin and I was tying it to the ring.


FD1-72-41-003.jpg
The gangway rope, on the stern side, was also tied to the pole of the handrail, but actually
the rope ended with the pole for the gangway rope railing.
The red arrow in the red frame is the last support for the rope railing.


FD1-72-41-002.jpg
FD1-72-41-001-01.jpg
It's a funny part of the movie. …The round hole in the red frame, this is where the cannon is
actually located, but I don't have the cannon, as it might prevent Jones from coming down the stairs.
However, the red arrow on the right and the brown barrel are slightly visible. In the second video
from above, Jack Sparrow has a tack on the main lower sail, breaks the pin rail and blows it up
to the lower yard, but is there a cannon cannon? ......


It is the story of the corrected part.


FD1-72-41-004.jpg
The red arrow part of the red circle frame, the fife rail part that is an obstacle when using the stairs ...


FD1-72-41-005.jpg
I cut it.


FD1-72-41-006.jpg
Gangway's rope handrail, this is the stern side, but the bow side is also tied to the handrail post,
but it is wrong.


FD1-72-41-007.jpg
On the bow side, there is a ring pin on the column, and the correct answer is to tie it to the ring.


FD1-72-41-008.jpg
On the stern side, there is a support for the rope handrail, and it seems correct that it is
tied to the ring pin of that support.


FD1-72-41-009.jpg
Pay attention to the red arrow!
It looks like this.


FD1-72-41-010.jpg
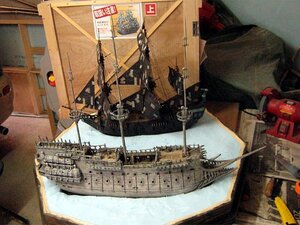
It is an image of the stern side after fixing the rope handrail.


FD1-72-41-011.jpg
Similarly, the image of the bow side with the rope handrail fixed.


FD1-72-41-012.jpg
I installed a cannon on a deck with a capstan on the stern side. The image seen from above.


FD1-72-41-013.jpg
Image on the port side.


Drawing of rat (held wheel)


FD1-72-41-0001.jpg
This drawing is the steering wheel drawing of the Black Pearl.
It's a drawing that I can see, so stop pushing.

I didn't know the pedestal part of the Flying Dutchman's helm even if I
watched the DVD many times, so I wondered if I could make it like the BP's
pedestal part, but in the end I decided to go with a different shape.
That is the drawing below.


FD1-72-41-0002.jpg
Here is a drawing of the helm and pedestal.
Since it is impossible to make a work as shown in the drawing, I will make it
by saying that it is OK if it resembles.
Maybe it looks like deformation.


FD1-72-41-0003.jpg
It is a part of the rat part.
Since the rudder wheels are directly attached to the front and rear of the drum part
where the rope is wound, it is assembled in that way.
Well, it's deformed at this point.


FD1-72-41-0004.jpg
I attached front and rear steering wheels.
The handle is too big...
But it may be emphasized.


FD1-72-41-0005.jpg
I put a 0.5mm brass wire in the center of the drum.
The rest is making a pedestal, but this is it for today.

Well, it took a lot of time to make this far. The wheel in the steering
wheel part is cut out from the wood pipe after making a hole for the handle,
but immediately after cutting out, it kicks back against the blade of a circular
saw and crushes against the wall, or sandpaper and cracks. came.
The handle also took time.
It is carved out from a toothpick.

Next, we plan to make a pedestal for rat (snake wheel) and pin rail for bulwark,
and to install a cannon on the upper deck of the bow side... Plan is undecided... It was
 
Making a pedestal for the rat PART 42


FD1-72-42-001.jpg
It's a rat pedestal work, but the first step is to make grating.


FD1-72-42-002.jpg
Then, I'm ready...
Actually, I forgot to take a photo.
When I'm absorbed in crafting, I forget about it.


FD1-72-42-003.jpg
I lined up with unpainted Davy Jones.
Well... roughly... is that okay?
Such a mess...


FD1-72-42-004.jpg
I made bulwark pin rails on the bow and stern and painted it with the rat I made.
From right: rat, 4 stern pin rails, 4 bow pin rails.
I will make belay pins later.


FD1-72-42-005.jpg
I installed a stern pin rail.
This is the port side.
The red arrow is the pin rail on the stern side.


FD1-72-42-006.jpg
Starboard side, red arrow is stern side pin rail.


FD1-72-42-007.jpg
It was installed on the port side of the bow, the red arrow on the pin rail, and
the blue arrow on the bow side of the cannon.


FD1-72-42-008.jpg
Starboard side of bow, red arrow is pin rail, blue arrow is cannon.


FD1-72-42-009.jpg
Installation of rat, was it a little bigger? ?
Don't worry...


FD1-72-42-010.jpg
Rat seen from the stern side


FD1-72-42-011.jpg
I saw the rat as seen from the bow side, and I had written so far, I forgot the railing in front of the rat
…Tohoho……


FD1-72-42-012.jpg
For now, that's all for today.

Next is the channel and Dead Eye. The dead-eye chain is so strong!
Then, I'll do my best until the completion! …(;^ω^)b
 
I found that there were various mistakes and strange things...
Well, that's what movies are like.
This was one of the points we made doing our research on the Black Pearl. It is also one of the reasons there is no copyright or trademark on the Black Pearl. There is no consistent nor documented design on how the ship actually was. It is a fantasy ship and changed from scene to scene to meet the production needs of the movie. While I have not personally researched the Flying Dutchman, my assumption is the same thing holds true here as well.

Sail on.

PS: GREAT MODEL, Mr Mellpapa!!!!
mrshanks, take a look at this picture.
It's the Flying Dutchman, but you can see the anchor so you can see where it is.
Look closely at the shape of the grating.
It's not the same as the published drawing.
This is why the movie is so much fun.
I've learned a lot since we built the bow deck.
When someone builds the Flying Dutchman, they can't trust the published plans.FD001.jpg
 
Last edited by a moderator:
Channel plate fabrication PART 43

FD1-72-43-001.jpg
A channel plate was cut out from a cypress 2 x 20 x 900 mm plate using a band saw.
It's easy to use a band saw because it has curves.


FD1-72-43-002.jpg
I used a brass wire to fit each position and tried temporary fixing.


FD1-72-43-003.jpg
This is the channel plate for the Mizzen Must, roughly the position of this side.


FD1-72-43-004.jpg
This is a channel plate for the main mast, I temporarily fixed it at this position,
but later I moved it down about 2 mm.


FD1-72-43-005.jpg
Channel plate for fore mast, this position is just right.


FD1-72-43-009.jpg
Position a dead mast with a temporary mast, and attach a string to the shroud.


FD1-72-43-010.jpg
I decided on something like this.


FD1-72-43-011.jpg
A proportional divider was used for even division. After that, I avoid the cannon and shift it.


FD1-72-43-012.jpg
Proportional dividers are pretty good.


Handrail construction of the platform at the top of each mast

FD1-72-43-013.jpg
I cut the channel board with a band saw, so I also cut the handrail jig on the top platform.
On the left is a side view of the platform and the railing loop drawing that only I know.
As always, it's a good drawing for me to understand, so don't be afraid!


FD1-72-43-006.jpg
A cylinder of each handrail jig was cut out from an 18 mm thick plate (half-milled wood).


FD1-72-43-007.jpg
Soak 1x2x900mm cypress wood in the bath for about 30 minutes, cut the beginning of the
winding diagonally, make a double wrap and secure with a rubber band.
Leave it as it is overnight.


FD1-72-43-008.jpg
The next day, I applied a tight bond and when the bond dried, I shave off the protruding
bond and finished it nicely with sandpaper.
Keep it until you make the mast.


Channel plate processing


FD1-72-43-014.jpg
The work returns to the channel plate, and the support plate is glued to the back of the channel plate.
When I made the 1/72 Black Pearl, I had cut out a large amount of this support plate so that it could be
used for the 1/72FD.


FD1-72-43-015.jpg
The support plate can be bonded to all the channel plates.


FD1-72-43-016.jpg
Adhesion of the channel plate to the hull.
This is the starboard side.


FD1-72-43-021.jpg
This is the port side.


FD1-72-43-017.jpg
Now that the channel plates have been bonded, it's time to prepare the Dead Eye.
I used Woody Joe's plastic dead eye for 1/72 BP.
But this time, I will use the plastic dead-eyes that the old elders gave me in large
quantities at the "My Ship Club" sailboat model club in Tokyo. There are 5 sizes.
In addition to Dead Eye, he gave me various materials.
The elder created the BP and FD issues using the naive drawings that I drew. It's about
20 cm long and super precise.
For that reason, my ship club also gave me a lot of wood.
Thank you to all my ship clubs.


FD1-72-43-018.jpg
We will use the 5mm size for each lower mast from among the ones we have handed over.


FD1-72-43-020.jpg
4mm size is used for each top mast and the mast above it.


I've put out as many as each one. It's easy because you don't have to make a dead eye.
If you cut the cut part from the runner with a little sandpaper, it's OK!
Let's do it for lunch break at work.
When the sandpaper is finished, it is painted in German gray.
Today is up to here.


Next is the production of the Dead Eye chain. This is quite tough... Because it's a
brazed 0.5mm brass wire... Be careful not to get burned.
(;^ω^)b
 

Attachments

  • FD1-72-43-019.jpg
    FD1-72-43-019.jpg
    40.7 KB · Views: 0
Creating dead eye chains PART 44


FD1-72-44-001.jpg
I made a sample of a Dead Eye chain.
I think this is just right.


FD1-72-44-002.jpg
Disassemble the chain made from the sample...


FD1-72-44-003.jpg
Straighten the brass wires and cut out brass wires of the same length as these.
Since I need the same number as the dead eyes, maybe 46 each?
I think there are only eight brass wires in the middle.


FD1-72-44-004.jpg
So I'm brazing suddenly.
The braided braid is contained in the white small plate, and the completed chain is complete.


FD1-72-44-005.jpg
It looks like this when uploaded.
A dead eye is attached to the upper circle.


FD1-72-44-006.jpg
I don't do it, and it took me a whole day to make 46 chains.
The gas torch for waxing is a red Coleman jet lighter. Made in China.
The ignition part broke when the brazing was finished. If you don't click
it for about 10 times, it won't ignite.


FD1-72-44-007.jpg
For brazing, I used this guy sold at home improvement stores.
It costs about 4,000 yen.
But brazing 0.5mm brass wire is best.


FD1-72-44-009.jpg
I washed off the brazing flux with water and dropped it.
Drain water with a tissue and dry.


FD1-72-44-010.jpg
Black with a birch wood black dye.


FD1-72-44-011.jpg
The left plate is black dyeing solution. I use it diluted with water.
The plate on the left is a black chain.


FD1-72-44-012.jpg
It is a close-up photo of the plate on the left.
Black dyeing is in progress.


FD1-72-44-013.jpg
It is a close-up photo of the plate on the right. It's dyed black.


FD1-72-44-014.jpg
After dyeing everything, wash it with water to remove the chemicals and dry it.


FD1-72-44-015.jpg
Up close picture.


FD1-72-44-016.jpg
This is a close-up photo of the guy with a short chain in the middle.


Dead eye painting


FD1-72-44-008.jpg
Put the double-sided tape on the paper box and put the dead eye on it to prepare for painting.
After this, I painted using the handpiece. The color is German gray.
You can see the brass wire ring in the picture.
When the brazing started, I was preparing for the painting of the dead eye and proceeding at the same time.


FD1-72-44-017.jpg
After painting, it is drying by exposing it to sunlight on the windowsill.


FD1-72-44-018.jpg
Once dry, turn the dead eye over and prepare for painting.


FD1-72-44-019.jpg
The back is also painted, and it is dried by shining sunlight on the windowsill.
It will dry soon!
The weather is fine today, so I'm excited.


FD1-72-44-020.jpg
Now, let's incorporate the dead eye into the black-dyed chain.
Tighten the red arrow with pliers.
It is completed when it is closed like a yellow arrow.


FD1-72-44-021.jpg
I assembled all dead eyes.
If you make it up to this point, you will soon want to assemble it on the hull.
But that's all for today.


Next is the installation of dead eyes on the hull. I also want to have a skeleton bow figure~
Then, I'll do my best until the completion! …(;^ω^)b
 
Dead eye installation PART 45


FD1-72-45-001.jpg
Paint the back side of the channel plate before installing the dead eye. This picture is the main mast channel board.


FD1-72-45-002.jpg
This picture is a channel plate of Mizzen Mast.


FD1-72-45-003.jpg
I attached a dead eye and glued 1x2mm cypress.
It's a little hard to see, so I'll upload some.


FD1-72-45-004.jpg
It is the fore mast channel board and dead eye.


FD1-72-45-005.jpg
Main mast channel plate and dead eye.


FD1-72-45-006.jpg
The channel plate and dead eye of the Mizzen Must.


Paint of channel board and dead eye

FD1-72-45-007.jpg
A dry brush from the usual German gray to a light gray.
Foremost channel plate on the starboard side.


FD1-72-45-008.jpg
Starboard side main mast channel plate.


FD1-72-45-009.jpg
Starboard side Mizzen mast channel plate.
I painted the port side as well.


Preparation for sail construction

FD1-72-45-010.jpg
It's about time to start preparing for the sail.
I used the white shirt I couldn't wear any more and traced the sail down to the cloth on the back.
Trace down will take quite a while. It took about 2 hours and I was able to trace down cleanly.


FD1-72-45-011.jpg
It is a commemorative photo with the drawing.
After this, I outsourced sewing to the Ministry of Finance of my home. (Lol)


Main mast work


FD1-72-45-012.jpg
The work flies around, but I also worked on the main mast.
Although the railing of the platform of the top part has not been made yet, the parts of the Maymast look like this.


FD1-72-45-013.jpg
It will look like this when assembled.
When this is attached to the hull...


FD1-72-45-014.jpg
It looks like this.
Hmm... it sounds like a good idea.
OK if you are satisfied!


FD1-72-45-015.jpg
I haven't taken the photo seen from above recently, so I took off the mast and took it.


While saying that I don't want to be involved in the skeletal bow image either... I have
proceeded with the work on the sail and mast. From now on, I will proceed with various works in parallel! !
 
Masts and sails PART 46


FD1-72-46-001.jpg
The sewing machine for the sail that had been outsourced is now ready. The Ministry of Finance of my home has done my best.
I dyed the sewn white fabric in gray. It's a relief because it's dyed in the color you expected.
When I was dyeing, I was afraid that it would work, and when it was wet, the color looked dark and I thought, "Are you... failed?"
When it dries, the color becomes brighter, and the expected color is relieved.


FD1-72-46-002.jpg
I made the main mast last time, but I also made the foreground and mist mast.
The red frame of A is a set of parts of fore mast,
The yellow frame of B is a set of parts of the main mast,
The white frame of C is a set of parts for the Mizzen Mast.
It took time to build these parts. It is quite a bender to rub the joints of each part.
No adhesive is required as the mating parts fit together when each mast is assembled.
Assembling each and assembling them into the hull...


FD1-72-46-003.jpg
I feel like this.
I made it according to the drawing, but it definitely does not follow the drawing. But it will be manageable.


FD1-72-46-004.jpg
It is painted by removing each mast from the hull.
A dry brush from the usual German gray to a light gray.


FD1-72-46-005.jpg
It is a part connection part of each mast.
The tip of the main mast and the cap, the bottom of the top mast and the platform fit together.


FD1-72-46-006.jpg
Top mast tip and cap, top galant mast bottom edge and trelle and cross tree.


FD1-72-46-007.jpg
Top galant mast tip and cap, Royal mast bottom edge and Trestle Tree and Cross Tree.


FD1-72-46-008.jpg
The united mast and hull that have been painted! It is gradually taking shape.
It's exciting.
When the mast stands, I will shoot at a favorite angle.


FD1-72-46-009.jpgFD1-72-46-010.jpgFD1-72-46-011.jpgFD1-72-46-012.jpg
The four points below are the photos.


Skull of the figure head


FD1-72-46-013.jpg
I drew the front view and side view of the skull on the balsa block, cut out the skull block, and carved it.


FD1-72-46-014.jpg
Is it like this? ?
This guy had a missing tooth.
Even so, my teeth were too big...


FD1-72-46-015.jpg
This guy has a protruding tooth. (Lol)


FD1-72-46-016.jpg
It's a very charming guy with missing teeth.


FD1-72-46-017.jpg
I put on my jawbone.


FD1-72-46-018.jpg
My teeth are missing, so cute!


FD1-72-46-019.jpg
Are you angry because your teeth are missing?
This skull is so small that it was hard to carve it out. Then I cut the index finger of my right hand……
Today is up to here.
Body parts are next

It was a laborious skeleton, but I managed to shave it. Next time I will make the body part!
 
Crafting a figure head PART 47


FD1-72-47-001.jpg
Last time it was the work up to this point, but this time it is the work of this body part.


FD1-72-47-002.jpg
I tried to make the spine part using epoxy putty for woodwork. I also made the clavicle with cypress.


FD1-72-47-003.jpg
Like a big caterpillar on your head...
It's a touch.


FD1-72-47-004.jpg
I made an arm with cypress. I also made a shoulder blade.


FD1-72-47-005.jpg
It's like swimming in a crawl.


FD1-72-47-006.jpg
Cut the tip of the toothpick and embed a 0.3mm brass wire.


FD1-72-47-007.jpg
Cut a 0.3mm brass wire to this length...


fd1-72-47-008.jpg
Cut it down...


FD1-72-47-009.jpg
Cut it off...
This is the bone of your fingertip.


FD1-72-47-010.jpg
Like this, I'm holding it down with my right hand.


FD1-72-47-011.jpg
I have a bone for my hand. Four fingers.
But I don't know clearly whether it's four fingers or five fingers.
All finger bones are made of toothpicks.


FD1-72-47-012.jpg
I tried to put the back of the left arm up.
The picture is a little small...


FD1-72-47-013.jpg
It is a close-up photo.


FD1-72-47-014.jpg
Up of the other hand.


FD1-72-47-015.jpg
Dorsal fin bone.


FD1-72-47-016.jpg
It becomes like this when attached.
I also made a plastic rod for parts like the tip of a fishing hook.
What kind of creature's bone is this?


FD1-72-47-017.jpg
Another angle picture……
After all, it's like swimming.


FD1-72-47-019.jpg
It is a rib work. Wrap a plastic stick around the magic handle, add hot water to the pan, add this and
let it boil in a gas stove for about 5 minutes.
Then cool it down with tap water all at once...


FD1-72-47-020.jpg
The spring of such a plastic rod is completed.
I will use this for my ribs.


FD1-72-47-021.jpg
The ribs are being glued together.
 
PART 47


FD1-72-47-022.jpg
I'm done.


FD1-72-47-023.jpg
It's taken from the other side.


FD1-72-47-024.jpg
What? …I've never seen it~
What was it? ?
I will paint it for the time being.


FD1-72-47-025.jpg
As usual, it is a dry brush from German gray to light gray.


FD1-72-47-026.jpg
This is the angle from the diagonally left front side.


FD1-72-47-027.jpg
Angle from the front...
I remembered. It is "Sadako".
"Video of Curse"……
Did I make the bones for "Sadako"?
Is that so ... (;^ω^)b


FD1-72-47-028.jpg
By the way, "Sadako-san" from the left side.


FD1-72-47-029.jpg
Also "Sadako-san" from the right side.
When I put it on the bow, I couldn't see the whole body of "Sadako" because various things got in the way,
so I took a lot of photos.

The figure head "Sadako-sama" has been created. The next work... is the statue of Hell Stern Gallery Hel
 
Stern Gallery work PART 48


FD1-72-48-001.jpg
We prepared 6mm thick balsa wood.
It was 498 yen with a width of 80 mm and a length of 600 mm. I cut it to a length of about 130 mm to make it easier to work.
I will carve a relief on this!


FD1-72-48-002.jpg
Preparation for tracedown. This time I prepared red carbon paper.


FD1-72-48-003.jpg
I will trace down with an iron brush.


FD1-72-48-004.jpg
Trace down completed!


FD1-72-48-005.jpg
Cut roughly with an electric thread saw.


FD1-72-48-006.jpg
Then, I will cut it with a design knife.


FD1-72-48-007.jpg
It has become more or less shaped.


FD1-72-48-008.jpg
This is a slightly improved image.
Cut it further...


FD1-72-48-009.jpg
I was able to do this. I tried to implant a 0.5mm brass wire for the dragon's teeth.
A and B have dragon faces sticking out, but a thickness of 6 mm is not enough, so I will glue
the balsa blocks together before cutting.


FD1-72-48-010.jpg
It is a close-up image of a dragon's face with brass wire teeth implanted. It feels good.


FD1-72-48-011.jpg
Glue the yellow arrow and balsa block and wait for the adhesive to dry.


FD1-72-48-012.jpg
did it!
It's painting!


FD1-72-48-013.jpg
The usual dry brush.
Hmm...
Well, right
I am self-satisfied.

A statue of Hell at Stern Stern Gallery was completed. Next... Ah! It was.
There was also a statue on the pillar on the terrace below this statue.
Let's make this next That’s all for today.
 
PART 49


FD1-72-49-001.jpg
I cut off a temporary stern of the stern and loaded a 1mm brass wire.


FD1-72-49-002.jpg
A long pillar is made by cutting a 2x2 mm square cypress wood on the end of a brass wire.
I also glued the statues from Stern Gallery.


FD1-72-49-003.jpg
Textured with woodworking epoxy putty. I also made an arm to support the lantern.


FD1-72-49-004.jpg
Stern Gallery looks like this.


FD1-72-49-005.jpg
Mr. Sadako on the bow was also temporarily assembled and glued something like a sickle on the tip.


FD1-72-49-006.jpg
I also made a horizontal bar that supports the lantern's arm.


FD1-72-49-007.jpg
This is the photo on the other side.


FD1-72-49-008.jpg
Photo from the bow side.


FD1-72-49-009.jpg
I made a fifth dead eye, but the edge got rattled.
It is troublesome to remake it, so I will use it as it is.
I'm happy when it suits the FD issue.


FD1-72-49-010.jpg
I painted the sickle part of bow bow spirit on the bow.


FD1-72-49-011.jpg
It looks like this from the side.


FD1-72-49-012.jpg
It is the fifth dead eye to support the fore main mast.


FD1-72-49-013.jpg
The fifth dead eye to support the main mast.
I'm sleeping a lot.


FD1-72-49-014.jpg
A fifth dead eye for supporting the muzzle mast is attached to the main mast.
I also started rigging. The work will fly around, but I will proceed with each work like this.

Since each part is worked in parallel, the work can be skipped here and there. I don't know what I'm doing...
 
Standing rigging PART 50


FD1-72-50-001.jpg
I put a shroud on each lower mast.
The photo is the main mast.
I installed a dead eye on the platform.


FD1-72-50-002.jpg
I stretched the main mast's Futtoshroud and the cat harpins.
It was okay to omit it.


FD1-72-50-003.jpg
It is a foremost.


FD1-72-50-004.jpg
Fore-mast platform, futock shroud, cat harpin.


FD1-72-50-005.jpg
It's a must-have.


FD1-72-50-006.jpg
Mizzen Mast Platform, Futto Shroud, Cat Harpin.


FD1-72-50-007.jpg
The shroud of each top mast was put up.


FD1-72-50-008.jpg
It is a close-up image of the shroud of each top mast.
Today is up to here.
Next is the shroud tension of the forgermast and the main mast Togernmast and the respective stay and backstay tension.


Rigging is tiring. If you do this, you will not be able to get up fast, and you have no choice but to work steadily...
 
Continuation of standing rigging PART 51


FD1-72-51-001.jpg
It is a shroud tension of forgermast and forgern mast of the main mast.
This is the Voedgernmast.


FD1-72-51-002.jpg
This is the main geln mast.


FD1-72-51-003.jpg
The whole thing looks like this.


FD1-72-51-004.jpg
Then, the rat line is attached to each lower mast part.
This is the fore mast.
By the way, the rat line interval is 4mm, which is the same as 1/72BP.


FD1-72-51-005.jpg
This is the Mizun Must.
I've finished tensioning the main mast, but I forgot to take a photo.


FD1-72-51-006.jpg
The rat line for each lower mast is over and the rat line for each top mast is over.
This is the foretop mast rat line.


FD1-72-51-007.jpg
This is the main top mast rat line.


FD1-72-51-008.jpg
This is the rat line of Mizun Top Mast.


FD1-72-51-009.jpg
And the whole thing looks like this.
I'm going to have the Tgernmast rat line.


FD1-72-51-010.jpg
It is a close-up photo of each Togeln mast.
Let's be enthusiastic and stretch!


FD1-72-51-011.jpg
So, I finished drawing the rat line of the main geln mast.


FD1-72-51-012.jpg
So, I finished drawing the rat line of the Vanguard Gelnmast.


FD1-72-51-013.jpg
The fore and the main are good friends and we take pictures.


FD1-72-51-014.jpg
The whole thing looks like this. After that, if you don't stretch yet, you'll win.


FD1-72-51-015.jpg
After finishing standing rigging and feeling the victory, I painted it in gray. In some places, the gray is light or dark,
but it should be like the FD!


FD1-72-51-016.jpg
It is an angle from the front.


FD1-72-51-017.jpg
It is an angle from behind the diagonal.
I was relieved after finishing standing rigging.
There are many parts that I haven't made yet, but it will take me to make the yard and sail.
It will be exhibited at the exhibition on May 13th and 14th, so it's incomplete, but I have to show it.


Standing rigging is tiring. After working steadily, I managed to do it, so the next step is to build the yard and sail...
 
Sail production PART 52


FD1-72-52-001.jpg
It is a canvas that had been sewn on a sewing machine and dyed, but it is finally manufactured in the shape of a sail.
This is the only photo I'm making of a sail...I was so absorbed in the work that I forgot to take it. Tohoho...
I also made a yard, but I forgot to shoot this too... sweat


FD1-72-52-002.jpg
Then, I tried to temporarily assemble the sail and yard to the hull without pulleys so that I could manage to see it.
It will be exhibited at the Modeler's Club joint work exhibition at the Shizuoka Hobby Show, so it is necessary to use only sails.
After the exhibition was over, I took it apart and reworked using the pulleys.
So don't sneak in.
Running rigging is also redone.
The current state is temporary running rigging.


FD1-72-52-003.jpg FD1-72-52-005.jpg
I shoot it at my favorite angle.


FD1-72-52-006.jpg
I have to make it a diorama because it will be exhibited.
I will use the Diorama stand that was produced at the same time.
The Black Pearl will also participate in the exhibition.
It's a duel scene in a big whirlpool.
But it's impossible until the battle scene.
The production of figures, small items, etc. was done after the exhibition.
I have to do damage marks on the Black Pearl, but I will display it as it is at the exhibition.
It is an unfinished exhibition because we are making something like this.


FD1-72-52-007.jpg
I'm grinning while watching.
It feels good ... (;^ω^)b


FD1-72-52-008.jpg
The wave of the large vortex is appropriate. It was shaped like what I imagined in my head. It may be different, though.


FD1-72-52-009.jpg
Spin around...


FD1-72-52-010.jpg
Skeleton of the figure of the bow, "Hachha! I'm saying...”

I have managed to show the FD issue in a temporary assembly. For now, this is the exhibition.
I'm going to make a wooden box for this...
 
Production of Diorama stand PART 53


FD1-72-53-001.jpg
Thanks! I went to the Shizuoka Hobby Show from May 12-14. I participated in "The 28th Modelers Club Joint Work
Exhibition 2017" on 13th and 14th. I came back home on the night of the 15th.
I was preparing for going to the hobby show, packing the work, and so on, so I couldn't update the HP easily.
Therefore, I will post a diary from the creation of the Diorama stand to the production of the packaging
box for the work and the exhibition of the work.

I made an octagonal diorama stand with cheap pine wood. Even if I decided the angle accurately and cut it,
I was crazy about 2 to 3 mm because it was an amateur. Well, the gap is filled with woodworking putty.
Then, when it was done, I painted the woodworking oil, black green, of washin. Three pieces of Styrofoam
with a thickness of 2 cm were stacked.


FD1-72-53-002.jpg
I made a full-scale drawing that determined the position of the ship and matched it with the Diorama stand
to trace down the position of the ship.


FD1-72-53-004.jpg
FD1-72-53-004.jpg
FD1-72-53-006.jpg
The holes for the two ships are drilled, and the FD and BP are actually placed to check the position.


FD1-72-53-004.jpg
FD1-72-53-006.jpg
Change the viewing angle and check whether the position is okay.


FD1-72-53-007.jpg
Make waves of vortex


FD1-72-53-008.jpg
I will make a swirl using 10 light clay from a 100 yen shop.
It may be different from the movie because it creates a whirlpool with the image I was thinking in my head.


FD1-72-53-009.jpg
Change the viewing angle, observe, and fix any strange places.


Vortex painting


FD1-72-53-010.jpg

FD1-72-53-011.jpg
FD1-72-53-012.jpg
When the light clay has dried and solidified, apply gesso to make the base of the painting.
Once the gesso is dry (it took about 2 days to dry) it is painted with Aspen lacquer spray black, navy blue, marine blue.
First, spray black on the entire surface, then dry it, then spray navy blue, then spray marine blue while watching
the condition...I have to make it look like the sea. When the paint in the spray can dries, apply white waves with
a gesso brush like a dry brush. This is the work while changing the viewing angle to check if there is any unpainted portion.
When the white waves are dry, apply the transparent Aspen lacquer evenly. I used two cans to give it a gloss.


Wooden box production for Diorama


FD1-72-53-013.jpg
It is a wooden box made of 2 mm thick lauan veneer and Falcata wood.


FD1-72-53-014.jpg
Falcata material is attached to the four sides of the plywood board and fastened with screws, and
the reinforcing material is attached inside. Make four of these.


FD1-72-53-015.jpg
If you can use a tight bond to attach the reinforcing material neatly...


FD1-72-53-016.jpg
It is dry with heavy objects.


FD1-72-53-017.jpg
We will make heaven and earth boards and build a box.


FD1-72-53-018.jpg
Insert a Diorama stand and check if it is okay to turn it upside down.


FD1-72-53-019.jpg
The height of this box is about 74 cm so that it can be used as an exhibition stand.


FD1-72-53-020.jpg
Diorama enters like this. The ship is fixed with screws from the back of the Diorama stand, so it is okay to invert it!
The lid is hinged, and the patchy lock is also attached for a luxurious finish.
I sent this by black cat transportation to the person who is taking care of me in Shizuoka.


Exhibited at the exhibition hall


FD1-72-53-021.jpg

I entered Shizuoka on May 12, and exhibited at the exhibition hall from 9 pm. I only have about one hour to work.
It's desperate because the general public will come to see us from the 13th... Sweat


FD1-72-53-022.jpg
This is the booth of the model club to which I belong. This is the aircraft carrier model of the space battleship
Yamato, the 1/700 battleship of the Japanese Navy or the current aircraft carrier, the 1/32 JASDF current
aircraft, and my sailboat model.


FD1-72-53-023.jpg
The Pirates of the Caribbean model of the sailing boat was quite popular, as anyone watching a movie could immediately see it.


I was happy!
FD1-72-53-024.jpg
Wooden model maker Woody Joe came to see me.
I was happy and asked me to take a photo, and he kindly accepted it.
I'm very impressed. I'm in the middle~
I received a praise saying, "It's made in detail."
Thank you Woody Joe! !!


This was the Shizuoka Hobby Show "28th Modelers Club Joint Work Exhibition 2017".
Many wonderful works were exhibited, but some of you have posted their reports online, so
please have a look.
I can't make the 1/72FD yet because the work hasn't come back yet. Let's make a 1/72 pirate figure!
 

Attachments

  • FD1-72-53-003.jpg
    FD1-72-53-003.jpg
    56.7 KB · Views: 1
When I came back from Shizuoka, PART 54


FD1-72-54-001.jpg
I felt faint, and when I was spending the whole of May, I got a little
work from June, and I worked until the end of June.
By the way, I removed all the yards of FD that came back from Shizuoka.
I attached it briefly, so I'll attach it properly.


FD1-72-54-002.jpg
First of all, the sail tied up in the yard was also simplified, so I reattached it.


FD1-72-54-003.jpg
I did not attach the red arrow part in a simplified manner, so I will put it together.


FD1-72-54-004.jpg
It is tied up using a sewing needle. I bought it at a 100-yen shop. A domestic needle breaks quickly. I'm surprised.
I talked to Mr. Yamagami doing patchwork and got a needle made in Japan. Tohoho……


FD1-72-54-005.jpg
I've added all the simplified parts.


FD1-72-54-006.jpg
Cut the shreds with the excess cloth used for the sail...


FD1-72-54-007.jpg
Represents seaweed attached to the sail.
I will paint the color later, but I will glue the Zorozoro (I think it is a seaweed) that was on the sail in the movie.
The adhesive is Konishi Bond's handicraft bond.


FD1-72-54-008.jpg
Vortogelnsur and Vortopsul have been created. I forgot to take a picture, but the back side is also glued.
The fore top sul also has leaf points.


FD1-72-54-009.jpg
I also made a foresle. This is a table.


FD1-72-54-010.jpg
This is the back.


FD1-72-54-010.jpg
Zorozoro (I think it is a seaweed) is also glued to the main top stissle and the main geln stissle.
The main top stinse and maint gern stissle were a little too long, so I cut the tip a little. The tip is square.
This stissle is different in the second and third movies... (laughs)
Which is not the correct answer...
I think I was in that mood ...(;^ω^)b


FD1-72-54-012.jpg
This is the back side of the Main Top Steinthle and Maint Gelnsteissle.


FD1-72-54-011.jpg
Today is up to here.

From the next, I'll glue Zorozoro to the fore top stilts, jib, main sul, main topsul, maint gernsle,
mizzen topstisle, latina sale, mizzen topsul. The painting is done after gluing Zorozoro to all sails.
It looks like it's going to take quite some time ... (;^ω^)b
 
Back
Top