FLYING DUTCHMAN

It is a continuation from the previous. PART 55


FD1-72-55-001.jpg
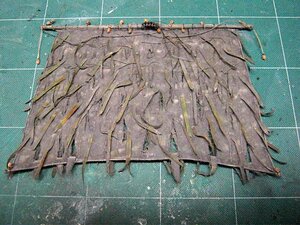
A thin strip is cut from the surplus cloth of the sail.
Circle cutter for cloth borrowed from Mr. Yamagami...
What was the last time I cut with a design knife?


FD1-72-55-002.jpg
And I'm pasting it.


FD1-72-55-003.jpg
I finished applying it all, so I applied a matt lacquer spray. Harden with lacquer so that the cut does not fray.


FD1-72-55-004.jpg
It is a close-up photo of the place being dried.


FD1-72-55-005.jpg
This is also being dried.


FD1-72-55-006.jpg
A commemorative photo as the matt lacquer spray dried.
This is the main mast, topsul, and tgernsur of the fore mast.


FD1-72-55-007.jpg
This is the main mast mainsul, topsul, tgernsul.


FD1-72-55-008.jpg
Mizun Mast Latin Sale, Topsul, Mizun Topstle


FD1-72-55-009.jpg
This is the Main Top Steinthle, Maint Gelnsteestle.


FD1-72-55-010.jpg
This is the fore top stissle and jib.


FD1-72-55-011.jpg
FD1-72-55-012.jpg
FD1-72-55-013.jpg
The fore top stilts and jibs, the mist mast's Latin sale, the top sul, the mizzen top stistle, the main
top stistle, and the main geln stistle were painted a little darker.
The rest of the sails will be next.
That's all for today!


FD1-72-55-014.jpg
I have seen the movie Pirates of the Caribbean 5. It was interesting.
As for your impression, there are some who wrote in detail on the internet, so please check that.
The photo is Captain Salazar of the pirate hunting... Not alive or dead... cursed...


FD1-72-55-015.jpg
What I was most concerned about was the ghost ship...
The Queen's Revenge was a frigate class... Silent Mary was a battleship with 80 cannon guns. It's big...
It's bigger than Flying Dutchman...
The picture is the Queen's Henri Revenge and the Ghost Ship Silent Mary... Structure model...


FD1-72-55-016.jpg
This is Silent Mary before it became a ghost ship.
That's cool. There are more than 80 cannons on both sides. I think there are about 6 gates in the stern.


FD1-72-55-017.jpg
Well, a ghost ship would be a structure model.
It's hard to make, but it's rewarding.
Are you already making it abroad? ?

I'm trying to paint the sails as much as I want... I think it's going to take quite a while ...(;^ω^)b
 
Painting the sail PART 56


FD1-72-56-001.jpgFD1-72-56-002.jpg
FD1-72-56-003.jpgFD1-72-56-004.jpg
I managed to paint it. Buffs, greens, browns and so on. Each seafood stuck on the sail is painted, so it's troublesome~(;^ω^)b
I used Tamiya's acrylic color and Turner acrylic gashes. It's a little fun because you can mix colors with water.
As you can see, I will not explain it.


FD1-72-56-005.jpg
The seafood is facing up and down, so even if you shoot from a certain direction, it doesn't look right.
So, "How is it different from before?" You might think that.


FD1-72-56-006.jpg
I found "mayutama" at the 100 yen shop in Daiso. Let's use this to represent seaweeds attached to the hull.
Let's loosen the eyebrows into fibers with hot water, dye it with dyeing powder and attach it to the hull.
I think it looks like that, but I don't know until I try it.
It's my first work, so I'm thrilled.


FD1-72-56-007.jpg
I loosened it into fibers with hot water.


FD1-72-56-008.jpg
Looking up, it looks like this, but I don't really understand.


FD1-72-56-009.jpg
FD1-72-56-010.jpg
FD1-72-56-011.jpg
First, I tried dyeing with bron.
It turned dark brown. There are seaweeds of this color.


FD1-72-56-012.jpg
Immediately attach it to the hull.
It looks like that. It may be self-satisfaction, but it's a lot of fun.
It takes time~... It's made from eyebrows... Silk!


FD1-72-56-013.jpg
It's nice to tie it to the dead-eye chain.


FD1-72-56-014.jpg
It is the port side of the bow.


FD1-72-56-015.jpg
This is the starboard side of the bow.


FD1-72-56-016.jpg
The stern side.


FD1-72-56-017.jpg
I also tried dyeing with olive green.


FD1-72-56-018.jpg
Then, attach it to the hull. Brown and green are pretty good.
It's a good accent for a light gray hull.
Channel part of the fore mast on the bow side.


FD1-72-56-019.jpg
The channel part of the main mast.


FD1-72-56-020.jpg
Bow part.


FD1-72-56-021.jpg
Channel part of the Mizun Must.


FD1-72-56-022.jpg
The stern part.


FD1-72-56-023.jpg
The port side of the ship.


FD1-72-56-024.jpg
Port side, channel part on the bow side.

I found that the expression of seaweed attached to the hull, that the eyebrows are quite useful. It looks like that.
 
Seaweed attached to the hull PART 57


FD1-72-57-001.jpg
The seaweed that I had attached the last time, and when I bought it to Daiso to attach more, I had
only 2f bags (4 bags per bag). I bought it for the time being.
Then, one bag was loosened on the fiber.


FD1-72-57-002.jpg
One bag was dyed with a thinner bron than the last time. The remaining one bag was dyed with olive green, adjusted
to the same depth as before.
Stick them to the hull until you like them. If you don't like it, just remove it.


FD1-72-57-003.jpg
On the starboard side of the bow, I've done so much.


FD1-72-57-004.jpg
This is on the port side of the bow, and you've become pretty creepy.


FD1-72-57-005.jpg
It is the starboard side channel part of the fore mast.


FD1-72-57-006.jpg
This is the port side of the fore mast.


FD1-72-57-007.jpg
The starboard side channel part of the main mast.


FD1-72-57-008.jpg
Port part of the main mast on the port side.


FD1-72-57-009.jpg
It is the Stern Gallery part of the stern.


FD1-72-57-011.jpg
On Saturday, July 29th and Sunday, July 30th, at the exhibition (HME) in Sapporo, all the
pulleys were not made and the sails were temporarily assembled for the time being. Rigging is also moderate without pulleys.


FD1-72-57-012.jpg
It was a diorama of the battle scene in the Great Pirates of the Caribbean whirlpool, so it was accepted by children and women.


FD1-72-57-013.jpg
Because it was displayed like this, it was noticeable. Also, an electric turntable would be great, but it's too expensive to buy.
Tohoho……('・ω・`)b


Silent Mary


FD1-72-57-014.jpg
I searched on the internet for Silent Mary's materials, and I had enough materials to draw some drawings, so I tried drawing them.
It seems to be a first-class battleship with 100 cannons in the setting, which makes it about the same size as the Victory of
the British Navy...
However, I could not find the full length of Silent Mary even if I searched on the net.
So if you set the total length of Victory to Silent Mary and make it 1/72, it will be over 140 cm...(´・ω・`)b


FD1-72-57-015.jpg
If you make it according to this, you will have to make a wooden box that is more than 1.5 m long when you carry it, and
the material will be very odd.
I want to make sure that the model fits within 90 cm.
So, if you set the total length of Silent Mary to about 87-90m (hull length is about 65-69m) and make it 1/98 round, the
model will be about 89cm.
It's the right size for me, so I decided to draw a drawing in this size.
The size of the person was set to about 1/72 to 1/75.
It may be better to make the scale display non-scale.
Shrink to A-3 size, it will be about 1/273.


FD1-72-57-016.jpg
Even so, the design drawing and the picture of the shooting set do not match at all.
In addition, Stern Gallery is a Gothic castle... The bottom of the stern doesn't match the side view of the design...
How did you make this ornament...


FD1-72-57-017-01.jpg
Figure head seems to be manageable with this design picture.
Let's carve balsa.


FD1-72-57-017.jpg
Design image for set


FD1-72-57-018.jpg
FD1-72-57-020.jpg
The stern lantern and the tower on the side are CG composites.


FD1-72-57-021.jpg
The Stern Gallery is cool.
But it seems quite difficult to make Gothic architecture...


FD1-72-57-022.jpg
It is a set for shooting before becoming a ghost ship. It doesn't fit the design at all...


FD1-72-57-019.jpg
In order to make this ghost ship, I can't make it without knowing the shape of Silent Mary before this? ?


FD1-72-57-023-01.jpg
A set for shooting ghost ships.


FD1-72-57-023.jpg
The drawing of 1/98 is reduced to the drawing of Silent Mary about 1/273. Here go to the high resolution of the
A-3 drawings image when you click.
It's a drawing with a combination of bonito and bonito. The draft is deeper than the design drawing.
The size of the person is included, but it is a little bigger.
If you have more information about Silent Mary, such as full length, hull width, how many cannons, how many
crew members, please contribute to the "Black Pearl bulletin board".

1/72 Flying Dutchman is working on pulleys, anchors, and other parts that haven't been made yet.
It was mellpapa who couldn't help but worry about Silent Mary... (;^ω^)b-
 

Attachments

  • FD1-72-57-010.jpg
    FD1-72-57-010.jpg
    19.3 KB · Views: 5
PART 58


FD1-72-58-01.jpg
We have mass-produced the first and second pulleys. I made enough belay pins. This is not enough, though.
I will attach a pulley to the yard for the time being.


FD1-72-58-02.jpg
I attached a pulley to the main lower yard. I also attached it to the corner of the sail.


FD1-72-58-03.jpg
It is an enlargement of part A. The clew and seat pulley on the left. A tack rope will be attached later.


FD1-72-58-04.jpg
It is the enlargement of B part. The clew on the right and the pulley of the seat. A tack rope will be attached later.


FD1-72-58-05.jpg
It is the enlargement of the C part. Pulley for clew line and pulley for main topsail seat.


FD1-72-58-06.jpg
It is an expansion of the yellow line.
Two of the second pulleys above are for gear.
There are other pulleys for reach lines and bunt lines, but they could not be confirmed on the Flying Dutchman in the movie.
The model is wondering what to do.


FD1-72-58-07.jpg
Photo a
The white rope is a foot rope.
I'll paint gray later.


FD1-72-58-07-01.jpg
The part that supports the foot rope in the red arrow is made of brass wire 0,5 mm.
I will paint it here in gray as well.


FD1-72-58-08.jpg
It is an enlarged photograph of A in Photo B.


FD1-72-58-09.jpg
This is an enlarged image of B in Photo B.


Parel work


FD1-72-58-10.jpg
The beads used for trucks were the smallest size found in the handicraft corner of a department store, and had a diameter of 2 mm.
Is there a smaller one? ?
Well, this is enough, so I use it for 1/72BP.
Ribs were cut from cypress wood with a thickness of 0.5 mm.


FD1-72-58-11.jpg
Ribs and tracks (beads) are threaded in order.


FD1-72-58-12.jpg
And it's done. I use 8 ribs, so this is for lower yard.


FD1-72-58-13.jpg
From bottom to bottom, it is for the main lower yard, for the lower yard, for the main top yard, for the fore
top yard, for the latin yard, and for the muzzle top yard.


FD1-72-58-14.jpg
I painted the ribs in gray and attached them to the main lower yard.


FD1-72-58-15.jpg
I thought about the pulley for the reach line and the pulley for the bunt line in the main lower yard, but I attached it after all.
The pulleys in the red circle are the pulleys for the reach line and the bunt line.
This is the front side.


FD1-72-58-16.jpg
Main lower yard, this is the back side.


Isn't there a cross-jack yard for Mizun Mast or a top galant yard for Mainmast and Foremost Use "sling parrels"
instead of parels. In short, you tie it up with a rope called "sling parrel."


FD1-72-58-16.jpg
Main top yard, front side.
I attached pulleys and clothes for the top yard.
Since it is a small part, it is troublesome. However, we will increase the amount of information by accumulating such small parts.
The amount of information provided by pulleys and clothing will make it even more realistic.


FD1-72-58-17.jpg
Main top yard, back side.
You can see the top yard apparel.


FD1-72-58-19.jpg
Main top galant yard, front side.
I attached the pulley of the top galant yard.


FD1-72-58-20.jpg
Main top galant yard, back side.
The rope around the top of the rope is a "sling parrel" that is tied to the top galant mast.

There is a difference between the pulley attached to the yard and the absence of pulley. So is the foot rope.
As the amount of information increases, it is more fun for the viewer to see...
 

Attachments

  • FD1-72-58-18.jpg
    FD1-72-58-18.jpg
    64.9 KB · Views: 0
It is a continuation from the previous. PART 59


FD1-72-59-001.jpg
As usual, the rope is tied to the pulley.


FD1-72-59-002.jpg
This is an unexpectedly troublesome process. I don't like it.


FD1-72-59-003.jpg
Then, attach it to the foretop yard.


FD1-72-59-004.jpg
The whole thing looks like this when tied together.


FD1-72-59-005.jpg
I will still tie the rope to the pulley.
This is the first pulley.


FD1-72-59-006.jpg
It looks like this when viewed from the other side.


FD1-72-59-007.jpg
Even if you say "make a lot," there are about eight.


FD1-72-59-008.jpg
Then, I installed pulleys at the necessary places in the fore top yard.
Looking from the front like this.


FD1-72-59-009.jpg
This is from the back.


FD1-72-59-010.jpg
Pulleys are attached to the fore main yard in the same manner as needed. This is the front side.


FD1-72-59-011.jpg
Seen from behind the fore main yard.


FD1-72-59-012.jpg
Foretop Gallant Yard also has pulleys where needed.


FD1-72-59-013.jpg
Seen from behind the foretop galant yard.


FD1-72-59-014.jpg
The rope is still tied to the pulley... (´・ω・`)b


FD1-72-59-015.jpg
It's a messy job.


FD1-72-59-016.jpg
Pulleys are attached to the required parts of the muzzle top yard and the black jack.


FD1-72-59-017.jpg
I also added pulleys to the yard of the Latin mast at the Mizun Must.
It's more fun for the viewer to see when the amount of information about the pulleys increases, so I added a lot, but I'm tired~
 
PART 60


FD1-72-60-001.jpg
Attached lower yard, top yard and tgern yard to fore mast, and attached jib, fore top stilt, main
tgern sul, main top stilt, and mist top stilt.


FD1-72-60-002.jpg
It is the attachment part of the rope under the jib and the fore top stissle.


FD1-72-60-003.jpg
This is the hull side attachment part of the rope for the jib and fore top stay.


FD1-72-60-004.jpg
The rope above the jib and the foretop stissle is attached to the fife rail on the hull side by a pulley.


FD1-72-60-005.jpg
The top part of the forearmast, pulleys and ropes make it quite complicated. It's hard to guide the ropes
so that the rope does not get tangled.


FD1-72-60-006.jpg
Forerlower mast, lower yard, and rigging have made it better.


FD1-72-60-007.jpg
The foretop mast and the top yard are getting more like that.


FD1-72-60-008.jpg
Votogelnmast and Togelnyard, these places are light and easy.


FD1-72-60-009.jpg
By the way, the rope that goes up and down the Togernyard passes through this pulley.


FD1-72-60-010.jpg
The same pulley is attached to the port side.


FD1-72-60-011.jpg
Attach the eyebolts to the Tegernmast cap, and the rope will start from there.


FD1-72-60-012.jpg
Pass through the pulley attached to the tip of the Togernyard.


FD1-72-60-013.jpg
Then, through this pulley, you will be guided to the fife rail on the deck.


FD1-72-60-014.jpg
This rope goes through the gap in the top part, but it is quite difficult to pass it as it is.


FD1-72-60-015.jpg
Then, use the needle to guide the fie rail.


FD1-72-60-016.jpg
With the ropes coming down from the top of the foil rails, this happens.
It's a chaos of which rope goes where.


FD1-72-60-017.jpg
I managed to finish the rigging to raise and lower the yards and sails of the fore mast.


As the amount of pulley information increases, it is more fun for the viewer to see, but I
can't really see it. I'm completely satisfied with the fact that the pulley is properly attached.
Rigging is troublesome. I have not attached the rope that swings the yard back and forth yet.
After all the masts have yards. The rope that prevents the back sail is also attached at the end.

It will take time……(;^ω^)b
 
PART 61


FD1-72-61-001.jpg
Attach the pulley to the main mast side before attaching the sail yard to the main mast. Pulleys for raising
and lowering the yard, pulleys for bunting lines and reach lines that fold the sails, etc.
On the cross tree section under the platform of the main mast, pulleys for Jear, Bunt line and reach line were attached.
The red circle is the pulley on the starboard side.


FD1-72-61-002.jpg
The red circle here is the pulley on the port side.


FD1-72-61-003.jpg
The top part of the top mast, which also has pulleys for raising and lowering the top yard, and pulleys for the bunt and reach lines.
The red circle is the pulley on the starboard side.


FD1-72-61-004.jpg
The red circle here is the pulley on the port side.


FD1-72-61-005.jpg
Main top galant Mast top part Top galant (also known as Togeln) A rope was attached to the center of
the yard to attach and pull a rope up and down.


FD1-72-61-006.jpg
I forgot to attach the pulley in the arrow part. The starboard side of the top.


FD1-72-61-007.jpg
This is the port side of the top.


FD1-72-61-008.jpg
I forgot to attach this to the top part of the Togernyard. It is the starboard side.


FD1-72-61-009.jpg
This is the port side.


FD1-72-61-010.jpg
I attached a main lower yard to the main mast.


FD1-72-61-011.jpg
This is a photo from the back of the main lower yard.
I tied it up properly with the apparel.


FD1-72-61-012.jpg
These are red arrow ropes. Topyard, Togernyard It's a rope for those sails.
Normally, soak the top yard and the Togern yard in the mast, then pull the rope from top to bottom
and tie it to the fie rail under the main mast.
However, even if I lead the rope from here on the fife rail, the area around the fife rail is too
narrow and I can not tie it to the fif rail if I do it normally. So prepare a long rope and tie it to
the fife rail first. Then guide the rope from bottom to top. A rope is a model, so it's a thread.

FD1-72-61-013.jpg
First, bundle the ropes tied to the fife rail (red arrow part) and pass through the gap between the platforms,
and then put the clip in the blue arrow part as a weight and lay it down.


FD1-72-61-014.jpg
I attached the main top yard and sail to the main mast.


FD1-72-61-015.jpg
As with the main lower yard, I use parrel.


FD1-72-61-016.jpg
Pass the rope through the second pulley in the top yard.


FD1-72-61-017.jpg
Thread the first pulley to raise the top yard.


FD1-72-61-018.jpg
It looks like this when the rope is taut.


FD1-72-61-019.jpg
This is also a pulley to raise the top yard. Pass the rope that has been guided from below.


FD1-72-61-020.jpg
Pass the pulleys at the edge of the top yard...
 
PART 61


FD1-72-61-021.jpg
Finished by tying to the ring pin attached to the cap.


FD1-72-61-022.jpg
Attach the Togernyard and sail.


FD1-72-61-023.jpg
The picture seen from the back side.


FD1-72-61-024.jpg
Pass the rope from below through the pulley indicated by the red arrow.


FD1-72-61-025.jpg
Pass through the pulley at the end of the Togernyard.


FD1-72-61-026.jpg
Tie it with the ring pin on the cap to finish.
It's the same as the rope handling in the top yard.


FD1-72-61-027.jpg
It has a top yard and a sail, but you can't really see it from the front.


FD1-72-61-028.jpg
From the back, you can see how the ropes and pulleys look like this.


FD1-72-61-029.jpg
The rest is the Mizun Must.
For now, I'm done.

From the front, you can't see the pulley and rope well. I don't really see it from a distance,
but the pulleys and ropes are cluttered when I see it from behind in the vicinity.
It took me a whole day on the main mast. If you look closely, there are some places that are confusing,
but unless you say it, you will not understand. So, she doesn't know her face and keeps her secret.

By the way, there are places where the cannon is not attached yet.

It's only after the mist mast has been installed in the yard. ……(;^ω^)b
 
Continuing from the last time PART 62


FD1-72-62-001.jpg
we will stretch the main mast Tegernmast Stistle and the top mast suttis ropes.
The red circle arrow, the rope that folds the main geln mustastle, and the pulley for pulling the down howler.


FD1-72-62-002.jpg
A is a pulley attached to Tgernmaststisle, and B is a pulley for pulling a halyard.


FD1-72-62-003.jpg
The photo shows the entire Togernmast Steisle.


FD1-72-62-004.jpg
The rope of the top mast stissle is also stretched like the Togern mast stissle, and the red
circle part is the seat part for straddling the stissle, and there are two so as to straddle the main stay.
If the main stay has a hem of the stissle, depending on the wind direction, tighten one side and loosen the other side.


FD1-72-62-005.jpg
This is the tack on the front side of the top mast stissle.


FD1-72-62-006.jpg
I added a cross mast jack and a latin yard of the Mizun mast.


FD1-72-62-007.jpg
Pulley for downhauler of mist mast top mast stissle.


FD1-72-62-007.jpg
Pulley for halyards on top mast stisle. The rope is fluffy.
Later, dilute the woodworking bond with water and soak it in a brush.


FD1-72-62-008.jpg
A whole picture of the Mizzun Top Mast Thistle.


FD1-72-62-009.jpg
The muzzle mast cross jack yard (also called blackjack) does not have sails. The reason for this is... to set up a Mizun Top Sale.


FD1-72-62-010.jpg
Pulleys and ropes to support the latin yard of the Mizun Mast.


FD1-72-62-011.jpg
The rope that supports the Latin yard is guided down through this pulley. It's attached to the back of the mizen top.


FD1-72-62-012.jpg
The stern starboard side is becoming that way.


FD1-72-62-013.jpg
It is the stern port side.
That's all for today.


FD1-72-62-014.jpg
This is the end of rigging to raise and lower the sail and yard.
Next, it takes rigging to swing the sail and the left and right of the yard back and forth. Rigging continues...(;^ω^)b
By the way, the name of the rope may be wrong , such as tack, seat or down howler .
When you're wrong

Continue to FD1-72-63! But it's still in production. You did it!

the end of the posted log
 
the Flying Dutchman was a great build to follow

i do think Mellpapa is building the Silent Mary and that will be another amazing build to follow.
 
Back
Top