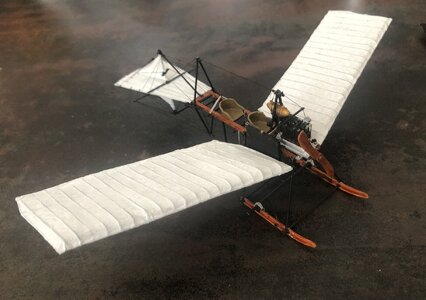
Fokker Spin III, scale 1:48, scratch build [COMPLETED BUILD]

Thanks Jan,
It took me a while, but I am now fully committed to completing this little build.
The main challenges being imposed are:
1. Is there sufficient reliable information to build this airplane? Answer no, AL-FI is indispensable.
2. How am I going to build any given part? Especially the engine gave me quite some headaches, since it was not covered by engine cowlings and also has a quite dominant place on the airframe.
3. Can I make a working gear suspension?
4. Are working flight controls feasible?
5. Wing covering; how to handle a single ply of tissue?
6. Build sequence: I build the fuselage including skids first and then started adding stuff. Another sequence could have been building wing halves and tail first, followed by fabrication of the fuselage. I guess I am pre-conditioned: in real life quite a few airraft are build fuselage first, followed by adding the tail surfaces, wing, landing gear and engines, in that particular sequence.
7. Bracing wires, especially the sequencing of adding the wires. I decided to work from the inside out, in order to avoid accessibility issues. So far, so good.

Despite its deceivingly simple looks, it's by no means a simple and straightforward build. If one is looking for an interesting scratch build without building instructions and numerous drawings, this is worth your while.

PS The swear jars need a little more filling up before I'm off to a nice warm land with sunny beaches...
Oh, WOW. That list of challenges is mind boggling. Lot's of "what ifs"and "how do I do it" items there.

Jan

BTW, I'd pack up the model, empty out the jars and find a nice Cabana on a very sunny island beach and have a couple of Beerand let AL-FI figure things out. :D
 
Last night saw the marriage of both wing halves to the fuselage, after rebuilding the right wing half. Working with tissue for wing skins remains tedious at best, but at least I have now both wing halves covered and coated.
For the connection between the form ribs and the spars I used CA. In hindsight and for any future build I would instead consider drilling holes in the front spar and creating notches in the rear spar at each rib crossing to have a more positive fixation.
For the rib forming I used a simple form tool, but in the end this tool (and the rather soft brass) gave me too much variation in shape. Again, next time I would consider a different tool, producing two ribs in one setup and the usage of the stiffer brass. (The reason I dismissed the stiffer brass was the difficulty in forming a consistent radius, this was mainly caused by the form tool, the end of part also had the rather tight airfoil radius.)
Now I’m preparing to add the bracing wires below the left wing half, permanent installation of both halves and start adding some forty bracing wires… Wish me luck.

Looking a lot more like a flying contraption than it did last week:
IMG_2065.jpeg
 
Last night saw the marriage of both wing halves to the fuselage, after rebuilding the right wing half. Working with tissue for wing skins remains tedious at best, but at least I have now both wing halves covered and coated.
For the connection between the form ribs and the spars I used CA. In hindsight and for any future build I would instead consider drilling holes in the front spar and creating notches in the rear spar at each rib crossing to have a more positive fixation.
For the rib forming I used a simple form tool, but in the end this tool (and the rather soft brass) gave me too much variation in shape. Again, next time I would consider a different tool, producing two ribs in one setup and the usage of the stiffer brass. (The reason I dismissed the stiffer brass was the difficulty in forming a consistent radius, this was mainly caused by the form tool, the end of part also had the rather tight airfoil radius.)
Now I’m preparing to add the bracing wires below the left wing half, permanent installation of both halves and start adding some forty bracing wires… Wish me luck.

Looking a lot more like a flying contraption than it did last week:
View attachment 456776
My respect for your re-do, Johan. A real plane is born! Fingers crossed for your the bracing wiring.
Regards, Peter
 
Last night saw the marriage of both wing halves to the fuselage, after rebuilding the right wing half. Working with tissue for wing skins remains tedious at best, but at least I have now both wing halves covered and coated.
For the connection between the form ribs and the spars I used CA. In hindsight and for any future build I would instead consider drilling holes in the front spar and creating notches in the rear spar at each rib crossing to have a more positive fixation.
For the rib forming I used a simple form tool, but in the end this tool (and the rather soft brass) gave me too much variation in shape. Again, next time I would consider a different tool, producing two ribs in one setup and the usage of the stiffer brass. (The reason I dismissed the stiffer brass was the difficulty in forming a consistent radius, this was mainly caused by the form tool, the end of part also had the rather tight airfoil radius.)
Now I’m preparing to add the bracing wires below the left wing half, permanent installation of both halves and start adding some forty bracing wires… Wish me luck.

Looking a lot more like a flying contraption than it did last week:
View attachment 456776
Good evening Johan. Wow- I was impressed with your first wings, and this redo is even better. Kudos. Cheers Grant
 
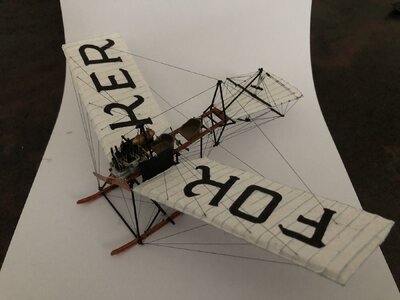
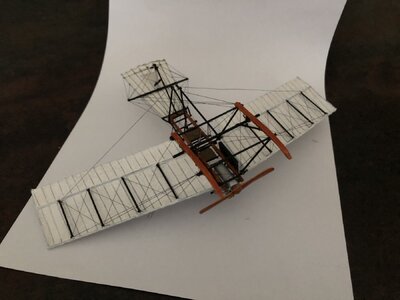
Getting close to the finish line now.
I was able to add Fokker’s name on the top side of the wing; the original Spin had the name of Fokker on the underside of the wing, smart man, that Anthony Fokker, but since this model will be on static display only, it doesn’t make sense to put the name on the lower side of the wing. So I am invoking AL-FI.
Also a lot of rigging took place; some overlooked brace wires needed to be added, plus the bracing of the wing.
It took me a lot less time than anticipated, but the result is stunning, in my humble opinion.
I am now waiting for the only readily purchased parts; the wheels of the undercarriage.

IMG_2080.jpegIMG_2081.jpegIMG_2083.jpeg
 
Getting close to the finish line now.
I was able to add Fokker’s name on the top side of the wing; the original Spin had the name of Fokker on the underside of the wing, smart man, that Anthony Fokker, but since this model will be on static display only, it doesn’t make sense to put the name on the lower side of the wing. So I am invoking AL-FI.
Also a lot of rigging took place; some overlooked brace wires needed to be added, plus the bracing of the wing.
It took me a lot less time than anticipated, but the result is stunning, in my humble opinion.
I am now waiting for the only readily purchased parts; the wheels of the undercarriage.

View attachment 457160View attachment 457161View attachment 457162
That is looking GREAT, Johan. Very nice old fashion letters and spider-web wiring. A real beauty.
Regards, Peter
 
Simply AWSOME!!!

Jan
WOW ~ WOW ~ WOW
That is looking GREAT, Johan. Very nice old fashion letters and spider-web wiring. A real beauty.
Regards, Peter
Outstanding Johan! I love the wing lettering. You certainly have the knack for scratch building.
Very impressive, looks absolutely outstanding.
Ditto, ditto and ditto.
Ditto with above
Bravo - I like this filigran model very much - Bravo
Gentlemen, thanks, again, for your accolades.
I said it before, I was not immediately in love with this little airplane; it took me a while to get acquainted with this little darling, but it happened anyway.
This is my first scratch build and had no idea what to expect. There are challenges all over the place; building an engine from scratch, how to build the seats, the propellor, the wing- and control surfaces, ect. It appears that with some forethought, friendly advice, relative simple materials and a dose of patience it is possible to build this model with relative ease.
And I never thought I'd say this, but I can truly recommend to anyone interested to build your own copy.
 
Congratulations on this scratch built model. You have created a unique model .

Is flying something you do as a vocation? Thanks again for starting this thread so we can enjoy seeing your project.
Regards
Rick
 
Congratulations on this scratch built model. You have created a unique model .

Is flying something you do as a vocation? Thanks again for starting this thread so we can enjoy seeing your project.
Regards
Rick
Thank you so much, kind sir!
One could indeed say that flying is my vocation, although I haven’t flown myself for nearly seven years now. But I’m still very much interested in everything related to this subject.
 
Back
Top