Fully functional realistic mini canons

I can not figure out how to write info on the pics so have to explain them this way.
First of all I agree with Donnie that we probable should put an disclaimer here like he suggested "I do think that it would be wise to place a disclaimer that the author is not responsible for any mishap or personal injury."
Use this info at your own risk.
The 5th pic with the black circle is how to paint powdered black powder on a single ply of klennex tissue
Pics 1&2 are separating impregnated dry tissue and 9/32 brass tube shown for scale. the fuse hole is 1-16th of inch
Pics 3&4 are .005 thousands brass plate used to indent the dry tissue and then twist it to a 1-16th inch fuse to insert inside the brass tube.
pic 6 is the powdered black powder and the scale to measure charge
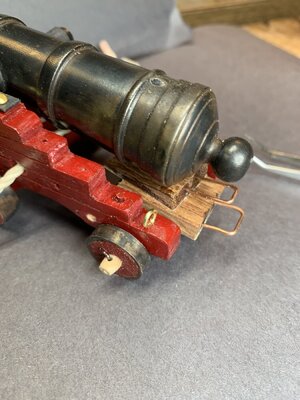
Pic 7 is little cannon set for firing 1-4 inch plug into hanging sheet
 
I do think that it would be wise to place a disclaimer that the author is not responsible for any mishap or personal injury.

here is high speed video of the shot
Your video will be set to public on October 7, 2020 at 12:15 AM

Video thumbnail: mini cannon firing brass tube


0:36
my mini cannon firing brass tube video
https://youtu.be/u1xbo9dqzbE
another cannon you tube example
and another cannon by a supper safe white beard
And here is a mini cannon purchase video

The fuse hole will back flame and in so doing will decrease the bore charge potential so I made the fuse hole as small as I could for firing a charge. The 1-16 inch fuse hole was the smallest I could make reliably a fuse to fit and fire a non electric initiater. 1-16th of an inch is 0.0625 inch but if you do not want to try and make your own fuses then there is a 0.079 inch fuse commercially available at https://www.amazon.com/Green-Premiu...t=&hvlocphy=9019300&hvtargid=pla-758825179845
Just remember when a charge is initiated it will force out both at the fuse hole and at the bore with equal force. If you are trying to shoot a mini cannon of 1-16th inch bore diameter like on a model and you use a 0.079 inch fuse hole then most of the combustion force will go out of the fuse hole. If you put a patch around a mini ball and force it under pressure into your 1-16 inch cannon then you might have ALL the combustion force be expanded out of the fuse hole and your ball will stay in the bore.
I used a little gorilla glue coat dried on my 1-4 inch plug to hold it in the bore so it would not fall out but added only a small constraint on the projectile so it would fire out the bore. The same technique may be used for a smaller bore projectile and so hold your projectile while not impeding its exit very much. Ramming a patch covered ball into a bore with force is not a good approach.

note on cannon building above. They turned cannons out of like 3-4 inch stock with maybe 1-4 bore for the variouse cannons shown on you tube. It is not necessary for cannons with a fuse hole, only need such large chamber thickness on breech loaded cannons who contain the combustion. As shown in my little brass tube cannon the 1-32 inch container is plenty thick for a fuse lit cannon as long as the projectile is not constrained from moving by too much wadding as said above. Thick walled combustion chamber are only needed is you have a tiny fuse hole and a massive projectile like on the old navy and army cannons because they were throwing very heavy projectiles and had tiny fuses. The explosive pressure built up to a much higher level because the combustion was effectively contained in the bore for a few milliseconds and so the chamber area would be under as much pressure as the ball charge for those milliseconds until the ball was ejected. Due to the poor quality of cast iron in the old days the tube could rupture and so they made the chamber thicker to compensate.
 
Last edited:
View attachment 183865From Donnie---I do think that it would be wise to place a disclaimer that the author is not responsible for any mishap or personal injury.View attachment 183866View attachment 183867View attachment 183868View attachment 183869View attachment 183870
Wise and good advise from all. Yes, we never know who may be reading these and what they may try to do. Working regularly with black powder muzzle loaders I have taken a cautious approach and safe use of the little barrel. I don't mind dropping this off of the radar at all. As is advised, "be safe and have fun". PT-2
 
Subject way beyond model building when pipe explosives are discussed.
I will probably not use this forum any longer.
I a sorry to have driven you off of the forum which is OK. There are a lot of forums and threads of more direct interest and transfer of skills and methods than this was. I was myself thinking about dropping it our voluntarily as it is not a good topic to be casing about who knows where in this day and age.
I do strongly recommend a guided approach to this type of scaled building and take no responsibility as to how anyone else may use or adapt any general or detailed information that I have put up. SoS has no endorsement or responsibility in any manner for how this forum and thread may have or will be used. It was personal comments only.
My own was a designed scaled naval cannon and carriage designed not to be a pipe bomb in a careless manner. I will drop this off and concentrate my posts in other forums of more general interest and post only my ship and boat involvement and replies to those forums. PT-2
 
View attachment 183865From Donnie---I do think that it would be wise to place a disclaimer that the author is not responsible for any mishap or personal injury.View attachment 183866View attachment 183867View attachment 183868View attachment 183869View attachment 183870
We can continue exchanges via emails to keep the waters calm. I had great success today and will pass that along in our own scale model building which includes all forms of things that can be modeled. PT-2
 
Back in the day, when high school's had shop classes, I built a model cannon similar to John J's.... The barrel was approximately 10 inches long and made of steel. The carriage was similar to John J's in that it was a naval gun. I had the external shape of the cannon complete when I started drilling out the barrel...and that's when the shop teacher took notice of what I was doing and brought my efforts to a halt... I was about 3 inches in so it never reached its full potential unfortunately... the cannon mysteriously disappeared when I went to college... Ah the memories. Heck, I might even try it again before too long. Always wanted something I could shoot on the 4th!
 
Back in the day, when high school's had shop classes, I built a model cannon similar to John J's.... The barrel was approximately 10 inches long and made of steel. The carriage was similar to John J's in that it was a naval gun. I had the external shape of the cannon complete when I started drilling out the barrel...and that's when the shop teacher took notice of what I was doing and brought my efforts to a halt... I was about 3 inches in so it never reached its full potential unfortunately... the cannon mysteriously disappeared when I went to college... Ah the memories. Heck, I might even try it again before too long. Always wanted something I could shoot on the 4th!
Here is a nice report on how to make a real cannon with a threaded breach and butt loaded beat in projectile and rifled bore. His projectile has little wings that are as big as the bore plus the rifling groves so it has to be beat into the cannon.
If you want to make a july 4th cannon you do not need all the material he used to make a real cannon. Normal steel tube 1 to 2 inches and 1-8th to 3-16 inch wall is all you need to fire a wood plug or a mass of old news paper. The breach can be a welded steel plug or you can epoxy in a wood breach plug and that will be good for maybe 10-50 shots depending on the wood used. Or you can have a breach plug threaded as this guy did. Do Not Pound fit the projectile in the bore, just hand pressed it in the bore so it will not constrain the combustion of the powder. The tube can be strapped to a block of wood and mounted on wheels of your choice or construction.

disclaimer: the author is not responsible for any mishap or personal injury resulting from following his recommendations. Use the information at your own risk and with your own head.
 
Now on to other combustible material and how to obtain it. Silver Fulminate in 209 shotgun primers.
In this pic you can see the primers pack I used and a primer in its normal state as well as one that I ground away the case with rotary tool and then filed until I could separate the charge vessel from the case. The charge can be seen in the lower area next to the patch.
Care must be used when using rotary grinder as the heat can build up and the charge ignite and scare you. It is very loud when that happens and the patch and charge container may be ejected so eye glasses at least should be wore. I gradually gound off the upper lip of this steel case and cooled it in water occasionally. Then I ground off the internal rear lip at the patch area and then slowly ground a line in the outer case to decrease the case material for an opening. Then I came to the case with a mico-file and files until the outer case separated from the charge case. Both the outer and internal cases were steel and tough to grind and file. I took me about 1.5 hours of grinding and filing to open up the 209 primer.


CIMG8613.JPGCIMG8613.JPG
here we have a pic of the charge container with the anvil and patch and ground outer case. Evidently they need an anvil to initiate the combustion.CIMG8615.JPGCIMG8616.JPG
The charge is enclosed with a rubber like coating and then the charge is below that barrier. I used a Dremel #113 Engraving cutter with 1-8th inch shank to grind out the charge set on Very low speed. I held the charge container with a little vice grip as can be seen belowCIMG8617.JPG.

A jewelers scale was used to determine the amount of Silver Fulminate I extracted from the 209 primer. The paper weighted 0.15g and so the charge was about 0.06 grams. note the large blob on the right edge of the paper was a intact crystal of Fulminate so the use of a grinder was a good idea.
CIMG8618.JPG

disclaimer: the author is not responsible for any mishap or personal injury resulting from following his recommendations. Use the information at your own risk and with your own head.
 
Last edited:
Another source of Silver Fulminate is from black powder gun caps.
CIMG8619.JPG

These caps are smaller than 209 primers but they are copper foil pressed containers and can be extracted with a slow rotary tool a lot quicker than opening up 209s.
CIMG8620.JPG
The caps also have a protecting film over the charge to keep moisture away from the fulminate and the engraving cutter also works in removing the Fulminate from the caps on slow speed.

CIMG8623.JPG

Besides being smaller than the 209 primary the charge that the caps carry are very much less. About 0.006-0.007 or so Grams.
This is the weight of Fulminate from 5 caps with a paper weight of about 0.145g. So 5 caps equal about 0.035 grams of material as compared to 209 with 0.06 grams in one. But this might be an artifact of the manufacturer methods and a quantified analysis would be need to establish if this cap material is more powerful than the 209 material. That would require a pressure analytical vessel which I do not have.

CIMG8624.JPG

Silver Fulminate can be found in those child tape cap rolls that kids use in their toy guns and is used inside Christmas Crackers on tape that friction pulls make a noise. They are also the ingredient of the poppers that are little wads of paper that you can find in holiday or specialty stores which pop when thrown on the sidewalk or hard floor. The poppers are tiny amounts of Silver Fulminate coated ceramic particles and when thrown hard enough on a hard surface the ceramic acts as an anvil and pressure ignites the fuminate.
Below you can see a comparison of the 209 primer and black powder cap quantity. You will notice my engraving tool left some fulminate behind in the caps because the caps are pressed copper and so have a rounded edge which the engraver tool can not access. It might be better to use a round ball engraver than the flat engraver that I had in order to get all the fulminate out of the caps.
fulminater quantity.jpg
ERROR: should be 0.035 and 0.06 grams instead

disclaimer: the author is not responsible for any mishap or personal injury resulting from following his recommendations. Use the information at your own risk and with your own head.
 
Last edited:
Another source of Silver Fulminate is from black powder gun caps.
View attachment 184548

These caps are smaller than 209 primers but they are copper foil pressed containers and can be extracted with a slow rotary tool a lot quicker than opening up 209s.
View attachment 184549
The caps also have a protecting film over the charge to keep moisture away from the fulminate and the engraving cutter also works in removing the Fulminate from the caps on slow speed.

View attachment 184550

Besides being smaller than the 209 primary the charge that the caps carry are very much less. About 0.06-0.07 or so Grams.
This is the weight of Fulminate from 5 caps with a paper weight of about 0.145g. So 5 caps equal about 0.035 grams of material as compared to 209 with 0.06 grams in one. But this might be an artifact of the manufacturer methods and a quantified analysis would be need to establish if this cap material is more powerful than the 209 material. That would require a pressure analytical vessel which I do not have.

View attachment 184551

Silver Fulminate can be found in those child tape cap rolls that kids use in their toy guns and is used inside Christmas Crackers on tape that friction pulls make a noise. They are also the ingredient of the poppers that are little wads of paper that you can find in holiday or specialty stores which pop when thrown on the sidewalk or hard floor. The poppers are tiny amounts of Silver Fulminate coated ceramic particles and when thrown hard enough on a hard surface the ceramic acts as an anvil and pressure ignites the fuminate.
Below you can see a comparison of the 209 primer and black powder cap quantity. You will notice my engraving tool left some fulminate behind in the caps because the caps are pressed copper and so have a rounded edge which the engraver tool can not access. It might be better to use a round ball engraver than the flat engraver that I had in order to get all the fulminate out of the caps.
View attachment 184552
ERROR: should be 0.035 and 0.06 grams instead

disclaimer: the author is not responsible for any mishap or personal injury resulting from following his recommendations. Use the information at your own risk and with your own head.

It seems that you really enjoy the work involved in obtaining your powder. I was not focused in that direction and did the simple muzzle loader's shop route as I was more interested in how my turned and bored cannon barrel would fire. Enjoy you research journey. PT-2 OH, yes, I am not responsible for how anyone may use this information in any manner.
 
It seems that you really enjoy the work involved in obtaining your powder. I was not focused in that direction and did the simple muzzle loader's shop route as I was more interested in how my turned and bored cannon barrel would fire. Enjoy you research journey. PT-2 OH, yes, I am not responsible for how anyone may use this information in any manner.
With a mix of historic and actual use needs my first carriage has received the barrel with the capstocks screwed in place and no run-out tackle included as there will not be a bulkhead or deck for breach withdrawal needs at this time. The restraining cable through the carriage is taken from the works of Jean Boudriot's drawings of gun crew work and the dark red from a French carriage. I will place the long restraining cable under some sand bags for friction and some recoil terminated by a third sandbag a bit behind the breach end.

While many models use natural wood, my lookback and brother's historical research indicate that the painted colors were the choice of each captain or admiral aboard. This carriage is too short at the breach end as the cascabel should determine the length there and this one is too short but will serve as a test horse for another one better scaled and with any strength revisions needed for 0.270 ball shot and firing charge results.

I'll let others do what they are after if firing and not put that information out in the forum. The trunnion cap squares are tight enough to hold the barrel elevation without the bolsters. To help stabilize those when placing I glued some 320 sandpaper on the bottom of each one. A longer carriage will better hold them in place as well as a grooved track and longitudinal bed piece on the breach axel to a crossing bolt/bar. I am going to use some fishing snap-hooks and line to secure each one to the undercarriage so that in firing they don't fly loose.

This will only be fired at the local gun range on members only days as the noise is similar to a hand gun and would not be tolerable or legal in town. A large paper "target" at various ranges starting short and working out will allow me to learn the elevation and trajectory lines but windage will mostly be a factor of how the wadded shot travels and travelsCannon in carriage side view and accessories.jpgCannon elevated view.jpgCannon Bore View.jpgCannon Breach End.jpg down the bore.
Hopefully this will be taken as a scaled working model and not a pyro in the dark but I assume no responsibility for any use by anyone of anything that I post.
 

Attachments

  • Cannon Breach Cascabel and Bolsters.jpg
    Cannon Breach Cascabel and Bolsters.jpg
    241.5 KB · Views: 1
PT=2 what are you saying with your statement? "I'll let others do what they are after if firing and not put that information out in the forum"
Are you NOT going to share any firing that you do with your gun here?
 
PT=2 what are you saying with your statement? "I'll let others do what they are after if firing and not put that information out in the forum"
Are you NOT going to share any firing that you do with your gun here?
The next time that I fire it from the longer carriage I'll post some photos but not include the shot and charge load data for devious minds to take it down their own possibly irresponsible path. Just complying in some part with Donnie's concerns which I can appreciate. An inquisitive mind could take what I have previously posted about black powder and ball shot using muzzle loaders information to patch it together but that will be their choice and outcome for which I will not take responsibility.

You may disagree but we can in a cooperative manner agree to disagree on some details. I also don't know what agencies may be trolling the internet with key words tracking this type of forum with forensic investigative purposes. I have a close friend in a police department whose assignment was just that until he retired so I know that there is a real "fishing net" constantly at work.

I think that the longer carriage in better proportion to the barrel length and proportions from trunnions will be more stable in recoil which still includes the historic carriage restraint hawser. The other tackle for outhaul and inhaul were not intended for recoil restraint. . . all part of my historical inclusion in the small models. PT-2
 
You may disagree but we can in a cooperative manner agree to disagree on some details. I also don't know what agencies may be trolling the internet with key words tracking this type of forum with forensic investigative purposes. I have a close friend in a police department whose assignment was just that until he retired so I know that there is a real "fishing net" constantly at work.
I can not figure out how to delete this---there is no delete key nor can I get back to the reply page.
 
Last edited:
I could not give a tinkers damn what worthless spying pricks do on the internet except for messing with my computer.

The damn left wing radical authoritarian socialists have not yet been able to deprive us of your second amendment rights and I am not a pansy tail between legs fearful US citizen. I will pray for your soul.
wow !!! i guess i missed something
 
found another mini cannon for sale really cheap--50$ Pyro Creations; https://triggercannons.com/product/22-cal-black-powder-mini-cannon-black-base/ Looks like a great 4th cannon!
It appears that there is an emerging and growing commercial business industry with mini-cannons which appear to be intended for the fun of shooting and not really focused upon historical mini scaled cannons. More do seem to be of field artillery with caissons than naval carriages. The main aiming problem with those is the tapered barrel which has a fairly short crossing line with the axis of the cannon bore itself. Taper sights down ward to the bore axis and not along or above it so accuracy is a matter of trial and documenting the combination of powder type, charge grain loading, any wads and ball shot size and grain weight over a series of trial distances. The issue of bore length after the charge length reduces some of that affects both range and accuracy from velocity. I have not tried to measure my compacted charge length to the remaining bore for the ball to travel before leaving the muzzle. That will be something to do next time out. I will be using FFFg black powder as a consistent base line in the variables involved. The model naval cannon that I fire is not bolted down but incorporates the historical carriage restraint hawser to sandbags in front of the muzzle (like a ships bulkhead) and a safety sandbag behind the breach end several inches related to the bore restraint hawser travel.
I remain not responsible for the outcome and use of anything that I put up by anyone else for any purposes. Know your target and what is behind it whenever and wherever shooting any type of gun. Stay safe and have fun to shoot another day. PT-2
After completing a slightly longer carriage, proportioned to the barrel I have made some bore depth measurements and marked them on the ram rod illustrating the various working depths that were machined and taken up by the charge load and ball shot for the remaining functional firing barrel length of shot for that charge load.
First the two carriages. The shorter would have been better for a carronade than a long gun.
Two Naval Cannon Carriages.jpg
Next is the ram rod to full machined depth of bore and charge, marked off. The diameter of the charge portion is smaller than that of the working bore. Depending upon the charge grain load that load extends past the charge depth into the full bore diameter, shortening up the barrel length for the ball shot travel.
Probing bore depth.jpg
I have skipped past the shot bore depth and charged depth, as well as face of ball shot to show all of those as marked on the rod which was being "extracted" with the shorter depths.Marked Ram Rod showing different depths in bore.jpgMarked Ram Rod Depths on ruler and barrel.jpg
Here you see all of the depth marks and have to mentally "pull" the rod to your right, out of the muzzle to visualize the working depths in the bore.
 
Back
Top