- Joined
- Sep 3, 2021
- Messages
- 5,199
- Points
- 738

As far as I'm concerned, the winter season may stay south, far south...It’s been a hectic winter.
 |
As a way to introduce our brass coins to the community, we will raffle off a free coin during the month of August. Follow link ABOVE for instructions for entering. |
 |
 |
The beloved Ships in Scale Magazine is back and charting a new course for 2026! Discover new skills, new techniques, and new inspirations in every issue. NOTE THAT OUR FIRST ISSUE WILL BE JAN/FEB 2026 |
 |

As far as I'm concerned, the winter season may stay south, far south...It’s been a hectic winter.
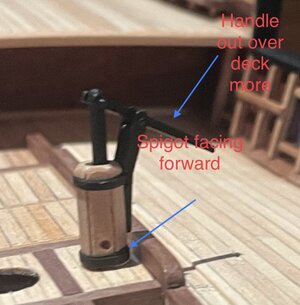
Good morning. Thanks Peter. I found them a bit bulky when I viewed them separately (as in photo below), however once all the surrounding parts are there they actually fitted nicely.Hi Grant. You made some good progress here. The bilge pumps are looking marvelous. I like the lower height better than what I did on my ship, so great work.
Thanks DanielGreat detail Grant, your time and effort are well worth it.
Hi Grant. Where does the water from the pumps go? I think something like a pipe or a hose is needed.
Good morning Vladimir and Jan. This is something which puzzled me. Occre placed the pumps with the handles sticking outward (different to my photo above) and I made the spigot accordingly so the water went out the fore part of the assembly. Can’t go anywhere else. I will probably end up placing the pumps this way- as in photo below. Good idea to add the hose. Jan see spigot hole.Excellent “scratch ” building. Those bits add a lot of “eye candy” to your build.
I don’t see a spigot at the bottom of the pumps, maybe the angle of the photo?
Jan

Thanks MarkVery nice work sir, always a joy to watch!
Eish that is warm Dean. Us South Africans moan a little about the cold but only 11•C so not bad compared to you guys. We have had a few weeks of non stop rain which gets me- besides building little ships all my hobbies and sports are outdoors so I’m in sulk mode at presentLooking good Grant. We are having 100 plus degree weather here in Texas! I could stand for some cooler days…
 . Cheers Grant
Jan see spigot hole.


Since your Xebec will never see a spot of water, intentionally, it's a moot point, but draining the bilge water overboard is not going to be easy. Being bugged all too frequently with this issue in my professional career I'm kind of allergic to these kind of details, but in this case I would claim AL-FI rights.Good morning. Thanks Peter. I found them a bit bulky when I viewed them separately (as in photo below), however once all the surrounding parts are there they actually fitted nicely.
Thanks Daniel
Good morning Vladimir and Jan. This is something which puzzled me. Occre placed the pumps with the handles sticking outward (different to my photo above) and I made the spigot accordingly so the water went out the fore part of the assembly. Can’t go anywhere else. I will probably end up placing the pumps this way- as in photo below. Good idea to add the hose. Jan see spigot hole.
View attachment 381629
Cheers Grant
Thanks BillPumps look great! These kind of details really bring a build to life. Spot on Grant!
True story JohanSince your Xebec will never see a spot of water, intentionally, it's a moot point, but draining the bilge water overboard is not going to be easy. Being bugged all too frequently with this issue in my professional career I'm kind of allergic to these kind of details, but in this case I would claim AL-FI rights.
Good morning Peter. This is good to know. Thanks.Hi Grant. I had to view sine pages, but you made a nice deck and nice added details around the mast. A the spigot is the plus-detail. There were also water pumps where the pumped water just flows over the top edge.
Regards, Peter

 - Did what I could.


I don't think there are many completed models from kits without any modifications.So the kit was modified.
Good morning Johan. True story. I should have made the rudder system from scratch to get it accurate however I am over making scratch parts from here on. (Just the cannons). Like so many of us it’s the kit build plus some mods until the rigging stage. Thanks for the compliment and checking in - it is appreciated. Cheers GrantI don't think there are many completed models from kits without any modifications.
Having said that, from the rookie point of view, you're really doing her justice!
Thanks Mark. Appreciated. Cheers GrantAwesome Grant! The entire rudder assembly is top-notch, and even works nogal. Kudos for the handle, very nice touch
Good morning Peter. Thanks. I struggled with is this. I decided to keep the notches in stem just from aesthetics. I have not found a rudder connected this way in the 18th Century so it certainly is not historically accurate however I sort of made it ok. Cheers GrantHi Grant, the rudder looks great. I see you kept the notches in the stem, but hanged the rudder! Job well done! It looks very solid to me!
Peter
Very nice rudder work Grant. Filling in notches not easy but you did an excellent job.Good morning. We have had some beautiful winters days and have capitalised on this while we can- not much Xebec time.
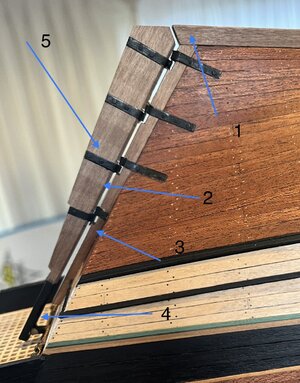
The rudder : This little bugger fought with me hard….I had to reshape her due to my hull shape changes, redesign the Occre kit fitting etc etc.
Grants design. Not accurate however I was not going to fill the notches on the stem. Just looked ugly. So the kit was modified.
View attachment 382675
1. The rudder had to be cut and reshaped to fit the false keel
2. The rudder was bevelled on each side
3. The notches in the rudder were filled with cut out walnut. The kit pins were too large so I used 6mm copper pins. These are supposed to fit perfectly into the notches on the stem.- Did what I could.
4. Extended the top of the rudder as my hull changes made this all longer
5. Used the kit hinges. I would have preferred them narrower, however I had to go with what I have. Acid, Roughed up and painted with primer paint. Man I need to get some brass black. Will be an expensive mission but I’m over my brass painting efforts.
….and of course where the tape was left a change of wood colour. I’m sure I can sand this off and hopefully will not be seen when I put poly on.
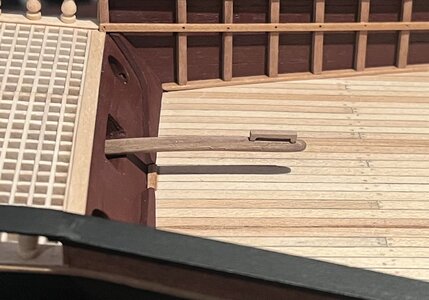
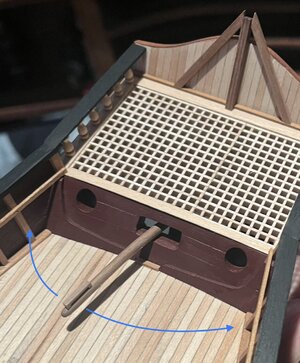
Tiller :
View attachment 382676
Rounded the edges of a 4x4 walnut, wet, heated and shaped with curve. I added a little handle to assist my crew for fun.
View attachment 382677
The whole mechanism actually works….
Cheers Grant
