It is a great video, Max! Looks like you are skilled with video editing.  Now to the actual build: it progresses very-well with the skeleton, and we can see a very accurate approach. One of the improvements you can implement (if you don't mind), is to reinforce the frames with the 'cut off' square blocks. They can be glued both sides of the bulkheads. I recall John (@neptune) suggested to you at the beginning of the thread. This way you can ensure the squares of 90 degrees and reinforcements of the bulkheads. Think of it as optional but this should eliminate the need for any foil and wax paper at all.
-

Win a Free Custom Engraved Brass Coin!!!
As a way to introduce our brass coins to the community, we will raffle off a free coin during the month of August. Follow link ABOVE for instructions for entering.
-

PRE-ORDER SHIPS IN SCALE TODAY!
The beloved Ships in Scale Magazine is back and charting a new course for 2026!
Discover new skills, new techniques, and new inspirations in every issue.
NOTE THAT OUR FIRST ISSUE WILL BE JAN/FEB 2026
You are using an out of date browser. It may not display this or other websites correctly.
You should upgrade or use an alternative browser.
You should upgrade or use an alternative browser.
H.M.S. Victory Constructo - by Wooden Ship Crafts
- Thread starter Wooden Ship Crafts
- Start date
- Watchers 26
-
- Tags
- constructo victory
Happy New Year, everyone!
My progress is rather slow, but I feel confident in what I do with the H.M.S. Victory model.
Today, I finally glued gun sides 19 and 20, these are the very bottom ones on the model. I decided to use CA glue as I wanted to fix the curving of the front gun sides on both sides. As on frame 9 where gun side no 19 meets gun side 20, there was some misalignment, which I am happy to say that it is looking good.

Also, I wanted to see how planking looks with the pencil on the sides applied. Here is the result.
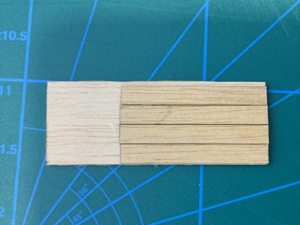
I have four questions to answer before I will go ahead and start planking for lower decks. These lower decks won't be visible, but I still want to make sure they look nice.
1. Does the pencil effect look good enough or I have to try another more bold pencil? Definitely, a marker would be too much for this size.
2. Should I apply some wood finish on top?
3. Should I make nails effect for this size 1:94?
4. And last but not least, I need to find out how long each plank should be on the size of the model?
And one more: what is the best and fast way to cut planks?
Any suggestions are welcome.
My progress is rather slow, but I feel confident in what I do with the H.M.S. Victory model.
Today, I finally glued gun sides 19 and 20, these are the very bottom ones on the model. I decided to use CA glue as I wanted to fix the curving of the front gun sides on both sides. As on frame 9 where gun side no 19 meets gun side 20, there was some misalignment, which I am happy to say that it is looking good.

Also, I wanted to see how planking looks with the pencil on the sides applied. Here is the result.

I have four questions to answer before I will go ahead and start planking for lower decks. These lower decks won't be visible, but I still want to make sure they look nice.
1. Does the pencil effect look good enough or I have to try another more bold pencil? Definitely, a marker would be too much for this size.
2. Should I apply some wood finish on top?
3. Should I make nails effect for this size 1:94?
4. And last but not least, I need to find out how long each plank should be on the size of the model?
And one more: what is the best and fast way to cut planks?
Any suggestions are welcome.
Last edited:
It is a great video, Max! Looks like you are skilled with video editing.Now to the actual build: it progresses very-well with the skeleton, and we can see a very accurate approach. One of the improvements you can implement (if you don't mind), is to reinforce the frames with the 'cut off' square blocks. They can be glued both sides of the bulkheads. I recall John (@neptune) suggested to you at the beginning of the thread. This way you can ensure the squares of 90 degrees and reinforcements of the bulkheads. Think of it as optional but this should eliminate the need for any foil and wax paper at all.

Hi Jim, thanks for the great feedback.
If to be honest, I am not quite sure if I want to go with the extra reinforcement for the frames for this size of the model. It seems like that with the 1:94 the size is just perfect to have no extra reinforcement. I've seen the other Victory model scale 1:84 where the false keel and the frames contain 3-4 parts. For this, I can understand the importance of reinforcement.
Also, I feel like to follow the "kit" approach, as this is my kind of the first model.
I realize, that at some point in my journey something could happen and I would think like "why didn't I add some extra square blocks", hopefully, it won't happen and I will be the happiest person on this forum.
Anyway, thanks for the feedback and your interest in my Build Log.
Always happy to hear any suggestions and feedback.
I have four questions to answer before I will go ahead and start planking for lower decks. These lower decks won't be visible, but I still want to make sure they look nice.
1. Does the pencil effect look good enough or I have to try another more bold pencil? Definitely, a marker would be too much for this size.
2. Should I apply some wood finish on top?
3. Should I make nails effect for this size 1:94?
4. And last but not least, I need to find out how long each plank should be on the size of the model?
And one more: what is the best and fast way to cut planks?
Any suggestions are welcome.
Very good work until now, and it is very good, that you are already thinking about the execution of some future working steps.
I will try to answer and hope, that some others are commenting and add everything necessary I forgot
1. Does the pencil effect look good enough or I have to try another more bold pencil? Definitely, a marker would be too much for this size.
The pencil lines are simulating the caulking (of deck planking) very good, especially in the scale of 1:94 I think it is a good way
2. Should I apply some wood finish on top? Here I suggest, that you try on some dummy part the effect - f.e you can use the test deck you showed in the photo
3. Should I make nails effect for this size 1:94? - No, in this scale the simulated treenails would be so small, which is hardly possible to achieve - It is hard to see a model in such a scale with good nailing - Often in models you can see to big simulated treenails. And in addition: the treenails for the deckplanking were done out of the same timber like the planks, so only slightly colour difference - I would not make treenails in this scale
4. And last but not least, I need to find out how long each plank should be on the size of the model?
In books like Mondfeld is written, that deck planking are appr. 6m long, but it is known from the Victory, that the planks have a length of 6m up to 12m
Also keep in mind the different distances of the beams (not bulkheads, the "real" beams), leading to different lengths of the planks. And with the correct spacing of the beams underneath the planks become much longer. The longest planks are in the middle of the deck, the shorter ones near bow or stern
Also as the deck beams do NOT have the same distances, the length of the planks varies quit a bit!
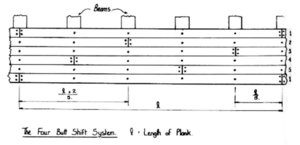
This sketch was taken from Peter Goodwin’s “The Sailing Man of War”.
Book review - The Construction and Fitting of the Sailing Man-of-War, 1650-1850" by Peter Goodwin
From the early beginning of this review: This book is very recommended and is a invaluable reference for ship modeling. In my opinion a "Must Have" The Construction and Fitting of the Sailing Man-of-War, 1650-1850 (Conway's History of Sail) (Hardcover) by Peter Goodwin (Author) Hardcover: 288...
shipsofscale.com
So now you have some information, of the real Victory planking - and you have to decide by yourself, how accurate and detailed you want to make your model.
You can also make all the planks in a certain length of let us say 7 to 8m in scale 1:94 would be around 7 to 8 cm
BTW: Do you have this book? It is helping a lot - not every detail is shown, but a very good help for building a model of the HMS Victory
Book review - The 100-Gun Ship Victory" (Anatomy of the Ship Series) by John McKay
Forever associated with Nelson's last battle at Trafalgar, Victory is one of the most famous ships of all time. An example of the ultimate sailing warship--the three-decker First Rate--Victory was the most popular and successful 100-gun ship of the period, the flagship of half a dozen famous...
shipsofscale.com
Where the [goodness gracious} is part 30? Are the parts 31 cut from strips?
I found that separating the laser cut parts was easiest if I used a scroll saw to cut the part holding them to the sheet, where they were not laser cut. An Exacto knife was not big enough to actually cut through.
I found that separating the laser cut parts was easiest if I used a scroll saw to cut the part holding them to the sheet, where they were not laser cut. An Exacto knife was not big enough to actually cut through.
Where the [goodness gracious} is part 30? Are the parts 31 cut from strips?
I found that separating the laser cut parts was easiest if I used a scroll saw to cut the part holding them to the sheet, where they were not laser cut. An Exacto knife was not big enough to actually cut through.
Hi, the part no 30 sits together with parts 22,23,24 and 73, 74. Hopefully, you've found it
I have now. Thank you. I was actually in the process of making one from thin basswood. I like the real one better. It didn't look quite as expected, which is why I hadn't found it earlier.Hi, the part no 30 sits together with parts 22,23,24 and 73, 74. Hopefully, you've found it.
Hi Max
Very thorough build practice, slow and steady makes for a happy ship. Cumulative error is a problem I’ve inflicted on my own builds so spot on now won’t bite you later.
The members here are great and I hope to aspire to the masters that are in the scratch build section and I’ve gained so much knowledge by just surfing topics and builds so when the fingers start to cramp up do a little reading.
I’m about to start a build of Panart Victory bow section 1:78 with interior detail so mabey my blundering attempt will help you decide.
One word of caution using pencils to simulate caulking on deck planks. On my Independance build when sanding finished deck the graphite was mixed with the dust and was actually ground into the deck surface turning the deck grayish. It worked out as it looked like weathered teak but I really wanted a “clean” finish.
Black construction paper between planks is an option but at your scale it would be a major pain. I use a Sharpie marker on on end and edge to darken it. You want to “ use it up” a little bit before trying this method because new marker ink will bleed into areas you don’t want.
Hope this helps. Rich
Hi Rich, max, to avoid discoloration of your deck by sanding you can scrape the deck instead of sanding. Scraping with a razor blade is giving you a very smooth and flat surface. After that you can sand it with steelwool to get a super sharp looking deck.Hi Max
Very thorough build practice, slow and steady makes for a happy ship. Cumulative error is a problem I’ve inflicted on my own builds so spot on now won’t bite you later.
The members here are great and I hope to aspire to the masters that are in the scratch build section and I’ve gained so much knowledge by just surfing topics and builds so when the fingers start to cramp up do a little reading.
I’m about to start a build of Panart Victory bow section 1:78 with interior detail so mabey my blundering attempt will help you decide.
One word of caution using pencils to simulate caulking on deck planks. On my Independance build when sanding finished deck the graphite was mixed with the dust and was actually ground into the deck surface turning the deck grayish. It worked out as it looked like weathered teak but I really wanted a “clean” finish.
Black construction paper between planks is an option but at your scale it would be a major pain. I use a Sharpie marker on on end and edge to darken it. You want to “ use it up” a little bit before trying this method because new marker ink will bleed into areas you don’t want.
Hope this helps. Rich
3k views on my build log. This is amazing and I am happy to see you like to come back. It means a lot to me 
I found out that all 3 decks can't be installed without an adjustment. No 22 and 23 decks on the right side if you see the picture below touch all right side of the frames 8 and 9 accordingly. It seems like I have to just use the sand stick to prepare 22 and 23 for the smooth installation. The deck 24 however, isn't aligned or touches the frame 10 from both sides.

Here is the picture from the top where it is clear that there is some misalignment. I've just measured the distance from both sides between frames 9 and 10 and indeed I have 1mm difference - 73 mm vs 74 mm.
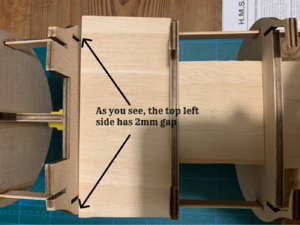
For the lower decks, I think it shouldn't be a huge problem. I will sand them to fit perfectly.
I will measure the remaining frames between each other and update you in my next post.
I found out that all 3 decks can't be installed without an adjustment. No 22 and 23 decks on the right side if you see the picture below touch all right side of the frames 8 and 9 accordingly. It seems like I have to just use the sand stick to prepare 22 and 23 for the smooth installation. The deck 24 however, isn't aligned or touches the frame 10 from both sides.

Here is the picture from the top where it is clear that there is some misalignment. I've just measured the distance from both sides between frames 9 and 10 and indeed I have 1mm difference - 73 mm vs 74 mm.

For the lower decks, I think it shouldn't be a huge problem. I will sand them to fit perfectly.
I will measure the remaining frames between each other and update you in my next post.
"Houston, we have a problem!"
I measured the left and right side of each and every frame and.... drum roll, I have different lengths for almost every single frame.

Here is the visual presentation with the length of my H.M.S. Victory.
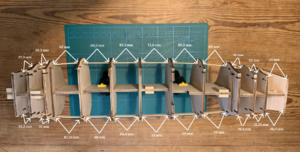
Here is a table with frames and lengths in millimeters between them.
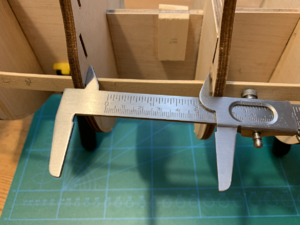
I did measure right before the gun sides and the top like below on the picture. Except between frames 15 and 16, where I checked the very top length.
From your experience, will this difference affect the build a lot, or it is a matter to do more sanding before gluing plunking strips?
Up until now, I was under the impression that my model's sides are perfectly 90 degrees deadly right (except the first 3 frames as I wasn't sure at all). But now, when I used my new ruler, it seems like I might be in trouble.
Looking for an advice.
I measured the left and right side of each and every frame and.... drum roll, I have different lengths for almost every single frame.
Here is the visual presentation with the length of my H.M.S. Victory.

Here is a table with frames and lengths in millimeters between them.
| Frame | Left Side (Top), mm | Right Side (Bottom), mm |
|---|---|---|
| Between 3 and 4 | 27,5 | 26,5 |
| 4 and 5 | 30,2 | 32 |
| 5 and 7 | 66 | 67,25 |
| 7 and 8 | 69,2 | 68 |
| 8 and 9 | 65,5 | 64,8 |
| 9 and 10 | 72,5 | 74 |
| 10 and 11 | 68,2 | 66 |
| 11 and 13 | 66 | 68 |
| 13 and 14 | 30 | 30,3 |
| 14 and 15 | 22 | 21,25 |
| 15 and 16 | 37 | 36,5 |
I did measure right before the gun sides and the top like below on the picture. Except between frames 15 and 16, where I checked the very top length.

From your experience, will this difference affect the build a lot, or it is a matter to do more sanding before gluing plunking strips?
Up until now, I was under the impression that my model's sides are perfectly 90 degrees deadly right (except the first 3 frames as I wasn't sure at all). But now, when I used my new ruler, it seems like I might be in trouble.
Looking for an advice.
Hello Max, for the most part, it shouldn't be a big deal! A double-planking hull will cover those imperfections. The only way I can see it may interfere when you will cut gun ports, where the port will cross the bulkhead. The top of the frames, however, should be even across port and starboard.From your experience, will this difference affect the build a lot, or it is a matter to do more sanding before gluing plunking strips?
Up until now, I was under the impression that my model's sides are perfectly 90 degrees deadly right (except the first 3 frames as I wasn't sure at all). But now, when I used my new ruler, it seems like I might be in trouble.
Hello Max, for the most part, it shouldn't be a big deal! A double-planking hull will cover those imperfections. The only way I can see it may interfere when you will cut gun ports, where I port will cross the bulkhead. The top of the frames, however, should be even across port and starboard.
Thanks, Jim, I can now be assured, all more or less fine with my model and I can continue my work
Hi Max
I agree with Jim,this is not going to make an ounce of difference when planked,however I would make sure the keel is straight and perhaps put in a fixture before continuing.This will ensure that it isn't twisted as well.This can be as simple as a shelf from the DIY store with some small angle brackets screwed to it.You need the angle brackets at a minimum of three places along the keel.If the is an issue,you may need to split a glue joint on one of the cannon support strips as these will be holding the hull solid
Kind Regards
Nigel
I've just realized that I am only on step #3 of the instructions book  and I have a very long way to go here with my build.
I am working on the lower decks of my model. There are 3 decks 22, 23, and 24 that have to be glued with planking. The 22 and 23 are going to be visible only from the upper deck ladders. These are like 25x25mm or so. The 24 decks will be visible from both sides of the ship between guns there is an entrance.

These decks allow me to practice with planking before I will do this in a visible area. Here is the deck 22 with planking glued. The deck, however, isn't glued on the picture to the false keel.
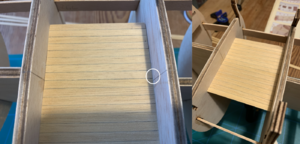
As you may notice the white circle is the place where I missed to center the deck when it is on the ship, as I centered the deck itself, and this is the result - 1.5 mm miss of alignment in the planking. Good thing is that it won't be visible. However, overall I am satisfied with the result. I use a pencil and draw one side of plankings to make this more "separated" effect.
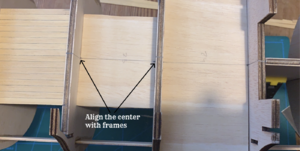
With the lesson learned, the decks 23 and 24 were installed and the line is centered in consideration with the frames. Here is the result.
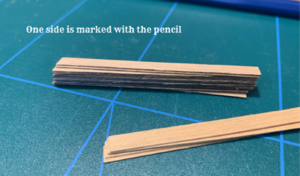
And here is my process of making planking for the deck 23 (middle one).
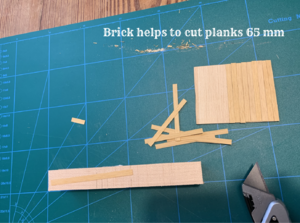
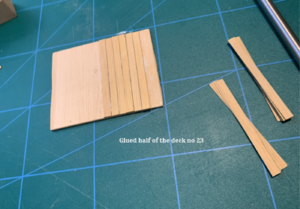
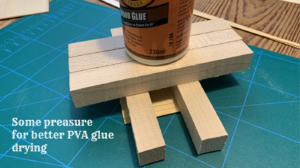
By the way, I bought Gorilla PVA and CA glue, I still don't use it but once my current ones are finished, I will open these two.
I can't wait to finish and see the end result of all three decks.
If you are reading these lines, I really thank you for stopping by.
I am working on the lower decks of my model. There are 3 decks 22, 23, and 24 that have to be glued with planking. The 22 and 23 are going to be visible only from the upper deck ladders. These are like 25x25mm or so. The 24 decks will be visible from both sides of the ship between guns there is an entrance.

These decks allow me to practice with planking before I will do this in a visible area. Here is the deck 22 with planking glued. The deck, however, isn't glued on the picture to the false keel.

As you may notice the white circle is the place where I missed to center the deck when it is on the ship, as I centered the deck itself, and this is the result - 1.5 mm miss of alignment in the planking. Good thing is that it won't be visible. However, overall I am satisfied with the result. I use a pencil and draw one side of plankings to make this more "separated" effect.
With the lesson learned, the decks 23 and 24 were installed and the line is centered in consideration with the frames. Here is the result.

And here is my process of making planking for the deck 23 (middle one).


By the way, I bought Gorilla PVA and CA glue, I still don't use it but once my current ones are finished, I will open these two.
I can't wait to finish and see the end result of all three decks.
If you are reading these lines, I really thank you for stopping by.
Last edited:
One of the biggest mistakes is to rush work for the finish. There should be no rush at all. Patience and a good understanding of the process will drive for the best results. You do it right, Max! 

One of the biggest mistakes is to rush work for the finish. There should be no rush at all. Patience and a good understanding of the process will drive for the best results. You do it right, Max!
Thanks Jim for the support !
Thank you for going into detail about the deck planking. I'm about to start that process, and your guidance is welcome.
The second deck no 23 is ready. Planks are glued and centered. I found out after the second one, that the center plank has to be installed and glued on the ship rather than having a deck on a table. It will allow removing, at least for me, event a tiny 0.5mm misalignment, that I have with this deck as well.
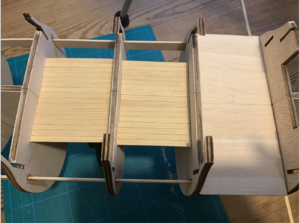
For the third deck no 24, I am going to glue a plank while the deck is on the ship, and then move the deck to a table and continue. It's like the 100% dead center approach in my case .
.
So happy that I:

For the third deck no 24, I am going to glue a plank while the deck is on the ship, and then move the deck to a table and continue. It's like the 100% dead center approach in my case
So happy that I:
- a) write down all my lessons learned and
- b) I will be way better with all these "new findings" when I will start the next model.
Lookin good!
I’m by no means an “expert” and make no claim as such I’ll just pass along my mistake so hopefully it can be avoided. I too have planked decks “off” ship. While this worked fine on flat decking I planked a deck that had not only camber it had a slight belly also. I’m sure you can see where this going. Upon install the planks litterly pinged off the deck DUH.
As far as trying to scale plank sometimes ya gotta just go with what will work and is pleasing to your eye and what looks ok especially on smaller scales. Trying to work with 2mm wide planks is beyond me.
This is the compromise I finally ended up with on my Independance. I tried to come close to Doc Blake’s excellent build but I’m just not in his league.
I’m by no means an “expert” and make no claim as such I’ll just pass along my mistake so hopefully it can be avoided. I too have planked decks “off” ship. While this worked fine on flat decking I planked a deck that had not only camber it had a slight belly also. I’m sure you can see where this going. Upon install the planks litterly pinged off the deck DUH.
As far as trying to scale plank sometimes ya gotta just go with what will work and is pleasing to your eye and what looks ok especially on smaller scales. Trying to work with 2mm wide planks is beyond me.

This is the compromise I finally ended up with on my Independance. I tried to come close to Doc Blake’s excellent build but I’m just not in his league.


