Yes you still can add more interior details in the kit ,upgrade the kit with scratch built stuffThanks Jim, yes I understood it was the similarities of construction only, not class of ship.
I have the Swan series and I’m waiting on the Hayling book from Mike (Seawatch). I am hoping the books will give me some background info. for the kit even though I know the kit is not based on those books.
-

Win a Free Custom Engraved Brass Coin!!!
As a way to introduce our brass coins to the community, we will raffle off a free coin during the month of August. Follow link ABOVE for instructions for entering.
-

PRE-ORDER SHIPS IN SCALE TODAY!
The beloved Ships in Scale Magazine is back and charting a new course for 2026!
Discover new skills, new techniques, and new inspirations in every issue.
NOTE THAT OUR FIRST ISSUE WILL BE JAN/FEB 2026
You are using an out of date browser. It may not display this or other websites correctly.
You should upgrade or use an alternative browser.
You should upgrade or use an alternative browser.
Kit Review Hayling (1760) - POF in scale 1:48 by Modelship Dockyard
That’s good to know, thanks zoly.Yes you still can add more interior details in the kit ,upgrade the kit with scratch built stuff
- Joined
- May 31, 2021
- Messages
- 86
- Points
- 88

I've taken the plunge as well. Ordered it a couple of days ago and can't wait to receive it. I'm no good at remembering to take photos and get a bit embarrassed when it all goes pear shaped (like my Yacht America build - it just didn't look right so it got binned) so I'll just follow this and any build threads with great interest 
Cheers

Cheers
DID NOT DOC BLAKE HAVE A SCRATCH BUILD OF A HAYLING HOY, WHAT WAS IT BASED ON I THINK A CHAPMAN DWG. BUT NOT SURE COME ON BOARD DOC I KNOW YOU LOVE SCRATCH BUILD BUT Y7OUR HELP IS ALWAYS NEEDED. GOD BLESS STAY SAFE ALL DON
Where was the USB drive hidden? I searched my kit carefully but could not find it. I've written to Modelship Dockyard requesting one - or a link to a manual on the web somewhere.Part 2
Kit in review: Hayling (1760)
Plank On Frame model, full hull kit, complete with rigging and sails
by Modelship Dockyard
Content of the box: Photoetch parts and Sails
I have a chance to show you some of the details of the PE supplied in the kit in Part 1. Today, we have a chance to see the entire PE fret in detail. The fret is sized 140mm x 95mm and covered with plastic film from both sides.
View attachment 323718
without protective film
View attachment 323719
In the upper left corners, you can see parts for the galley stove. Recall that the stove itself is printed from resin in white color. It is assumed the painting will require making a nice finish but... The kit provided PE parts to cover the hood, sides, and grill. Oh...there are tinny doors as well for both sides.
View attachment 323720 View attachment 323721
Moving to the next right corner, there are block strops with hooks. I always have challenges making them, I think it is a very nice addition. A bit below is rudder hinges, and a bit to the right side what I believe, parts of the shaves. They come in two halves, You will have to bend together and solder them. There are various sizes of ringbolts and hooks, down below. At the left bottom are thee deadeyes strops and chainplates. In the same row, on the opposite side the parts I don't know for. I guess we will have to find out. There are also some very tiny parts in different locations. I am sure they will add a touch to the parts they belonged to. Let's see some macro shots.
View attachment 323723
View attachment 323724
View attachment 323728
The Sails comes complete with the leech bolt ropes, earing, clew, and bridle cringles. They are very nice thin, white material sewing in the machine with stitches. You have a choice to stain them in any color you may like. The Gaf has holes for riffs. Check them out...
The set
View attachment 323729
View attachment 323730
View attachment 323731
Some details
View attachment 323732
View attachment 323734
Alright, folks, this is pretty much it. We left only with the manual. The manual comes in PDF format, it is isometric images with step-by-step instructions. The instruction manual comes in the flash drive so you don't have to search for aged CD-Rom. You can view the manual right on your computer. This was the hidden part when we opened the box. Besides the imaging manual, there is a written explanation instruction (which also comes in the flash drive). Also, I believe documentation can be downloaded from the link provided by Modelship Dockyard
View attachment 323736
Here are some pages (random) from the manual.
View attachment 323737
View attachment 323738
View attachment 323739
View attachment 323740
View attachment 323741
View attachment 323742
View attachment 323743
As you can see it is pretty intuitive, with added "key points" and "Notes". BTW, take look at the image upper right corner, did you recognize the part PR1? Yep, this is one of the windlass jigs that come with a galley stove.
Yet, another review comes to its end. I must say, I enjoy reviewing this kit, and have the pleasure to share this review with you! Modeships Dockyard brings to the consumer something different. With the highest grade timber set and other innovative parts, this kit should make a very nice model. Today, modelers have a kit, they can be considered the first POF kit. I hope I didn't miss anything but feel free to contact me with any questions.
P.S. By the time of wrighting this review, I was told by @Modelship Dockyard that the Hayling kit is available for sale at the flat price of $298.00 USA (shipping including). It can be purchased here (link below)
Enjoy building The Hayling 1760! Until then, so long.
- Joined
- Jan 23, 2021
- Messages
- 627
- Points
- 353

Hi ,I will email you all the filesWhere was the USB drive hidden? I searched my kit carefully but could not find it. I've written to Modelship Dockyard requesting one - or a link to a manual on the web somewhere.
@Modelship Dockyard Victor, can you help Van get the missing flash drive?Where was the USB drive hidden? I searched my kit carefully but could not find it. I've written to Modelship Dockyard requesting one - or a link to a manual on the web somewhere.
- Joined
- Jan 23, 2021
- Messages
- 627
- Points
- 353

Hi,download all the files from the link belowWhere was the USB drive hidden? I searched my kit carefully but could not find it. I've written to Modelship Dockyard requesting one - or a link to a manual on the web somewhere.
Dropbox
- Joined
- May 31, 2021
- Messages
- 86
- Points
- 88

I've just downloaded the files and they are excellent. The sad part is that looking at them has just made me more impatient for my kit to arrive. 

Cheers
Tom

Cheers
Tom
- Joined
- Aug 20, 2022
- Messages
- 2
- Points
- 3
No flash drive, see update below
- Joined
- Aug 20, 2022
- Messages
- 2
- Points
- 3
Update: Got the dropbox link to work is MS Edge, wouldn't work with Chrome.No flash drive, unable to get dropbox to work,.
- Joined
- Jan 23, 2021
- Messages
- 627
- Points
- 353

Hi ,here is the files from Drive tooUpdate: Got the dropbox link to work is MS Edge, wouldn't work with Chrome.
- Joined
- Jan 23, 2021
- Messages
- 627
- Points
- 353

Hayling Hoy instruction manual – Google Drive
 drive.google.com
To all readers of this thread,
Victor @Modelship Dockyard updated the manual and sent an email to inform all members who recently purchase the kit.
Dear Modellers,
For your best experience, we advise you to stay up to date on the instructions as we have made several updates, some of which were significant. The current version of the instruction is now: "Version 2.1"
The latest version of drawings and instructions can always be downloaded through:
https://drive.google.com/drive/folders/1pJdrReIO6Y7mlYsO_B0TKbXEMJ7-GJpq?usp=sharing
To avoid disturbing you, we will no longer send you email notices of updating instructions. However, if you want to receive an automatic reminder when there are updates, please reply to this email with "Update".
Thank you for supporting Modelship Dockyard, and have a nice day!
Kind regards
Victor
UPDATE. GOD BLESS STAY SAFE ALL DON
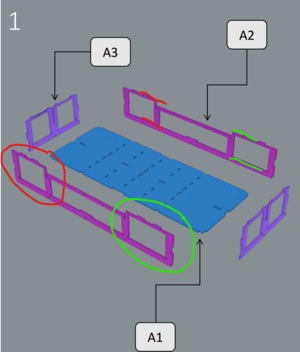
I need some help and hope this is the right place to seek it. While building the cradle which will hold the keel and frames during construction, I ran into problems with step 4. Pieces A1,2 and 3 went to together fine and all the tabs matched. So did A8 to A15 and A5 and A7. When I went to put the last piece in, A4, the tabs didn't match up. If I've made a mistake I don't know what it is. I can modify A4 to fit but I need to know whether I should lower the end of A4 where it meets A2 (by cutting away some of A4). That will make all three tabs of A4 fit into the slots on A2. Or should I raise A4 to where it is parallel with A1. Then A4 will fill the slots in A3 but not any of those in A2. Maybe the pictures can make things clearer.
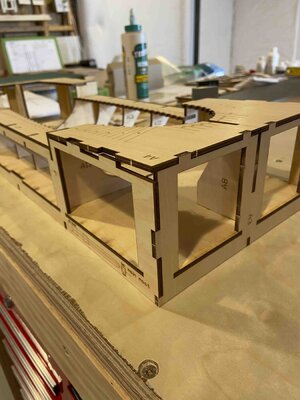
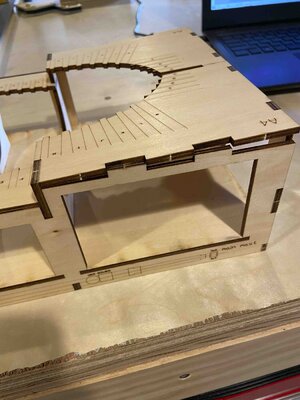
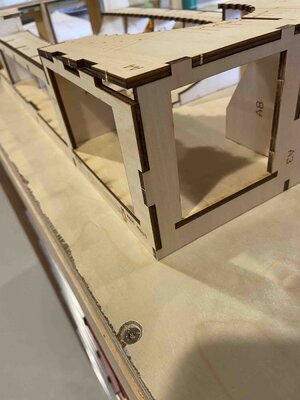


Check the orientation of part A2. as you can see from the manual one side is a bit higher than another. (at least I can see it on the diagram), The green part is a bit shorter than the red.I need some help and hope this is the right place to seek it. While building the cradle which will hold the keel and frames during construction, I ran into problems with step 4. Pieces A1,2 and 3 went to together fine and all the tabs matched. So did A8 to A15 and A5 and A7. When I went to put the last piece in, A4, the tabs didn't match up. If I've made a mistake I don't know what it is. I can modify A4 to fit but I need to know whether I should lower the end of A4 where it meets A2 (by cutting away some of A4). That will make all three tabs of A4 fit into the slots on A2. Or should I raise A4 to where it is parallel with A1. Then A4 will fill the slots in A3 but not any of those in A2. Maybe the pictures can make things clearer.
- Joined
- Oct 14, 2020
- Messages
- 294
- Points
- 323

I think you have placed the two A3 the reverse order, try to place the two A3 the other way round, and it should be fit.I need some help and hope this is the right place to seek it. While building the cradle which will hold the keel and frames during construction, I ran into problems with step 4. Pieces A1,2 and 3 went to together fine and all the tabs matched. So did A8 to A15 and A5 and A7. When I went to put the last piece in, A4, the tabs didn't match up. If I've made a mistake I don't know what it is. I can modify A4 to fit but I need to know whether I should lower the end of A4 where it meets A2 (by cutting away some of A4). That will make all three tabs of A4 fit into the slots on A2. Or should I raise A4 to where it is parallel with A1. Then A4 will fill the slots in A3 but not any of those in A2. Maybe the pictures can make things clearer.
View attachment 327976View attachment 327977View attachment 327978
Thanks very much to both of you for responding so quickly, When building the cradle the written instructions say "Place A8 in the bow direction, and put A9 in the bow direction." They can't both be true. But the pictures show A9 in the stern which is what I did. My sides are oriented as both of you suggest (you couldn't see them in the pix). I think of the A2 sides as having a bigger "window" in the stern and a smaller one in the bow. I have the bigger window in the stern so the sides are oriented as you both suggest. Pieces A4 and A5 are different lengths. A5 pieces fit fine in the stern where A4 would not if I had things reversed. Only A4 pieces do not fit properly in the bow. If I've made a mistake I'd try to buy another set of the plywood pieces that make the cradle. If the kit is wrong I'll build the keel and see if "fixing" A4 one way or the other will be a solution. Has either of you made a cradle? If so then I must have done something wrong and not the kit.I guess Jim is correct with his hint -
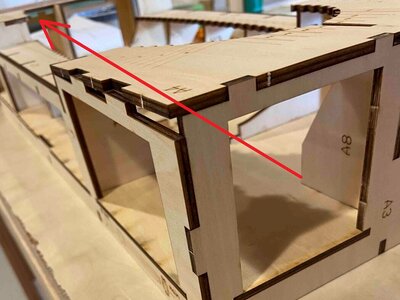
if you take a look at this photo, you can see, that the side element on the other side looks to narrow (red arrow)
View attachment 328040


