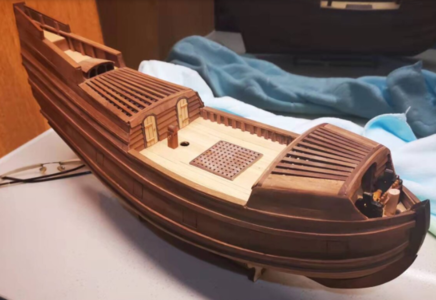
I agree it‘s about the same for us Germans. I can puzzle my way through Dutch and French. But American English, well ……….I admire what Heinrich is able to do.That's how English looks to us Dutchies...
-

Win a Free Custom Engraved Brass Coin!!!
As a way to introduce our brass coins to the community, we will raffle off a free coin during the month of August. Follow link ABOVE for instructions for entering.
-

PRE-ORDER SHIPS IN SCALE TODAY!
The beloved Ships in Scale Magazine is back and charting a new course for 2026!
Discover new skills, new techniques, and new inspirations in every issue.
NOTE THAT OUR FIRST ISSUE WILL BE JAN/FEB 2026
You are using an out of date browser. It may not display this or other websites correctly.
You should upgrade or use an alternative browser.
You should upgrade or use an alternative browser.
HIGH HOPES, WILD MEN AND THE DEVIL’S JAW - Willem Barentsz Kolderstok 1:50
Ok you all! Finish your coffee, and all back to work! 
It is very difficult to base a 16th/17th century ship on 21st century paintings, so although the paintings are very nice and very well thought out - they are all based on knowledge we have now. So be carefull using them as a definite source.
But one thing is true: a windlass behind the canopy is a better place, as the windlass itself would - in this case - be at a more suitable spot to hoist f.i. the main yard.
But then again - if you make the spikes of the windlass a bit shorter so they can pass underneath the front beam of the canopy (assuming the windlass was at the front) then all of a sudden the operation angle is more then 90 degrees.
I haven't checked if Witsen mentiones a length of the spikes - but also here: Witsen wrote his book almost 100 years later as Willem Barentsz made his attempt to find the northern passage - so if he mentioned the length of the spikes, even then it could have changed a lot.
We do really not know how it was exactly done and placed, and everyone has his own ideas and reasons to do it A or B. That is all okay (also for me as the maker of this kit). I like these discussions, without having a firm fixed and stubborn opinion on it. Both Hoving and the Weerdt have their own vision on the place of the windlass, and I have gone through the same train of thoughts to decide where to place it.
For me the small boats where of much importancy and from the original journal we know they could be placed on deck.
- Joined
- Sep 3, 2021
- Messages
- 5,190
- Points
- 738

Yes boss, right away boss...Ok you all! Finish your coffee, and all back to work!
- Joined
- Sep 3, 2021
- Messages
- 5,190
- Points
- 738

Wouldn't they have used rope ladders in those days?Good evening, in my opinion, you should also have the maneuver to hoist the ladder on the deck
- Joined
- Oct 17, 2020
- Messages
- 1,691
- Points
- 488

no rope ladder was there to useWouldn't they have used rope ladders in those days?
- Joined
- Jan 9, 2020
- Messages
- 10,566
- Points
- 938

Thank you very much for your input Hans. I know that you went through the same ordeal when you were trying to decide where to place the windlass. I agree that shorter spikes might have been made to pass under the roof of the canopy, it would have improved the degrees of operation, but it also meant that the operator would have lost a lot of leverage.Ok you all! Finish your coffee, and all back to work!
It is very difficult to base a 16th/17th century ship on 21st century paintings, so although the paintings are very nice and very well thought out - they are all based on knowledge we have now. So be carefull using them as a definite source.
But one thing is true: a windlass behind the canopy is a better place, as the windlass itself would - in this case - be at a more suitable spot to hoist f.i. the main yard.
But then again - if you make the spikes of the windlass a bit shorter so they can pass underneath the front beam of the canopy (assuming the windlass was at the front) then all of a sudden the operation angle is more then 90 degrees.
I haven't checked if Witsen mentiones a length of the spikes - but also here: Witsen wrote his book almost 100 years later as Willem Barentsz made his attempt to find the northern passage - so if he mentioned the length of the spikes, even then it could have changed a lot.
We do really not know how it was exactly done and placed, and everyone has his own ideas and reasons to do it A or B. That is all okay (also for me as the maker of this kit). I like these discussions, without having a firm fixed and stubborn opinion on it. Both Hoving and the Weerdt have their own vision on the place of the windlass, and I have gone through the same train of thoughts to decide where to place it.
For me the small boats where of much importancy and from the original journal we know they could be placed on deck.
But ... ultimately you had to make a call and go for one of the two options (just like I had to do now) and I respect that. In the process I have created a lot of extra work for myself but if I look at how beautifully clean my front section is now, it was worth it. I also think that placing the windlass at the back of the canopy allows me to display it far better with more detail.
And about the lifeboats - I ain't done yet.
- Joined
- Jan 9, 2020
- Messages
- 10,566
- Points
- 938

Exactly Frank!Good evening, in my opinion, you should also have the maneuver to hoist the lifeboat on the deck

Lookin’ good Heinrich
All this talk regarding windlass placement required I look to my upcoming (hopefully) Statenjacht build. Whew, no foremast or canopy for me to worry about. I’m sure I’ll find something else to get my shorts in a twist though.
All this talk regarding windlass placement required I look to my upcoming (hopefully) Statenjacht build. Whew, no foremast or canopy for me to worry about. I’m sure I’ll find something else to get my shorts in a twist though.
- Joined
- Jan 9, 2020
- Messages
- 10,566
- Points
- 938

Oh yes Ron - you can bet your bottom dollar that the Statenjacht will have its own challenges. I am holding all thumbs for you to start your build.Lookin’ good Heinrich
All this talk regarding windlass placement required I look to my upcoming (hopefully) Statenjacht build. Whew, no foremast or canopy for me to worry about. I’m sure I’ll find something else to get my shorts in a twist though.
Great work HeinrichDear Friends
So no good talking about things - let's put it together and see what it looks like.
View attachment 300867
I started by putting together the actual windlass (braadspil).
View attachment 300868
Then I took some dry shellac and mixed it with the highest-content alcohol I could find (95%).
View attachment 300869
Which then resulted in this solution.
View attachment 300870
The windlass then received two coats of shellac,
View attachment 300871
After which the wood became darker and - I think - created a "warmer" atmosphere.
View attachment 300872
Now if you thought that space was at a premium, it gets worse. The whole assembly does not fit into the space behind the foremast. I sacrificed one piece of round wood, by cutting it to a length that would protrude slightly higher than the belaying rack so that I knew exactly where and how deep to file a groove into the belaying rack. Now all fits as it is supposed to.
And then this is what the whole assembly looks like dry-fitted.
View attachment 300873
View attachment 300874
View attachment 300875
So this where I am tonight. You know me - I don't expect you to pull any punches. Let me hear what you REALLY think - I value your opinion and especially your criticism if any.
@Kolderstok Hans is this what it should look like?
@Ab Hoving Ab I need your opinion here in the only way that you give opinions - from the hip and straight!

Nice finish Heinrich, great workFinal bow assembly - happy!
View attachment 304179
And seeing that it's now 04:28 in the morning, I have exactly two hours and 32 minutes before I have to get up.

- Joined
- Jan 9, 2020
- Messages
- 10,566
- Points
- 938

Thank you very much for the kind words Mark. I fully agree with you - we sometimes get so caught up with that one little thing that occupies our mind that we cant see the forest for the trees!Great looking model Heinrich, always good to see the full-size view from time to time
View attachment 304187
- Joined
- Jan 9, 2020
- Messages
- 10,566
- Points
- 938

Thank you Mark - much appreciated!Nice finish Heinrich, great work
- Joined
- Jan 9, 2020
- Messages
- 10,566
- Points
- 938

Hello Dear Friends
Today I want to change tack completely and share the making of a simple, little thing with you. The plans called for a knecht (knightshead) to be fitted with a clamp on either side. (see pic below):

Try as I might, I could not get this to work. I suppose with a milling machine or a miniature chisel set it would have been easier, but seeing that I don't possess any of the two, I had to resort to a sharpened small screwdriver and my X-Acto. Attempt after attempt followed - all with the same result - the walnut wood would simply crack along the grain. Eventually, after I don't know how many attempts, I contacted Hans and asked him if two eyebolts would work. He said I could do it, but also hinted that it was supposed to be a clamp. in a classic example of "read between the lines".
Eventually I found a piece of scrap pear wood (still from the Leudo) that was more or less the same size as the required part. With the much denser grain of the pear wood, I could finally get my X-Acto to cut instead of split and finally I had managed to cut some sort of groove of which I was mighty proud. But now the next challenge presented itself - making the actual clamps. This turned out to be an even bigger disaster than making the groove. Again, I scrounged the parts bin and found two deck cleats - I have no idea even to which model they once belonged - maybe the Leudo as well. And would you believe it - they fitted.
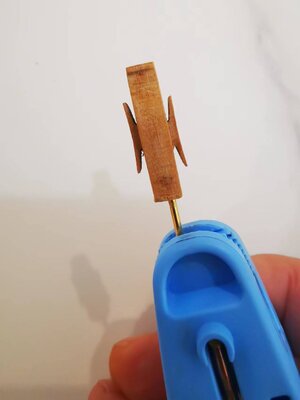
Deck cleats posing as clamps.
Then it was time for the laborious process of preparing the assembly for fitment. After the cleats had been glued into the groove, it was time again to prepare my special concoction.
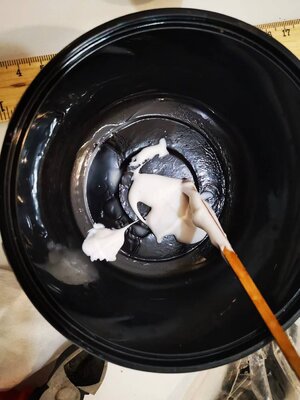
Pour white PVA into a plastic container.
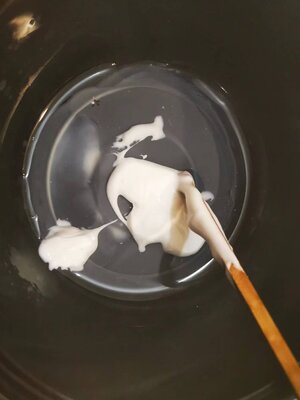
Add hot water and stir until there are no more or as few as possible lumps of glue.
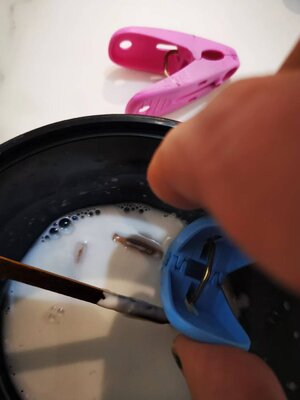
Immerse the part into the mixture and allow the diluted PVA mixture to flow thoroughly into any nooks and crannies.

Part removed from its glue bath and left to dry. By the way, the brass pin that you see on the pictures is the same method I use to mount every single deck fitting.
When the glue had dried completely, the part was sanded a final time and received one coat of shellac after which it was installed on the ship.
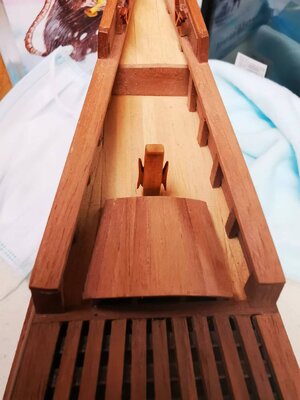
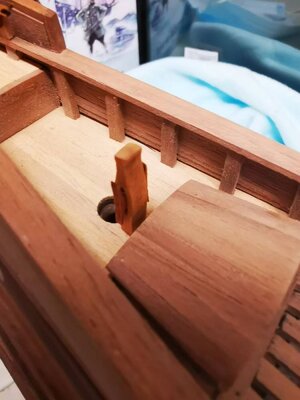
And there we go - a cleated and clamped knighthead which just shows - if you ain't strong, you have to be resourceful.
@Pathfinder65 Jan, the next picture I include just for you because I think it may be helpful in your build. It shows the exact groove required for the bowsprit to lie at its perfect angle.
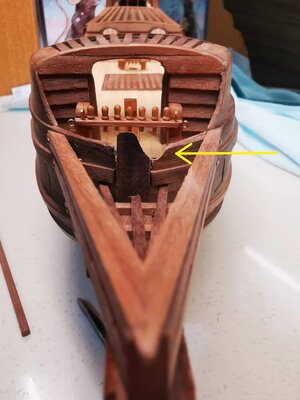
Note that it does require you to file part of the stem away as well.
Thank you all for watching and following along as I slowly make progress on the journey. Next step would now be two more belaying racks behind the front canopy and then on to the scratch-build of the windlass.
Today I want to change tack completely and share the making of a simple, little thing with you. The plans called for a knecht (knightshead) to be fitted with a clamp on either side. (see pic below):

Try as I might, I could not get this to work. I suppose with a milling machine or a miniature chisel set it would have been easier, but seeing that I don't possess any of the two, I had to resort to a sharpened small screwdriver and my X-Acto. Attempt after attempt followed - all with the same result - the walnut wood would simply crack along the grain. Eventually, after I don't know how many attempts, I contacted Hans and asked him if two eyebolts would work. He said I could do it, but also hinted that it was supposed to be a clamp. in a classic example of "read between the lines".
Eventually I found a piece of scrap pear wood (still from the Leudo) that was more or less the same size as the required part. With the much denser grain of the pear wood, I could finally get my X-Acto to cut instead of split and finally I had managed to cut some sort of groove of which I was mighty proud. But now the next challenge presented itself - making the actual clamps. This turned out to be an even bigger disaster than making the groove. Again, I scrounged the parts bin and found two deck cleats - I have no idea even to which model they once belonged - maybe the Leudo as well. And would you believe it - they fitted.

Deck cleats posing as clamps.
Then it was time for the laborious process of preparing the assembly for fitment. After the cleats had been glued into the groove, it was time again to prepare my special concoction.

Pour white PVA into a plastic container.

Add hot water and stir until there are no more or as few as possible lumps of glue.

Immerse the part into the mixture and allow the diluted PVA mixture to flow thoroughly into any nooks and crannies.

Part removed from its glue bath and left to dry. By the way, the brass pin that you see on the pictures is the same method I use to mount every single deck fitting.
When the glue had dried completely, the part was sanded a final time and received one coat of shellac after which it was installed on the ship.


And there we go - a cleated and clamped knighthead which just shows - if you ain't strong, you have to be resourceful.
@Pathfinder65 Jan, the next picture I include just for you because I think it may be helpful in your build. It shows the exact groove required for the bowsprit to lie at its perfect angle.

Note that it does require you to file part of the stem away as well.
Thank you all for watching and following along as I slowly make progress on the journey. Next step would now be two more belaying racks behind the front canopy and then on to the scratch-build of the windlass.
I thought they were cleats when I first saw it. Do they function as cleats?
I meant on the first picture of what it was supposed to be! Do the „clamps“ perform the same function as cleats do?


