- Joined
- Jan 9, 2020
- Messages
- 10,566
- Points
- 938

Thank you, my friend. It was not something difficult to do - it just had to be done. It will save us a lot of time over the weekend.Again an excellent explanation Heinrich,, great work sofar
 |
As a way to introduce our brass coins to the community, we will raffle off a free coin during the month of August. Follow link ABOVE for instructions for entering. |
 |
 |
The beloved Ships in Scale Magazine is back and charting a new course for 2026! Discover new skills, new techniques, and new inspirations in every issue. NOTE THAT OUR FIRST ISSUE WILL BE JAN/FEB 2026 |
 |

Thank you, my friend. It was not something difficult to do - it just had to be done. It will save us a lot of time over the weekend.Again an excellent explanation Heinrich,, great work sofar
Great problem solving Heinrich.Dear Friends
Tonight, I want to share one of the idiosyncrasies of rigging the Willem Barentsz and how sometimes we need to simulate something if it cannot be made to work like it had been in real life.
View attachment 350657
On the superb @Kolderstok drawings, you will see that the two (Port and Starboard Sides) backstays (red line) of the main mast are belayed at two different locations. One is on the wale (blue line) and the other one (yellow line) seems to be belayed on the center canopy. This can obviously not be so let me explain at the hand of a few pictures.
View attachment 350658
The equally superb @Kolderstok instruction manual provides a graphic illustration of the above plans. Here the backstay can be seen in red, the line that is belayed to the wale in blue and the one that seems to come from the center canopy, in yellow. Here it is obvious that the real belaying point was from the deck of the ship, but seeing that in the current state of the build, it is impossible to do that, it has to be simulated or suggested that the line runs from the deck and comes from BELOW the roof of the center canopy.
View attachment 350659
To facilitate that, Hans suggests creating a small hook out of steel wire to which the 0.4mm belaying line is tied. The hook and line are then inserted through the grating of the center canopy's roof. When the line is now pulled tight as part of the belaying process, the bent wire will lock from the inside of the canopy against the roof grating and voila!
This is a very good suggestion except for me and @pietsan Piet, because we have both deviated in how we constructed the grating. In essence it means that we have more lengthwise beams in our assemblies which result in much smaller openings between beams. Simply, put it is impossible to insert anything through the hole which features some type of knot - irrespective of how small the knot it. The only thing that I could get to fit into the hole was a length of brass wire. After some careful bending, maneuvering and manipulation, I could get the other end of the brass wire to exit through the door opening of the canopy's front wall.
Next, I tacked the rope with CA glue lengthwise to the brass wire and then the operation started.
View attachment 350662
The brass wire with the rope tacked to it with CA glue (yes, even I use the stuff sometimes), is pushed through the correct opening.
View attachment 350663
The brass wire and rope emerge from the front door opening. Note the prepared part for the mizzen stay is still there! The rope was now cut loose from the brass wire and tied to an oversized deadeye which I had in my stash. The knot was thoroughly sealed with CA glue. Now the rope could be pulled into its position while the deadeye butted up against the roof, preventing the rope from slipping out - effectively locking it in place.
View attachment 350664
And Voila! Both backstays are now secure and awaiting the admiral's arrival this weekend.
View attachment 350666
As a parting shot - the simulation of what these two ropes will look like when permanently belayed.


Thank you, my friend. Luckily, I knew about this little "hurdle", so it did not come as a surprise.Great problem solving Heinrich.
Cheers,
Stephen.
Good morning Heinrich. “N Boer maak n plan”. Your last pic shows how this plan worked perfectly. You owned it. Cheers GrantDear Friends
Tonight, I want to share one of the idiosyncrasies of rigging the Willem Barentsz and how sometimes we need to simulate something if it cannot be made to work like it had been in real life.
View attachment 350657
On the superb @Kolderstok drawings, you will see that the two (Port and Starboard Sides) backstays (red line) of the main mast are belayed at two different locations. One is on the wale (blue line) and the other one (yellow line) seems to be belayed on the center canopy. This can obviously not be so let me explain at the hand of a few pictures.
View attachment 350658
The equally superb @Kolderstok instruction manual provides a graphic illustration of the above plans. Here the backstay can be seen in red, the line that is belayed to the wale in blue and the one that seems to come from the center canopy, in yellow. Here it is obvious that the real belaying point was from the deck of the ship, but seeing that in the current state of the build, it is impossible to do that, it has to be simulated or suggested that the line runs from the deck and comes from BELOW the roof of the center canopy.
View attachment 350659
To facilitate that, Hans suggests creating a small hook out of steel wire to which the 0.4mm belaying line is tied. The hook and line are then inserted through the grating of the center canopy's roof. When the line is now pulled tight as part of the belaying process, the bent wire will lock from the inside of the canopy against the roof grating and voila!
This is a very good suggestion except for me and @pietsan Piet, because we have both deviated in how we constructed the grating. In essence it means that we have more lengthwise beams in our assemblies which result in much smaller openings between beams. Simply, put it is impossible to insert anything through the hole which features some type of knot - irrespective of how small the knot it. The only thing that I could get to fit into the hole was a length of brass wire. After some careful bending, maneuvering and manipulation, I could get the other end of the brass wire to exit through the door opening of the canopy's front wall.
Next, I tacked the rope with CA glue lengthwise to the brass wire and then the operation started.
View attachment 350662
The brass wire with the rope tacked to it with CA glue (yes, even I use the stuff sometimes), is pushed through the correct opening.
View attachment 350663
The brass wire and rope emerge from the front door opening. Note the prepared part for the mizzen stay is still there! The rope was now cut loose from the brass wire and tied to an oversized deadeye which I had in my stash. The knot was thoroughly sealed with CA glue. Now the rope could be pulled into its position while the deadeye butted up against the roof, preventing the rope from slipping out - effectively locking it in place.
View attachment 350664
And Voila! Both backstays are now secure and awaiting the admiral's arrival this weekend.
View attachment 350666
As a parting shot - the simulation of what these two ropes will look like when permanently belayed.
Hi Heinrich,Thank you, my friend. Luckily, I knew about this little "hurdle", so it did not come as a surprise.


Good morning, Grant and thank you. I can assure you that there is a lot of "boere"-logic in this build with more probably to come still!Good morning Heinrich. “N Boer maak n plan”. Your last pic shows how this plan worked perfectly. You owned it. Cheers Grant

Concidering the way you get your tools and materials, that sounds a lot like you, Heinrichor someone who uses whatever he can lay his hands on, to accomplish his goal.

I agree 100%, Mark! From what I can find on the web, it received good reviews.The movie 'Nova Zembla" sounds interesting Heinrich, I'll keep my eyes open for that one. In my mind there have been too few movies made of some of these famous expeditions, particularly nautical ones, or the producer adds too much irrelevant content to render it unwatchable. The pictures you posted make it look interesting though ...

Exactly, my friend!Concidering the way you get your tools and materials, that sounds a lot like you, Heinrich


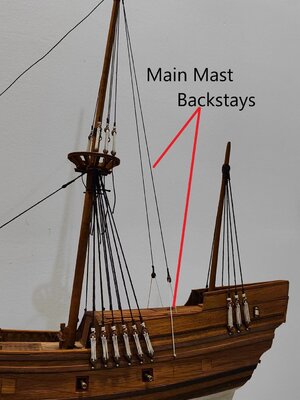
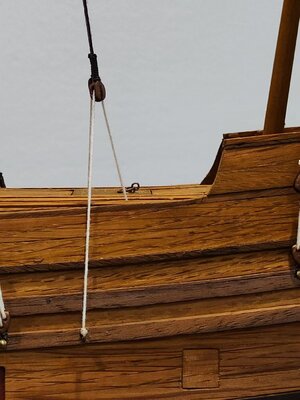
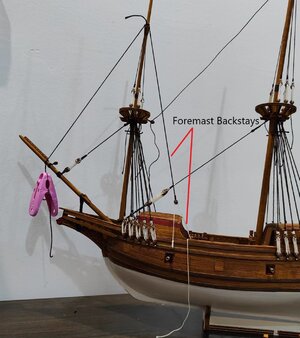
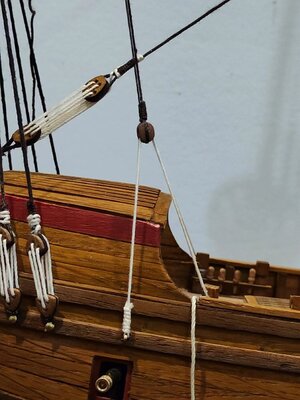
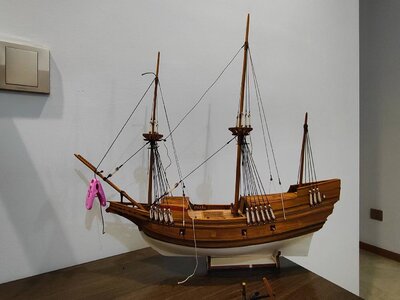

Oh heck, yes, Jan! There is still a very long rigging road to travel.You are making great progress. Looking at the Kolderstok rigging plans you have much more to do.
My first build "Constructo's Enterprise" had the most confusing (to me at the time) rigging plans. I managed to do many a "RE-DO".Oh heck, yes, Jan! There is still a very long rigging road to travel.

Jan as far as that goes - I have no excuse. The @Kolderstok plans and rigging instructions are very comprehensive and logically set out. In addition to that, @pietsan Piet's build log is of great help too. When these two sets are consulted in conjunction with each other, there should not be a problem. The actual doing part though, is another issue altogether.My first build "Constructo's Enterprise" had the most confusing (to me at the time) rigging plans. I managed to do many a "RE-DO".
In typical novice fashion I had assembled, glued all the mast components before getting to the stays, shrouds, standing rigging, etc.


