-

Win a Free Custom Engraved Brass Coin!!!
As a way to introduce our brass coins to the community, we will raffle off a free coin during the month of August. Follow link ABOVE for instructions for entering.
-

PRE-ORDER SHIPS IN SCALE TODAY!
The beloved Ships in Scale Magazine is back and charting a new course for 2026!
Discover new skills, new techniques, and new inspirations in every issue.
NOTE THAT OUR FIRST ISSUE WILL BE JAN/FEB 2026
You are using an out of date browser. It may not display this or other websites correctly.
You should upgrade or use an alternative browser.
You should upgrade or use an alternative browser.
HIGH HOPES, WILD MEN AND THE DEVIL’S JAW - Willem Barentsz Kolderstok 1:50
- Joined
- Jan 9, 2020
- Messages
- 10,566
- Points
- 938

My dear friend, Stephan.And now the old drawings 16th or 17th century from these ships.
Why are we actually even going there? I am not going to plug up my hull because De Weerdt may or may not have used hawse holes. Of all the examples, I rate De Weerdt's version as the most inaccurate and the one that I pay the least attention to. Just to cite TWO examples. We know for a fact that Barentsz's ship carried at least a boot (it is debatable whether the sloop was towed or stored onboard) because De veer mentions on two occasions that the boot was lowered (set out into the water). De Weerdt makes no provisions in his build for that - none whatsoever! His achteropbouw (midships canopy) is completely open sans front wall. On a polar expedition? Really?
I may not see eye to with @Ab Hoving's choice as to which ship Barentsz was on during the 1596 expedition, but I have no reason whatsoever to doubt him when it comes to naval construction techniques and practices of the time. Add to that @Kolderstok's design and that of Zhdan and it is a no-brainer. And to top it all - my build also has hawse holes - irrefutable proof!

- Joined
- Jan 9, 2020
- Messages
- 10,566
- Points
- 938

Okiedokie, back to the build.
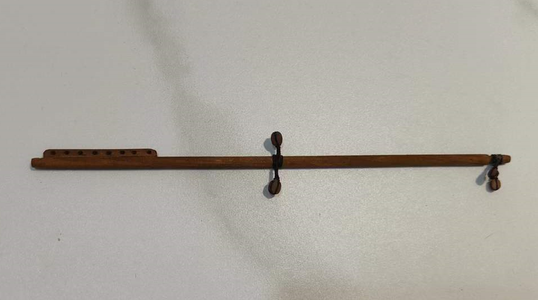
The mizzen is done for now. The "geer" (block) still needs to be added to added on the side of the scheerstrook, but that is at a later stage during actual fitment of the mizzen mast.
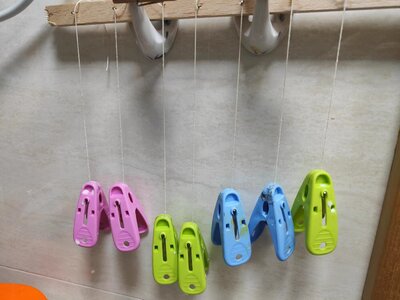
Question: Does anyone want to venture a guess as to what part of the build, this picture pertains? A correct answer earns the contestant bragging rights as to having thorough knowledge of the build log. Clue: It is not the first time that I have posted a picture like this.

The mizzen is done for now. The "geer" (block) still needs to be added to added on the side of the scheerstrook, but that is at a later stage during actual fitment of the mizzen mast.

Question: Does anyone want to venture a guess as to what part of the build, this picture pertains?
 A correct answer earns the contestant bragging rights as to having thorough knowledge of the build log. Clue: It is not the first time that I have posted a picture like this.
Hello Heinrich, you are doing great work my friend.
- Joined
- Jan 9, 2020
- Messages
- 10,566
- Points
- 938

Dear Friends. I have made small, and time-consuming progress today.
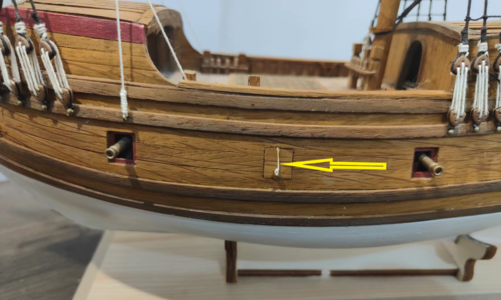
On the Port Side the three closed gunport hinges had their cables installed. This has to be repeated on the Starboard side and then hinges obviously still need to be fitted. As far as hinges go, I will have to do some serious aftermarket sourcing to find ones that I am happy with.
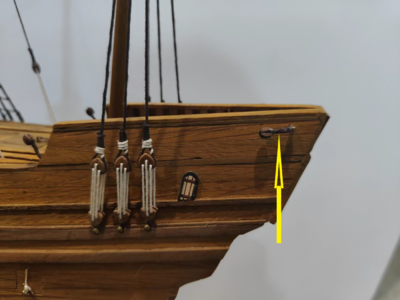
The rear bulwarks each received a four-in-one block as part of the mizzen spar's rigging. The two eyelets which secured the blocks to the bulwarks will double as mounting points for the lines which will run from the spar's "geer" (sorry, I have no idea what the English translation for "geer" is).
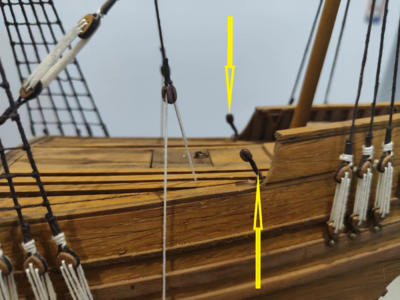
The "achteropbouw" (Rear/Midships) canopy also received two four-in-one blocks which will be used to tie the two "halstalies" to. Apologies again, neither do I have an idea what the English name for "halstalies" is. Unfortunately, all of this will only come into play (and hopefully become clear) when the actual hanging of the mizzen's spar takes place.
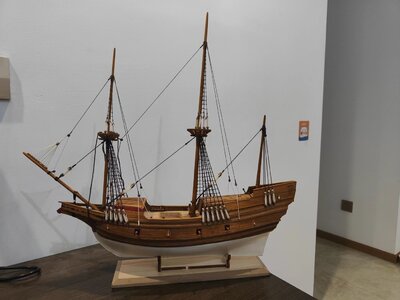
And lastly, an overview of what she looks like tonight.
Thank you all for looking in - it is sincerely appreciated!
PS. Those thick, ugly looking lines that are draped over the foremast, are the anchor cables which are just temporarily "stored" there.

On the Port Side the three closed gunport hinges had their cables installed. This has to be repeated on the Starboard side and then hinges obviously still need to be fitted. As far as hinges go, I will have to do some serious aftermarket sourcing to find ones that I am happy with.

The rear bulwarks each received a four-in-one block as part of the mizzen spar's rigging. The two eyelets which secured the blocks to the bulwarks will double as mounting points for the lines which will run from the spar's "geer" (sorry, I have no idea what the English translation for "geer" is).

The "achteropbouw" (Rear/Midships) canopy also received two four-in-one blocks which will be used to tie the two "halstalies" to. Apologies again, neither do I have an idea what the English name for "halstalies" is. Unfortunately, all of this will only come into play (and hopefully become clear) when the actual hanging of the mizzen's spar takes place.

And lastly, an overview of what she looks like tonight.
Thank you all for looking in - it is sincerely appreciated!
PS. Those thick, ugly looking lines that are draped over the foremast, are the anchor cables which are just temporarily "stored" there.
Butler, maid, or all the servants pull cords to their call bells.Okiedokie, back to the build.
View attachment 394686
The mizzen is done for now. The "geer" (block) still needs to be added to added on the side of the scheerstrook, but that is at a later stage during actual fitment of the mizzen mast.
View attachment 394687
Question: Does anyone want to venture a guess as to what part of the build, this picture pertains?A correct answer earns the contestant bragging rights as to having thorough knowledge of the build log. Clue: It is not the first time that I have posted a picture like this.
Nice to see progress on her again Heinrich.
- Joined
- Jan 9, 2020
- Messages
- 10,566
- Points
- 938

Good answer Daniel. Actually, it is just a little rig that I used to straighten the gunport lids' cables after it was soaked in diluted PVA.Butler, maid, or all the servants pull cords to their call bells.
- Joined
- Jan 9, 2020
- Messages
- 10,566
- Points
- 938

Thank you, Daniel. It is nice to be working on the ship again.Nice to see progress on her again Heinrich.
Nice work ,my friend, and, you are making progress.
- Joined
- Jan 9, 2020
- Messages
- 10,566
- Points
- 938

Thg

Thank you, Peter. It is weird to post such a small update, but studying the rigging, looking at build photos, prepping the blocks (serving/stropping), fixing them to the pins and then finally to the model, took up most of the day. Clearly, I am very rusty.Nice work ,my friend, and, you are making progress.

You're not rusty my friend, but by building the hull of the vessel, you are only halfway the entire proces of building a ship.
In other words, the rigging and sails are also very time-consuming

In other words, the rigging and sails are also very time-consuming
- Joined
- Jan 9, 2020
- Messages
- 10,566
- Points
- 938

Very true, my friend!You're not rusty my friend, but by building the hull of the vessel, you are only halfway the entire proces of building a ship.
In other words, the rigging and sails are also very time-consuming
- Joined
- Jan 9, 2020
- Messages
- 10,566
- Points
- 938

Hi Peter. Exactly for that reason - it makes it easy to install them relatively straight and they lie flat against the hull. You can also manipulate them relatively easy by effecting just enough of a twist to make it look realistic.Hi Heinrich, your WB is looking great. Question, why do you soak the ropes for the gunport lids into diluted PVA. I know when dry they become stiff as a bone.
- Joined
- Sep 3, 2021
- Messages
- 5,199
- Points
- 738

Rigging is one of the more challenging tasks of a build. It definitely requires your undivided attention and a continuous checking of plans, with high risk of misreading them.
I wish you the best of luck, but your saving grace is the fact you've done it before, so it should be a walk in the park...
I wish you the best of luck, but your saving grace is the fact you've done it before, so it should be a walk in the park...
- Joined
- Jan 9, 2020
- Messages
- 10,566
- Points
- 938

Thank you, Johan. Thankfully, I have very good rigging plans for this ship and for once, they are all more or less in agreement (save for a few small details). A good dose of luck, however, is always a welcome commodity.Rigging is one of the more challenging tasks of a build. It definitely requires your undivided attention and a continuous checking of plans, with high risk of misreading them.
I wish you the best of luck, but your saving grace is the fact you've done it before, so it should be a walk in the park...
Yes, luck helps. But Anna is more reliableThank you, Johan. Thankfully, I have very good rigging plans for this ship and for once, they are all more or less in agreement (save for a few small details). A good dose of luck, however, is always a welcome commodity.
- Joined
- Jan 9, 2020
- Messages
- 10,566
- Points
- 938

very true, Paul, but Anna has yet to be called in for help. The hardware is all my responsibility, so I need the luck.Yes, luck helps. But Anna is more reliable.


