HMB ENDEAVOUR - New 1/65 Artesania Latina Model

Joined
Dec 30, 2021
Messages
278
Points
268

What's in the Box: 24 Dec 2021
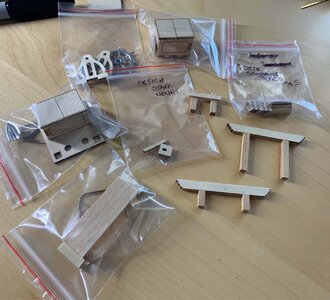
My second build is underway. I am constructing the new HMB ENDEAVOUR in 1/65 scale by Artesania Latina. The kit has some amazing features for the price including detailed templates when it comes time to find the openings in the hull, etched stainless steel details for almost everything and highly detailed pewter castings for cannons, anchors, figureheads etc.
Everything is tightly shrink-wrapped in the multiple layers in the box and all the small parts come in handy compartmentalised containers.
The laser cut wood is mostly cleanly cut but there are a couple of burns where the laser did not cut all the way through.
The kit does not come with hardcopy instructions but a CD with a 516 page PDF of colour assembly diagrams and a separate PDF parts list. Only problem is, the supplied wood does not match the dimensions shown and sorting the various timbers is difficult as no quantities are provided so in some cases its a guessing game (e.g. 1.15mm is 1mm thick material while 1.28mm thick is 1.5mm material).
To keep the price of the kit down, all 280 x 4mm and 8 x 3mm single blocks are laser cut timber and must be cut out, drilled and shaped individually. Same goes for the all the cleats.
The thread is all Artesania's own and you get plenty of it.
There are nicely printed flags which appear to come on a fabric material and all the sails are lightweight, pleated and overlocked. Not sure I like the overlocking as I hemmed my own sails in my first build and that looked far neater and prototypical.
 
Last edited:
HULL Construction: 22 Jan 2022
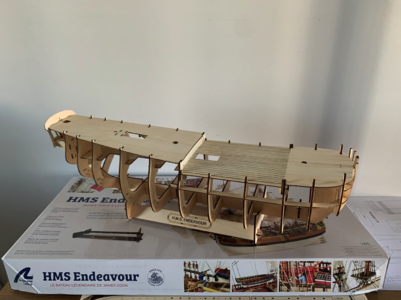
Each frame of the hull comes in multiple pieces. Unfortunately the laser cutting has made the pieces a very loose fit so care needs to be taken to:
1. Ensure the frame is symmetrical around the centreline and​
2. The gap between the sides is the right measurement to fit the deck beam to be fitted later.​
I chose to fit the deck beam when assembling the frame pieces to simplify the process, however this cannot be done on all frames to look ahead in the instructions to check which ones and be glued and which ones are to be temporarily taped together.
Assembly is fairly straight forward though care needs to be taken to assure the false keel is straight and that the frames sit symmetrically around the centreline.
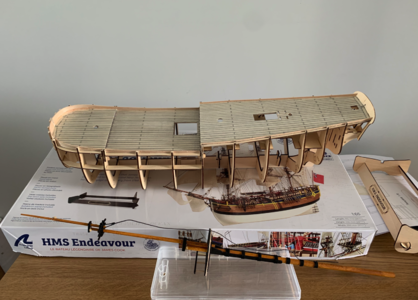
Everything started to become more rigid once the four deck pieces go in. There will be a need to do quite a bit of fairing to get frames and longitudinal stiffeners faired for planking.
It's at this stage that the deck planking is fixed in place. I continued using the technique I used on PORT JACKSON for the main deck - run a permanent marker down the edge of the planking material and lay in full length strips stating at the centre and moving to the edge. For the ForDeck and Quarterdeck I lay in rim planking so that deck planks could be cut in to prevent sharp angled points.
The deck joins and nails were all marked in using a 0.1mm permanent marker.
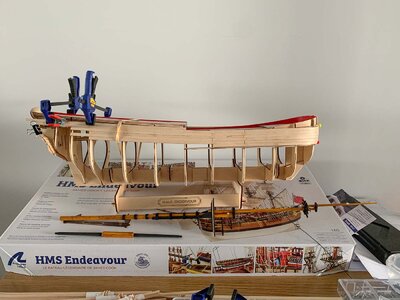
Once interior bulwark planking was laid and painted red, it was time for planking.
This is a much larger vessel than my PORT JACKSON and the plank material is thicker so it is going to take time.

Oh yes. I was bored waiting for somme of the hull work drying so I made a start on the Foremast; but that's another storey

Screen Shot 2022-02-05 at 11.14.22 am.png

Screen Shot 2022-02-05 at 11.15.30 am.png
 
Last edited:
PLANKING: 1 Feb 2022
Fairing the framework was a relatively straightforward task. I checked how I went with a strip of brass flat bar particularly on the bow and stern. The I had to plank the
Planking has got to be one of the most tedious jobs in a build. ROTFROTF
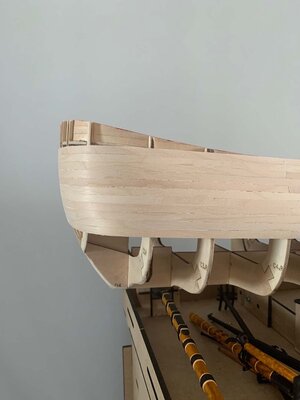
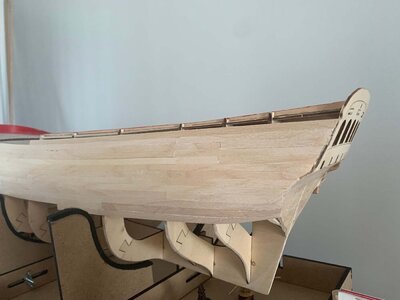
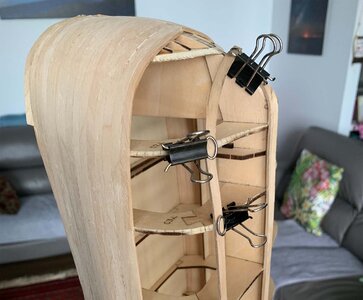
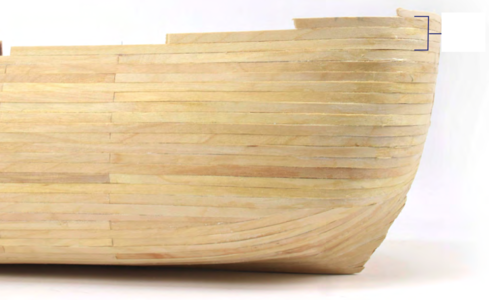
In PORT JACKSON I employed the soldering iron on wet timber technique to get the tight bluff bow bends. This time I simply let the timber sit on boiled water for a few minutes and then bent it to shape, clamping till dry before glueing in place.
NOTE: Make sure the timber is completely dry before glueing in place - yep. I made the mistake and have a couple of gaps formed by shrinking timber to fill at a later date.
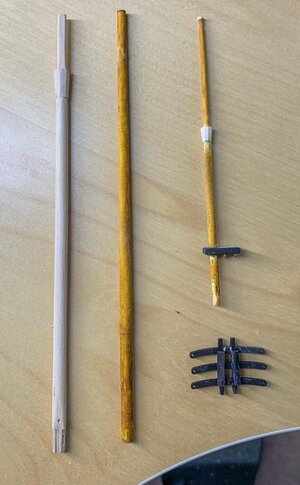
As planking takes time waiting for timber and glue to dry I had time on my hands. I spent much of this doing research on square rigged ships and obtaining more data on the ENDEAVOUR. I have the Parkin book and obtained information from the ANMM on the masts and yards. This is where I found that Artesania has taken some shortcuts/simplifications. The Foremast I originally made during the hull frame construction had to be disassembled as it was missing many of the necessary features to be used later in rigging the ship. I have attached a photo showing the simple topmast tapered pole per Artesania instructions and the new mast section per Marquardt's drawings which requires square, hexagonal and tapered hexagonal sections along its length plus a number of sheaves.

IMG_0213.jpg

IMG_0216.jpg
 
Don't mind if I pull up a chair and watch along.

500 pages of instructions! Going to print them or do you have a screen nearby?
 
At last, Peter, a model builder doing the 2021 version of Artesania Latina Endeavour. I took delivery of my kit in late August and have put in about 600 hours to this stage, with lots of sweat and tears, but nothing has been beyond fixing and adapting. I consider the kit to be very high quality but lots of analysis and detective work is left to the model builder. I have completed about 60% of the keel planking, but am now facing the bow and stern challenges which are causing me plenty of bending and twisting challenges. I have a minimum of tools, but am at my wits end with the more testing bends. I do consider the bulkhead members to be too delicate for possible nailing and abutting two planks on the three-ply width, and have had many examples of the laminations coming unstuck, possibly when drilling. Having limited desk space I need to almost complete the hull planking before inserting the masts into their sockets below deck where the fit is VERY snug.
In the interim, while drying glues etc, I have fabricated and painted most of the desk furniture and housings, enjoyed constructing the six canons. I am concerned at the rather rough finish of some of my planking, but hope that extensive sanding and filling may resolve a lot of this. I am hopeful of finishing the vessel to near museum standard, providing I keep my standards high, and can cope with the masts, rigging and sails to a good standard. So glad to read your material, have been hoping to find a kindred spirit, I value your comments, tips and suggestions, and would welcome any further pearls of wisdom from you.
Best wishes, Denis in Adelaide.
Hi Denis.
Is this your first build? Seems a bit strange to tackle a ship like this as a first. While there is some double planking, the planks are quite thick compared to other ships. Certainly a good 1mm thicker than PORT JACKSON's so there is plenty of 'meat' for sanding purposes. I have been bevelling the top of my planks to make sure the seams will be reasonably tight. This is also important when sanding material away; if not beveled then gaps will open up in the planking on convex curved areas of the hull and concave areas that don't need too much sanding will also be tight. This is particularly important at the stern.
I soak all my planks in boiled water for about 10mins so that there are no problems bending and twisting the planks to fit the form of the frames. Obviously let them dry throughly before gluing. I also stagger all the plank joints as I progress and plank symmetrically - i.e. port and starboard planks at the same time. I have found that I need to clamp the planks at the bow as the pin just doesn't have the holding power while the plank takes shape. The pin's fine while glueing though to keep the planks tight together.
What research material do you have? I have the Parkin book, but that's of limited assistance. The Marquardt drawings are very useful though work between Parkin, Marquardt and Peterssons Rigging Period Ships to make sure you get the masts, yards and bulwark sheaves and cleats sorted. I
I went to the ANNM and got access to PDFs of drawings from them. I mentioned that with the recent discovery of ENDEAVOURs resting place they are likely to get a lot of requests for such material and they were more than happy to supply provided you signed for them.
Do you have a build log? I would be interested to trade data and knowledge as we both progress through the build.
regards,Peter in ACT
 
Last edited:
Hi Denis.
Is this your first build? Seems a bit strange to tackle a ship like this as a first. While there is some double planking, the planks are quite thick compared to other ships. Certainly a good 1mm thicker than PORT JACKSON's so there is plenty of 'meat' for sanding purposes. I have been bevelling the top my planks to make sure the seams will be reasonably tight. This is also important when sanding material away; if not beveled then gaps will open up in the planking on convex curved areas of the hull and concave areas that don't need too much sanding will also be tight. This is particularly important at the stern.
I soak all my planks in boiled water for about 10mins so that there are no problems bending and twisting the planks to fit the form of the frames. Obviously let them dry throughly before gluing. I also stagger all the plank joints as I progress and plank symmetrically - i.e. port and starboard planks at the same time. I have found that I need to clamp the planks at the bow as the pin just doesn't have the holding power while the plank takes shape. The pins fine while glueing though to keep the planks tight together.
What research material do you have? I have the Parkin book, but that's of limited assistance. The Marquardt drawings are very useful though work between Parkin, Marquardt and Peterssons Rigging Period Ships to make sure you get the masts, yards and bulwark sheaves and cleats sorted. I
I went to the ANNM and got access to PDFs of drawings from them. I mentioned that with the recent discovery of ENDEAVOURs resting place they are likely to get a lot of requests for such material and they were more than happy to supply provided you signed for them.
Do you have a build log? I would be interested to trade data and knowledge as we both progress through the build.
regards,Peter in ACT
What a nice posting!Thumbsup
 
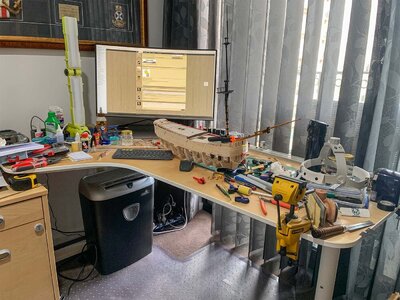
I have a 27in Samsung UHD curved wide screen used for photo editing sitting on the desk with my MacBook, bluebook keyboard and mouse. I had to move the A3+ printer off the desk so I could have space to build.

View attachment 290057
Hello Peter- some serious bending around that buff bow. Lovely start to your build and informative log. Cheers
 
Hello Peter- some serious bending around that buff bow. Lovely start to your build and informative log. Cheers
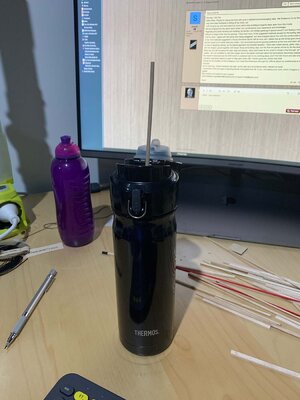
I use a thermos on my desk to soak the planking timber for 10+ min. It will hold up to four 5 x 2mm planks at any one time. The planks just glide around the bend without any issues. I also find them twist and bend nicely at the stern. Just takes time for them to dry out befit I can glue.

IMG_0226.jpg
 
Have spent time doing more planking. Bends are going well but I am now getting to the point on the bow and stern where the bend and twist starts to exceed the capacity of straight planks so it's time to start tapering.
In th meantime I have received my serving machine which has sped up and improved my serving so I have dumped previously made rigging components and started again. I have rigged the Bowsprit with both Fore and Preventer stay deadeyes and the Bobstay deadeye. I have also lashed the jib boom to the Bowsprit.
I have also made a start of the deck fitting, features, structures though I am loathe to paint them all red per the instructions. I think I will have to do some more reading before I commit to painting everything red.
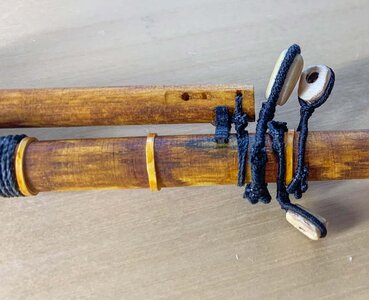
I put wooden hoops on the foremast and bowsprit using white heat shrink. Its temporarily in place and only coloured with a caramel marker (I'm waiting for some paint to arrive).

IMG_0229.jpg

IMG_0228.jpg
 
Did some light sanding of the port side of the hull (which looked the worse of the two) to see where I stood with gaps and bumps. I looks OK compared to my first builds first planking with only some seams to fill so I am happy so far with progress. Having completed 10 planks I have 22 to go and its time to start tapering. Measurements show 22 x 5mm planks midships so that means tapering to 3mm at the bow and 4 at the stern.

IMG_0230.jpg.49f2a46f0be9217724e664b4c7e30dab.jpg

IMG_0231.jpg.ee389b615e98702de81e0210ff56378f.jpg
 
Last edited:
PLANKING: 1 Feb 2022
Fairing the framework was a relatively straightforward task. I checked how I went with a strip of brass flat bar particularly on the bow and stern. The I had to plank the
Planking has got to be one of the most tedious jobs in a build. ROTFROTF
In PORT JACKSON I employed the soldering iron on wet timber technique to get the tight bluff bow bends. This time I simply let the timber sit on boiled water for a few minutes and then bent it to shape, clamping till dry before glueing in place.
NOTE: Make sure the timber is completely dry before glueing in place - yep. I made the mistake and have a couple of gaps formed by shrinking timber to fill at a later date.
As planking takes time waiting for timber and glue to dry I had time on my hands. I spent much of this doing research on square rigged ships and obtaining more data on the ENDEAVOUR. I have the Parkin book and obtained information from the ANMM on the masts and yards. This is where I found that Artesania has taken some shortcuts/simplifications. The Foremast I originally made during the hull frame construction had to be disassembled as it was missing many of the necessary features to be used later in rigging the ship. I have attached a photo showing the simple topmast tapered pole per Artesania instructions and the new mast section per Marquardt's drawings which requires square, hexagonal and tapered hexagonal sections along its length plus a number of sheaves.

View attachment 290044

View attachment 290045
Good advice about the planking. thanks
 
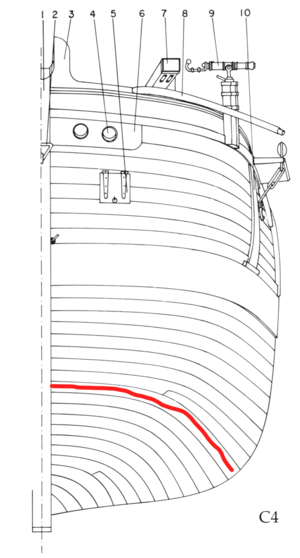
Had some challenging comments on another forum regarding my planking and failure to taper all my planks. I was planning to follow the Marquardt drawing (attached) without thought of whether it was achievable or not. So to check if it was actually achievable I test bent a plank to see if the compound curves below the waterline were possible.
With a little bit of surprise I found the planks supplied in the kit were quite forgiving. The plank I bent is marked on the Marquardt drawing.
I have also added a screenshot of what Artesania instructs to do for the planking....

IMG_0234.jpg

Screen Shot 2022-02-23 at 11.00.22 am.png

Screen Shot 2022-02-23 at 10.53.59 am.png
 
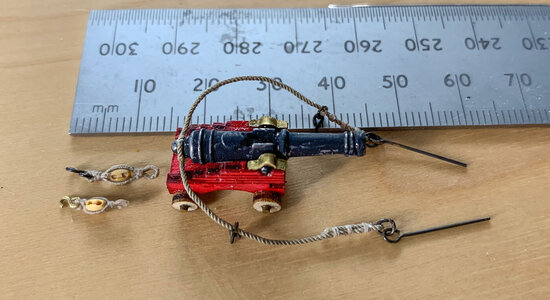
Planking is progressing with 10 rows to go. In between I have spent many hours experimenting with serving rope and stropping blocks for my 6 cannons. I have gone from 0.5mm to 0.15mm to Guttermann thread on thread to find a size that looks scale against the 3mm blocks.
One issue I am finding with serving is that the serving is not tight ly bound enough and once a section of served rope is removed from the 'machine" I have to push the serving tighter. More serving practice is needed.
I think I have settled on the Guttermann thread on thread as scale size as shown in the two single blocks in the image. The wire for the hooks rings and ringbolts is 0.5mm. I might have to remake these using 0.3mm wire.
The primary reinforcement is 0.6mm Rope of Scale seized with 0.15mm Amarti thread
Next is stropping the double blocks before laying the rope tackle of 0.25mm Ropes of Scale.

IMG_0254.jpg
 
Planking is progressing with 10 rows to go. In between I have spent many hours experimenting with serving rope and stropping blocks for my 6 cannons. I have gone from 0.5mm to 0.15mm to Guttermann thread on thread to find a size that looks scale against the 3mm blocks.
One issue I am finding with serving is that the serving is not tight ly bound enough and once a section of served rope is removed from the 'machine" I have to push the serving tighter. More serving practice is needed.
I think I have settled on the Guttermann thread on thread as scale size as shown in the two single blocks in the image. The wire for the hooks rings and ringbolts is 0.5mm. I might have to remake these using 0.3mm wire.
The primary reinforcement is 0.6mm Rope of Scale seized with 0.15mm Amarti thread
Next is stropping the double blocks before laying the rope tackle of 0.25mm Ropes of Scale.

View attachment 296061
Good morning Peter. Planking is so variable in choice. Follow the kit, taper based on general lining principles or line off and taper per the historical ship itself (and in that choice there are so many hotly debated thoughts). AND then there is builders choice which is what I strongly believe in. Your planking looks good and to bend and twist a plank as is your choice is quite a feat. Well done. I love your cannon. Personally I would stain the hinges black as well. On my ship I did not and in hindsight an sorry I did not. Cheers Grant
 
Good morning Peter. Planking is so variable in choice. Follow the kit, taper based on general lining principles or line off and taper per the historical ship itself (and in that choice there are so many hotly debated thoughts). AND then there is builders choice which is what I strongly believe in. Your planking looks good and to bend and twist a plank as is your choice is quite a feat. Well done. I love your cannon. Personally I would stain the hinges black as well. On my ship I did not and in hindsight an sorry I did not. Cheers Grant
Thanks for the feedback Grant. This Cannon is far from finished. I will be getting rid of the kit defined red finish (its what they did on the replica)and staining the base and wheels brown and go back over the cannon in black and do the hinges then. I still have to blacken the hooks etc but I will do that once I have settled on the wire size.
While prototype planking is perhaps contentious, I have decided to follow one author for the planking so it removes any ambiguity or confusion for me. I must admit its becoming a struggle as I move down toward the keel and the bends and twists progress and that why its taking at two days per row of planks. I have remanded my progress and found that I have had to glue in some backing pieces as the planks become a little thin. I am at the stage of having my first stealers in the stern and dropped planks in the bow per Marquardts drawings.
 
Back
Top