
deck planking very good too,Hello Everyone, Thanks again for the interest you are showing and for your kind comments and likes, it keeps me going through the more frustrating parts of the build and there are many to come, all however eventually resolved.
Today I’ll go through the deck planking and fitting, but first a bit of a rant at Euromodel.
The plans that come with this kit look extensive and they are to a point but cause much confusion. What I hadn’t noticed prior to this stage was that the plans show two versions of the same ship, one supposedly after an extensive refit, the other prior to it. The sides above the gun ports on the model are at least an inch higher on the earlier one and are of a very different design, the later one has flush decks and different fittings, the canons and layout are different as are the stern and galleries. Because I hadn’t studied the plans closely until I reached this point I thought that the difference was only showing the hammock netting in place. I’m sure that the plans tell me this but I don’t read Italian! It was however somewhat of a relief to now understand the plans more clearly. BUT, the bulwarks provided were for the later version and didn’t go anywhere near high enough, it would have been difficult at this stage to extend the side supports, the deck ply was also for the newer version. The gallery castings and canons were for the early version so you are really obliged to build that version. I have managed to eventually modify and make up the side walls successfully, in fact I enjoyed doing them once that I’d got my mind around how, I got a lot of satisfaction doing it but why would Euromodel give you parts that aren’t compatible with each other, didn’t they have someone proof build their kit.
I decided to plank the deck prior to fitting, I haven’t done this before, I always plank after the deck has been fitted but as this bit was designed to be a flush deck and sit on top of the bulkheads edges I thought that it would be easier. The first picture shows the plywood deck not quite fitting. I cut the front part off and made up a new one, I’ll fit them separately; the front wall will hide any join. I’ll be using my selection of good planks so no excuses for poor fitting and finish. The same prep as before and again a three butt change. I’ve shown the sequence so I think that no explanation is needed. I used a .6mm drill for the tree nails and again rubbed coloured filler in, I used a drill this time instead of punching a hole so that it would be neater. One of the pictures shows the filler to be quite dark, this is because I photographed before it had dried, it later looked much more subtle. I sanded and sealed ready for varnishing later, I then nailed it onto the deck, it looks as good as I’d hoped that it would. Next will be raising the unsupported sides, see you then.
View attachment 216272
View attachment 216273
View attachment 216274
View attachment 216275
View attachment 216276
View attachment 216278
View attachment 216279
View attachment 216280
View attachment 216281

You are using an out of date browser. It may not display this or other websites correctly.
You should upgrade or use an alternative browser.
You should upgrade or use an alternative browser.
HMS Ajax 38 gun frigate. Euromodel [COMPLETED BUILD]
- Thread starter Ken
- Start date
- Watchers 36
-
- Tags
- ajax completed build euromodel
The Ship now looks VERY good. I like the decks without toowell done MATE
Hello Everyone. Once again thanks for your likes and comments. There’s plenty to show today as I’m still trying to catch up. First I made up and attached the knees at the bow, the plan didn’t show any shape for these only a side view, I ended up making a template that I got to shape then marked out and cut the four knees needed and fitted them. This next area was always going to be the most difficult part of the build for me, the head rails. I have never had to make them up from scratch before and I had no idea where to start, the plan was little help as it was done like a drawing, shaded in so that you couldn’t see them properly and with the sharp curve of the bow the side view on the plan gave no idea of the sizes or shapes required, this would have to be made up freehand just by eye. First I tried to make up the inner rails that they fix on to but not knowing their sizes or shapes this was a fruitless exercise and wasted hours in the attempt so I decided to made up the rails first then I would add the inner rails later. I tried to bend the wood strips into shape having soaked them overnight, the curve needed was quite severe and several broke but I eventually managed to get four sort of ok and glued them into place. I was so stressed out that I’d accepted after several hours work that this was the best that I could do so I settled for the result. On looking at them the next day my heart sank I realised that no way could I accept the result, so I ripped them out and started again. I hit on the idea not to bend them but cut them to shape. I made up templates from thin card and found that I could trim them bit at a time and get an exact shape for each rail. I glued wood together to get enough of a size to fit the template, I then cut them to shape and with a little sanding each rail came out perfect without having to twist or bend to fit and they were done in no time at all. I added the inner rail using thin strip rather than heavier wood so that it bent to the shape of the rails. It turned out better than I ever thought it would, I felt like I’d got out of jail free. The photos show my template method. You’ll also notice other work done, the catheads, side strakes and doublers for the anchor area and hawse holes. I feel as If I'm now really making progress having passed what I thought would be a nightmare for me.
View attachment 218275
View attachment 218276
View attachment 218278
View attachment 218279
View attachment 218280
View attachment 218281
View attachment 218282
much chalking. The BOW part -although


 one of the more difficult parts look Super
A little late Birthday from hereYou are building with lightning speed, Ken! Fantastic work!


Sorry Ken for these late comments from me about your ship, which is in fact well build, but I just found your build log at noon todayA little late Birthday from here
- Joined
- Dec 16, 2016
- Messages
- 996
- Points
- 453

Hi Peaelcapi, I think that there are times when they're an advantage but what I said was that if the shape of the hull is friendly they aren't absolutely necessary and you can often get away without using them. The plans for Ajax showed them included as its stern had a quite severe curve.Only one comment Ken. As far I remember, you mentioned here, that you never use bow and Sternfellers. where I recommended this to a builder., but at least on this Ajax I see both types


Lets
us Not make a big story about that. Anyways the last 15 of my build, I used alwas, as special on the bow, -apart from the curve, as much bigger Glue space area for the PlanksHi Peaelcapi, I think that there are times when they're an advantage but what I said was that if the shape of the hull is friendly they aren't absolutely necessary and you can often get away without using them. The plans for Ajax showed them included as its stern had a quite severe curve.
- Joined
- Dec 16, 2016
- Messages
- 996
- Points
- 453
Hello Everyone. Again thanks for your encouragement.
I’m afraid today is another bit of a moan about the kit. There are decorations the whole length of the hull, most companies supply photo etch or cast for these, the best ones offer carved wood but not Euromodel. I’ve shown a picture of what they give you, it is a strip of wood with a rough surface and a sort of mock decoration impressed into it, it is about .3mm thick and has a peel off adhesive backing which you are supposed to attach it with. The wood is dyed with a washed out blue colour. No self respecting modeller would use this; it would ruin the look of the model. I have tried to cut out the pattern within the strip but it is just too fragile, the model will look better without it. I looked on the Euromodel site to see their displayed model and yes they have used it, see picture. This part is for the bin.
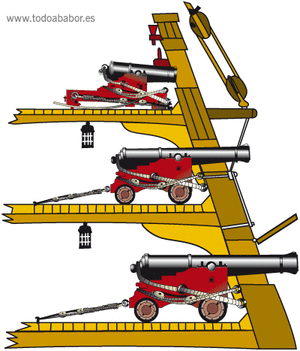
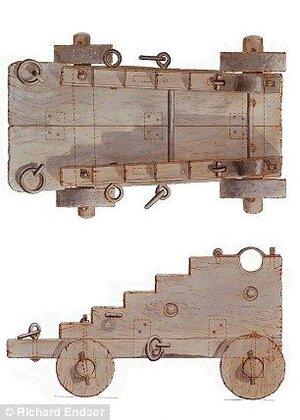
My second issue about quality are the canon carriages. I hate doing canons so when I saw pre made carriages in the kit I was quite pleased but when I looked closely I realised that they couldn’t be used as they were. They were the wrong size, the wrong shape, they were machined very poorly with chunks out, the stepped parts were inconsistent and the sides were different thicknesses, very poor indeed, and obviously another stock item.
Although I am enjoying building Ajax a lot, I am now realizing that although it is a premium priced kit it is far from premium quality in fact it is quite poor and I'm now sure that their kits come out very nicely only due to the builder’s experience and the time and efforts that they are prepared to go to. Brian hinted at this earlier in my log when he said he dumped most of the fittings and bought in better quality ones, I intend to plod on with much of what I have and hope for a decent result.


I’m afraid today is another bit of a moan about the kit. There are decorations the whole length of the hull, most companies supply photo etch or cast for these, the best ones offer carved wood but not Euromodel. I’ve shown a picture of what they give you, it is a strip of wood with a rough surface and a sort of mock decoration impressed into it, it is about .3mm thick and has a peel off adhesive backing which you are supposed to attach it with. The wood is dyed with a washed out blue colour. No self respecting modeller would use this; it would ruin the look of the model. I have tried to cut out the pattern within the strip but it is just too fragile, the model will look better without it. I looked on the Euromodel site to see their displayed model and yes they have used it, see picture. This part is for the bin.
My second issue about quality are the canon carriages. I hate doing canons so when I saw pre made carriages in the kit I was quite pleased but when I looked closely I realised that they couldn’t be used as they were. They were the wrong size, the wrong shape, they were machined very poorly with chunks out, the stepped parts were inconsistent and the sides were different thicknesses, very poor indeed, and obviously another stock item.
Although I am enjoying building Ajax a lot, I am now realizing that although it is a premium priced kit it is far from premium quality in fact it is quite poor and I'm now sure that their kits come out very nicely only due to the builder’s experience and the time and efforts that they are prepared to go to. Brian hinted at this earlier in my log when he said he dumped most of the fittings and bought in better quality ones, I intend to plod on with much of what I have and hope for a decent result.
I can't give a like, sorry, those carriages and decorations are total garbage. That is a real shame, how could they let something like that go into a supposed high quality kit?
FULLY AGREE-Hello Everyone. Again thanks for your encouragement.
I’m afraid today is another bit of a moan about the kit. There are decorations the whole length of the hull, most companies supply photo etch or cast for these, the best ones offer carved wood but not Euromodel. I’ve shown a picture of what they give you, it is a strip of wood with a rough surface and a sort of mock decoration impressed into it, it is about .3mm thick and has a peel off adhesive backing which you are supposed to attach it with. The wood is dyed with a washed out blue colour. No self respecting modeller would use this; it would ruin the look of the model. I have tried to cut out the pattern within the strip but it is just too fragile, the model will look better without it. I looked on the Euromodel site to see their displayed model and yes they have used it, see picture. This part is for the bin.
My second issue about quality are the canon carriages. I hate doing canons so when I saw pre made carriages in the kit I was quite pleased but when I looked closely I realised that they couldn’t be used as they were. They were the wrong size, the wrong shape, they were machined very poorly with chunks out, the stepped parts were inconsistent and the sides were different thicknesses, very poor indeed, and obviously another stock item.
Although I am enjoying building Ajax a lot, I am now realizing that although it is a premium priced kit it is far from premium quality in fact it is quite poor and I'm now sure that their kits come out very nicely only due to the builder’s experience and the time and efforts that they are prepared to go to. Brian hinted at this earlier in my log when he said he dumped most of the fittings and bought in better quality ones, I intend to plod on with much of what I have and hope for a decent result.
View attachment 222710
View attachment 222717
View attachment 222718
View attachment 222719
By the way "Artesanis Home Pages" does not work any more. You are automatically transferred to Hole Seller.
- Joined
- Jan 1, 2018
- Messages
- 51
- Points
- 68

Sorry guys. I am not going to follow the leader as I feel that some balance is needed in this discussion. The administrators will think I have over-stepped the mark. With respect to Euromodel, I believe the intention has always been to supply basic carriages that could be modified and as such supply so much more meaning to the word 'construction'. I was able to taper the body of each one, slightly alter their lengths, unify any differences in thickness, angle the cheeks at the front, add trunnion straps, place a quoin under the rear end of the barrel, add gun tackle at the rear, recoil tackle towards the front and so on ... and so on. Even the supplied trucks needed their central openings slightly enlarged. We are not talking about additional cost but additional time and also ingenuity. Ken is quite correct when he refers to the skill of the builder being very important. You have to do what I have done with these carriages in a more recent kit to appreciate the huge satisfaction that their construction gives. The timber carriages being used in this kit are in a kit produced approx. 32 years ago and some natural deterioration will have occurred. The machined carriages that I worked with had no such 'chunks' out of them.
Having said all of that, I must commend Ken on the superb model that he is producing and I admire his intention of working only with what is supplied in the kit.
Having said all of that, I must commend Ken on the superb model that he is producing and I admire his intention of working only with what is supplied in the kit.
Generally, in my last year of a builder, I made my own Gun Carrigw, mainly for 2 reasons. 1_ there is generally a mix up of the Oriental versus the Ingles ones. There is some difference here. 2: As I inserted all decks with total open Gunports there were some differences in the size of the lower port up to the upper ones- different gun calibre..3 and oriental, 2and 4 inglesSorry guys. I am not going to follow the leader as I feel that some balance is needed in this discussion. The administrators will think I have over-stepped the mark. With respect to Euromodel, I believe the intention has always been to supply basic carriages that could be modified and as such supply so much more meaning to the word 'construction'. I was able to taper the body of each one, slightly alter their lengths, unify any differences in thickness, angle the cheeks at the front, add trunnion straps, place a quoin under the rear end of the barrel, add gun tackle at the rear, recoil tackle towards the front and so on ... and so on. Even the supplied trucks needed their central openings slightly enlarged. We are not talking about additional cost but additional time and also ingenuity. Ken is quite correct when he refers to the skill of the builder being very important. You have to do what I have done with these carriages in a more recent kit to appreciate the huge satisfaction that their construction gives. The timber carriages being used in this kit are in a kit produced approx. 32 years ago and some natural deterioration will have occurred. The machined carriages that I worked with had no such 'chunks' out of them.
Having said all of that, I must commend Ken on the superb model that he is producing and I admire his intention of working only with what is supplied in the kit.
Attachments
- Joined
- Dec 16, 2016
- Messages
- 996
- Points
- 453
Hi Pete, That’s a very good argument that you’ve put forward for making one of their kits and as I said it’s the builder that makes the difference. To date my favourite build and still the one that I’m most in love with is the Royal William, it’s awesome. Although I am enjoying this build my point was that their high price is not reflected in what you actually get in the kit. You only have to compare what else is now on the market at a similar price point, here in the UK with tax and delivery kits such as Vanguard I think are cheaper than Ajax, a small frigate, and Agamemnon a large and very complete kit only slightly more, and I’m sure you know what a good builder can make of them.Sorry guys. I am not going to follow the leader as I feel that some balance is needed in this discussion. The administrators will think I have over-stepped the mark. With respect to Euromodel, I believe the intention has always been to supply basic carriages that could be modified and as such supply so much more meaning to the word 'construction'. I was able to taper the body of each one, slightly alter their lengths, unify any differences in thickness, angle the cheeks at the front, add trunnion straps, place a quoin under the rear end of the barrel, add gun tackle at the rear, recoil tackle towards the front and so on ... and so on. Even the supplied trucks needed their central openings slightly enlarged. We are not talking about additional cost but additional time and also ingenuity. Ken is quite correct when he refers to the skill of the builder being very important. You have to do what I have done with these carriages in a more recent kit to appreciate the huge satisfaction that their construction gives. The timber carriages being used in this kit are in a kit produced approx. 32 years ago and some natural deterioration will have occurred. The machined carriages that I worked with had no such 'chunks' out of them.
Having said all of that, I must commend Ken on the superb model that he is producing and I admire his intention of working only with what is supplied in the kit.
Thanks for your compliment and yes I’m sure that I’ll continue to enjoy the build, mostly with what’s provided, today it’s those canon. Pete your right to post your opinions here, they are welcome and unlike some other forums, providing you aren’t disrespectful the moderators welcome discussion rather than repress it.
Last edited:
- Joined
- Jan 1, 2018
- Messages
- 51
- Points
- 68
Ken,
Going back a bit but how did you wrap those wales around the bow ?
Going back a bit but how did you wrap those wales around the bow ?
Last edited:
- Joined
- Dec 16, 2016
- Messages
- 996
- Points
- 453
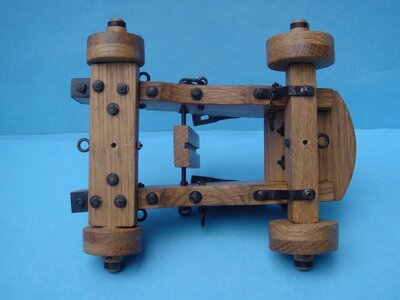
Hello Everyone. Again some progress. The first picture shows the flagstaff, nothing special. Now the canons, first I’ll say that the condition of the carriages is not due to age but poor production. They are machined from a plain white wood and the surface is stained to look like walnut so any chips or splinters that happened after leaving the factory would have left the white wood showing in those areas, cutting into the wood I found that it was still in very good condition. Earlier I had made cradles for the canons that wouldn’t be seen, so I had spare carriages, I only needed twelve so chose the better ones to use. I cut them in half along the centre, sanded them to a taper then glued them back together. I then filed them to the correct length/shape and cleaned up the top and stepped areas as best as I could, I sealed, sanded and painted them. The barrels are very nice, they are from machined steel with a good, and convincing looking patina. There were no hasps for the securing of barrel pintle, these were easily made up but it is the first time that I haven’t had these supplied with a kit. These canons will not be very visible when fitted as they are sighted under the walkway, but I still wanted them to be half decent. There were two sizes of wheels supplied, I naturally thought that the larger were for the front and the smaller were for the rear so that’s how I fitted them. I ended up with a pair of the small wheels short, I realised that these should have been used on the smaller carriages on the upper deck and that the wheels supplied were not of different sizes front and rear but the same all round. I wouldn’t be able to get at the canons at all once in place so I rigged them before fitting, as the front half would never be seen I didn’t do any inhauls ropes, I couldn’t have attached them to the sides anyway, I’m reasonably happy with the result.


Last edited:
Nice rework Ken. The barrels do look very good.
- Joined
- Dec 16, 2016
- Messages
- 996
- Points
- 453
Hello Everyone. Thanks again for your likes on my post. Don, I’m getting use to issues that this build is throwing at me and sorting them out gives me some satisfaction, it must be some sort of masochistic tendencies.
In my last post I said I’d show you the flagstaff, but I forgot to attach the pics, so here it is.
All the gun deck canons are now mounted and rigged, so Ajax has now got teeth. To make up my rope coils I use clear double sided tape, it’s easy to coil on as the sticky holds it in place. After I’ve done enough I cut them out, peel off the backing and just stick them in place, it’s a fairly quick and effective method.
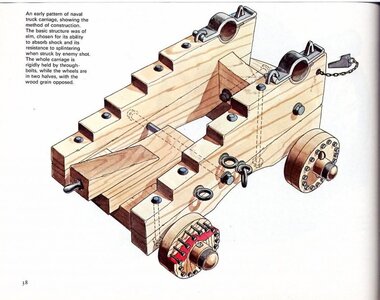
I’m admitting defeat and I’m replacing the gun carriages for the upper deck. The kit ones are the same construction as the previous ones but just smaller, they are in much better condition than the others were so I could use them but as they will be on full view I would like them to look correct. The kit ones have straight carriages which look wrong but unlike the others which needed the front narrowing these need the rear widening instead which would require much more work and even then the finish wouldn’t be crisp, the finished wood will show as I’m not going to paint them. I’ve
shown pics of the kit ones against their replacements, I think that there’s an improvement.


In my last post I said I’d show you the flagstaff, but I forgot to attach the pics, so here it is.
All the gun deck canons are now mounted and rigged, so Ajax has now got teeth. To make up my rope coils I use clear double sided tape, it’s easy to coil on as the sticky holds it in place. After I’ve done enough I cut them out, peel off the backing and just stick them in place, it’s a fairly quick and effective method.
I’m admitting defeat and I’m replacing the gun carriages for the upper deck. The kit ones are the same construction as the previous ones but just smaller, they are in much better condition than the others were so I could use them but as they will be on full view I would like them to look correct. The kit ones have straight carriages which look wrong but unlike the others which needed the front narrowing these need the rear widening instead which would require much more work and even then the finish wouldn’t be crisp, the finished wood will show as I’m not going to paint them. I’ve
shown pics of the kit ones against their replacements, I think that there’s an improvement.
Last edited:

Am I correct in understanding that you just taped rope coils to the deck?


The rope coils look really good Ken.