Thank you, friend, for your high praise and such a good question. The deck will be removable until I glue the ledges, remove all excess glue, and sand everything on both sides. Then I'll oil the bottom surface of the deck, avoiding the sides, and the top surface, then glue it all into the ship's hull. Next, I'll prepare the vertical knees and coat the surface that will be inaccessible when they're fixed in place. Then I'll glue these knees into place, carefully aligning them with the main surface. But before that, I'll still make all the parts that will be on the hull while the deck is removable, so I can adjust everything both inside and outside the ship's hull. And after the final gluing, I'll oil everything on top. But before that, the railings and the outer skin will still need to be done. I hope the translator translates everything correctly.)))Very nice and careful work, Sergey. I appreciate the alignment of the carlings along the length of the ship. Well done, my friend!
Several times you have mentioned the 'removability' of this deck. Are you taking about during the construction phase? I assume you will be permanently installing everything when you add the hanging knees? Or will the knees be allowed to "hang free" because there is no interior planking thus truly making the deck removable?
-

Win a Free Custom Engraved Brass Coin!!!
As a way to introduce our brass coins to the community, we will raffle off a free coin during the month of August. Follow link ABOVE for instructions for entering.
-

PRE-ORDER SHIPS IN SCALE TODAY!
The beloved Ships in Scale Magazine is back and charting a new course for 2026!
Discover new skills, new techniques, and new inspirations in every issue.
NOTE THAT OUR FIRST ISSUE WILL BE JAN/FEB 2026
- Home
- Forums
- Ships of Scale Group Builds and Projects
- HMS Alert 1777 1:48 PoF Group Build
- HMS Alert 1777 1:48 Group Build Logs
You are using an out of date browser. It may not display this or other websites correctly.
You should upgrade or use an alternative browser.
You should upgrade or use an alternative browser.
HMS Alert [1777] 1:48 POF by serikoff. (Two hulls: skeleton and fully rigged)
Excellent. Thank you for taking the time to answer my question. This seems like a good plan.Thank you, friend, for your high praise and such a good question. The deck will be removable until I glue the ledges, remove all excess glue, and sand everything on both sides. Then I'll oil the bottom surface of the deck, avoiding the sides, and the top surface, then glue it all into the ship's hull. Next, I'll prepare the vertical knees and coat the surface that will be inaccessible when they're fixed in place. Then I'll glue these knees into place, carefully aligning them with the main surface. But before that, I'll still make all the parts that will be on the hull while the deck is removable, so I can adjust everything both inside and outside the ship's hull. And after the final gluing, I'll oil everything on top. But before that, the railings and the outer skin will still need to be done. I hope the translator translates everything correctly.)))
I hope you don't mind if I share some additional thoughts... Getting the hanging knees to perfectly align with the deck surface (and still relate well to the side of the ship) would appear to be the biggest challenge you will face. The knees will be difficult to handle at that stage because there will be very little to hold on to while positioning them. On the Kingfisher I installed the hanging knees before the deck was permanently affixed so I could more easily position them and still sand the deck surface smooth outside of the model. This created the additional challenge of installing my now completed deck. Disclosure: I ended up sectioning the deck into several pieces, installed the hanging knees, sanded everything, and then inserted/installed the deck in stages like a puzzle. I do not endorse my approach but recognize the challenge inherent in yours.
Perfection is a cruel taskmaster.
I will now crawl back under my rock and cheer you on!
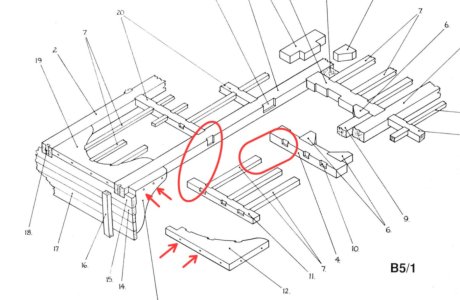
Thanks for the tips. Yes, it's not that simple, but I've drawn up a plan and will show it in detail. I hope everything works out great. And for those who don't know what we're talking about, here's the diagram. It's about vertical knees.Excellent. Thank you for taking the time to answer my question. This seems like a good plan.
I hope you don't mind if I share some additional thoughts... Getting the hanging knees to perfectly align with the deck surface (and still relate well to the side of the ship) would appear to be the biggest challenge you will face. The knees will be difficult to handle at that stage because there will be very little to hold on to while positioning them. On the Kingfisher I installed the hanging knees before the deck was permanently affixed so I could more easily position them and still sand the deck surface smooth outside of the model. This created the additional challenge of installing my now completed deck. Disclosure: I ended up sectioning the deck into several pieces, installed the hanging knees, sanded everything, and then inserted/installed the deck in stages like a puzzle. I do not endorse my approach but recognize the challenge inherent in yours.
Perfection is a cruel taskmaster.
I will now crawl back under my rock and cheer you on!
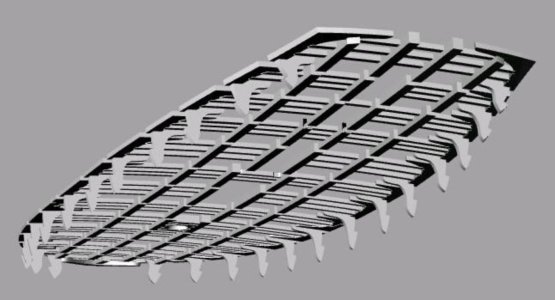
I also considered making it collapsible, but abandoned the idea early on to avoid breakage and potential errors. However, under different circumstances, it's a very good option.
Some thoughts... to better visualize what I want to ask (for those who haven't yet looked at the post with photos of the finished deck, look at the repost below) what do you think will look better.
I have three options for securing the partitions:
1. Install everything as it should be. (The downside is that the lower deck won't be visible due to all the parts.)
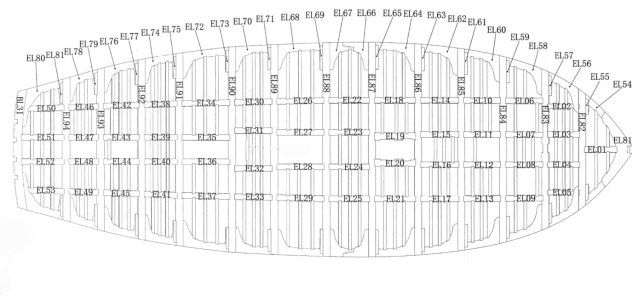
2. Install only the two left and middle sections, and leave the two right bays unattached. The upside is that the lower deck will be more visible, but the downside is that the partitions aren't quite properly secured in the knees. There are no stops, and the grooves are through.
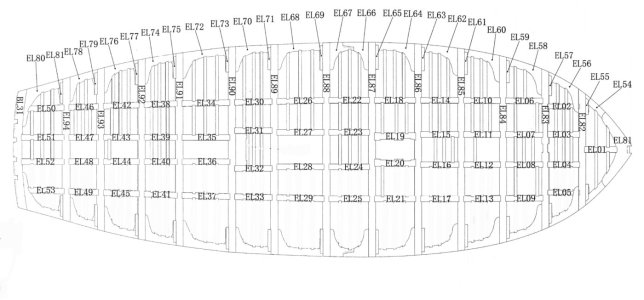
3. Install the side bays (right and left) and the middle bay, and leave the two middle bays unattached. The upside is that the lower deck will be more visible, but not as much as with the second option, but the upside is that the grooves for the partitions in the carlings are properly made than in the knees.
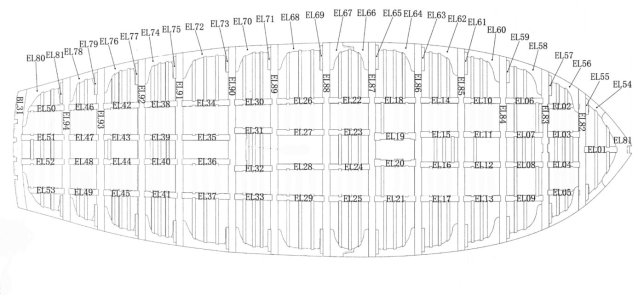
So I'm wondering... which is better? What are your options?
I have three options for securing the partitions:
1. Install everything as it should be. (The downside is that the lower deck won't be visible due to all the parts.)

2. Install only the two left and middle sections, and leave the two right bays unattached. The upside is that the lower deck will be more visible, but the downside is that the partitions aren't quite properly secured in the knees. There are no stops, and the grooves are through.

3. Install the side bays (right and left) and the middle bay, and leave the two middle bays unattached. The upside is that the lower deck will be more visible, but not as much as with the second option, but the upside is that the grooves for the partitions in the carlings are properly made than in the knees.

So I'm wondering... which is better? What are your options?
I'm slightly favoring #2. And if you want to be an overachiever place a floor in the notches (I wouldn't bother, but...). Option 2 gives you the best view of the hanging knees and a more coherent centerline.
You probably know my preference for half builds or half models, Sergey.Some thoughts... to better visualize what I want to ask (for those who haven't yet looked at the post with photos of the finished deck, look at the repost below) what do you think will look better.
I have three options for securing the partitions:
1. Install everything as it should be. (The downside is that the lower deck won't be visible due to all the parts.)
View attachment 553541
2. Install only the two left and middle sections, and leave the two right bays unattached. The upside is that the lower deck will be more visible, but the downside is that the partitions aren't quite properly secured in the knees. There are no stops, and the grooves are through.
View attachment 553542
3. Install the side bays (right and left) and the middle bay, and leave the two middle bays unattached. The upside is that the lower deck will be more visible, but not as much as with the second option, but the upside is that the grooves for the partitions in the carlings are properly made than in the knees.
View attachment 553543
So I'm wondering... which is better? What are your options?
Regards, Peter
- Joined
- Jul 27, 2021
- Messages
- 444
- Points
- 323

Even the lower deck won't be visible due to all the parts I might install everything as it should be. Just because in my experience people who don't know anything about these ships won't understand that parts are "removed" by intention to show lower hull ...
Love that build btw
Dirk
Love that build btw
Dirk
- Joined
- Jul 11, 2023
- Messages
- 390
- Points
- 238

@serikoff, I have been thinking about the same issue myself: how to display lower deck without changing the overall integrity of the build. I DID NOT try the following myself, so this is just a suggestion - an alternative to 1, 2 or 3.
Transparent plexiglass/acrylic bars: I'm wondering if we could find a close match in term of size. Food for thought.
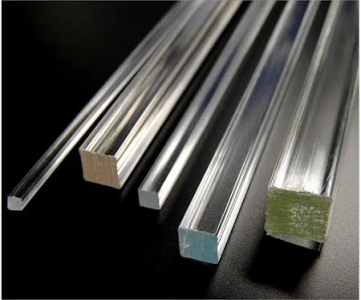
Transparent plexiglass/acrylic bars: I'm wondering if we could find a close match in term of size. Food for thought.

Last edited:
Friends, thank you to everyone who took part in the survey. Your opinions are important to me, and please don't be offended if I don't follow someone's advice.
So, in order:
Option 1 (install all the details).
Option 3 (install everything except the intermediate spans).
Option 2 (install everything except the two side bays on one side).
As you might have guessed, option 2 was the favorite...

In short, for now I'm planning to close three of the five bays, leaving the two side bays on the right open and see how it looks. Then I'll solve the grooves in the side knees, and if everything looks great, then so be it.
Thanks everyone!
So, in order:
Option 1 (install all the details).
I originally wanted it that way, but I realized that the lower deck wouldn't be visible at all through all the partitions. And since this model is meant to show the entire interior of the ship, it wouldn't make sense to cover up what took so long to build, but I agree—the finished design looks more impressive.Я за №1, зроби все як має бути
I'm for #1, do everything as it should be.
I understand your answer applies more to the first option, but with transparent parts... but in my opinion, it's not very applicable to an all-wood design. Plus, I'm afraid that in a small size, transparent parts would obscure the view just as much as wooden ones. But thanks for the interesting idea.@serikoff, I have been thinking about the same issue myself: how to display lower deck without changing the overall integrity of the build. I DID NOT try the following myself, so this is just a suggestion - an alternative to 1, 2 or 3.
Transparent plexiglass/acrylic bars: I'm wondering if we could find a close match in term of size. Food for thought.
If the translator translated it correctly, I understand that everything needs to be installed, since people who don't understand ships won't understand why some parts are missing. And I agree with that. I personally find it difficult to evaluate models that are missing a section of the deck or planking; I prefer fully planked models with masts and rigging, but! I'm building that model in parallel, but this model (the skeleton) will be used to show the entire structure of the ship, and therefore it's very important to see what's on the lower deck as well.Even the lower deck won't be visible due to all the parts I might install everything as it should be. Just because in my experience people who don't know anything about these ships won't understand that parts are "removed" by intention to show lower hull ...
Love that build btw
Dirk
Option 3 (install everything except the intermediate spans).
I completely agreed with you, but then I began to doubt that the symmetry could actually mislead the viewer, leading to the impression that it's just how it's supposed to be. Plus, because the side section is closed, there won't be much of a view anyway. And I'll try to solve the knee groove issue. But I was almost choosing this option...It sounds like option 3 has two upsides and only a minor downside. My vote is 3.
Option 2 (install everything except the two side bays on one side).
As you might have guessed, option 2 was the favorite...
I definitely expected you to write it that way. You've got a really good model! Or rather, two halves of the same model.You probably know my preference for half builds or half models, Sergey.Then I vote for option 2.
Regards, Peter
Thanks, friend, one of the reasons I chose this option was the greater visibility (including the vertical knees). I'll try to solve the problem with the grooves in the side knees, but it will be obvious that there won't be symmetry on the lower deck. Otherwise, the symmetry (option 3) could be misleading and it might seem like it's meant to be that way. But I doubt anyone could even imagine that half of the deck could be open. )))I'm slightly favoring #2. And if you want to be an overachiever place a floor in the notches (I wouldn't bother, but...). Option 2 gives you the best view of the hanging knees and a more coherent centerline.
In short, for now I'm planning to close three of the five bays, leaving the two side bays on the right open and see how it looks. Then I'll solve the grooves in the side knees, and if everything looks great, then so be it.
Thanks everyone!

The other day, I was once again tidying up the details. I need to understand what will be on the deck, what will be underneath, and all the necessary items to consider when attaching the Ledges.
But before that, I decided to sand the deck.
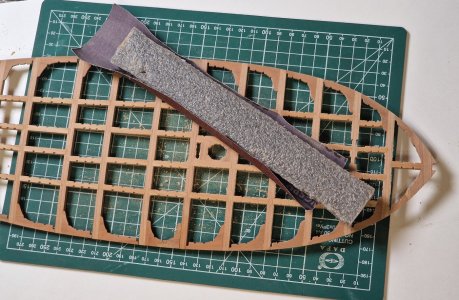
And almost ruined several days' work!!!

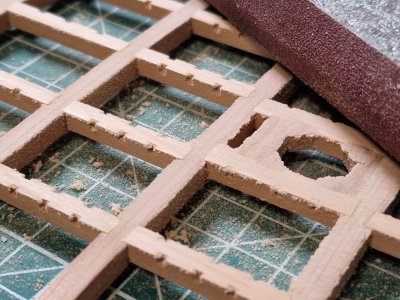
At first, I used a soft pad to smooth out the biggest bumps, but I overdid it and didn't see this in the dust:
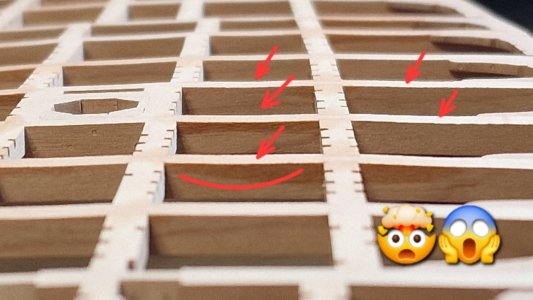
I accidentally mixed up the sandpaper (they were the same color) and created what initially seemed like an irreparable flaw... grooves in the beams between the dwarfs...
I had no idea what to do next and thought this was the end, so I barely slept...
...but before bed, I figured out a fix. I glued 240-grit sandpaper to a small piece of wood and slowly began to trace the curved profile along the beam...
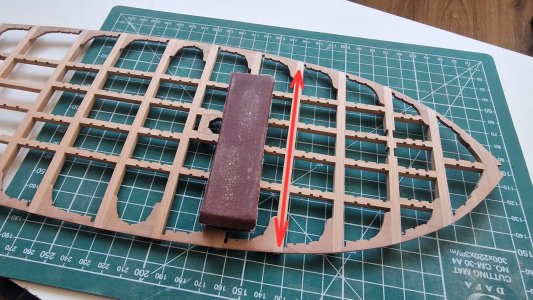
...and to my relief, everything worked out. 90% so far... I'll do a little finishing touches on the rest once I install the Ledges.
Here's the result:
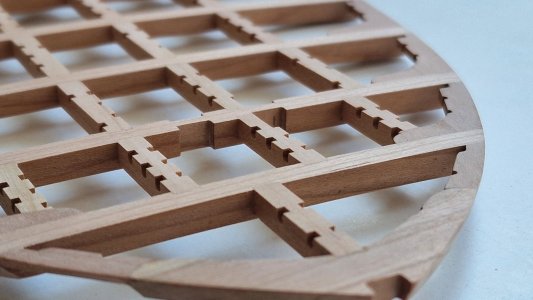
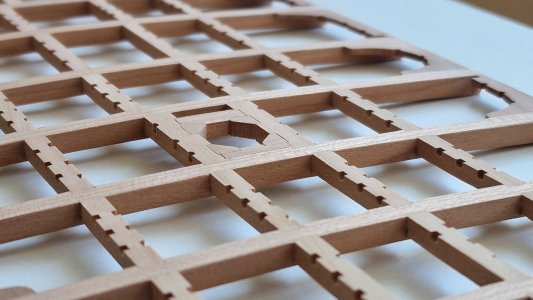
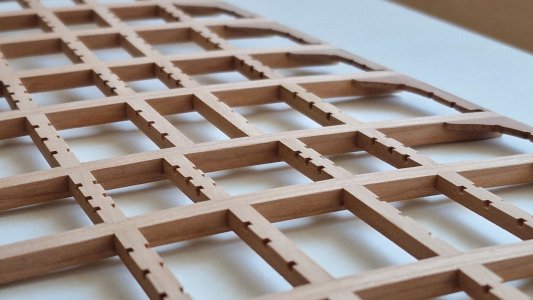
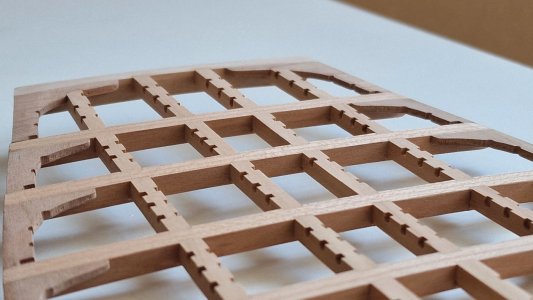
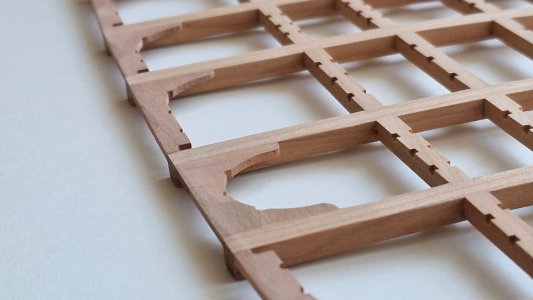
While fixing my mistake, I naturally ended up taking off a couple of tenths of a decimal place, but all the joints were completely smoothed out and the deck became as smooth as possible. But this experience taught me a lesson: you need to check everything carefully and keep a close eye on things so you don't miss your mistake in the dust! I advise you to do the same.
Ledges.
I once prepared the material for them because I really didn't like the wood from the kit, but I had to redo everything again.
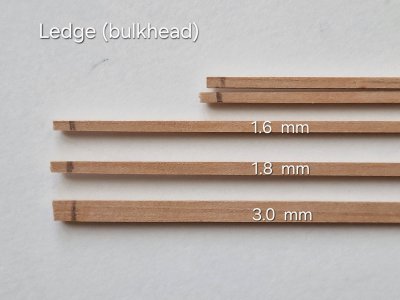
I carefully studied the anatomy and realized that the partitions weren't all the same size. I made them the same way. Most of the partitions were 1.6 mm thick. 1.8 mm thick in wide spans and stress zones, and more than 2.5 mm thick (I'd left a 3 mm buffer) in specific areas near gratings and other objects.
I'll make a diagram a little later.
Now a few words about the fixation. I glued them with PVA TiteBond II.
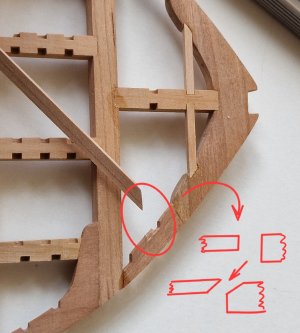
I glued them to the knees, making a bevel beforehand to provide support and to make it look from above that the connection was made authentically.
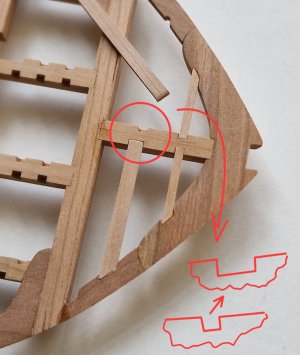
And in the carlings, where thicker partitions need to be secured, I widened the groove.
And as I already mentioned, it's important to constantly consider the anatomy of the placement of partitions of varying thicknesses and consider the practical elements on the deck, like the pawl bitt pin in this case.
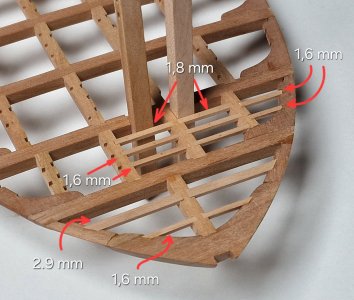
In the photo above, I've indicated the dimensions of the partitions, so you can see the variety in such a small space.
And here's the final result...
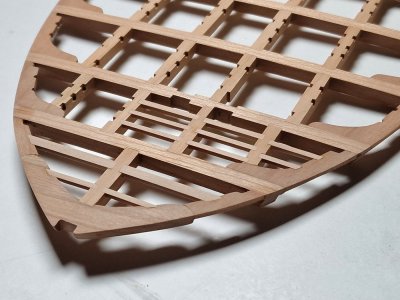
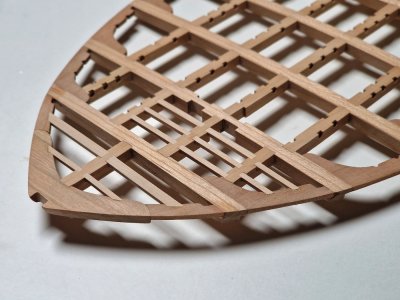
...and as you've already figured out, I'm leaning toward the second option with the bulkheads. In any case, I'll try the second option first and see how it looks and how the lower deck is visible. And if I'm satisfied with everything, I'll change the knee grooves on the opposite side, where there are no bulkheads, since they don't look right now and need to be made as authentic as possible. That's the goal for now...
But before that, I decided to sand the deck.

And almost ruined several days' work!!!

At first, I used a soft pad to smooth out the biggest bumps, but I overdid it and didn't see this in the dust:

I accidentally mixed up the sandpaper (they were the same color) and created what initially seemed like an irreparable flaw... grooves in the beams between the dwarfs...
I had no idea what to do next and thought this was the end, so I barely slept...
...but before bed, I figured out a fix. I glued 240-grit sandpaper to a small piece of wood and slowly began to trace the curved profile along the beam...

...and to my relief, everything worked out. 90% so far... I'll do a little finishing touches on the rest once I install the Ledges.
Here's the result:


While fixing my mistake, I naturally ended up taking off a couple of tenths of a decimal place, but all the joints were completely smoothed out and the deck became as smooth as possible. But this experience taught me a lesson: you need to check everything carefully and keep a close eye on things so you don't miss your mistake in the dust! I advise you to do the same.
Ledges.
I once prepared the material for them because I really didn't like the wood from the kit, but I had to redo everything again.

I carefully studied the anatomy and realized that the partitions weren't all the same size. I made them the same way. Most of the partitions were 1.6 mm thick. 1.8 mm thick in wide spans and stress zones, and more than 2.5 mm thick (I'd left a 3 mm buffer) in specific areas near gratings and other objects.
I'll make a diagram a little later.
Now a few words about the fixation. I glued them with PVA TiteBond II.

I glued them to the knees, making a bevel beforehand to provide support and to make it look from above that the connection was made authentically.

And in the carlings, where thicker partitions need to be secured, I widened the groove.
And as I already mentioned, it's important to constantly consider the anatomy of the placement of partitions of varying thicknesses and consider the practical elements on the deck, like the pawl bitt pin in this case.

In the photo above, I've indicated the dimensions of the partitions, so you can see the variety in such a small space.
And here's the final result...


...and as you've already figured out, I'm leaning toward the second option with the bulkheads. In any case, I'll try the second option first and see how it looks and how the lower deck is visible. And if I'm satisfied with everything, I'll change the knee grooves on the opposite side, where there are no bulkheads, since they don't look right now and need to be made as authentic as possible. That's the goal for now...
These details take some time to get right - and most people won't notice the difference - but the personal satisfaction in getting things as close as you can to being correct is enormously satisfying. Plus, you have once again impressed your followers.
You know, I decided not to vote in your option survey. I decided it is your model so you should build it the way you want to.
However, I want to add a 4th option that you maybe didn't consider.
Build it with all the details and since you are building 2, the one to show the details, cut it in half horizontally. Yes, I know it's already been done, but I think with the second build, you have the perfect opportunity to use that style of "cut away",
That's exactly what my wife said: that no one but me will see it and not notice, but! That's the main thing, because I see it and I don't like it, and that motivates me to do what needs to be done. So I completely agree with you! You need to do something that you like and don't feel ashamed of.These details take some time to get right - and most people won't notice the difference - but the personal satisfaction in getting things as close as you can to being correct is enormously satisfying. Plus, you have once again impressed your followers.

Believe it or not, I've thought about this many times. I considered cutting it both vertically and horizontally, as several modelers on this forum have done.You know, I decided not to vote in your option survey. I decided it is your model so you should build it the way you want to.
However, I want to add a 4th option that you maybe didn't consider.
Build it with all the details and since you are building 2, the one to show the details, cut it in half horizontally. Yes, I know it's already been done, but I think with the second build, you have the perfect opportunity to use that style of "cut away",

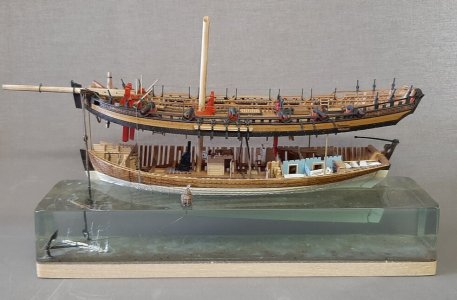
(but that's been done before and is hardly new). I even considered making a separate upper deck, raising it above the hull and mounting the deck parts on it, but I abandoned that option too. There's always a first vision of how things should be, and so far I'm becoming convinced of it... but we'll see what happens; maybe I'll change my mind, who knows?

Продовжуємо заповнювати пробіли... так сказати )))
(in my language, it's a funny pun, unfortunately untranslatable).
I'm continuing to fill in the gaps. (But the second meaning of the phrase is to fill the empty space between words where we put the space button)
Earlier, I showed the first two flights...
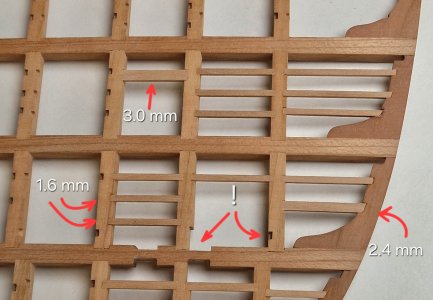
...now, in detail, what's in the third and fourth spans.
Almost everywhere, it's 1.6 mm, except for the reinforcement area, where there are only two crossbars; there, it's 2.4 m. This area (!) will be implemented after fitting the anchor mechanism. And where 3 mm is indicated, that's the edge of the lattice, and this width is needed so that part of the crossbar serves as a stop for the lattice and the other part serves to secure the boards next to it. I'll show this in detail later when installing all the parts on the deck.
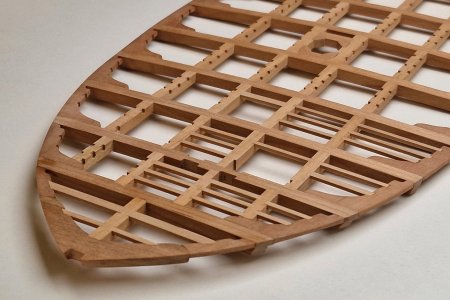
Next are the 5th and 6th spans.
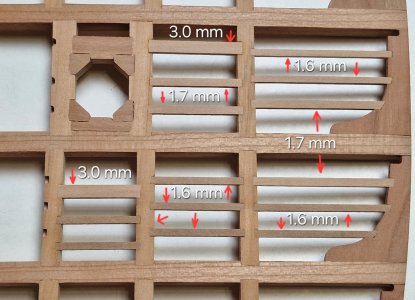
Here, a 3mm lintel is fixed near the chimney (for the same reasons) and near the winch. 1.8mm lintels are also fixed along the winch elbow. They are also fixed under the cannon, which is located above the beam marked 1.8mm. In other places, standard 1.6mm lintels are used.
The logic here is clear (not always visible in the anatomy, but judging by other anatomies and the overall logic) that in standard locations, 1.6mm lintels are used. In places where the distance between beams is greater, 1.8mm lintels are used. The same applies under the cannons, to reinforce the space beneath them. Where elements protrude from the deck, up to 3mm lintels are used to support and secure the boards next to these elements. I'll draw a full diagram later, after all the lintels are fixed.
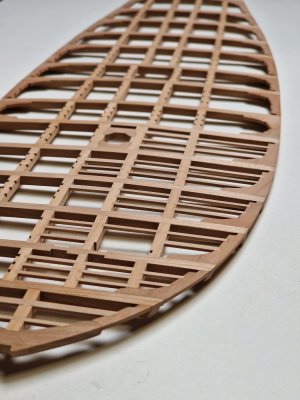
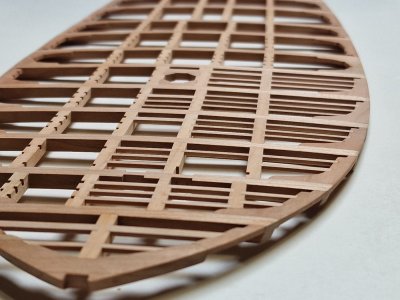
And a few words about my choice for the deck.
I forgot to clarify... my projects, as a rule, aren't based on anything standard... I'm building two hulls at the same time (I don't think anyone has done that before). I'm building the second hull on a plastic base (again, probably a first). And overall, I'm building the kit a bit differently from the instructions (anything is possible, improving it somehow). So, I want to make the deck a bit different too. ))) I've seen decks planked halfway, but I've never seen crossbars on just one side, and that's one of the reasons I want to do it this way. And it's not because I'm unique, no, no! Not at all. I just want to do something new, something interesting, because repetition doesn't generate that much interest, does it? And the second reason is the visual overview.
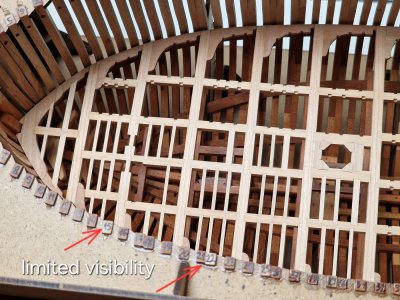
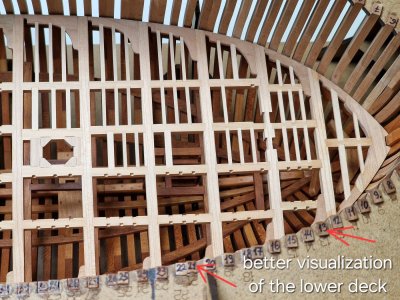
Even in this small fragment, it is clear that the lower deck is much more visible without the lintels, which makes me happy.
P.S. Just don't tell me that the difference between 1.6mm and 1.8mm is not visible, I've already noticed it myself...

Just kidding, if you look closely, you can see it.

(in my language, it's a funny pun, unfortunately untranslatable).
I'm continuing to fill in the gaps. (But the second meaning of the phrase is to fill the empty space between words where we put the space button)
Earlier, I showed the first two flights...

...now, in detail, what's in the third and fourth spans.
Almost everywhere, it's 1.6 mm, except for the reinforcement area, where there are only two crossbars; there, it's 2.4 m. This area (!) will be implemented after fitting the anchor mechanism. And where 3 mm is indicated, that's the edge of the lattice, and this width is needed so that part of the crossbar serves as a stop for the lattice and the other part serves to secure the boards next to it. I'll show this in detail later when installing all the parts on the deck.

Next are the 5th and 6th spans.

Here, a 3mm lintel is fixed near the chimney (for the same reasons) and near the winch. 1.8mm lintels are also fixed along the winch elbow. They are also fixed under the cannon, which is located above the beam marked 1.8mm. In other places, standard 1.6mm lintels are used.
The logic here is clear (not always visible in the anatomy, but judging by other anatomies and the overall logic) that in standard locations, 1.6mm lintels are used. In places where the distance between beams is greater, 1.8mm lintels are used. The same applies under the cannons, to reinforce the space beneath them. Where elements protrude from the deck, up to 3mm lintels are used to support and secure the boards next to these elements. I'll draw a full diagram later, after all the lintels are fixed.


And a few words about my choice for the deck.
I forgot to clarify... my projects, as a rule, aren't based on anything standard... I'm building two hulls at the same time (I don't think anyone has done that before). I'm building the second hull on a plastic base (again, probably a first). And overall, I'm building the kit a bit differently from the instructions (anything is possible, improving it somehow). So, I want to make the deck a bit different too. ))) I've seen decks planked halfway, but I've never seen crossbars on just one side, and that's one of the reasons I want to do it this way. And it's not because I'm unique, no, no! Not at all. I just want to do something new, something interesting, because repetition doesn't generate that much interest, does it? And the second reason is the visual overview.


Even in this small fragment, it is clear that the lower deck is much more visible without the lintels, which makes me happy.
P.S. Just don't tell me that the difference between 1.6mm and 1.8mm is not visible, I've already noticed it myself...


Just kidding, if you look closely, you can see it.

Last edited:
Thank you for the compliment. Good question. Yes, only the beams were secured to the ship's hull, and they were very securely fastened with elbows, both wooden and metal. But the deck planks and crossbeams were simply secured into grooves, and then the deck boards were nailed in place, joining everything into a single structure. Some deck planks near power components (mast, anchor gear, winch, etc.) could be reinforced with bolts or brackets.A stunning work of precision Sergey! In the full scale ships, did the carlings and lintels have any mechanical fastenings, or were they simply trapped in their mortises by the decking (which was obviously bolted to the beams)?
Kurt Konrath
Kurt Konrath
She is looking good, I can also review all of this when I get into my build down the road.


