• Win a Free Custom Engraved Brass Coin!!!
    As a way to introduce our brass coins to the community, we will raffle off a free coin during the month of August. Follow link ABOVE for instructions for entering.

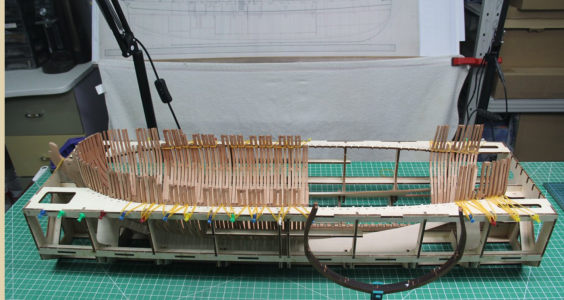
HMS ENTERPRISE 1774 by RichardJJS 1:48 scale. New Kit from M.D

can you post some pictures of your gun ports please I need to remove somestuff from the for part of the frame aft of the gun port
They are not wide enough
Its an azazing kit
Sorry, just saw this.
FWIW I think your issue might be ties to frame spacers you're using.
I have found my sp[acing required a few sizes to fit frame tops while in jig. Given this I have had zero frames altered for proper width, all checked from main plan sheet with inside calipers transferred to frames, virtually all of them have come out almost exact. Couple of them off maybe a few thousandths, evened up after planking by sanding.
Lastly, since my experience has been less than ideal as far as leaving planking short on the ports to allow lids to seal, I've planked right to the sill edges and will take some thin stock to lay in side , top/bottom in relief to give proper effect which looks nice and neat, especially when, likely, I will paint them red ocre.

Tim
 
Its ok Frame spacers are only being used tempoarily
I remove them now before cutting Gun POrts BUT ive not checked that the lids will Fit will look tomorrow
But normally I build the Lids with two parts Inner and Outer
Outer goes over the POrt Inner fits inside
Will again look at this tomorrow

THANKS
 
Sent to Victor

I think it might be worth makingan update to your instructions

Could you please mark the Top of the Jig on the ,main Full size plan it would make Marking and Cutting the Gun Ports and then top Frames much easier

Also we all seem to e dry fitting the all frames before Fixing them in

I believe it would be much easier to Mark and then cut the Ports before Gluing them into the Keel ie Remove the 3 Frames after Marking them.

Each batch of 3 Frames would then be easier to cut (With possibly a mini Jig on future Models)
Hi Richard.
If that lines is helpful with your workaround, it isn't very difficult to draw that line yourself:
-mark the top of the jig on a frame in the front and a frame in the aft of your model;
-lay both frames on the right (horizontal) position on the full size plan (top on top);
-set a mark on the plan beside the marks on both frames;
-draw a line through both marks.
Now you can measure up and down from that lines everything you needed.
Regards, Peter
i am asking the designer to mark it on the PLAN (Thanks )
It would be absolutely correct
Cany understand why its not on there it was on one of their other models
Ive obviously done it some time ago
 
Last edited:
This is what you wrote:
Could you please mark the Top of the Jig on the ,main Full size plan it would make Marking and Cutting the Gun Ports and then top Frames much easier
That's why I explained the little workaround.
And now it's:
i am asking the designer to mark it on the jig
So:.....to mark the top of the jig on the jig .........
I think Victor find this also a bit confusing too.:rolleyes:
But it's for me end of story and I won't bother you anymore.
Regards, Peter
 
This is what you wrote:

That's why I explained the little workaround.
And now it's:

So:.....to mark the top of the jig on the jig .........
I think Victor find this also a bit confusing too.:rolleyes:
But it's for me end of story and I won't bother you anymore.
Regards, Peter
"mark the Top of the Jig on the ,main Full size plan "
Its no Bother but i did not write mark the top of the jig on the jig
And i dont think Victor is around at present its a holiday in China
 
This is what you wrote:

That's why I explained the little workaround.
And now it's:

So:.....to mark the top of the jig on the jig .........
I think Victor find this also a bit confusing too.:rolleyes:
But it's for me end of story and I won't bother you anymore.
Regards, Peter
sorry got it
The original post was OK But your reply confused me
It was my answer to you that i said wrong not my other post to Victor
Which requested Top of Jig marked on Main Plan (Which i think would be a good idea on new Models)
 
Just been looking at Arbon's Build and he is assemling the hull with Gun POrts cut to size and appears to be using the bottom and top of the port sub frames to ensure its easier
REaalise why he has done it now
 
JUst cut GunPort 6 to size POrt Side of Ship (Larboard)
Needed to remove the Long ones either side to shape and Cut (Just undoing a Joint !!)
It really would be easier to do this as you fit each set of frames into the Jig/ Keel
ie X5 Bow Side X3 Stern and Cutting X4 down
All can be marked DRY in the Jig and then before Gluing then Cut
THis is the wat Arbon seems to have done it
THis from his Last Post
1760133120234.png
 
Hoping to receive my Hawse pieces next week

How are you getting on with this Geoff (Corsair )
Not sure how Arbon and Keith are getting on
Seems I am leading the Fleet at present - Need some Support
I'm still working on some other things that need to get done but I think I've got a solution to the cant frames that I've looked at. Wife's birthday is tomorrow, so I'll have to wait until after the weekend to try to make some progress on it.
As far as leading the fleet, I think you are second. I think Tim (@TRS7139 ) is ahead of you still. :)
which is his thread
Feed me your ideas about cant frames
Have you finished the hawse
 
Tim doesn't have his own thread. He has been posting occasional pictures of his build in mine and Keef's thread. Here is a link to the last post in my thread:
Tim's post
As far as the cant frames, the angle on the bottom of the frame doesn't line up with the keel to glue it. I have to spend time on each one to determine if I can sand it down to the right angle or if I need to add material to the bottom of the frame so I don't make it too short. :) To give you an idea the first cant frame (X1) when the bottom touched the bottom of the keel while in the building jig, I had about a 1/8" (about 3 mm) gap at the top of the keel. On that one, I had some excess material so the top of the frame stuck up above where it should and I was able to sand it. I hope they all turn out like that. :)
Tim has been too lazy to have his own thread..
Truth be told, I kind of fell into occasional posts on yours and Keefs, usually in relation to your latest steps which I hope you find not bothersome.
I originally was farther along without pictures to begin my own so I became a claim jumper .

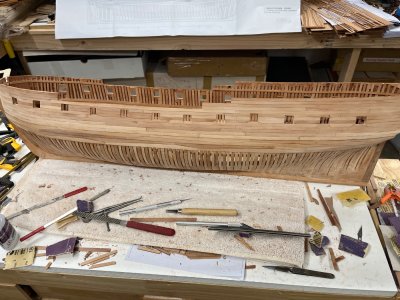
Anyway, here’s where I am. Light first sanding but more needed.
My first semi complaint about the kit, I wished all the exterior planking had been more uniform as to color.
Now trying to decide whether I might apply a light stain to even it up before final finish.
That said, now back inside to finalize lower platforms.

Tim

IMG_0771.jpeg
 
Last edited:
Tim has been too lazy to have his own thread..
Truth be told, I kind of fell into occasional posts on yours and Keefs, usually in relation to your latest steps which I hope you find not bothersome.
I originally was farther along without pictures to begin my own so I became a claim jumper .

Anyway, here’s where I am. Light first sanding but more needed.
My first semi complaint about the kit, I wished all the exterior planking had been more uniform as to color.
Now trying to decide whether I might apply a light stain to even it up before final finish.
That said, now back inside to finalize lower platforms.

Tim

View attachment 549523
She is looking great Tim ! :)
 
Sorry, just saw this.
FWIW I think your issue might be ties to frame spacers you're using.
I have found my sp[acing required a few sizes to fit frame tops while in jig. Given this I have had zero frames altered for proper width, all checked from main plan sheet with inside calipers transferred to frames, virtually all of them have come out almost exact. Couple of them off maybe a few thousandths, evened up after planking by sanding.
Lastly, since my experience has been less than ideal as far as leaving planking short on the ports to allow lids to seal, I've planked right to the sill edges and will take some thin stock to lay in side , top/bottom in relief to give proper effect which looks nice and neat, especially when, likely, I will paint them red ocre.

Tim
Interesting
AS we know the port lid has two main layers
And the inner goes inside the gun port so the outer would need to fit inside the port as well so it is flush
Or is it proud when shut
Ive just checked with My Caldercraft Victory and the inner lining IS showing when the port is open and Painted RED
I always build one side of the ship OPen and Run Out the otherside Closed but ready to open
THe Gun POrt Lids on the closed side are Flush
So yes it needs a lining - JUst hoping the Inner LId os smaller or we will ned to cut that to fit
Hopefully we will have enough this "Stuff" as Longridge calls it te line the POrts
Comments please
Have repeated this ON tonight post
 
Back
Top