Hello Ian, also from my side a Merry Christmas.
-

Win a Free Custom Engraved Brass Coin!!!
As a way to introduce our brass coins to the community, we will raffle off a free coin during the month of August. Follow link ABOVE for instructions for entering.
-

PRE-ORDER SHIPS IN SCALE TODAY!
The beloved Ships in Scale Magazine is back and charting a new course for 2026!
Discover new skills, new techniques, and new inspirations in every issue.
NOTE THAT OUR FIRST ISSUE WILL BE JAN/FEB 2026
You are using an out of date browser. It may not display this or other websites correctly.
You should upgrade or use an alternative browser.
You should upgrade or use an alternative browser.
HMS Medea (28) (1778) 1/48 scratch build
- Thread starter Masters Mate
- Start date
- Watchers 44
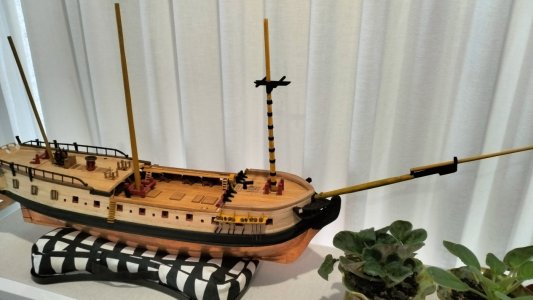
I've managed to string together a few days of solid work on Medea and have tentatively begun on the foremast setup.
I still wasn't happy with the chains (below) so I re built them before final installation.
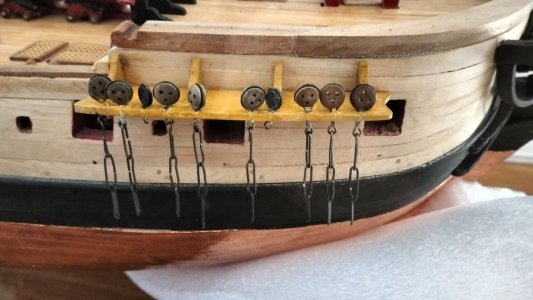
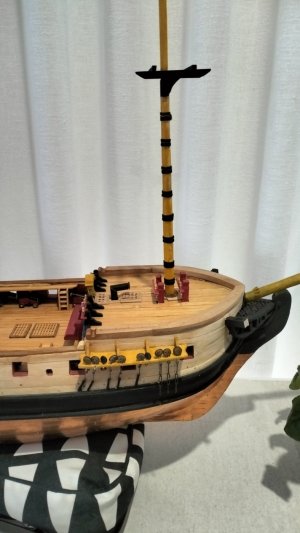
The three chains towards the stem are not finished yet.
Top
I reshaped some bronze ovals from a necklace I salvaged from a charity store to make the mast hoops, then lashed either side of them with my home made rope. Not perfect but it was a great learning curve for me. The bronze hoops are completely lost in the lashings!
I have to make more rope so I can lash the bowsprit and begin the fore stays. The top is just sitting there at the moment while I work through all the steps I have to take to complete this important stage.
See you all on the other side of 2024. Happy New Year.
I still wasn't happy with the chains (below) so I re built them before final installation.


The three chains towards the stem are not finished yet.

Top
I reshaped some bronze ovals from a necklace I salvaged from a charity store to make the mast hoops, then lashed either side of them with my home made rope. Not perfect but it was a great learning curve for me. The bronze hoops are completely lost in the lashings!
I have to make more rope so I can lash the bowsprit and begin the fore stays. The top is just sitting there at the moment while I work through all the steps I have to take to complete this important stage.
See you all on the other side of 2024. Happy New Year.
- Joined
- Jan 26, 2017
- Messages
- 1,339
- Points
- 493

She looks beautiful. Happy new year!I've managed to string together a few days of solid work on Medea and have tentatively begun on the foremast setup.
I still wasn't happy with the chains (below) so I re built them before final installation.
View attachment 492402
View attachment 492401
View attachment 492403
The three chains towards the stem are not finished yet.
View attachment 492404
Top
I reshaped some bronze ovals from a necklace I salvaged from a charity store to make the mast hoops, then lashed either side of them with my home made rope. Not perfect but it was a great learning curve for me. The bronze hoops are completely lost in the lashings!
I have to make more rope so I can lash the bowsprit and begin the fore stays. The top is just sitting there at the moment while I work through all the steps I have to take to complete this important stage.
See you all on the other side of 2024. Happy New Year.
Nice work on the model... but the window violets really made me smile. My grandma used to have them on her windowsills and its one of the things I remember fondly about her. I also remember that she made me plant geraniums all over her yard when I was a boy. I still hate the smell of geraniumsI've managed to string together a few days of solid work on Medea and have tentatively begun on the foremast setup.
I still wasn't happy with the chains (below) so I re built them before final installation.
View attachment 492402
View attachment 492401
View attachment 492403
The three chains towards the stem are not finished yet.
View attachment 492404
Top
I reshaped some bronze ovals from a necklace I salvaged from a charity store to make the mast hoops, then lashed either side of them with my home made rope. Not perfect but it was a great learning curve for me. The bronze hoops are completely lost in the lashings!
I have to make more rope so I can lash the bowsprit and begin the fore stays. The top is just sitting there at the moment while I work through all the steps I have to take to complete this important stage.
See you all on the other side of 2024. Happy New Year.
 .
.Sorry for the diversion from your wonderful build report.
Thank you Mustafa. I appreciate your encouragement. Happy 2025.She looks beautiful. Happy new year!
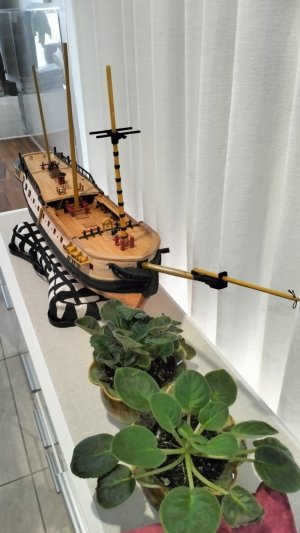
Lorraine's violets are her pride and joy so it's appropriate that my pride and joy sits beside them sometimes.Nice work on the model... but the window violets really made me smile. My grandma used to have them on her windowsills and its one of the things I remember fondly about her. I also remember that she made me plant geraniums all over her yard when I was a boy. I still hate the smell of geraniums.
Sorry for the diversion from your wonderful build report.
Geraniums are another story. My Dad planted geraniums right along the edges of an open drain we had in the 50's. Whatever they smell like, they always remind me of stinking drain water...
I have put cedar chips inside some models to keep out the bugs, but scented geraniums are also known to help keep bugs away due to the lemon like fragrance. When the leaves die off, maybe a good thing is put them in the hull.
So no, I won't be putting them, either dried or otherwise, inside the hull.
I love that violets are universally loved - and geraniums are universally despised  . There are still pockets of order in the world.
 . There are still pockets of order in the world.
A bit more progress with the foremast. (Sorry about the image quality. I guess it was the white background that confused my camera). All dry fitted because I've been caught too many times charging ahead of myself and having to undo my work. 
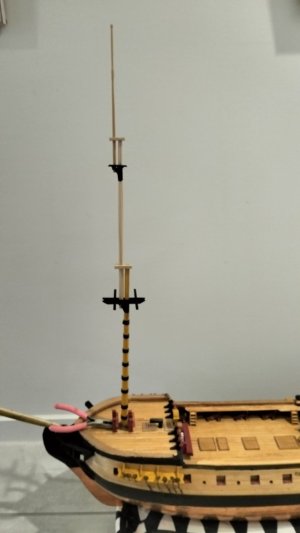
The pliers are to hold the mast straight as it isn't glued in yet!


The completed ship in the diorama won't fit in the case with the top gallant and royal masts up and I propose lowering them as shown below and lashing them to the topmast. What do you think? Or should I lower them to the deck and stow?

Back in her box for a while until I complete more fittings.
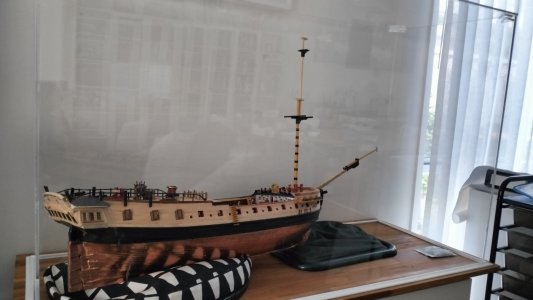


The pliers are to hold the mast straight as it isn't glued in yet!


The completed ship in the diorama won't fit in the case with the top gallant and royal masts up and I propose lowering them as shown below and lashing them to the topmast. What do you think? Or should I lower them to the deck and stow?

Back in her box for a while until I complete more fittings.

I think that would make a very interesting presentation. You could lash them (was that how it was done?) - or rig them as if they were about to be raised.The completed ship in the diorama won't fit in the case with the top gallant and royal masts up and I propose lowering them as shown below and lashing them to the topmast. What do you think? Or should I lower them to the deck and stow?
Thanks Paul.I think that would make a very interesting presentation. You could lash them (was that how it was done?) - or rig them as if they were about to be raised.
Harland says top gallants and royals could be lowered to rest on the the top mast doubling and lashed, but were more often lowered to the deck and stowed.
In my case I think I'll do the former as it will show the work and fit in with the theme of the proposed diorama.
A quick update (just to show I haven't been shipwrecked).
I've now finished off the bollards (or as they should have been, the tops of the frames if I hadn't cut them off).
My little Chinese lathe keeps on keeping on and still does all I need.
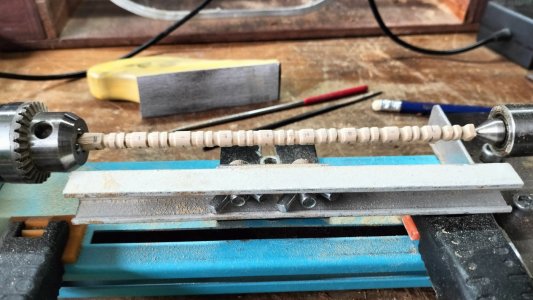
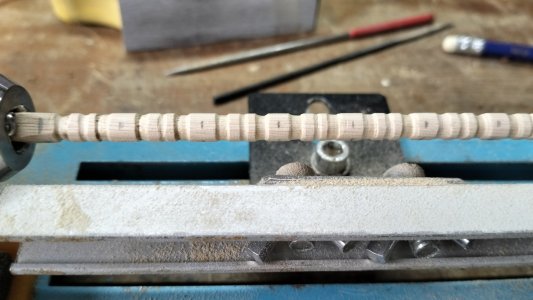
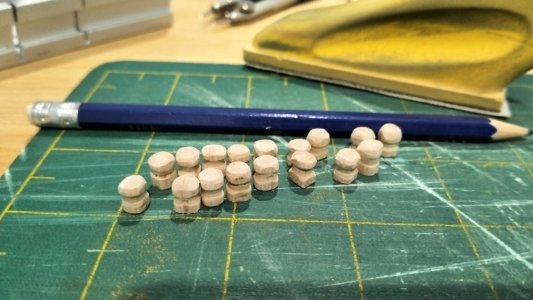
These are now painted and in place.
I've also been working on an anchor, with only the stock to finish. I'll put up the images tomorrow. It was a very enjoyable day's work doing it from scratch.
I've now finished off the bollards (or as they should have been, the tops of the frames if I hadn't cut them off).
My little Chinese lathe keeps on keeping on and still does all I need.


These are now painted and in place.
I've also been working on an anchor, with only the stock to finish. I'll put up the images tomorrow. It was a very enjoyable day's work doing it from scratch.
A lot of modelers cut them off as it is difficult to cut the openings in the rails for a perfect fit to go over the timber heads (bollards?). From Goodwin's The Construction and Fitting English Ships of War, page 222. Sorry for the poor focus.I've now finished off the bollards (or as they should have been, the tops of the frames if I hadn't cut them off).
Allan

Last edited:
EDIT. - There are some basic errors in my construction of the head stock, which I have corrected and show in a later post. Just in case another newbie was to follow this post 
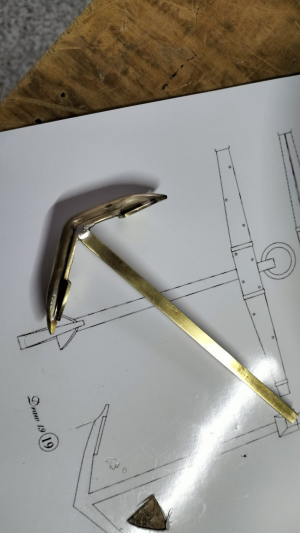
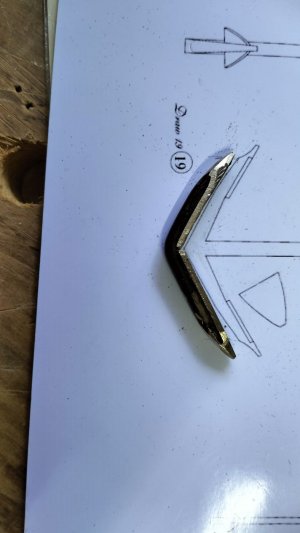
This is something I have been keen to do for a long time. I wanted to make the anchor as close to the plans as possible but from scratch only.
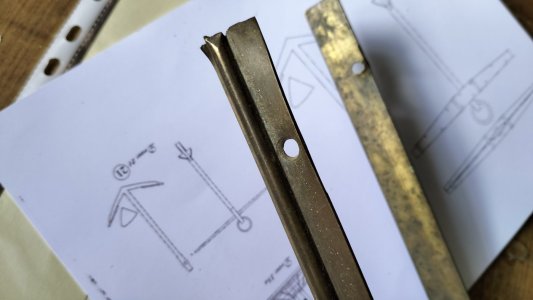
I started out going through my brass scrap box and found what I think may have been part of a sliding door track.
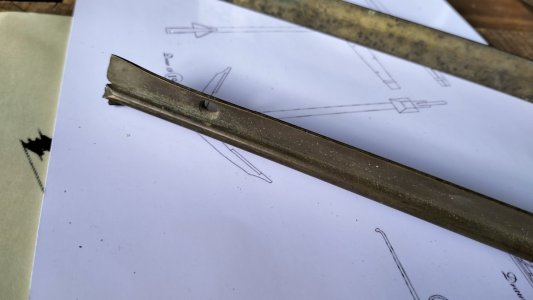
Heated with my blowtorch and bent to shape
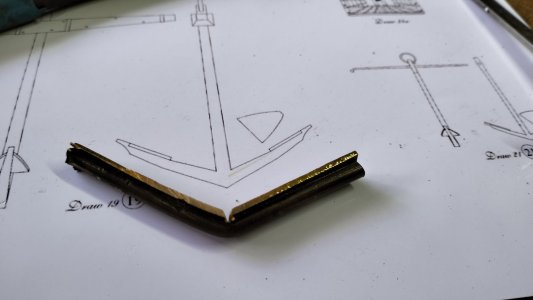
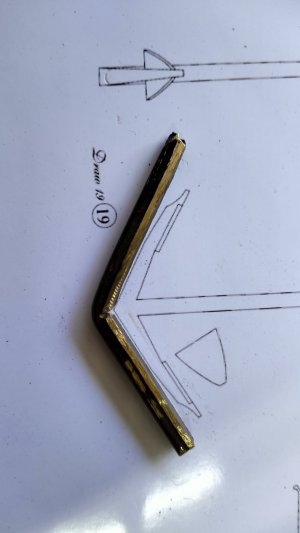
Shaped with Dremel grinder, files and emery paper
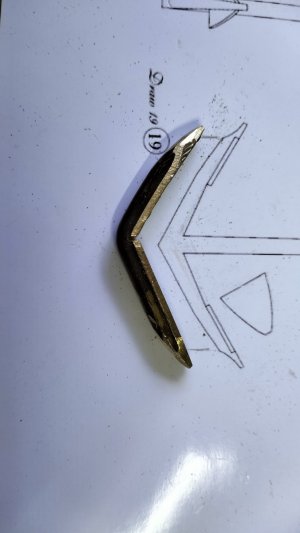
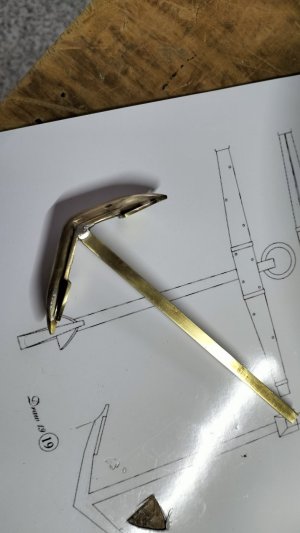
Finished the soldering.

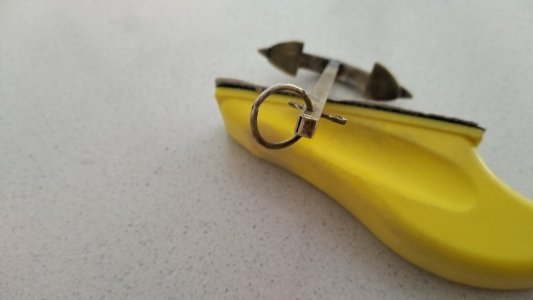
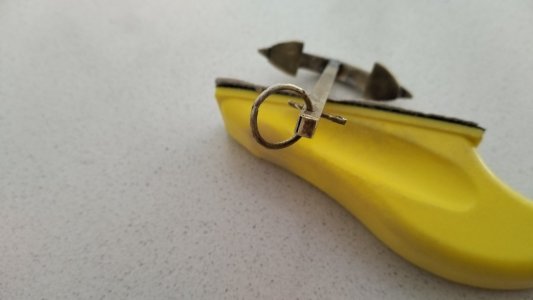
Today's work was to build the stock and finish.

I'm not happy with the rope and serving I used here and will do it again with black Gutermann polyester rope. I used some rope I made when I first built my rope walk and it turns out it is linen thread. Not suitable.

Painted and only the straps to go on to complete. As this is going on a model of a working warship I played around with the paint to make it look used. If I had used the polyester thread I would have accepted my other shortcomings with lashing the ring for the same reason.


That's a lot of images but I found this very challenging and yet rewarding.
This is something I have been keen to do for a long time. I wanted to make the anchor as close to the plans as possible but from scratch only.
I started out going through my brass scrap box and found what I think may have been part of a sliding door track.


Heated with my blowtorch and bent to shape


Shaped with Dremel grinder, files and emery paper


Finished the soldering.


Today's work was to build the stock and finish.

I'm not happy with the rope and serving I used here and will do it again with black Gutermann polyester rope. I used some rope I made when I first built my rope walk and it turns out it is linen thread. Not suitable.

Painted and only the straps to go on to complete. As this is going on a model of a working warship I played around with the paint to make it look used. If I had used the polyester thread I would have accepted my other shortcomings with lashing the ring for the same reason.


That's a lot of images but I found this very challenging and yet rewarding.


Last edited:
I'd call that some pretty awesome up-cycling Ian. Well done!
- Joined
- Mar 22, 2024
- Messages
- 396
- Points
- 168

Lavender is good as a bug-repellant - it also keeps away moths and european scorpions.
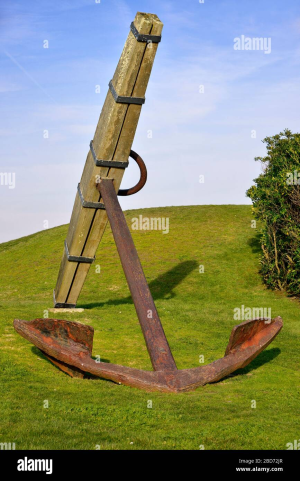
Wow, Jim. How did that happen?? I had it all planned out the right way but I guess my enthusiasm to get it done tricked me up!! Of course I will fix it. I wouldn't be allowed on board the Medea with an anchor like that!Absolutely lovely work, Ian. I love your creativity and ability to use common material to fabricate parts. One small mistake, which I am sure can be easily fixed, is the wood stock. You will need to rotate it 90 degrees to the shank.
View attachment 498190
View attachment 498193
Thanks for your kind guidance.
Thanks Paul. I love the challenges but in my enthusiasm to get it done I missed the basic structure which Jim so kindly pointed out. I'll fix it today....I'd call that some pretty awesome up-cycling Ian. Well done!
 , There were two major errors with my post #394, the main one being the orientation of the stock. (Thanks again Jim).
I have also investigated why I made the mistake with the length of the arms of the stock and it turns out the printer truncated my image of the plan and I was too dumb to notice. Then I went off today trying to find the reason for one arm being longer than the other and it turned out, as you would expect, that my version in completely unique, and wrong!.
So this is the amended version, with bands and ring binding (name??) still to do.
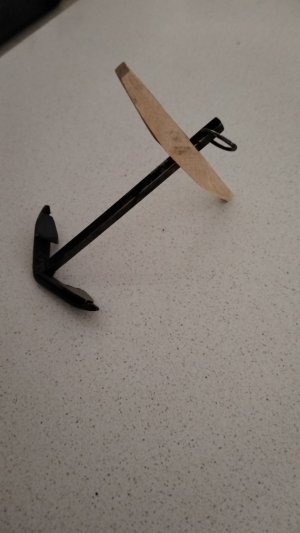
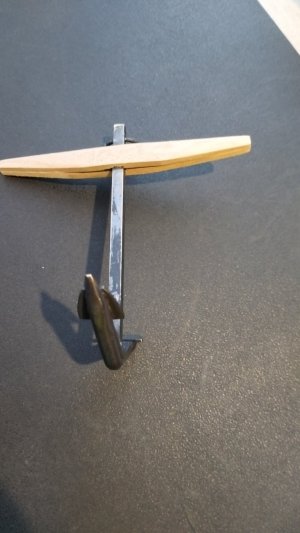

I'm happy to show my mistakes because they are inevitable when building a model ship for the first time and it might save another builder making the same errors.


