HMS Royal Caroline kit ZHL 1/30 (Following the Maarten's RC)

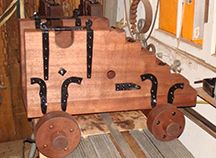
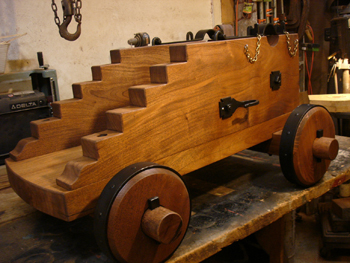
Hi Alex. First let me congratulate you on your excellent work. I take my hat off to you for the courage of conviction to make this the longest RC in the world! Second, don't be too hasty to abandon the metal bands around the gun carriages' wheels. I am studying the Batavia in depth and the following photographs are courtesy Don Hitchcock, Western Australia Museum, April 2014. To me at least, it looks as if there are certainly metal bands around these wheels. If you enlarge the picture sufficiently, there seems to be a clear difference in texture between wood and metal. Also the scuff marks on the wheels would indicate abrasion of metal.

Bowchaser Bronze Cannon.jpgimg_8388batavia.jpg
 
I am studying the Batavia in depth
Thank you, Heinrich.
I also tend to believe that there were metal bands, because I feel that the wooden wheel might crack under the load or in the middle of the battle.
Re: your studying Batavia, here is the audioguide the museum has published with the izi.TRAVEL platform. I even translated it for them in Russian, as a volunteer, and it will be published soon.
 
Issue: what to use to cover the deck when it's ready.
I have never worked seriously with wood finishes, so I made several experiments, depicted below, with different colors of dyes.
IMG_0871-1.JPG
#1 is the winner, it's a clear mix of beeswax and Danish oil, I used yesterday for the capstan. It makes the wood shine, just like the next picture shows. #3 could be used. Probably #4 is the candidate for the inner bulwarks, as they need to be reddish. Originally I thought about adding a little bit airbrush+red color, but probably the #4 will do the job.
In any case, now we are going to enjoy the #1:
IMG_0876.JPG
In order to keep the beeswax hot, my father made a very advanced device...
IMG_0870.JPG
 
Thank you, Heinrich.
I also tend to believe that there were metal bands, because I feel that the wooden wheel might crack under the load or in the middle of the battle.
Re: your studying Batavia, here is the audioguide the museum has published with the izi.TRAVEL platform. I even translated it for them in Russian, as a volunteer, and it will be published soon.
G'day Alex, here is a couple of pics of the cannon that Heinrich is talking about, it looks like a metal band until you enlarge it,


IMG_1070~2.jpeg

IMG_1070~4.jpeg
 
I am trying to finalize the list of parts for the canon.
Here is the list specifically for guns.
I still have couple of questions:
1. I need your help in giving the right English names to parts #1, #2, #3, #5, #7 and #8 on the picture below. It will help to finalize the Parts list.
2. I am not sure where to take the handles, depicted on the second picture below.

Thank you!
View attachment 133199
View attachment 133200
@Maarten , does it go from the same pack of copper pins, used for the bitts etc? (see the photo below)
View attachment 133285
Hi Alex,

Yes I took them from there.
8 and 7 are parts for the two stern gun port lids
 
Re: your studying Batavia, here is the audioguide the museum has published with the izi.TRAVEL platform. I even translated it for them in Russian, as a volunteer, and it will be published soon.

Thank you so much Alex. There is a wealth of information here.
 
I also tend to believe that there were metal bands, because I feel that the wooden wheel might crack under the load or in the middle of the battle.

G'day Alex, with regards to the cannon trucks, the British used to make theirs out of two pieces, giving them extra support,

Credit for all the pics below goes to The Anatomy of the ship, The Royal Yatch Caroline,


1.jpg
In this first pic it looks like there is a metal tyre round the truck,


2.jpg
but when we look at this pic it is just the bevel round the truck to stop it breaking away,


3.jpg
close up,


4.jpg
On British ships the trucks were made up of two sections, which you can see here, the grain of one section went
the other way to the grain of the first giving the truck greater strength, and in the above pics you can see the
pins or dowels going through the trucks holding them together,

hope this helps,

best regards John,

.
 
G'day Alex, with regards to the cannon trucks
Dear John,
Looks like my theory was not supported by practice.
I am persuaded. Well, I will leave the bands only because it will drive my father crazy, and I do not want to depress the guy who spent some time on putting them on. But trust me, when I will make an audio guide, this story will get some credits. And I think the Batavia Ship Museum will envy it.
In the mean time the cannons are getting ready and I already made the measurements of their height in order to define the ports' height.
IMG_0905.JPG
 
So, it's time to answer the question: was it a good idea to cut the ship and add 28 mm?

First I wanted to set the carvings along the ship but then I decided its too complicated.

So, I started with the image processing.

A stupid copying at the copy machine did not help, as it gave 1% mistake! Hmmm
IMG_0888.JPGIMG_0889.JPG
Ok, I had to go long way:
- I took a picture
- I printed it out
- measured the mistake in scale
- reprinted again with correction
Now I had it in the perfect size:
Carvings Left side.JPGCarvings Right side.JPGIMG_0897.JPG
And here is the moment of truth:
I have a perfect ship:
IMG_0898.JPG
Many thanks to @Maarten and John (@neptune )!!!!!!
 
Interesting, the same cannons from the same kit have different height.
This one is from @Maarten
Cannon on deck.JPG
And this one is mine...
IMG_0911.JPG
It's like... 3mm difference? In my case it is on the planked deck, but this is 0.5mm.
Interesting...
Does it mean that my ports go 3mm up?
 
Last edited:
I have 3 Questions for @Maarten:

#1. I guess this is the correct usage of parts #1-2-3?
I would appreciate if you help me to name them in English
1581934192112.png

#2. The Chinese manual mentions that I will need these three photoetched parts for cannons. Do you agree?
1581937357211.png
#3. Where did you take the small 2mm eyelets (two on each side of the cannon), depicted below? They do not look like #10 photoetched eyelets above, as it seems that they are made of a wire. Or I got it wrong? The picture is not clear.
1581938963177.png
 

Attachments

  • 1581891981675.png
    1581891981675.png
    722.8 KB · Views: 18
Last edited:
It's like... 3mm difference? In my case it is on the planked deck, but this is 0.5mm.
Interesting...
Does it mean that my ports go 3mm up?
[/QUOTE]


G'day Alex, on what info are you basing this on, as you say yours is on the deck planks, that's .5mm,
then if you are judging it by the planking Maartens planking is a little bit higher than yours, its just the way
each of you each planked the hull, mine was probably different as well,
So if its the planking on the bulwarks have a look at the pics below,

Cannon on deck.jpg
Maartens cannon sitting on the bare deck, so add .5mm for deck planks, also the plank at X is approx 2mm higher
than the bulwark support, that makes 2.5mm difference, now if you look at your pic below you will see that the
plank at X is approx 1mm lower than the bulwark support, that makes approx 3.5mm difference,


IMG_0911.jpg

The best thing to do is ask Maarten to measure the height from a flat surface to the top of the front of his barrel
and then check it against yours as yours might also be elevated a little bit more or less than his, hope this all
makes sense,

best regards John,
.
 
Last edited:
related to the discussion here and on one other location here in the forum.....related to the wheels of a naval gun

Naval, Garrison or Field Carriage?

What's the difference between naval, garrison and field carriages?

navalcarriage.jpg

Naval carriages are shorter, four-wheeled carriages that have four small, wooden wheels.
Since these were on the deck of a ship, which was wooden, you would not want metal wheels, which would damage the deck.

03_cannon_carriage03.jpg

Garrison carriages look much like naval carriages except the wheels have a metal tire attached.
The reason for this is because garrison carriages were usually on a stone floor, in a garrison or fort, and the metal tire would protect the wooden wheel from the harshness of the stone.

taken from a producer:

and take a look at the gundeck of the HMS Victory:
12.jpg

aa.jpg
 
IMG20200217204959.jpg
G'day Alex, this is the instruction book that came with the kit, and also there was another larger size one that has
all the masts and spars in it, also three CD's with 192 photo's, 32 video's and 30 PDF's,

IMG20200217204931.jpg
they are in Chinese but the photo's are clear,

IMG20200217205040.jpg


.
 
I have 3 Questions for @Maarten:

#1. I guess this is the correct usage of parts #1-2-3?
I would appreciate if you help me to name them in English
View attachment 133527

#2. The Chinese manual mentions that I will need these three photoetched parts for cannons. Do you agree?
View attachment 133528
#3. Where did you take the small 2mm eyelets (two on each side of the cannon), depicted below? They do not look like #10 photoetched eyelets above, as it seems that they are made of a wire. Or I got it wrong? The picture is not clear.
View attachment 133530
Hi Alex,

1 - No 1, 2 & 3 are the gun barrel hinges. No 1 is placed with its small end behind the gun barrel in the gun carriage. No 2 is the hinge which is fitted to no 1 with a piece of brass wire. No 3 is the hinge lock which is fitted before the gunbarrel in the gun carriage. Clearly as your arrows point out.

2, 3 - yes you need these. These eye bolts are the photo etsched ones which are burnished. I think I used the #10. The number 11 I used to lock the gun barrel hinges. These are fitted at the front of the gun carriage. The hook is used for the gun tackle.
 
G'day Alex, this is the instruction book that came with the kit, and also there was another larger size one that has
all the masts and spars in it, also three CD's with 192 photo's, 32 video's and 30 PDF's
Dear John,
Thank you VERY much for the Chinese PDF files which I have received by email. Finally I have something to work with, as the paper version was difficult to read. The PDF can be easily processed with the Google Translate and I will share the results on line.
 
Back
Top