-

Win a Free Custom Engraved Brass Coin!!!
As a way to introduce our brass coins to the community, we will raffle off a free coin during the month of August. Follow link ABOVE for instructions for entering.
-

PRE-ORDER SHIPS IN SCALE TODAY!
The beloved Ships in Scale Magazine is back and charting a new course for 2026!
Discover new skills, new techniques, and new inspirations in every issue.
NOTE THAT OUR FIRST ISSUE WILL BE JAN/FEB 2026
You are using an out of date browser. It may not display this or other websites correctly.
You should upgrade or use an alternative browser.
You should upgrade or use an alternative browser.
HMS Sovereign of the Seas - Bashing DeAgostini Beyond Believable Boundaries
- Thread starter DARIVS ARCHITECTVS
- Start date
- Watchers 105
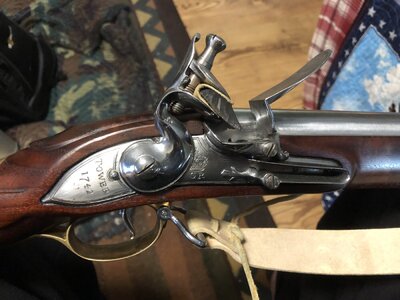
That's actually a very nice 'Bess, with great architecture and excellent wood to metal fit. If you bought it on the cheap, because of the solder issues, you got it for a bargain! Was this a kit that someone made?I had to stop work on the ship for a few days for a side project. I bought this reproduction Brown Bess musket which needed repairs. I got it for a good price and spent the day working on it. The barrel lugs which hold it to the stock were soldered to the barrel with very little adhesion and they all were broken except for one. Also, the bayonet lug on top of the barrel was sheared off because of the same problem, bad solder joints.
Since these parts were supposed to be brazed on, I brazed new ones on using brass, and re-drilled the pin holes in them. the bayonet lug was brazed onto the barrel. After lots of cleanup and polishing, the barrel was reassembled to the stock. It fit tightly was was no longer loose. It shoots .75 caliber (19mm) balls at 1000 feet/second and weighs 10.4 lbs. What a beast!
I have 50 musket balls and a pound of black powder. I can't wait to see what damage it can do.
Here is the bayonet. The tip needed a little sharpening. Now it's like a needle.
View attachment 328412
Disassembled for inspection and repair.
View attachment 328413
The lock after being removed.
View attachment 328414
One of the broken barrel lugs.
View attachment 328415
After reassembly.
View attachment 328416
The lock is 20% than any American rifle.
View attachment 328417
It's not optimum for close quarters combat indoors...
View attachment 328418
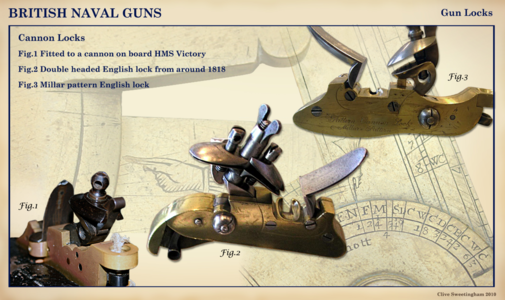
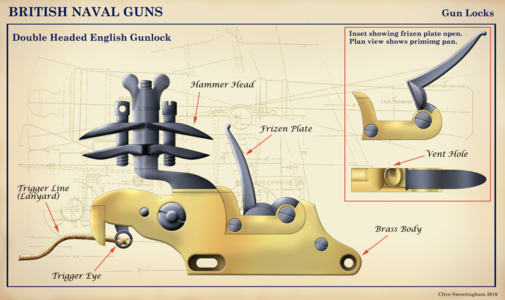
Very good image, Similar locks were used at the naval guns.THAT is what the Brown Bess is for...
View attachment 328674
There's used to be a company in Indiana called Narrangasett Arms that went out of business in the 1990's. They made black powder firearms here in the USA at a level of quality higher than rack grade Italian made Pedersoli guns but just short of custom built ones. The Bess I found is one of those, but had improper solder joints instead brazed ones. The inlay was good, and the lock was of excellent quality. You can't find reproduction muskets at this level of quality without going custom built, as I learned after doing some research. I got lucky finding and deciding to buy this one as my first flintlock. The dealer at the gun show may or may not have been aware of the damage, but the barrel to stock fit was quite loose and apparent to me. He was asking $1500 USD for it! Hugely high price. As I was about to walk away, he offered $750 USD and I accepted. Literally 4 seconds after I payed for it, I slipped the bayonet on and the bayonet lug sheared off! Uh Oh! Not a good sign. That's what you get for using plumber's lead solder. The same fellow who used weak solder, and BADLY fused at that, also attached the barrel lugs. I fixed all that in the shop. It should be 100% now. It could have ended up being a turd, but it turned out to be a good bargain in the end.That's actually a very nice 'Bess, with great architecture and excellent wood to metal fit. If you bought it on the cheap, because of the solder issues, you got it for a bargain! Was this a kit that someone made?
There is a shorter version of the Brown Bess called the sea pattern which was used on ships. The pattern I have is the long land pattern of 1740, used primarily in the French and Indian War in Canada and where I live in Minnesota, so that makes it local, and some were later used in the American Revolutionary War. Most American rebels used the 1766 Charleville's provided by France, but captured Brown Bess's were also prized.
That double headed lock serpentine on the marine cannon lock above has a unique back-up flint in case the first chips out. Rather remarkable innovation.
Last edited:
It seems likely that guy who sold you the gun knew about the solder issue. Nevertheless, that really is a bargain, though - especially if you have the skills required to properly braise the lugs in place. I haven’t gone flintlock shooting in many years. I bought a beautiful Bucks county rifle 16 years ago, but I have yet to shoot it. I was never comfortable with the idea of keeping black powder in a city apartment. I wish there were a nearby range that sold powder by the flask.
Yeah, gun dealers are the same as used car salesmen. He even said it was unfired, which proved untrue due to the powder residue I found under the lock. You have to be careful purchasing. I live 4 miles away from Track of the Wolf, a well known black powder firearms supplier, and picked up a pound of ffg powder and 50 musket balls last week, but the price of powder is very high. One pound costs $29 USD.It seems likely that guy who sold you the gun knew about the solder issue. Nevertheless, that really is a bargain, though - especially if you have the skills required to properly braise the lugs in place. I haven’t gone flintlock shooting in many years. I bought a beautiful Bucks county rifle 16 years ago, but I have yet to shoot it. I was never comfortable with the idea of keeping black powder in a city apartment. I wish there were a nearby range that sold powder by the flask.
I know Track of the Wolf well. I bought my rifle from them and was super-impressed with the care of packing and that the rifle looked even better in-person than it did on-line - great company! It has been interesting to me that, throughout the pandemic, their flinter inventory has been pretty anemic. I check every so often, just in case an Eric Kettenburg gun somehow surfaces.
Their store is actually very small, with 80% if it storage for parts for orders. They have quality parts and stocks, but when you buy in person, they don't have much time for you because they are busy in the back.I know Track of the Wolf well. I bought my rifle from them and was super-impressed with the care of packing and that the rifle looked even better in-person than it did on-line - great company! It has been interesting to me that, throughout the pandemic, their flinter inventory has been pretty anemic.
I'm not yet sure how the shape of the stern galleries will go quite yet, so at the risk of stopping all the fun talk with ship business, I went to work on the wales. Taking inspiration from Nigel's model, and cutting strips of cherry wood to the sizes provided by Frank48's information, I set about devising a way to method to make the wales and attach them to the hull.
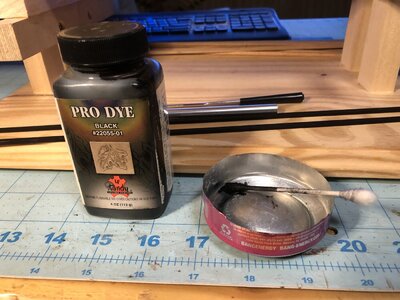
I found some old leather dye that had totally dried up, so I put some xylene into it and made it liquid again and used it to stain the strips for the lowest wale, because it's what I had.
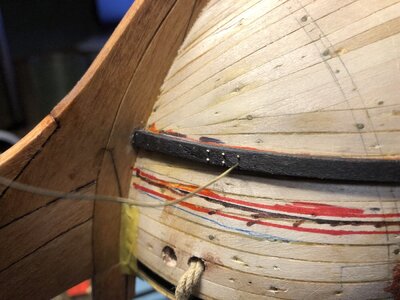
The wood strip was sanded smooth, soaked in water, and bent at the bow end with a form and hot iron. It had to not only band around the hull, but had to be bent upward as well as it was formed around the bow. Since the sharpest curve is at the bow, that's where you want to start attaching the wale the hull. Once the glue is set there, then you can bend the rest of the strip around the hull easily, gluing and anchoring it in a couple more spots near the bow too cement it in the correct location. The wale should appear level as is approached the stem, and not sweep upward and form a peak. To do that, it has to be curved against the long axis of the cross section. Below you can see the end of the strip ends in a spline joint, and will be continues aft with a second strip of wood.
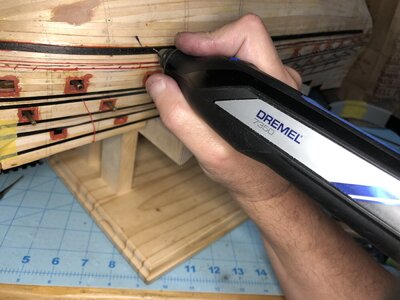
Holes are drilled in pairs approximately every 8-9mm, about where each of the frames would be.
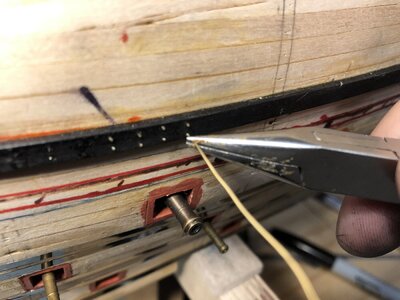
Wire is pushed about 5mm into the holes using pliers with an interference fit. Glue is not needed.
The wire is cut as close to the wale as possible with a wire cutter.
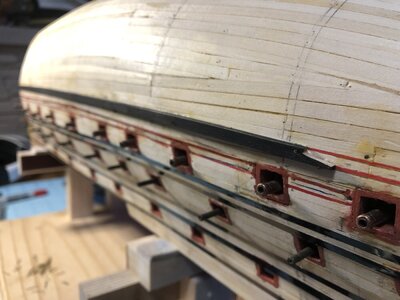
After filing the protruding end of the wire until the barbs are removed, the wire ends are tapped in flush with a light hammer.
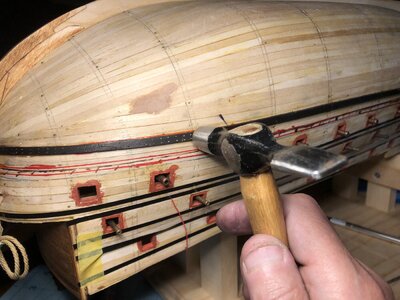
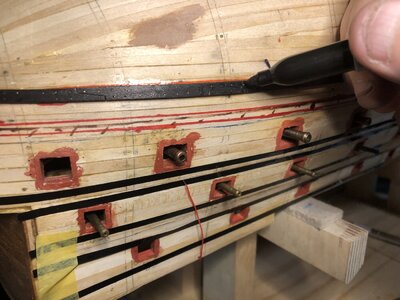
The shiny brass is made dark with a permanent marker. You could use brass blacking acid, but this was faster with no risk of leaving acid behind. Even if the mark rubs off, the brass will darken over time from oxidation and blend in.
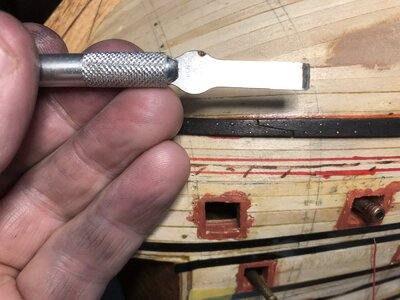
Simulated scarf joints are made using a chisel shaped knife and a light hammer. They are quick and compared with making actual scarf joints, and they look the same when the wood grain is obscured by painting or black staining.
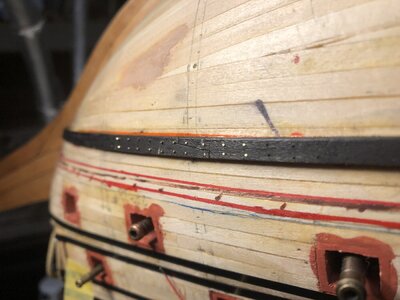
I got about 1/4 of of the way on the first wale on the starboard side before I ran out of time today. Below you can see more wires needing to be filed and tapped flush. The two red lines below the wale show where the next wale will go. A red marker was run along the pinstripe tape before it was removed.
I found some old leather dye that had totally dried up, so I put some xylene into it and made it liquid again and used it to stain the strips for the lowest wale, because it's what I had.

The wood strip was sanded smooth, soaked in water, and bent at the bow end with a form and hot iron. It had to not only band around the hull, but had to be bent upward as well as it was formed around the bow. Since the sharpest curve is at the bow, that's where you want to start attaching the wale the hull. Once the glue is set there, then you can bend the rest of the strip around the hull easily, gluing and anchoring it in a couple more spots near the bow too cement it in the correct location. The wale should appear level as is approached the stem, and not sweep upward and form a peak. To do that, it has to be curved against the long axis of the cross section. Below you can see the end of the strip ends in a spline joint, and will be continues aft with a second strip of wood.

Holes are drilled in pairs approximately every 8-9mm, about where each of the frames would be.

Wire is pushed about 5mm into the holes using pliers with an interference fit. Glue is not needed.

The wire is cut as close to the wale as possible with a wire cutter.

After filing the protruding end of the wire until the barbs are removed, the wire ends are tapped in flush with a light hammer.

The shiny brass is made dark with a permanent marker. You could use brass blacking acid, but this was faster with no risk of leaving acid behind. Even if the mark rubs off, the brass will darken over time from oxidation and blend in.

Simulated scarf joints are made using a chisel shaped knife and a light hammer. They are quick and compared with making actual scarf joints, and they look the same when the wood grain is obscured by painting or black staining.

I got about 1/4 of of the way on the first wale on the starboard side before I ran out of time today. Below you can see more wires needing to be filed and tapped flush. The two red lines below the wale show where the next wale will go. A red marker was run along the pinstripe tape before it was removed.

Very nice Kurt. Love the tiny brass pins.
Awesome! Super clean work, Kurt.
Looks good Kurt 
One tip I discovered by chance the other day that I haven't had the chance to try but will be using on Soleil Royal;
If you want the next wale to be perfectly parallel to this one, say 10mm gap between.Cut a strip of 10mm wide Styrene sheet say 150mm long and cut saw cuts every 10 -15 mm along the strip three quarters of the way down's it kind of resembles a comb.You can the use this as a spacer and it will bend to follow the sheer of the wale below perfectly
Kind Regards
Nigel
I used to have a .58 caliber flintlock, Kurt. And I thought IT was a beast. 120 grains of black powder would send the 750 grain mini scooting down the range. It wasn’t that accurate, but it packed a whallop. My cousin Bubba told me to sit beside him while he shot it to see if I could see the ball as it went to the target. That’s when I learned never to stand next to the flash pan when someone is shooting. I was picking specks of gunpowder out of my left cheek for a week.I had to stop work on the ship for a few days for a side project. I bought this reproduction Brown Bess musket which needed repairs. I got it for a good price and spent the day working on it. The barrel lugs which hold it to the stock were soldered to the barrel with very little adhesion and they all were broken except for one. Also, the bayonet lug on top of the barrel was sheared off because of the same problem, bad solder joints.
Since these parts were supposed to be brazed on, I brazed new ones on using brass, and re-drilled the pin holes in them. the bayonet lug was brazed onto the barrel. After lots of cleanup and polishing, the barrel was reassembled to the stock. It fit tightly was was no longer loose. It shoots .75 caliber (19mm) balls at 1000 feet/second and weighs 10.4 lbs. What a beast!
I have 50 musket balls and a pound of black powder. I can't wait to see what damage it can do.
Here is the bayonet. The tip needed a little sharpening. Now it's like a needle.
View attachment 328412
Disassembled for inspection and repair.
View attachment 328413
The lock after being removed.
View attachment 328414
One of the broken barrel lugs.
View attachment 328415
After reassembly.
View attachment 328416
The lock is 20% than any American rifle.
View attachment 328417
It's not optimum for close quarters combat indoors...
View attachment 328418
The pseudo scarf joints probably look more realistic than making actual ones. It’s hard to make the real ones fit tightly at that scale.I'm not yet sure how the shape of the stern galleries will go quite yet, so at the risk of stopping all the fun talk with ship business, I went to work on the wales. Taking inspiration from Nigel's model, and cutting strips of cherry wood to the sizes provided by Frank48's information, I set about devising a way to method to make the wales and attach them to the hull.
I found some old leather dye that had totally dried up, so I put some xylene into it and made it liquid again and used it to stain the strips for the lowest wale, because it's what I had.
View attachment 328983
The wood strip was sanded smooth, soaked in water, and bent at the bow end with a form and hot iron. It had to not only band around the hull, but had to be bent upward as well as it was formed around the bow. Since the sharpest curve is at the bow, that's where you want to start attaching the wale the hull. Once the glue is set there, then you can bend the rest of the strip around the hull easily, gluing and anchoring it in a couple more spots near the bow too cement it in the correct location. The wale should appear level as is approached the stem, and not sweep upward and form a peak. To do that, it has to be curved against the long axis of the cross section. Below you can see the end of the strip ends in a spline joint, and will be continues aft with a second strip of wood.
View attachment 328984
Holes are drilled in pairs approximately every 8-9mm, about where each of the frames would be.
View attachment 328985
Wire is pushed about 5mm into the holes using pliers with an interference fit. Glue is not needed.
View attachment 328986
The wire is cut as close to the wale as possible with a wire cutter.
View attachment 328987
After filing the protruding end of the wire until the barbs are removed, the wire ends are tapped in flush with a light hammer.
View attachment 328988
The shiny brass is made dark with a permanent marker. You could use brass blacking acid, but this was faster with no risk of leaving acid behind. Even if the mark rubs off, the brass will darken over time from oxidation and blend in.
View attachment 328989
Simulated scarf joints are made using a chisel shaped knife and a light hammer. They are quick and compared with making actual scarf joints, and they look the same when the wood grain is obscured by painting or black staining.
View attachment 328990
I got about 1/4 of of the way on the first wale on the starboard side before I ran out of time today. Below you can see more wires needing to be filed and tapped flush. The two red lines below the wale show where the next wale will go. A red marker was run along the pinstripe tape before it was removed.
View attachment 328991
Ditto- I have learnt how to do scarf joints now.The pseudo scarf joints probably look more realistic than making actual ones. It’s hard to make the real ones fit tightly at that scale.
Genius! Thanks Nigel!Looks good Kurt
One tip I discovered by chance the other day that I haven't had the chance to try but will be using on Soleil Royal;
If you want the next wale to be perfectly parallel to this one, say 10mm gap between.Cut a strip of 10mm wide Styrene sheet say 150mm long and cut saw cuts every 10 -15 mm along the strip three quarters of the way down's it kind of resembles a comb.You can the use this as a spacer and it will bend to follow the sheer of the wale below perfectly
Kind Regards
Nigel
The downside is that there is no contrast between the wood grain on either side of the scarf joint. So if you just oil the wood, the simulated scarf joint is apparent to the close observer. On this scale, not so much.The pseudo scarf joints probably look more realistic than making actual ones. It’s hard to make the real ones fit tightly at that scale.
Great technique Kurt, I have found the chisel tip Exacto to be an indispensable tool in my work.


