-

Win a Free Custom Engraved Brass Coin!!!
As a way to introduce our brass coins to the community, we will raffle off a free coin during the month of August. Follow link ABOVE for instructions for entering.
-

PRE-ORDER SHIPS IN SCALE TODAY!
The beloved Ships in Scale Magazine is back and charting a new course for 2026!
Discover new skills, new techniques, and new inspirations in every issue.
NOTE THAT OUR FIRST ISSUE WILL BE JAN/FEB 2026
You are using an out of date browser. It may not display this or other websites correctly.
You should upgrade or use an alternative browser.
You should upgrade or use an alternative browser.
HMS Sovereign of the Seas - Bashing DeAgostini Beyond Believable Boundaries
- Thread starter DARIVS ARCHITECTVS
- Start date
- Watchers 105
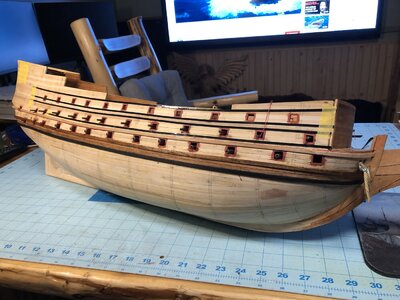
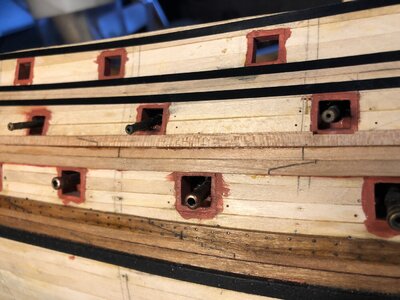
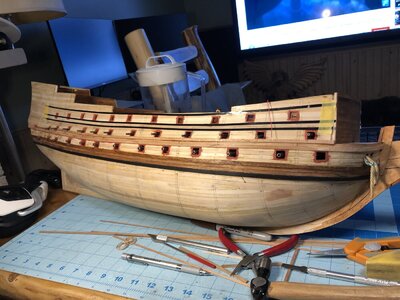
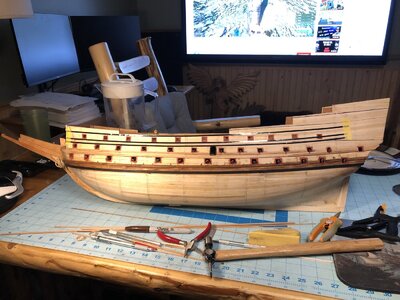
More work today. Installed third and fourth wales on both sides with planking in between. The gun ports act as landmarks for placing the wales, and the wales in turn are landmarks for placing the decorations later. Scarf joints and plank end seams are both real and simulated with razor knife cuts darkened with pencil graphite. These sets of wales are not oiled yet. Trenails will be marked on the rest of the upper hull after the wales are completed. Pinstripe tape will be used to mark vertical lines to guide penciling in the trenails later.


Nice progress Kurt. This is a fun stage - looking very good!
The fifth wale is plain, but the sixth wale needs to be shaped. I made a shaping tool from scrap lumber that cuts a groove in the center of the cherry wood strip. the tip of a razor knife blade scrapes the groove. Corner edges will be rounded over to complete the shaping.
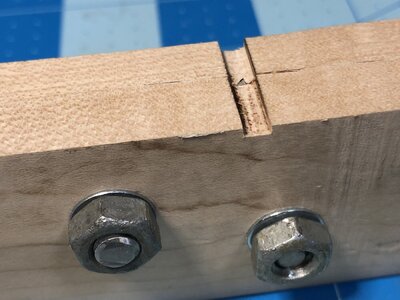
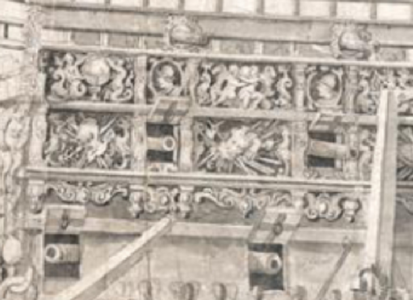
The 3x2mm strips are grooved below.
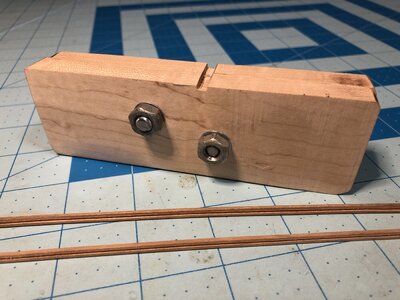


The 3x2mm strips are grooved below.

Small progress but it took all day. The fifth wale was installed on both sides of the hull. I was getting hungry, but I couldn't stop there. On the starboard side, black dyed cherry planking was installed above the fifth wale. But that wasn't enough. Final shaping of the wood for the sixth wales was completed. Time for lunch yet? Heck no. I need to see some bling. So, I painted the sixth wale for the starboard side, and after doing the usual cuts in it for the gun ports, it was glued in place. The first gold piece on the model has been installed. Time for dinner/breakfast.
Fifth wale installed on both sides.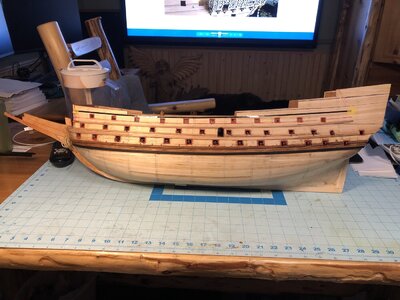
Planking which was dyed black was added above the fifth wale.
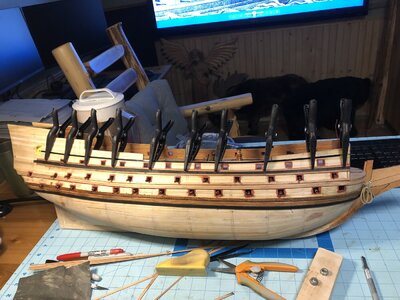
Test fit the sixth wale.
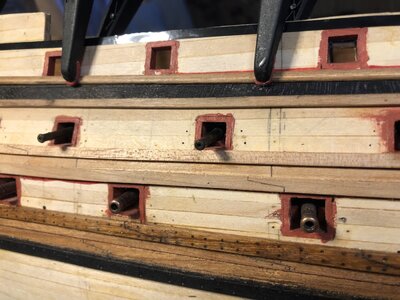
Gold painted sixth wale.
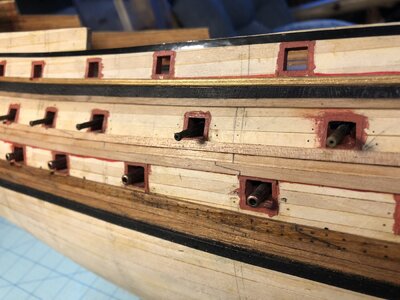
Progress so far.
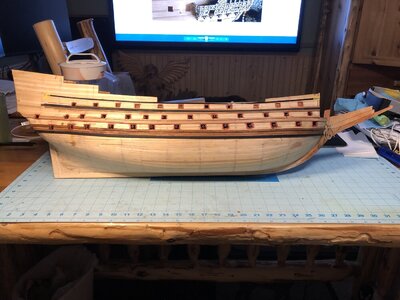
Fifth wale installed on both sides.

Planking which was dyed black was added above the fifth wale.

Test fit the sixth wale.

Gold painted sixth wale.

Progress so far.

Great progress Kurt.You have a vision of how you want the model to look, now we start to see that vision
You are like me.Sometimes I seem to spend countless hours achieving nothing mainly because it is prep work for jobs 6,7 and 8 steps down the line, then all of a sudden things come together all at once and I just keep going, sometimes all the way through the night!
You are like me.Sometimes I seem to spend countless hours achieving nothing mainly because it is prep work for jobs 6,7 and 8 steps down the line, then all of a sudden things come together all at once and I just keep going, sometimes all the way through the night!
If you understand what my vision is, do you mind telling me what it is?Great progress Kurt.You have a vision of how you want the model to look, now we start to see that vision
You are like me.Sometimes I seem to spend countless hours achieving nothing mainly because it is prep work for jobs 6,7 and 8 steps down the line, then all of a sudden things come together all at once and I just keep going, sometimes all the way through the night!
If you understand what my vision is, do you mind telling me what it is?
No I don't, that is why I am enjoying you demonstrate it
Every model I build, I have a mental picture of the overall result I want to achieve, yeah I tweak it along the way, but the overall look is in my head.The only way to show that is to build the model.This is where extreme bashing is sooo different to normal kit building.The result bears little semblance to the picture on the box.Some Pro builders I know have a certain style to all their models so you can get half an idea what the finished model will look like.I don't and chop and change depending on the subjects, only me has a full grasp of what the model will look like.
- Joined
- Aug 8, 2019
- Messages
- 5,584
- Points
- 738

When you study the build of Dutch ships, you will learn that not the Wales are the main part of the structure but the keel and the "zeeg" (english I think seepage) of the ship together with the hull.
Only these types of ships
Hi Frank,I'm sorry but I don't agree with what you say, I don't look at paintings to study naval architecture but texts of the time
I come back to this question. My explanation was not quite correct as I told it. I explained that the wales had no bearing construction on Dutch ships of that class. That's not entirely true. I am now reading author Dik's book about the Zeven Provinciën. And the book of Ab Hoving about Witse and Yk. The explanation in these books was that the lower wales make part of the construction of the ship. But they didn't mind sawing through the wales at the end toward Stern for the gun ports. This would not affect the stability of the ship. So you were more or less right that the wales did have load-bearing construction. Although with this type of ship it was mainly the lower wales that contributed to this. So the sagging of these wales occurred only at the stern. With the upper wales, this was seemingly not a problem at all.
gr. Stephan
- Joined
- Oct 17, 2020
- Messages
- 1,691
- Points
- 488

Hi Stefano, thank you, I am very pleased that you have seen my opinion reading books, have a nice day.Hi Frank,
I come back to this question. My explanation was not quite correct as I told it. I explained that the wales had no bearing construction on Dutch ships of that class. That's not entirely true. I am now reading author Dik's book about the Zeven Provinciën. And the book of Ab Hoving about Witse and Yk. The explanation in these books was that the lower wales make part of the construction of the ship. But they didn't mind sawing through the wales at the end toward Stern for the gun ports. This would not affect the stability of the ship. So you were more or less right that the wales did have load-bearing construction. Although with this type of ship it was mainly the lower wales that contributed to this. So the sagging of these wales occurred only at the stern. With the upper wales, this was seemingly not a problem at all.
gr. Stephan
I love this post, Nigel. In my case I started out with a vision too - but that vision WAS what was on the box. The problem that soon became evident, however, was that DeAg misrepresented what was IN the box. They used the 1:10 museum model for their promotional materials rather than a model built from the kit parts.No I don't, that is why I am enjoying you demonstrate it
Every model I build, I have a mental picture of the overall result I want to achieve, yeah I tweak it along the way, but the overall look is in my head.The only way to show that is to build the model.This is where extreme bashing is sooo different to normal kit building.The result bears little semblance to the picture on the box.Some Pro builders I know have a certain style to all their models so you can get half an idea what the finished model will look like.I don't and chop and change depending on the subjects, only me has a full grasp of what the model will look like.
Several months into my build I needed to recast my mental picture and I have been chasing down that target for nearly two years. This did lead to some extreme bashing (in part encouraged by Kurt on his La Couronne as his summarily trashed kit parts in favor of modified or scratch-built parts). I didn't know it was nicknamed 'bashing' at the time, but it gave me heaps of satisfaction (and frustration).
I have been accused of being hard on myself - that happens when my build doesn't match my vision. My sails are the most recent victim of that self-criticism but there have also been plenty of times where I think: that turned out pretty good.
Anyway, I appreciate the wisdom in your post. Sorry for the OT Kurt. Bash on.
Kurt.
Really coming along - She's bound to be a beauty when completed!!
Really coming along - She's bound to be a beauty when completed!!
Stop apologizing Paul. You are too hard on yourself. It creates lots of fun for me, though!I love this post, Nigel. In my case I started out with a vision too - but that vision WAS what was on the box. The problem that soon became evident, however, was that DeAg misrepresented what was IN the box. They used the 1:10 museum model for their promotional materials rather than a model built from the kit parts.
Several months into my build I needed to recast my mental picture and I have been chasing down that target for nearly two years. This did lead to some extreme bashing (in part encouraged by Kurt on his La Couronne as his summarily trashed kit parts in favor of modified or scratch-built parts). I didn't know it was nicknamed 'bashing' at the time, but it gave me heaps of satisfaction (and frustration).
I have been accused of being hard on myself - that happens when my build doesn't match my vision. My sails are the most recent victim of that self-criticism but there have also been plenty of times where I think: that turned out pretty good.
Anyway, I appreciate the wisdom in your post. Sorry for the OT Kurt. Bash on.


Exactly... I agree that DeAgostini misrepresented what was in the box, and this is especially true for the Sovereign. We all feel disappointed in parts of our builds. For me, the wood finish is not what I would have liked, but I'm using cheap hobby store hardwood and Chinese imported planking, not box wood and pear wood. Plus, I'm not good with wood finishes. Still, the model has taken on a more rustic, used look than a neat, new, presentation model appearance. I was aiming at making a model close to those made be Nigel, Uwe, and Wolfgang Rotter, and yours in neatness, and it's falling a tad short of the mark. Still, it's still a good model. We all have our strong points and weak points, and by practicing, our weak points improve. Bashing has created a lot more work than anticipated, but the added features have been fun to construct.
Last edited:
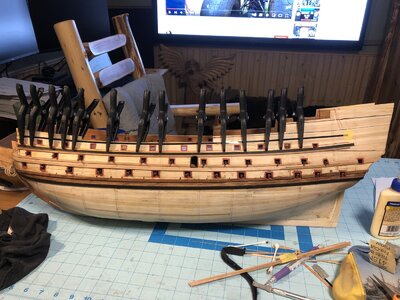
The sixth wale was installed on the port side today. Next is to place all the planks in between the wales.
Gluing the wale in place after painting and installing the black planking strips beneath it.
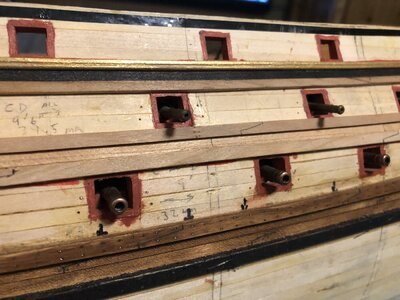
Close up.
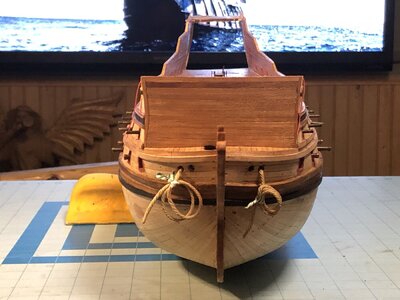
There's still time to correct the twisted poop deck, which will eventually be cut out and replaced with a detailed deck structure. Everything else seemed to line up well enough.
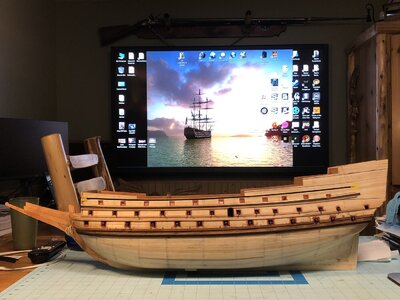
Progress so far.
Gluing the wale in place after painting and installing the black planking strips beneath it.

Close up.

There's still time to correct the twisted poop deck, which will eventually be cut out and replaced with a detailed deck structure. Everything else seemed to line up well enough.

Progress so far.

Thanks for all the likes, guys. One of the things that really motivates me is the company on this forum. It's really a joy to share this hobby with others.
Says the guy who celebrates being banned...It's really a joy to share this hobby with others.

 .
.Cute, Paul...Says the guy who celebrates being banned...
.
DittoThanks for all the likes, guys. One of the things that really motivates me is the company on this forum. It's really a joy to share this hobby with others.
Stop apologizing Paul. You are too hard on yourself. It creates lots of fun for me, though!Your input is what makes this build interesting for me, and diversions are warmly welcomed because they always interesting.
View attachment 331027 View attachment 331028
Exactly... I agree that DeAgostini misrepresented what was in the box, and this is especially true for the Sovereign. We all feel disappointed in parts of our builds. For me, the wood finish is not what I would have liked, but I'm using cheap hobby store hardwood and Chinese imported planking, not box wood and pear wood. Plus, I'm not good with wood finishes. Still, the model has taken on a more rustic, used look than a neat, new, presentation model appearance. I was aiming at making a model close to those made be Nigel, Uwe, and Wolfgang Rotter, and yours in neatness, and it's falling a tad short of the mark. Still, it's still a good model. We all have our strong points and weak points, and by practicing, our weak points improve. Bashing has created a lot more work than anticipated, but the added features have been fun to construct.
Kurt come on, now who is being hard on yourself.Do not sell yourself short, I can count on one hand the number of builders that have had the guts/stupidity/courage/skills (delete as appropriate
 ) to take a perfectly good kit and decide "I know,I am going to build the hull, then chop all the guts out and build a full interior".
Working in more noble woods,I found is an easy step to improving the look of my models and believe me they actually are a lot easier to work with.The downside is they do cost a LOT more, especially now compared to when I was working on Sovereign.The other sacrifice to striving for a near to perfect finish is time and lots of it.My Sovereign so far is the result of sixty hours per week spread over two years! I had a lot more free time back then.
You may strive to improve your standard of finish and that will come with time and is the easy bit.You have mastered the hard part, being able to completely redesign a kit to meet your own goals, firstly in your head and then put it into practice.
Kind Regards
Nigel
I thought my assessment of the results was quite accurate based on study of your model's photographs. I may be able to bash the hell out of the structure, but there is room for improvement when it comes to neatness of the final appearance of the hull when viewed closely. Admittedly, this is my second model, so lack of polish in certain areas is to be expected. Also, if it came out perfect, there would be much less point to making the next model!Kurt come on, now who is being hard on yourself.Do not sell yourself short, I can count on one hand the number of builders that have had the guts/stupidity/courage/skills (delete as appropriate) to take a perfectly good kit and decide "I know,I am going to build the hull, then chop all the guts out and build a full interior".
Working in more noble woods,I found is an easy step to improving the look of my models and believe me they actually are a lot easier to work with.The downside is they do cost a LOT more, especially now compared to when I was working on Sovereign.The other sacrifice to striving for a near to perfect finish is time and lots of it.My Sovereign so far is the result of sixty hours per week spread over two years! I had a lot more free time back then.
You may strive to improve your standard of finish and that will come with time and is the easy bit.You have mastered the hard part, being able to completely redesign a kit to meet your own goals, firstly in your head and then put it into practice.
Kind Regards
Nigel

