I apologize for such a belated Happy Birthday, but I want to congratulate you on a magnificent lower hull planking. This came out really well!
-

Win a Free Custom Engraved Brass Coin!!!
As a way to introduce our brass coins to the community, we will raffle off a free coin during the month of August. Follow link ABOVE for instructions for entering.
-

PRE-ORDER SHIPS IN SCALE TODAY!
The beloved Ships in Scale Magazine is back and charting a new course for 2026!
Discover new skills, new techniques, and new inspirations in every issue.
NOTE THAT OUR FIRST ISSUE WILL BE JAN/FEB 2026
You are using an out of date browser. It may not display this or other websites correctly.
You should upgrade or use an alternative browser.
You should upgrade or use an alternative browser.
HMS Sovereign of the Seas - Bashing DeAgostini Beyond Believable Boundaries
- Thread starter DARIVS ARCHITECTVS
- Start date
- Watchers 105
What happens in Vegas...Are you speaking from experience perhaps? Just wondering. View attachment 341486
I got a good question from @lakedaisy today and thought I'd share the answer with everyone since the subject is helpful:
"Kurt. Why did you mark the outside of the hull with the bulkheads? Thanks."
Good question. There are two reasons.
First, I have often wondered whether kit designers place their bulkhead locations are the same locations in the hull as one of the frames. Not having done enough research ship construction so that I may be able to discern where frames are supposed to go in a ship, or even is it is possible to determined where frames are suppose to be, I made an assumption that the kit designers knew where the frames went, and made a second assumption that the bulkhead locations where placed where one of the frames went. The more I learn about how kits are designed, the less I believe that kit designers do the in-depth research necessary to know how ships were actually framed. Instead, now I believe that the bulkhead locations are chosen such that 1) there are enough of them to form the basic shape of the hull using planks, and 2) they are using as few of them as possible to save costs one plywood.
When planking, in the absence of information, I have assumed that a frame exists where the kit designer placed a bulkhead. Perhaps those who build POF models have a better idea where frames went and how many there were for late period ships, but on early ones, everyone would make a wild guess as to actual frame positions. So, marking the location of the frames on the outside of the first planking layer became where most of the final plank end seams would be placed. Plank ends have to be located on a frame, so if a plank seam had be placed between two bulkhead locations, its location was arbitrarily chosen.
Thanks HH. As you know, Uwe always has the birthday thing covered...I apologize for such a belated Happy Birthday, but I want to congratulate you on a magnificent lower hull planking. This came out really well!

Never been there... I'd have to defer to you on that one, Paul. I saw all "The Hangover" movies. Care to share any spicy stories with us?What happens in Vegas...
Actually...I'm usually in bed by 9:00 pm...Never been there... I'd have to defer to you on that one, Paul. I saw all "The Hangover" movies. Care to share any spicy stories with us?
Impressive work and translucent painting. Is that an original Paasche Airbrush?.Well, it was time to try using the air brush again. Mine is an airbrush from 1987, given to me by a close friend along with an equally old compressor. The bottom of the hull was painted and lacquered. Then, the saddles were reinstalled on the baseboard and the model placed on them upright.
View attachment 341375
Materials for masking off the lower hull. The paint was mixed with airbrush medium to thin it out to the proper viscosity for the airbrush.
View attachment 341376
After masking, the hull is painted with a thin coat, allowing the plank seams to show.
View attachment 341377
Seams still visible. The airbrush applied paint in a much thinner coat than spray paint directly from a spray can. This will work.
View attachment 341378
Krylon Satin Finish is the lacquer I used to protect the paint. It adds a small amount of satin sheen to the hull.
View attachment 341379
Buttocks after laquering.
View attachment 341380
Letting the lacquer dry.
View attachment 341381
Preparing to reinstall the saddles so the model can sit upright again.
View attachment 341382
The saddles are reinstalled on the baseboard.
View attachment 341383
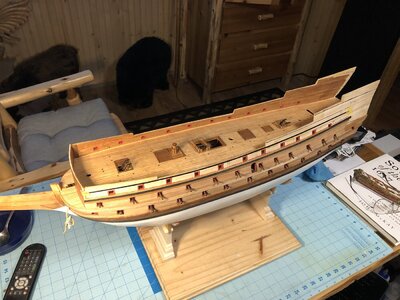
Progress so far. View attachment 341384
No, it was an old Badger airbrush, which is very common. I am new to using the airbrush and the mixture of medium and paint was only approximated. The tip of the airbrush clogged three times over the 3 hours I took to learn how to paint the hull as I went. I'm getting quite experienced at cleaning it.Impressive work and translucent painting. Is that an original Paasche Airbrush?.
Thank you. Possibly paint medium may have been too high a viscosity or solvent incompatibility usually helps clog nozzles. Regardless, you ended up with a very nice finish.No, it was an old Badger airbrush, which is very common. I am new to using the airbrush and the mixture of medium and paint was only approximated. The tip of the airbrush clogged three times over the 3 hours I took to learn how to paint the hull as I went. I'm getting quite experienced at cleaning it.

Since I was spraying more air than paint, the tip would slowly accumulate dry paint. The viscosity could definitely be off, because I literally dumped paint and medium into the spray bottle with pure guesswork, checking to see how thin the mixture swirled in the bottle, and it looked pretty thin. Paint was applied in very thin, misty coats, slowly fading the planking seams until they were barely visible. What too forever is inspecting and painting those area which were thin, and removing the blobby appearance of the overall coating. It looks even now, and a bit thicker, but the wood grain and seams peek through. It still looks like wood, and avoids the plastic, smooth appearance found on models made by builders who are more precise, careful, and experienced than I am. The lacquer coating hardened and protects the paint well from scrapes and dirty finger stains. I learned a lot from this paint job.Thank you. Possibly paint medium may have been too high a viscosity or solvent incompatibility usually helps clog nozzles. Regardless, you ended up with a very nice finish.
Thank you for the summation. Cheers.Since I was spraying more air than paint, the tip would slowly accumulate dry paint. The viscosity could definitely be off, because I literally dumped paint and medium into the spray bottle with pure guesswork, checking to see how thin the mixture swirled in the bottle, and it looked pretty thin. Paint was applied in very thin, misty coats, slowly fading the planking seams until they were barely visible. What too forever is inspecting and painting those area which were thin, and removing the blobby appearance of the overall coating. It looks even now, and a bit thicker, but the wood grain and seams peek through. It still looks like wood, and avoids the plastic, smooth appearance found on models made by builders who are more precise, careful, and experienced than I am. The lacquer coating hardened and protects the paint well from scrapes and dirty finger stains. I learned a lot from this paint job.

Good morning Kurt. When you said you were going to paint that beautiful planking I was like “NO”. You pulled this off brilliantly and thank you for explaining the process. Certainly owned this. Cheers GrantWell, it was time to try using the air brush again. Mine is an airbrush from 1987, given to me by a close friend along with an equally old compressor. The bottom of the hull was painted and lacquered. Then, the saddles were reinstalled on the baseboard and the model placed on them upright.
View attachment 341375
Materials for masking off the lower hull. The paint was mixed with airbrush medium to thin it out to the proper viscosity for the airbrush.
View attachment 341376
After masking, the hull is painted with a thin coat, allowing the plank seams to show.
View attachment 341377
Seams still visible. The airbrush applied paint in a much thinner coat than spray paint directly from a spray can. This will work.
View attachment 341378
Krylon Satin Finish is the lacquer I used to protect the paint. It adds a small amount of satin sheen to the hull.
View attachment 341379
Buttocks after laquering.
View attachment 341380
Letting the lacquer dry.
View attachment 341381
Preparing to reinstall the saddles so the model can sit upright again.
View attachment 341382
The saddles are reinstalled on the baseboard.
View attachment 341383
Progress so far. View attachment 341384
Thanks, Grant! There is just enough paint to make it white without drowning out the wood texture and seams. This experiment was a success. Time to contemplate construction of the stern castle interior decks and how to merge them with the side galleries. La Couronne should have been white, but I left the mahogany planking alone on that model, so in the interests of historical accuracy in appearance, it was decided to paint this hull.Good morning Kurt. When you said you were going to paint that beautiful planking I was like “NO”. You pulled this off brilliantly and thank you for explaining the process. Certainly owned this. Cheers Grant
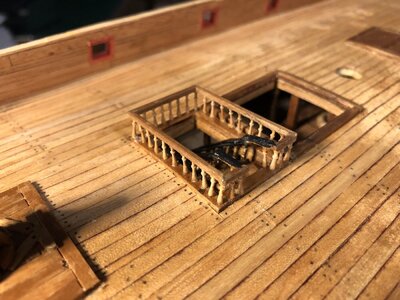
Hi Kurt, yet another great hack for making balusters.11mm Falkonet belaying pins used for the balusters.
Hacks are bread and butter for scratch building. I neatened up the and repainted a couple joined on the rails and straightened a few balusters. That assembly was very delicate!Hi Kurt, yet another great hack for making balusters.
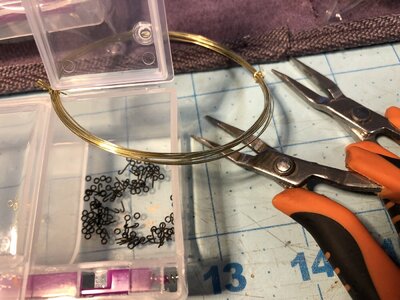
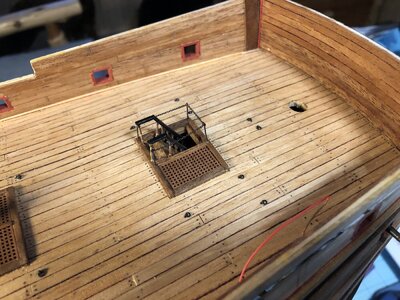
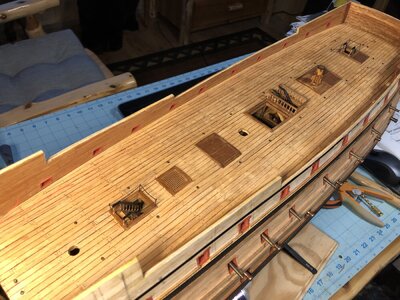
Deck rings were made and installed on the upper gun (weather) deck. Rings and "J" bolts were made from 26 gage wired and blackened with brass blackening solution. Holes were drilled in the deck and the "J" rings glued in them, trapping the deck rings against the deck. These deck rings are used for train tackles for the guns, and were placed behind all the gun ports. A few more rings are needed to be installed for the stern chasers after their positions are determined.
I'm thinking of replacing the rails on the other two ladders, but I dont' have enough 11mm belaying pins yet.
I'm thinking of replacing the rails on the other two ladders, but I dont' have enough 11mm belaying pins yet.


Last edited:
I spend the whole day making the railing and balusters for the aft ladder, just forward of the mizzen mast. This looks much better than the chain railing which was previously made.
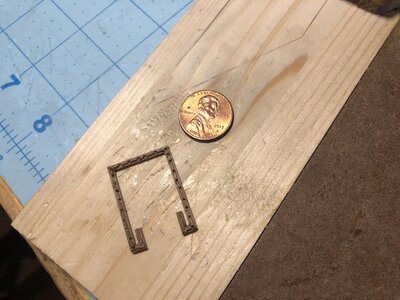
2mm x 2mm walnut was scraped into a "T" cross section to make the railing. Railing sections were mitered and glued end to end. Holes are drilled part way into the bottom for the balusters. The bottom of the railing is shown below.
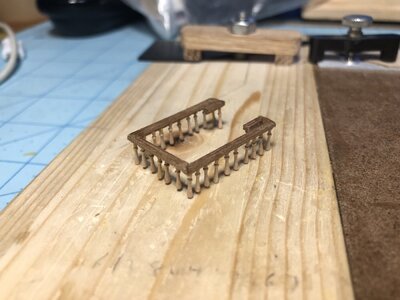
11mm wooden belaying pins were cut to length and glued into the holes.
The railing is glued to the deck and a section of the railing is painted black.
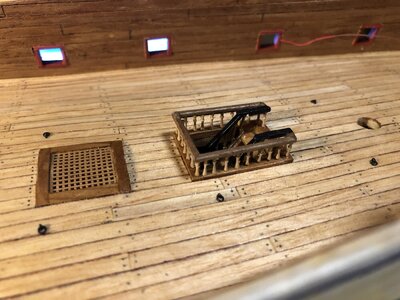
Progress so far.
2mm x 2mm walnut was scraped into a "T" cross section to make the railing. Railing sections were mitered and glued end to end. Holes are drilled part way into the bottom for the balusters. The bottom of the railing is shown below.

11mm wooden belaying pins were cut to length and glued into the holes.

The railing is glued to the deck and a section of the railing is painted black.

Progress so far.

Last edited:
True story


