HMS Sovereign of the Seas - Bashing DeAgostini Beyond Believable Boundaries

In all fairness, they do look great and are ready for the Kings' inspection. Thumbsup
What to do with colors on a ship has a lot to do with the overall look you are going for. The best weathering job I have ever seen on a model was done by our own member @shelk on Santisimo Trinidad using a sophisticated chipped paint method: That ship looks like it has been through hell, and the guns are all green with oxide. If you want to see what a truly weather-worn ship model looks like, that would be it. This was not the look I am trying for on HMS Sovereign of the Seas, for several reasons. First, I wanted to depict the ship as it was launched, in almost new condition but with enough wear to give the appearance of a real ship. Second, I am a rank novice at painting and weathering, and diorama quality realism is still far outside my skill set. So, that's why a mildly oxidized, browned appearance of the bronze guns is what was chosen.

And believe me, I graduated from a US Military Academy at Kings Point, so I really know how much work it is to polish brass! Years of experience there. . .. :D ROTF
 
Last edited:
I find myself in similar waters; I have almost no building experience, and no skills with regards to painting. Plus I also lack your polishing expertise. :cool:
We all have our own ideas of how we want to present our models, no idea is the same and luckily none is better than the other.
I still thoroughly enjoy your journey.
 
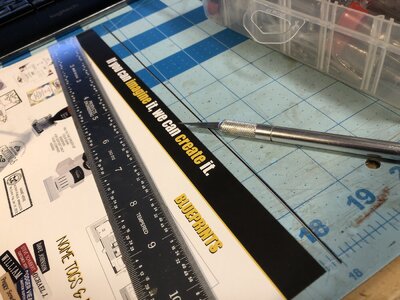
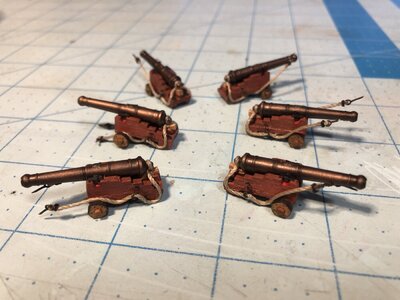
The first six gun carriages for the upper deck for gun ports 1 through 3 have been assembled. The caps for the barrel trunnions were cut from thick paper strips using a ruler and razor knife. I guess junk mail is good for something after all. The strips were stained with black wood stain, and chopped into short segments with the razor chopper, then glued in place over the trunnions of the cannon barrels.

1350 Cut Strips of Thick Paper for Caps.jpg

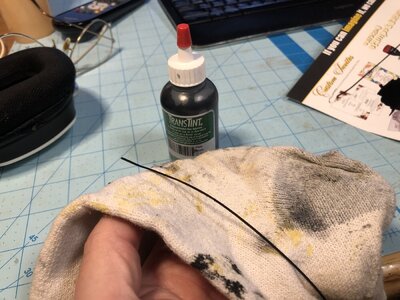
Strips are stained black to simulate iron and excess stain is wiped off with dirty smelly old sock... still useful.
1351 Stain Strips of Paper Black.jpg

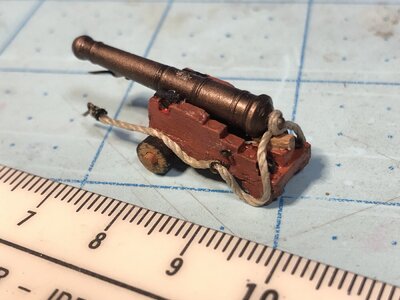
The quoin and barrel is glued to the carriage with CA glue. The breeching line is made by first seizing an eyelet to one end, threading it through the ring one side, looping and gluing it around the cascabel, passing it through the ring on the opposite side, the seizing another eyelet on the end.
1352 Glue Paper as Barrel Trunnion Caps.jpg

The line is glue to the sides of the carriage near the rear skids, then stiffened with PA glue and the line draped for realism.
1353 First Carriage Complete.jpg

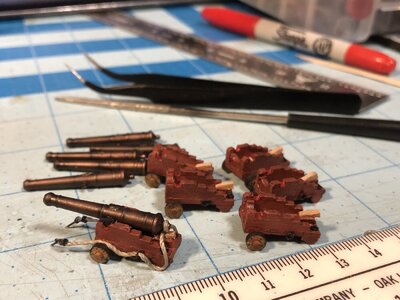
The first 6 demi-culverin drakes are ready to install on the upper gun deck. Four of these are inside the forecastle.
1354 Six Gun Carriages Complete.jpg
 
The first six gun carriages for the upper deck for gun ports 1 through 3 have been assembled. The caps for the barrel trunnions were cut from thick paper strips using a ruler and razor knife. I guess junk mail is good for something after all. The strips were stained with black wood stain, and chopped into short segments with the razor chopper, then glued in place over the trunnions of the cannon barrels.

View attachment 348634

Strips are stained black to simulate iron and excess stain is wiped off with dirty smelly old sock... still useful.
View attachment 348635

The quoin and barrel is glued to the carriage with CA glue. The breeching line is made by first seizing an eyelet to one end, threading it through the ring one side, looping and gluing it around the cascabel, passing it through the ring on the opposite side, the seizing another eyelet on the end.
View attachment 348636

The line is glue to the sides of the carriage near the rear skids, then stiffened with PA glue and the line draped for realism.
View attachment 348637

The first 6 demi-culverin drakes are ready to install on the upper gun deck. Four of these are inside the forecastle.
View attachment 348638
Very convincing looking carriages, Kurt.
Now, with the barrels mounted to the gun bases, your choice of finish for the barrels are very convincing.
 
Very convincing looking carriages, Kurt.
Now, with the barrels mounted to the gun bases, your choice of finish for the barrels are very convincing.
Thanks! I'm trying to keep the appearance of all the parts similar in respect to weathering so nothing stands out as too clean or too dirty. Everything has some indication of age, and is not pristine, but neither is it neglected. Seeing as my finishing work is rather simple and crude compared to the neat appearance of other builds like Paul's Wasa, making things look a bit used and dirty comes naturally. :D
 
Last edited:
Thanks! I'm trying to keep the appearance of all the parts similar in respect to weathering so nothing stands out as too clean or too dirty. Seeing as my finishing work is rather simple and crude compared to the neat appearance of other builds like Paul's Wasa, making things look a bit used and dirty comes naturally. :D
I said it before; I don't consider myself to be a gifted modeler, so I do read the build logs of the prodigies for enjoyment but also to try and improve myself. In the end, most of my work comes out like yours; a bit used and a bit dirty... ;)
 
Very nice work Kurt.The paper trunnion caps is a nice work round to maintain scale fidelity and avoid the frequent clunky appearance of these items

Happy New Year

Nigel
 
Very nice work Kurt.The paper trunnion caps is a nice work round to maintain scale fidelity and avoid the frequent clunky appearance of these items

Happy New Year

Nigel
Yes, a small improvement over the last 60 carriages that were made. Keeping things in scale is a constant study. When the ship is done, it will look much better for these details.
 
Yes, a small improvement over the last 60 carriages that were made. Keeping things in scale is a constant study. When the ship is done, it will look much better for these details.
The one piece of advice I could offer anyone when trying to keep everything scale is to always think if full size and work back.Trunnion caps cannot be any thicker than 20mm wrought iron, 0.25mm in your scale;)
 
Unfortunately, I frequently do the math, both ways, and sometimes the results are hilarious: scale 1:72, thickness of strips, used to fabricate a door panel: 1mm/0,040"=72mm/2,8". Yeah right.
Heh. Good luck making 0.040mm door panels from wood. Use paper at that point. We try to stay in scale, but it's not always possible.
 
Last edited:
Honey.....! Kurt found my sock!

So, Kurt I ran across an offer to purchase "Sovereign of the seas" completed. Which is a little sad, but I think the guy needs the money and I do not want the ship to end up in turmoil. The model looks great in the only picture he has, and I will pursue it tomorrow. Now I have to buy a borescope to see if the model maker put in as much detail as you have. And while I am commenting on your details, I cannot wait to see your interior designs with 3-d RUM bottles sitting around, with corks in them, of course.

How do I put a picture in place of my (blue D)/ Tired of my (blue D). I am kind of an old and tired (D).Pirate Flag
Tell us more about your model purchase! Who makes it?
 
Tell us more about your model purchase! Who makes it?
I have not made it to the purchase yet, supposedly around 8:00 PM tonight. I am not sure what I am looking for, IE: size, scale or mfg of the model. Hopefully I can get some history on it. Thank you for the info on doing a picture and also still wondering about my lost sock and those tiny bottles of 3-d RUM bottles.

Stay Warm
I'm working on the lost sock, and I believe you're talking about the three cases of rum that got lost "under mysterious circumstances". I have it on good authority they will be discovered once we send the Bosun and a few trustworthy mates down below the orlop deck and search for them. With any luck, a few of them may not be empty.

As for your model, the larger the scale, the easier it is to build, especially in details. The DeAgostini model of HMS Sovereign of the Seas has issues with an incorrect stern (difficult to fix) and gun carriages. The classic Mantua model has nice decorations, but ALL decorations on ALL models are not historically correct, at least 70% wrong on all counts. Everyone wants to build the Rolls Royce of ship models, but the only kits out there are Fiats. Many of the hull features on the Mantua model are incorrect but fixable. In short, if you want a pretty model, go with Mantua, if you want an easy to build model, so with DeAgostini. The Amati Plans are good for building from scratch, but the decorations are also incorrect. This is why I'm bashing the hello out of my model and about 95% of it is scratch built. Too many things need correcting in any of the kits to ever consider building them straight out of the box. If you correct the stern of McKay's design and eliminate a few features like the booby hatch, rearrange the ladders and hatches, and fix the belfry, the rest of the model is worthy of scratch building. See the first few pages of this build log for details on what features need correction. It's a shame that NO ONE makes a correct set of decorations for the Sovereign. Once I figure out how to use Blender and make .STL files of all the decorations in the upcoming years, that will change.
 
Last edited:
Back
Top