I have caught up again. You have fixed the cat-related damage nicely and thanks for showing the clever way for the construction of the bulwarks. I certainly hope for you that the stone was a once in a lifetime experience.
-

Win a Free Custom Engraved Brass Coin!!!
As a way to introduce our brass coins to the community, we will raffle off a free coin during the month of August. Follow link ABOVE for instructions for entering.
-

PRE-ORDER SHIPS IN SCALE TODAY!
The beloved Ships in Scale Magazine is back and charting a new course for 2026!
Discover new skills, new techniques, and new inspirations in every issue.
NOTE THAT OUR FIRST ISSUE WILL BE JAN/FEB 2026
You are using an out of date browser. It may not display this or other websites correctly.
You should upgrade or use an alternative browser.
You should upgrade or use an alternative browser.
HMS Sovereign of the Seas - Bashing DeAgostini Beyond Believable Boundaries
- Thread starter DARIVS ARCHITECTVS
- Start date
- Watchers 105
Well, all you have to do is produce a hundred or more just like it and glue em in there!Funny you should mention that. I WAS thinking of placing it inside the model to leave a piece of me in the ship! Just wondering where to put it.
Here it is:
View attachment 359279

Hey, it's all in fun my friend, I know the pain of something like that one stone would probably kill me.
- Joined
- Nov 6, 2022
- Messages
- 243
- Points
- 113

It is a keeper. Tag and punch your card before the warden ask's if it were really yours. Three mm does not seem like much until you scale it to microns. I have appreciated your skills and figure it will be on the cathead, because the cat started all this anyway. I hope to see you back soon on this one-of-a-kind build going full wind.
Good morning Kurt. Eish that must of been a tad painful. Send that little rebellious stone to the ship gallows with no parole. Cheers GrantFunny you should mention that. I WAS thinking of placing it inside the model to leave a piece of me in the ship! Just wondering where to put it.
Here it is:
View attachment 359279
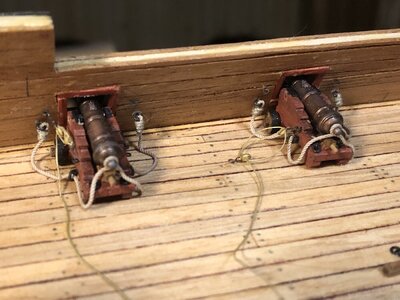
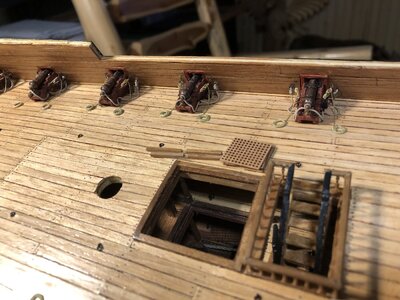
Work is getting very busy, and soon I'll be working 6 days a week 14 hours per day for about a month. Some etched hooks came in from HiSModel today, so now I can start work on the Sovereign again. I used the tiniest hooks and blocks t make the last four gun tackles for two waist guns on the upper gun deck.


Nice work, Kurt! Silly question: Why the straight line of butt joints on the left of the last picture where there doesn't appear to be a joist beam? I'm sure there must be a logical explanation. Just curious.Work is getting very busy, and soon I'll be working 6 days a week 14 hours per day for about a month. Some etched hooks came in from HiSModel today, so now I can start work on the Sovereign again. I used the tiniest hooks and blocks t make the last four gun tackles for two waist guns on the upper gun deck.
View attachment 363024
View attachment 363025
- Joined
- Jun 22, 2020
- Messages
- 16
- Points
- 58

Hi, I started a scratch build SOTS using the DeAgostini plans but quickly abandoned them in favour of using John McKays book. While I appreciate you are looking to modify the kit rather than build from scratch, I would caution that there are significant differences and the kit has several hull cuts in the wrong places (e.g. gun ports, entry ports, deck hatches, ladders, even masts) so I recommend (from bitter experience) you check what result you are looking for before you cut.
Good luck!
Good luck!
Sharp eye Vic! Due to a problem, I had to replank that section of the deck. As a result, all those plank ends at the extreme left lined up. The trenails were marked because something has to hold the ends of the planks down. Not to worry though, because all those seams will be hidden under or behind the bulkhead located there, so the mistake will eventually be buried under the halfdeck bulkhead. Sometimes you get lucky and a mistake can be buried. The alternative was replanking the entire deck aft of that area, including gun carriage removal. The choice was obvious.Nice work, Kurt! Silly question: Why the straight line of butt joints on the left of the last picture where there doesn't appear to be a joist beam? I'm sure there must be a logical explanation. Just curious.
True sir! If you go back far enough into my log, you will see that I documented in detail (with measurements) most of the changes to this kit with regard to gun port position, hatch and ladder position, and a host of others. I deemed the DeAgostini kit to be closer to the original ship than McKay's design as a starting point. All changes were considered with most known sources of information available on the Sovereign. A great source for details is James A. Sephton's Sovereign of the Seas: The Seventeeth-Century Warship. One of the intriguing things is Sephton states that the Sovereign did not have capstans but relied on windlasses for hauling work. I am skeptical about that considering the large size of the ship. I wonder where he got that idea, since capstans did exist on ships this early, as evidenced by the Vasa.Hi, I started a scratch build SOTS using the DeAgostini plans but quickly abandoned them in favour of using John McKays book. While I appreciate you are looking to modify the kit rather than build from scratch, I would caution that there are significant differences and the kit has several hull cuts in the wrong places (e.g. gun ports, entry ports, deck hatches, ladders, even masts) so I recommend (from bitter experience) you check what result you are looking for before you cut.
Good luck!
You should likewise be warned NOT to take everything McKay's design proposes as historically correct also. Look at my build log near the first few pages for a scathing review of McKay's interpretation of the Sovereign by Frank Fox, an expert on 17th century vessels. He makes a couple serious errors worth noting, such as reliance on Dean's doctrine regarding hull shape over the original designer, Peter Pett's notes. 18th and 19th century features, such as the booby hatch and officer's companionway do not belong on a 17th century ship. The entire stern shape is incorrect, to a ridiculous degree such that it makes the ship unsteerable. Since no kit in existence is correct for HMS Sovereign of the Seas, the builder is given the choice of heavily modifying an existing kit or scratch building all of the model. I have borrowed carefully chosen features from McKay, where judgement and research indicate they are consistent with 17th century design or corroborated by other sources or period vessels. Even with all the known research sources made available to the builder, there are large portions of this vessel that remain unknown, made worse by the fact that this vessel was unique in design in many ways.
Excellent discussion.True sir! If you go back far enough into my log, you will see that I documented in detail (with measurements) most of the changes to this kit with regard to gun port position, hatch and ladder position, and a host of others. I deemed the DeAgostini kit to be closer to the original ship than McKay's design as a starting point. All changes were considered with most known sources of information available on the Sovereign. A great source for details is James A. Sephton's Sovereign of the Seas: The Seventeeth-Century Warship. One of the intriguing things is Sephton states that the Sovereign did not have capstans but relied on windlasses for hauling work. I am skeptical about that considering the large size of the ship. I wonder where he got that idea, since capstans did exist on ships this early, as evidenced by the Vasa.
You should likewise be warned NOT to take everything McKay's design proposes as historically correct also. Look at my build log near the first few pages for a scathing review of McKay's interpretation of the Sovereign by Frank Fox, an expert on 17th century vessels. He makes a couple serious errors worth noting, such as reliance on Dean's doctrine regarding hull shape over the original designer, Peter Pett's notes. 18th and 19th century features, such as the booby hatch and officer's companionway do not belong on a 17th century ship. The entire stern shape is incorrect, to a ridiculous degree such that it makes the ship unsteerable. Since no kit in existence is correct for HMS Sovereign of the Seas, the builder is given the choice of heavily modifying an existing kit or scratch building all of the model. I have borrowed carefully chosen features from McKay, where judgement and research indicate they are consistent with 17th century design or corroborated by other sources or period vessels. Even with all the known research sources made available to the builder, there are large portions of this vessel that remain unknown, made worse by the fact that this vessel was unique in design in many ways.
Great explanation!Sharp eye Vic! Due to a problem, I had to replank that section of the deck. As a result, all those plank ends at the extreme left lined up. The trenails were marked because something has to hold the ends of the planks down. Not to worry though, because all those seams will be hidden under or behind the bulkhead located there, so the mistake will eventually be buried under the halfdeck bulkhead. Sometimes you get lucky and a mistake can be buried. The alternative was replanking the entire deck aft of that area, including gun carriage removal. The choice was obvious.
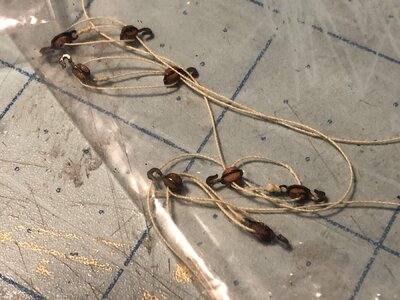
They are at HisModel HERE for the tiniest 3mm hooks, tied to 1.5mm blocks, and HERE for the strops with hooks and eyelets, used for 2mm blocks. A mix of 1.5mm and 2mm blocks were used in making gun tackles on my model.Hi Kurt,
Where did you get those hooks? - I need some as well - I like that they are 3 dimensional not just flat.
View attachment 363177
Note that the hooks for each gun tackle were twisted 90 degrees after the strop is glued to the wooden block or the individual hook is tied to the block, using a needle nosed pliers while being held with tweezers in your other hand. Make sure that when you twist the hooks on the stropped blocks that CA glue has been used to secure the strop all the way around the block FIRST, or you will tear the strop off the block and mangle your work. This is careful work.
Oldflyer, read about the process of making gun tackles using two types of hooks in my build log starting HERE. The process using strops and hooks with 2mm blocks goes fast once you train your hands and perform the process a few times. It's a self-taught process.
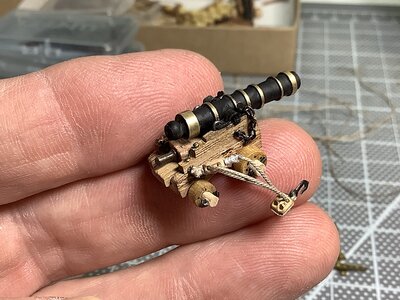
Two types of gun tackles using 2mm blocks, one with etched metal strops/hooks/eyes (thicker hooks that are too large for scale but strong) and another with tiny hooks tied to blocks with black thread forming the strops (extremely delicate).
Method 1: tiny 3mm hooks
Method 2: Strops/hooks/eyes
Last edited:
GREAT - thanks for the link as well as your always detailed "how to's". I just ordered several sets of blocks from Dry Dock, but in 4mm.
I did glance at Hismodel last night - need to return today. I Also gladly noted that they have miniature chains.
I also want to add capsquare details including chains to the carriages for the Sovereign, as I did for my Santisima cross-section - in that one I think that the chains are bit out of scale (and had to be painted black). As always thanks for the advice.
Regards,

Last edited:
I am leaving the cap square details off, judging them to be too small to pursue. It was hard enough shrinking the gun tackle blocks down to a size where they are actually smaller than trucks! It's hard to put all the details on a small model without making them grotesquely out of scale, things like trenails, blocks, and rigging line diameter, and keep the model looking realistic at a distance. Every modeler has to set that threshold between realism and amount of detail.GREAT - thanks for the link as well as your always detailed "how to's". I just ordered several sets of blocks from Dry Dock, but in 4mm.
I did glance at Hismodel last night - need to return today. I Also gladly noted that they have miniature chains.
I also want to add capsquare details including chains to the carriages for the Sovereign, as I did for my Santisima cross-section - in that one I think that the chains are bit out of scale (and had to be painted black). As always thanks for the advice.
Regards,
View attachment 363243
Have you considered black paper as the capsquare? 0.5mm~0.7mm would do it and will look very good.I am leaving the cap square details off, judging them to be too small to pursue. It was hard enough shrinking the gun tackle blocks down to a size where they are actually smaller than trucks! It's hard to put all the details on a small model without making them grotesquely out of scale, things like trenails, blocks, and rigging line diameter, and keep the model looking realistic at a distance. Every modeler has to set that threshold between realism and amount of detail.
Actually Jimsky, I did. To make them to scale, the parts that protrude from the top of each 1mm wide x 3mm long cap square would have to be about 0.75mm tall like you said. But you know me... if I add that to one the gun carriages, I'd have to do it to ALL of them.I am leaving the cap square details off, judging them to be too small to pursue. It was hard enough shrinking the gun tackle blocks down to a size where they are actually smaller than trucks! It's hard to put all the details on a small model without making them grotesquely out of scale, things like trenails, blocks, and rigging line diameter, and keep the model looking realistic at a distance. Every modeler has to set that threshold between realism and amount of detail.
Adding trenails to the hull was also a consideration when looking for ideas for super-detailing, but at 1:78 scale, they should be practically invisible, and adding them with tiny marks would make the hull look like a mass of millions of dots, breaking immersion.
One detail that need to be added in small and subtle way is the rows of leather scupper covers on the hull sides. Paper would be good to use there.
The major challenge for me is figuring out what the inside decor for the spaces in the stern castle should like, and adjust the level of detail commensurate with the ability to view the interior spaces trough the stern and side gallery windows.
- Joined
- Jun 22, 2020
- Messages
- 16
- Points
- 58

Absolutely, and sorry, when I posted I neglected to notice how long you have been working on this. One thing I have learned from you is to do the thorough research and make detailed plans BEFORE starting to model. I am afraid my SOS is a bit of compromise after the fact.True sir! If you go back far enough into my log, you will see that I documented in detail (with measurements) most of the changes to this kit with regard to gun port position, hatch and ladder position, and a host of others. I deemed the DeAgostini kit to be closer to the original ship than McKay's design as a starting point. All changes were considered with most known sources of information available on the Sovereign. A great source for details is James A. Sephton's Sovereign of the Seas: The Seventeeth-Century Warship. One of the intriguing things is Sephton states that the Sovereign did not have capstans but relied on windlasses for hauling work. I am skeptical about that considering the large size of the ship. I wonder where he got that idea, since capstans did exist on ships this early, as evidenced by the Vasa.
You should likewise be warned NOT to take everything McKay's design proposes as historically correct also. Look at my build log near the first few pages for a scathing review of McKay's interpretation of the Sovereign by Frank Fox, an expert on 17th century vessels. He makes a couple serious errors worth noting, such as reliance on Dean's doctrine regarding hull shape over the original designer, Peter Pett's notes. 18th and 19th century features, such as the booby hatch and officer's companionway do not belong on a 17th century ship. The entire stern shape is incorrect, to a ridiculous degree such that it makes the ship unsteerable. Since no kit in existence is correct for HMS Sovereign of the Seas, the builder is given the choice of heavily modifying an existing kit or scratch building all of the model. I have borrowed carefully chosen features from McKay, where judgement and research indicate they are consistent with 17th century design or corroborated by other sources or period vessels. Even with all the known research sources made available to the builder, there are large portions of this vessel that remain unknown, made worse by the fact that this vessel was unique in design in many ways.
Funny you should say that. I saw a video on YouTube from Olha Batchvarov on here very first ship and offered her some advice on how to improve the model. Trouble was, that was, it was the first modeling video I saw from here, and didn't know that since then, she has become a world class professional ship modeler with many awardsAbsolutely, and sorry, when I posted I neglected to notice how long you have been working on this. One thing I have learned from you is to do the thorough research and make detailed plans BEFORE starting to model. I am afraid my SOS is a bit of compromise after the fact.
 in Ukraine, and her husband is a maritime historian. And here I was giving a professional advice after only building one model!
 No worries. This forum is full of buried treasure when it comes to information in build logs. It's a one-stop shop for learning about all sorts of techniques and tools. The trick is choosing the right words to input into the search engine. That's particularly hard when you're a beginner who doesn't know a lot of old nautical terminology for ship parts.
I'm a big fan of Olha's work, and her videos are one reason why I learned so much so fast and built an advanced ship like La Couronne as my first model, complete with full rigging and scratch made sails. I'm indebted to her and several other builders on this forum like NMBROOK (Nigel), Uwe, Maarten, dockattner (also a new builder), and many others for helping out with advice on just about everything, sometimes just by example.
Last edited:
Return of Kraken-Kitty!
The model suffered another assault by being knocked off the table onto the floor by my Bengal cat, Leopold. That's what I get for ignoring him when he wanted to play. He was so frustrated, he knowingly knocked the ship right off the table and it went rolling across the floor.
I spent the next four hours putting the stem and beakhead, sternpost, and three dislodged cannon carriages on the upper gun deck back together. I REALLY have to upgrade the cat shield. It was broken too.

The model suffered another assault by being knocked off the table onto the floor by my Bengal cat, Leopold. That's what I get for ignoring him when he wanted to play. He was so frustrated, he knowingly knocked the ship right off the table and it went rolling across the floor.

I spent the next four hours putting the stem and beakhead, sternpost, and three dislodged cannon carriages on the upper gun deck back together. I REALLY have to upgrade the cat shield. It was broken too.


