OMG, pardon me, those are what I spend a lot of time hand bending with unwanted alterations necessitating bending more to try to fine a matching batch and sorting the rest into a waiting container for similar sizes and types that may be wanted in the future. I have a good stock of black finished jewelry wire rolls so at this point I can use it fairly casually: 22, 24, 26, 28 gauges of Zebra Wire, Rich (PT-2)Only three hundred and something to go! Woot! Woot!
-

Win a Free Custom Engraved Brass Coin!!!
As a way to introduce our brass coins to the community, we will raffle off a free coin during the month of August. Follow link ABOVE for instructions for entering.
-

PRE-ORDER SHIPS IN SCALE TODAY!
The beloved Ships in Scale Magazine is back and charting a new course for 2026!
Discover new skills, new techniques, and new inspirations in every issue.
NOTE THAT OUR FIRST ISSUE WILL BE JAN/FEB 2026
You are using an out of date browser. It may not display this or other websites correctly.
You should upgrade or use an alternative browser.
You should upgrade or use an alternative browser.
HMS Sovereign of the Seas - Bashing DeAgostini Beyond Believable Boundaries
- Thread starter DARIVS ARCHITECTVS
- Start date
- Watchers 105
Shortcuts from hand bending wire into parts, such as etched brass parts, are where you find them. HiS has a lot of them. Crafty sailor has a few from Falkonet. Smart shopping can save you vast amounts of tedious scratch building, especially when you add ridiculously unnecessary amounts of extra detail just for fun that will go unseen without a borescope. You can make all the parts you need from small gauge, blackened wire, but in many cases, you don't have to.OMG, pardon me, those are what I spend a lot of time hand bending with unwanted alterations necessitating bending more to try to fine a matching batch and sorting the rest into a waiting container for similar sizes and types that may be wanted in the future. I have a good stock of black finished jewelry wire rolls so at this point I can use it fairly casually: 22, 24, 26, 28 gauges of Zebra Wire, Rich (PT-2)
Photo etched metallic parts at HiS Models
This link is a new resource that I didn't know about. Thanks, Rich (PT-2)Shortcuts from hand bending wire into parts, such as etched brass parts, are where you find them. HiS has a lot of them. Crafty sailor has a few from Falkonet. Smart shopping can save you vast amounts of tedious scratch building, especially when you add ridiculously unnecessary amounts of extra detail just for fun that will go unseen without a borescope. You can make all the parts you need from small gauge, blackened wire, but in many cases, you don't have to.
Photo etched metallic parts at HiS Models
Today I experimented with photo etched copper strops purchased from HiS Models. Because 2mm Falkonet blocks are too large to squeeze into the strop, the strop is cut and reformed around the block. All the blocks had their holes drilled to enlarge them slightly and allow the glue stiffened thread to pass through easily. Here is the process I used to make these strops work.
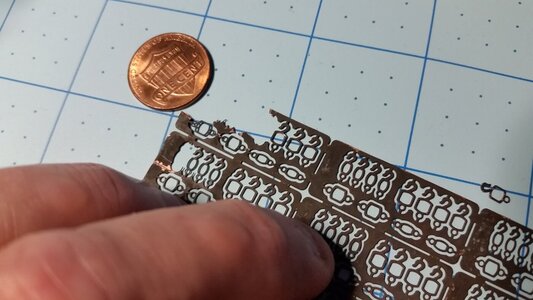
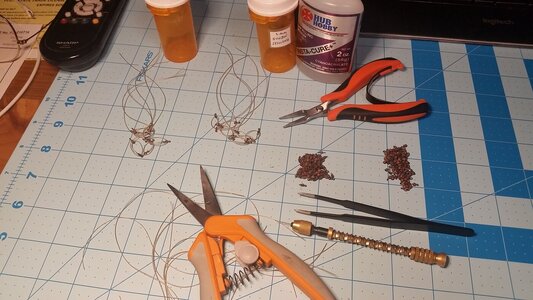
First, cut the strop from the nippers or the tips of the Fiskars scissors, which are very precise in cutting.
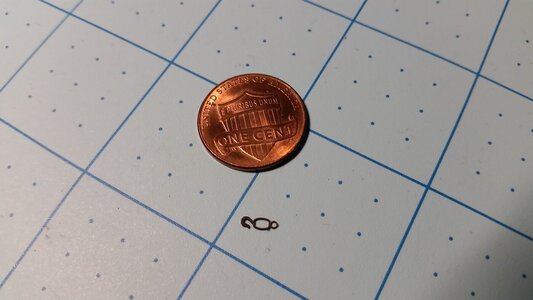
The cut is made on the bottom, which is the side that the hook points toward, so when the gun tackle is on the carriage, it won't be seen.
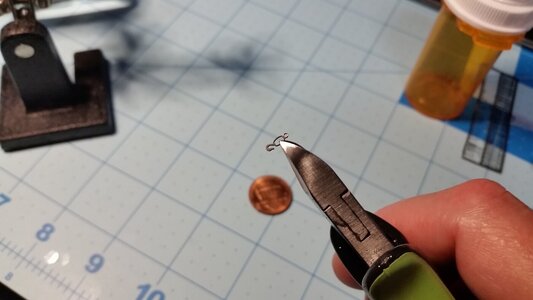
Open the strop a bit so it can accept the block
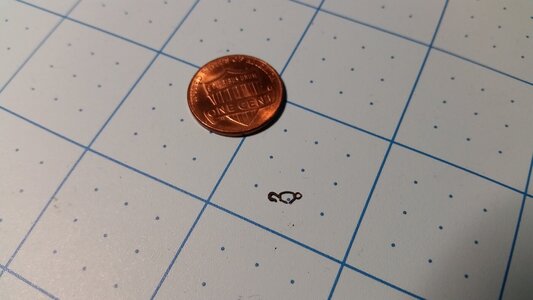
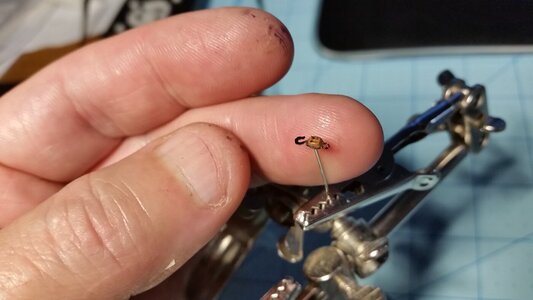
This example uses a single, 2mm block from Falkonet. Using tweezers, place the strop around the block, then squeeze the loose ends of the strop where it was cut against the block to hold the strop in place. Then squeeze the strop as shown below to make the strop fit tightly around the block. You need steady hands for this.
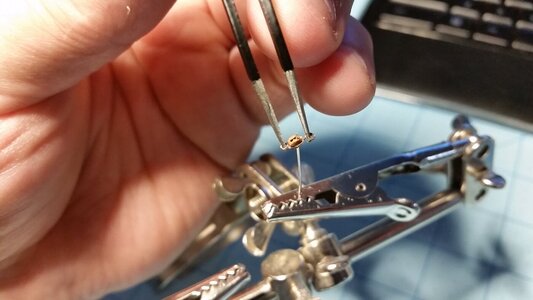
Apply some CA glue to both sides of the block to anchor the strop to the block.
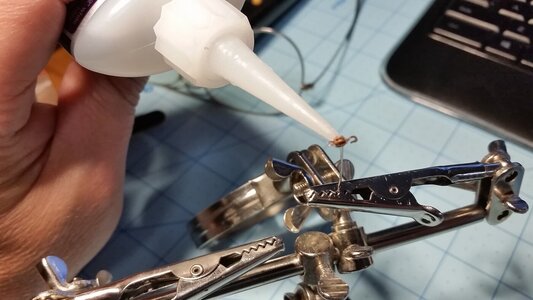
Since working with the strop wears some of the blackening off, use a Sharpie marker to color the copper black.
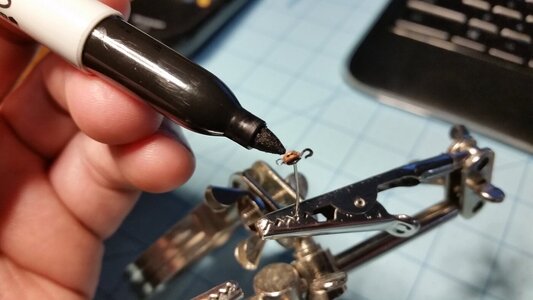
Here is an example of a 2mm double block. The strops provided by HiS Model for the double blocks were too large, so the strop meant for the single block was also used on the double block. It seems to work.
Both blocks stropped
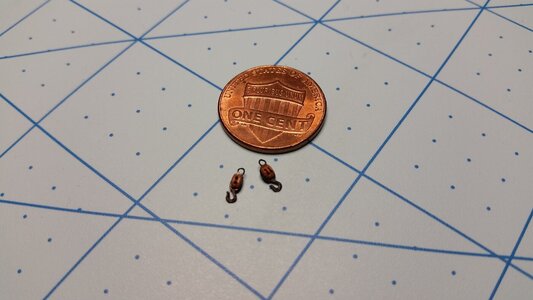
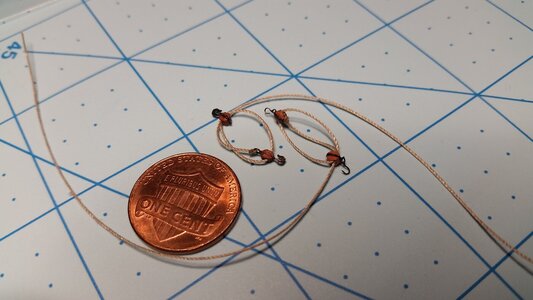
With a tweezers, the hooks on the blocks were twisted 90 degrees, and the loop on the double block was cut off, since it is not needed for a gun tackle. Shown below are the two types of gun tackle I have been assembling. The one on the left uses photo etched strops, and the one on the right uses very thin 3mm hooks with the tackle made using blocks tied with thread. I have to decide which type will be used on the upper deck guns which are the most visible. Which do you think looks better? Please comment below.

First, cut the strop from the nippers or the tips of the Fiskars scissors, which are very precise in cutting.

The cut is made on the bottom, which is the side that the hook points toward, so when the gun tackle is on the carriage, it won't be seen.

Open the strop a bit so it can accept the block

This example uses a single, 2mm block from Falkonet. Using tweezers, place the strop around the block, then squeeze the loose ends of the strop where it was cut against the block to hold the strop in place. Then squeeze the strop as shown below to make the strop fit tightly around the block. You need steady hands for this.

Apply some CA glue to both sides of the block to anchor the strop to the block.

Since working with the strop wears some of the blackening off, use a Sharpie marker to color the copper black.

Here is an example of a 2mm double block. The strops provided by HiS Model for the double blocks were too large, so the strop meant for the single block was also used on the double block. It seems to work.

Both blocks stropped

With a tweezers, the hooks on the blocks were twisted 90 degrees, and the loop on the double block was cut off, since it is not needed for a gun tackle. Shown below are the two types of gun tackle I have been assembling. The one on the left uses photo etched strops, and the one on the right uses very thin 3mm hooks with the tackle made using blocks tied with thread. I have to decide which type will be used on the upper deck guns which are the most visible. Which do you think looks better? Please comment below.

- Joined
- Sep 3, 2021
- Messages
- 5,199
- Points
- 738

Good heavens, you must be blessed with the patience of an angel!Shown below are the two types of gun tackle I have been assembling. The one on the left uses photo etched strops, and the one on the right uses very thin 3mm hooks with the tackle made using blocks tied with thread. I have to decide which type will be used on the upper deck guns which are the most visible. Which do you think looks better? Please comment
This would be testing my willpower to its extremes. My compliments on your build.
As for your request for comments; of course, it's my personal opinion, but I like the ones with the photo etched strops, they have a more robust appearance, better fitting their purpose.
Johan
With your well explained and illustrated tutorial I am convinced that with your skills and eyes you could become a watch maker . . . not just a repairer; unless fine jewelry would be your preference. Excellent work! RIch (PT-2)Today I experimented with photo etched copper strops purchased from HiS Models. Because 2mm Falkonet blocks are too large to squeeze into the strop, the strop is cut and reformed around the block. All the blocks had their holes drilled to enlarge them slightly and allow the glue stiffened thread to pass through easily. Here is the process I used to make these strops work.
View attachment 260771
First, cut the strop from the nippers or the tips of the Fiskars scissors, which are very precise in cutting.
View attachment 260772
The cut is made on the bottom, which is the side that the hook points toward, so when the gun tackle is on the carriage, it won't be seen.
View attachment 260773
Open the strop a bit so it can accept the block
View attachment 260774
This example uses a single, 2mm block from Falkonet. Using tweezers, place the strop around the block, then squeeze the loose ends of the strop where it was cut against the block to hold the strop in place. Then squeeze the strop as shown below to make the strop fit tightly around the block. You need steady hands for this.
View attachment 260775
Apply some CA glue to both sides of the block to anchor the strop to the block.
View attachment 260776
Since working with the strop wears some of the blackening off, use a Sharpie marker to color the copper black.
View attachment 260777
Here is an example of a 2mm double block. The strops provided by HiS Model for the double blocks were too large, so the strop meant for the single block was also used on the double block. It seems to work.
View attachment 260778
Both blocks stropped
View attachment 260779
With a tweezers, the hooks on the blocks were twisted 90 degrees, and the loop on the double block was cut off, since it is not needed for a gun tackle. Shown below are the two types of gun tackle I have been assembling. The one on the left uses photo etched strops, and the one on the right uses very thin 3mm hooks with the tackle made using blocks tied with thread. I have to decide which type will be used on the upper deck guns which are the most visible. Which do you think looks better? Please comment below.
View attachment 260780
What name or source are your tweezers shown above? I need to look into those to add to the ones that I have. RIch (PT-2)Today I experimented with photo etched copper strops purchased from HiS Models. Because 2mm Falkonet blocks are too large to squeeze into the strop, the strop is cut and reformed around the block. All the blocks had their holes drilled to enlarge them slightly and allow the glue stiffened thread to pass through easily. Here is the process I used to make these strops work.
View attachment 260771
First, cut the strop from the nippers or the tips of the Fiskars scissors, which are very precise in cutting.
View attachment 260772
The cut is made on the bottom, which is the side that the hook points toward, so when the gun tackle is on the carriage, it won't be seen.
View attachment 260773
Open the strop a bit so it can accept the block
View attachment 260774
This example uses a single, 2mm block from Falkonet. Using tweezers, place the strop around the block, then squeeze the loose ends of the strop where it was cut against the block to hold the strop in place. Then squeeze the strop as shown below to make the strop fit tightly around the block. You need steady hands for this.
View attachment 260775
Apply some CA glue to both sides of the block to anchor the strop to the block.
View attachment 260776
Since working with the strop wears some of the blackening off, use a Sharpie marker to color the copper black.
View attachment 260777
Here is an example of a 2mm double block. The strops provided by HiS Model for the double blocks were too large, so the strop meant for the single block was also used on the double block. It seems to work.
View attachment 260778
Both blocks stropped
View attachment 260779
With a tweezers, the hooks on the blocks were twisted 90 degrees, and the loop on the double block was cut off, since it is not needed for a gun tackle. Shown below are the two types of gun tackle I have been assembling. The one on the left uses photo etched strops, and the one on the right uses very thin 3mm hooks with the tackle made using blocks tied with thread. I have to decide which type will be used on the upper deck guns which are the most visible. Which do you think looks better? Please comment below.
View attachment 260780
I kind of like the one on the left. The hooks may be a bit large for scale, but the rigging looks better to me.
Nice tutorial. Your experience matched my expectations/concerns vis a vis the fit of the strop around the block. Nice solution.
I guess I'm marginally more fond of the ones on the right - perhaps for no reason other than that's the way I ended up doing mine... Of course that's not much of an endorsement!
I guess I'm marginally more fond of the ones on the right - perhaps for no reason other than that's the way I ended up doing mine... Of course that's not much of an endorsement!
- Joined
- Oct 9, 2020
- Messages
- 2,231
- Points
- 488

I have a preference for the one on the right. They both look nice, but the one on the left is, in my humble opinion, too big for the block.Today I experimented with photo etched copper strops purchased from HiS Models. Because 2mm Falkonet blocks are too large to squeeze into the strop, the strop is cut and reformed around the block. All the blocks had their holes drilled to enlarge them slightly and allow the glue stiffened thread to pass through easily. Here is the process I used to make these strops work.
View attachment 260771
First, cut the strop from the nippers or the tips of the Fiskars scissors, which are very precise in cutting.
View attachment 260772
The cut is made on the bottom, which is the side that the hook points toward, so when the gun tackle is on the carriage, it won't be seen.
View attachment 260773
Open the strop a bit so it can accept the block
View attachment 260774
This example uses a single, 2mm block from Falkonet. Using tweezers, place the strop around the block, then squeeze the loose ends of the strop where it was cut against the block to hold the strop in place. Then squeeze the strop as shown below to make the strop fit tightly around the block. You need steady hands for this.
View attachment 260775
Apply some CA glue to both sides of the block to anchor the strop to the block.
View attachment 260776
Since working with the strop wears some of the blackening off, use a Sharpie marker to color the copper black.
View attachment 260777
Here is an example of a 2mm double block. The strops provided by HiS Model for the double blocks were too large, so the strop meant for the single block was also used on the double block. It seems to work.
View attachment 260778
Both blocks stropped
View attachment 260779
With a tweezers, the hooks on the blocks were twisted 90 degrees, and the loop on the double block was cut off, since it is not needed for a gun tackle. Shown below are the two types of gun tackle I have been assembling. The one on the left uses photo etched strops, and the one on the right uses very thin 3mm hooks with the tackle made using blocks tied with thread. I have to decide which type will be used on the upper deck guns which are the most visible. Which do you think looks better? Please comment below.
View attachment 260780
- Joined
- Oct 9, 2020
- Messages
- 2,231
- Points
- 488

Hi PT-2, here is the tweezer set I use. It's a cheap set for $10 from Amazon: Teckman Tweezer Set
the 4mm wide tweezer, EDS-13, is used to hold the small part while the pointy tweezer, EDS-15 is used to bend or squeeze the copper part. Everyone has their own favorite tools. The best tools are the ones you are personally comfortable with.
the 4mm wide tweezer, EDS-13, is used to hold the small part while the pointy tweezer, EDS-15 is used to bend or squeeze the copper part. Everyone has their own favorite tools. The best tools are the ones you are personally comfortable with.
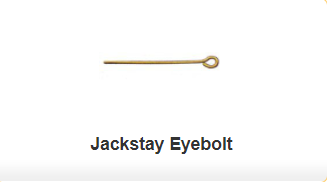
I did that for a while, then found that just buying some hooks saved me an additional step. Also, there are no wire eyebolts as small as the hooks I am currently using.If I may add to the information:
I have been making a lot of hooks lately for the rigging. What I do is I take an eyebolt like shown below, bend it in the shape of a hook, and then trim off the extra. It saves me having to make the loop part of the hook because it is already made.
View attachment 260877
Thanks for all your input, guys! I thought you would be interested in seeing how those photo etched parts from HiS Models would turn out. I haven't seen anyone else using them. It seems that half of you like the photo etched strops with built in hooks, despite then looking oversized, and the other half prefer the thinner etched 3mm hooks tied to the blocks.
Tying the etched hooks took a bit more time than cutting, fitting and shaping the photo-etched strops with hooks to the blocks. The strops with integral hooks are much stronger than the hooks, which seem to bend by simply breathing on them. Since the gun tackles will have to be slung to the eyebolts is such tight spaces when inistalling them, it will probably be easier to use the strops & hooks because less of them will get mangled trying to install them.
Tying the etched hooks took a bit more time than cutting, fitting and shaping the photo-etched strops with hooks to the blocks. The strops with integral hooks are much stronger than the hooks, which seem to bend by simply breathing on them. Since the gun tackles will have to be slung to the eyebolts is such tight spaces when inistalling them, it will probably be easier to use the strops & hooks because less of them will get mangled trying to install them.
Hi PT-2, here is the tweezer set I use. It's a cheap set for $10 from Amazon: Teckman Tweezer Set
the 4mm wide tweezer, EDS-13, is used to hold the small part while the pointy tweezer, EDS-15 is used to bend or squeeze the
Thank you for the lead. RichThanks for all your input, guys! I thought you would be interested in seeing how those photo etched parts from HiS Models would turn out. I haven't seen anyone else using them. It seems that half of you like the photo etched strops with built in hooks, despite then looking oversized, and the other half prefer the thinner etched 3mm hooks tied to the blocks.
Tying the etched hooks took a bit more time than cutting, fitting and shaping the photo-etched strops with hooks to the blocks. The strops with integral hooks are much stronger than the hooks, which seem to bend by simply breathing on them. Since the gun tackles will have to be slung to the eyebolts is such tight spaces when inistalling them, it will probably be easier to use the strops & hooks because less of them will get mangled trying to install them.
opper part. Everyone has their own favorite tools. The best tools are the ones you are personally comfortable with.
That's a good point Kurt (strength of the hooks). I did spend some time re-bending them into shape. HiS does have 'regular' hooks as well as 'soft' hooks. The regular hooks were marginally stronger/stiffer. I think your choice to use the built-in strop is a good one despite the relative bulkiness (which will go away when you aren't showing them next to the more delicate ones).
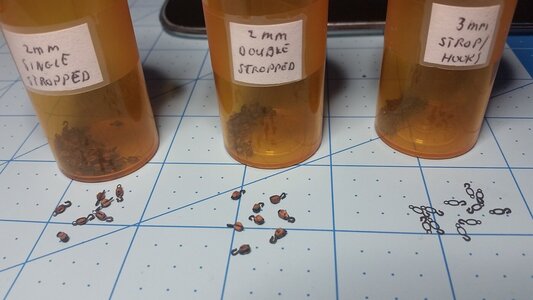
Many hours were spent mass producing stropped 2mm single blocks with hooks and eyes and stropped 2mm double blocks with hooks for gun tackles. Some of the single blocks are small enough to slip strops around them without cutting and opening them. After a while, I could identify when this was possible. Approximately 1/3 of all the required blocks were done. I'm getting faster and more comfortable making these.

His almost looks like a collection of ants caught in the sugar bowl.Many hours were spent mass producing stropped 2mm single blocks with hooks and eyes and stropped 2mm double blocks with hooks for gun tackles. Some of the single blocks are small enough to slip strops around them without cutting and opening them. After a while, I could identify when this was possible. Approximately 1/3 of all the required blocks were done. I'm getting faster and more comfortable making these.
View attachment 262050
Yeah.. they do look like ants. Made about 50 more today.His almost looks like a collection of ants caught in the sugar bowl.Very nice work. Rich (PT-2)
I'm waiting on more hooks and strops from HiS to arrive, but assembly of the gun tackles goes on with the blocks that have already been stropped and I only lost 4 parts to the carpet gods. 10 left and 10 right hand tackles are done so far. Add to that the 15 left hand tackles and the 12 right hand tackle made using the tied strops with 3mm hooks and there are only 157 tackles left to make for 102 guns.

Last edited:


