Huh. Only 157 left. I'm feeling a little queasy... But think of the story you will get to tell! Yes, it's true, dad spent a month just rigging the cannons...
-

Win a Free Custom Engraved Brass Coin!!!
As a way to introduce our brass coins to the community, we will raffle off a free coin during the month of August. Follow link ABOVE for instructions for entering.
-

PRE-ORDER SHIPS IN SCALE TODAY!
The beloved Ships in Scale Magazine is back and charting a new course for 2026!
Discover new skills, new techniques, and new inspirations in every issue.
NOTE THAT OUR FIRST ISSUE WILL BE JAN/FEB 2026
You are using an out of date browser. It may not display this or other websites correctly.
You should upgrade or use an alternative browser.
You should upgrade or use an alternative browser.
HMS Sovereign of the Seas - Bashing DeAgostini Beyond Believable Boundaries
- Thread starter DARIVS ARCHITECTVS
- Start date
- Watchers 105
Kurt, I'm sorry that I've not checked-in in a while - your progress is astounding and it all looks so neat and clean. This is sure to be among the best builds of this kit. I will endeavor to stay more current, going forward!
I'm on Day 5.Huh. Only 157 left. I'm feeling a little queasy... But think of the story you will get to tell! Yes, it's true, dad spent a month just rigging the cannons...
This is my second ship, and it will have about 30% more detail because of experience gained, and slowing down to add more details using many new techniques taken from other forum members and other places. Nice to see you weighing in on this thread.Kurt, I'm sorry that I've not checked-in in a while - your progress is astounding and it all looks so neat and clean. This is sure to be among the best builds of this kit. I will endeavor to stay more current, going forward!
- Joined
- Jan 9, 2020
- Messages
- 10,566
- Points
- 938

I like your way of thinking Kurt. just one becomes more experienced does not mean that progress is any faster. On the contrary, the desire to push the boundaries further and further, has just the opposite effect. Stick to your guns - you are doing a fine job.
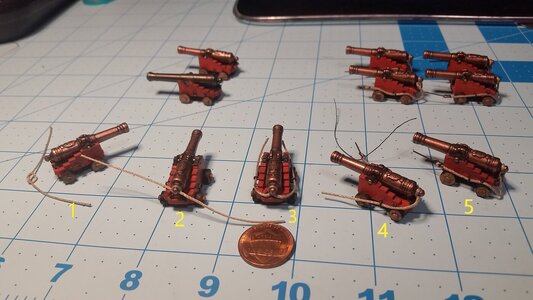
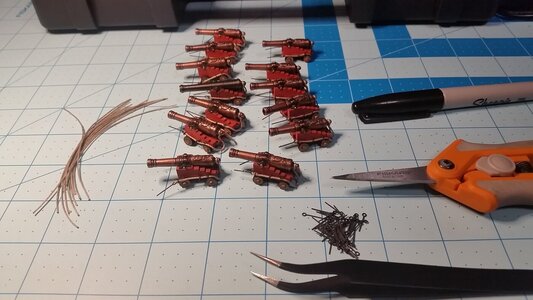
Today, since making gun tackles is getting a bit boring, breaching lines on the demi cannon drakes and the pair of cannon of VII drakes for the lower gun deck were started. About half of the guns got breech ropes rigged. Not bad for one evening's work. Repetition is making the process get quite fast.
For other novices in modeling, the steps used are detailed as follows. Of course, a magnifying headset and tweezers are required unless you happen to be a human microscope.
1) A 9cm length of 0.8mm diameter is used for the breech rope. for these size carriages, this will place the eyes of the eyebolts just forward of the muzzle of the gun barrel when the breech rope is stretched taut. For speed and simplicity, the line is tied in an overhand knot at the center on the cascabel at the rear of the gun barrel. Typically, the line would be wound with one turn around the cascabel, and seized with small cord to hold it there, but since that cord is practically invisible at this scale, the line was tied and glued instead.
2) Breech rope shown tied and glued with a very small amount of CA glue. In general, CA glue is used in very small quantity and applied to places not easily visible when the gun in complete, so darkening stains will not be visible.
3) Each end of the breech rope is passed through the rings on the side of the carriage and led forward.
4) At the ends of the breach line, the tip of the rope is passed through the ring of a 2mm diameter eyebolt, folded over, then tacked in place with a bit of CA glue, drying by pinching it between your fingers. For additional detail, a black thread is tied around the loop with an overhand knot, secured with a bit of CA glue, then trimmed. This makes the seizing appear very small, thus very close to scale, yet visible because of the contrasting color.
5) Most people stop at this step, but the breech rope does not drape properly over the wheels and hang like real rope, the tan line being rather stiff. To make the entire gun look realistic, this has to be addressed. The breeching rope ends are pulled rearward until the eyes of the eyebolts are positioned just in front of the front edge of the carriage cheeks. To make the rope droop properly, a bit of CA glue (not enough to soak through the line) is placed on the top of the rear wheels and the line is glued there. Then to make the line loops hang down far enough at the rear of the carriage below the casabel, apply some CA glue to the bottom surface of the lines just below the cascabel and hold the line downward until the line stiffens and stays in place. Again, do not use too much CA glue or it will soak through the line and create dark spots. When ready to install the guns on the deck, the the breech rope eyebolts will be glued into holes predrilled in the bulwark, and then tweezers are used to hook the gun tackles to the other eyebolts on the bulwark and to the carriage, then are adjusted to the proper tension.

Last edited:
Sticking to guns... using CA.I like your way of thinking Kurt. just one becomes more experienced does not mean that progress is any faster. On the contrary, the desire to push the boundaries further and further, has just the opposite effect. Stick to your guns - you are doing a fine job.
These look very good. Well done. RIchToday, since making gun tackles is getting a bit boring, breaching lines on the demi cannon drakes and the pair of cannon of VII drakes for the lower gun deck were started. About half of the guns got breech ropes rigged. Not bad for one evening's work. Repetition is making the process get quite fast.
For other novices in modeling, the steps used are detailed as follows. Of course, a magnifying headset and tweezers are required unless you happen to be a human microscope.
1) A 9mm length of 0.8mm diameter is used for the breech rope. for these size carriages, this will place the eyes of the eyebolts just forward of the muzzle of the gun barrel when the breech rope is stretched taut. For speed and simplicity, the line is tied in an overhand knot at the center on the cascabel at the rear of the gun barrel. Typically, the line would be wound with one turn around the cascabel, and seized with small cord to hold it there, but since that cord is practically invisible at this scale, the line was tied and glued instead.
2) Breech rope shown tied and glued with a very small amount of CA glue. In general, CA glue is used in very small quantity and applied to places not easily visible when the gun in complete, so darkening stains will not be visible.
3) Each end of the breech rope is passed through the rings on the side of the carriage and led forward.
4) At the ends of the breach line, the tip of the rope is passed through the ring of a 2mm diameter eyebolt, folded over, then tacked in place with a bit of CA glue, drying by pinching it between your fingers. For additional detail, a black thread is tied around the loop with an overhand knot, secured with a bit of CA glue, then trimmed. This makes the seizing appear very small, thus very close to scale, yet visible because of the contrasting color.
5) Most people stop at this step, but the breech rope does not drape properly over the wheels and hang like real rope, the tan line being rather stiff. To make the entire gun look realistic, this has to be addressed. The breeching rope ends are pulled rearward until the eyes of the eyebolts are positioned just in front of the front edge of the carriage cheeks. To make the rope droop properly, a bit of CA glue (not enough to soak through the line) is placed on the top of the rear wheels and the line is glued there. Then to make the line loops hang down far enough at the rear of the carriage below the casabel, apply some CA glue to the bottom surface of the lines just below the cascabel and hold the line downward until the line stiffens and stays in place. Again, do not use too much CA glue or it will soak through the line and create dark spots. When ready to install the guns on the deck, the the breech rope eyebolts will be glued into holes predrilled in the bulwark, and then tweezers are used to hook the gun tackles to the other eyebolts on the bulwark and to the carriage, then are adjusted to the proper tension.
View attachment 262607
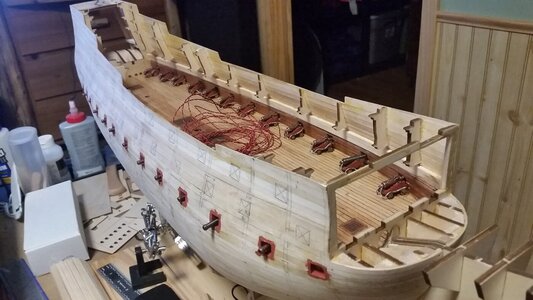
A well armed ship well planked and built. Rich (PT-2)The breech ropes for the remaining guns for the lower gun deck are finished. More gun tackles need to be assembled... lots more. The tedium continues.
View attachment 263297
Guns set in place just to see how they'll look
View attachment 263298
Ten more pairs of gun tackles were rigged today. That's about it.
Ten are good as you would not want to report Craps or do you play the game? Rich (PT-2)Ten more pairs of gun tackles were rigged today. That's about it.
I don't play craps. I try to minimize as much crap in my life as possible.Ten are good as you would not want to report Craps or do you play the game? Rich (PT-2)
Don't we all but "life is what happens when we are making other plans"I don't play craps. I try to minimize as much crap in my life as possible.
One successful craps game and your life will be changed: no more crapI don't play craps. I try to minimize as much crap in my life as possible.
Ahh... But WAIT.... there's always taxes.One successful craps game and your life will be changed: no more crap

Taxes. . . yes but those are better than death and taxes as unavoidable IMOH.Ahh... But WAIT.... there's always taxes.
Even after taxes, you will have plenty left to forget about crap. The problem, however, is that in order for you to win, someone has to looseAhh... But WAIT.... there's always taxes.
Another 10 sets of gun tackles churned out today...
That may be true about the craps, but with the taxes, everyone loses. Most taxes are horribly wasted.Even after taxes, you will have plenty left to forget about crap. The problem, however, is that in order for you to win, someone has to loose


