
I am wondering what these four square on the fore casle is for.The bulkhead extensions that allowed hull planking now need to be cut off.
View attachment 198681
The instructions didn't show this but I installed and stained ceiling planks (on the forecastle for now, on the quarterdeck as I move aft). Only now can I start deck planking.
View attachment 198682

-

SUBSCRIBE TO SHIPS IN SCALE TODAY!
The beloved Ships in Scale Magazine is back and charting a new course for 2026!
Discover new skills, new techniques, and new inspirations in every issue.
NOTE THAT OUR NEXT ISSUE WILL BE July/August 2026 -

Win a Free Custom Engraved Brass Coin!!!
As a way to introduce our brass coins to the community, we will raffle off a free coin during the month of August. Follow link ABOVE for instructions for entering.
You are using an out of date browser. It may not display this or other websites correctly.
You should upgrade or use an alternative browser.
You should upgrade or use an alternative browser.
yes, you are right. I have answered that somewhere. Bowpart, KEEL, and STERN POST will have to add to the false keelImagine my Surprise (pun intended) when I realized I still had not installed the keel nor the stern post nor the bow stem. I'm beating my self up over it but found a solution that is so far working. All of the above mentioned parts are laser cut from walnut. The bulkheads extend, in some cases, well down into the keel proper which for me suggested the rabbit should be cut into the walnut keel rather than the central structure that holds each bulkhead like normal. ?Design flaw? To be clear nothing in the directions mention anything about a rabbit or installation of the keel, stern post, and bow stem, all of that is left up to the builder.
I dry fitted each piece of keel/post/stem and traced out where each bulkhead ended. Then I just cut the rabbit into the keel according to the marked lines. Glued in with carpenter's glue and clamped. Then I drilled holes and sunk nails through the keel and into that central piece. I'm pretty confident it is one of the most solid keels I've ever made. I've been setting a first-layer plank up against my rabbit at various locations and so far what I cut out is working pretty well. Tomorrow is the last keel section and stern post.
View attachment 170282View attachment 170283View attachment 170284
Attachments

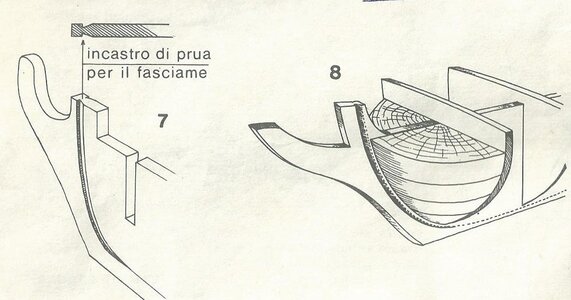
that the way of doing it. This article -can be downloaded in a PDF format -was and still is my Planking Bible.The tongue in the keel under the skin, should go aft parallel to the lower edge of the keel.The sternpost is pile.The aft deadwood is sewn up with planks level with the stern post.View attachment 170288View attachment 170289
Attachments
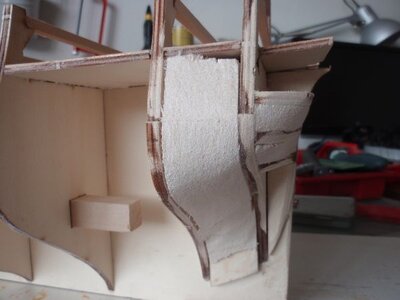
it is very important to fill the bow part and stern, so plank can lay googFaired well. And stern blocks installed.
View attachment 172042View attachment 172043View attachment 172044View attachment 172045View attachment 172046
Attachments

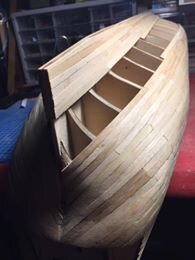
WELL DONE MATE. NOW I AREE TTALY WITH YOUAfter the first four layers of hull planks right below the gun ports are installed, customary is to install the garboard plank against the keel. Again, I must have learned something on my previous builds as this is going smoothly so far.
View attachment 172814View attachment 172815
My comment. I prefer to use full lengths planks, as it will get it cure. This can be difficult when two plans is nailed so that you miss the right curve- MY OPININLooking very good TKAM. This is the part I like as it begins to look like a ship.Do you find using shorter planks vs one long plank is easier?
- Joined
- Mar 27, 2019
- Messages
- 831
- Points
- 403

I am wondering what these four square on the fore casle is for.
Following the directions, I should have installed the cannon prior to installing the false deck and prior to the hull planking. I knew there would be mountains of sawdust sanding down the first planking and didn't want to foul the gun deck with all that sawdust. So I installed the false deck but cut holes out to slip in the cannon AFTER planking was completely finished. Now the holes are sealed up and the false deck is ready to be planked. Came out pretty good.
- Joined
- Mar 27, 2019
- Messages
- 831
- Points
- 403
My comment. I prefer to use full lengths planks, as it will get it cure. This can be difficult when two plans is nailed so that you miss the right curve- MY OPININ
I've done that on occasion for some situations. A simple cut with a sharp #11 blade and a little darkening of the cut with a sharp pencil works pretty good. But mostly I'll use 80cm long planks for a full run.
Last edited:
- Joined
- Mar 27, 2019
- Messages
- 831
- Points
- 403
greeting and service boat after some change -not the metal one.
For sure not the metal one. These little mini-kits for the ship's launch I get from Falkonet in Russia and are extremely detailed. The whole launch kit takes 3-4 days but the results are worth it.
- Joined
- Mar 27, 2019
- Messages
- 831
- Points
- 403
it can be seen, that this model is a quality model. 1Th time I seee so early the curved on the deck. Most- and mean most- have all decks vertically, with water ways to run out. bravo
So you think a waterway for the forecastle would be a good thing to install? Complete with scuppers.....I like it. I'll add that to my additions to this ship.
- Joined
- Mar 27, 2019
- Messages
- 831
- Points
- 403
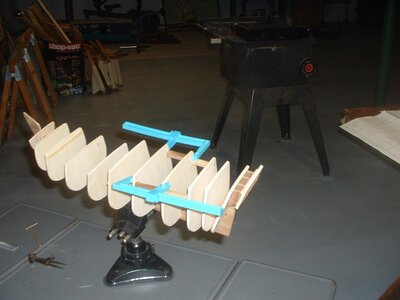
this what i used to get bulkheads square. it cost a few cents. using carpenter glue, it can easily be taken away later on if it disturbed. The deck (s) I took all out and planked the outside the ship. Sealed off with a mix of carpenter Glue and a black color Just before settling down the Glue on the surface, I cleaned up. Finally, when DRY, I used a Razor blade or a piece of Cristal, to shave the planks from bow to stern-allways same direction, later with sandpaper until totally smooth, the sealed off. It will give you a perfect deck, without all the inside parts of the ship to disturb.
That is a fantastic idea! I do, however, like the permanent installation of something square against each bulkhead. I find it helps keep the bulkheads perfectly square during fairing and even hull planking. They are all covered up by the hull planking anyway, I like the additional strength it gives the whole structure.
You should try it. You can use more than. Easy to take. In your case, not the problem, but when you are building a 2 or tree decker, the loves deck are not included. prepared to use Dummy Guns. Here I use -after making a marking to use them from inside to out of the Bulkhead. Now there is a support to insert pieces of Plywood between the Bulkheads so you know has a lower deck, where gun carriage/ gun can be inserted -te complete guns -instead of the Dummy Guns. Dummy Guns and me are NOT goods friends. Apart from the little piece I measure complete with the right measurement the outside between two bulkheads and cut and insert a 4x4 piece of wood, just below the decks. Gives much more Gluing surface When the decks are finally inserted.That is a fantastic idea! I do, however, like the permanent installation of something square against each bulkhead. I find it helps keep the bulkheads perfectly square during fairing and even hull planking. They are all covered up by the hull planking anyway, I like the additional strength it gives the whole structure.
Attachments


- Joined
- Mar 27, 2019
- Messages
- 831
- Points
- 403
As I lay down deck planks I'm also working on the cutouts for the six cannon on the quarter deck. The hull slopes down so each cutout is smaller as I move towards the bow. I gotta tell you, every time I cut into a completed hull for this sort of thing it gives me the heaby-jeabies. I mean, it's finished right? Nope, gotta cut into the painted and completed hull. So far, so good.


- Joined
- Mar 27, 2019
- Messages
- 831
- Points
- 403
Weather deck planking complete. One coat of stain and then a quick wash of acetone to tone it down a bit. I might scrub with some more acetone tomorrow after it dries completely. I like the gray-ish look better than an in your face wood look of a weather deck.
Next will be the upper rails and waterway/scuppers. That'll take a couple of days to do it right.

Next will be the upper rails and waterway/scuppers. That'll take a couple of days to do it right.
a good beginning, Mate. one question: What are these cut in the false deck for?
as said before very clean and proper planking. It can now be discussed if it is correct, but I WILL not go into that. Your chalking is now well. I have an Excel sheet about this, but have used it. WELL DONE MATE
no further comment here. it is already been here.
tioned