

Yes it is, I was born 1961, I remember well I was about 15-16 years old when the box was issued.Originally posted on modelshipworld.com March 5, 2025
Browsing through some other Superbe threads, I found a comment that confirms my guess the original kit was launched in 1977. I also stumbled across a YouTube channel with some pretty neat CGI recreations of historical battles, Epic History - YouTube, including a half hour episode of the Battle of the Nile which appears well researched and filled in a few gaps in my understanding both of the battle itself, and the lead up. I especially appreciated how it gives a sense of the scale and distance to shore.

-

SUBSCRIBE TO SHIPS IN SCALE TODAY!
The beloved Ships in Scale Magazine is back and charting a new course for 2026!
Discover new skills, new techniques, and new inspirations in every issue.
NOTE THAT OUR NEXT ISSUE WILL BE July/August 2026 -

Win a Free Custom Engraved Brass Coin!!!
As a way to introduce our brass coins to the community, we will raffle off a free coin during the month of August. Follow link ABOVE for instructions for entering.
You are using an out of date browser. It may not display this or other websites correctly.
You should upgrade or use an alternative browser.
You should upgrade or use an alternative browser.
HMS Vanguard 1:150, converted from Heller's Le Superbe


Handsome ship, congrats.


Welcome PQ to the forums and greetings from Texas! Magic Mike

No build activity over the weekend, as I've been traveling over Labor Day weekend, however an exciting update that Igorcap finished crafting wooden yard arms, which should be here in a few weeks. Very excited to get on with this last stage of the build!
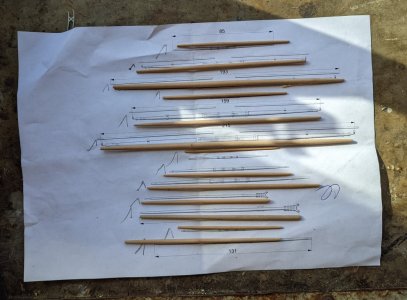
Looking a little closer it seems they may need a bit of sanding down before adding all the fittings, hopefully not too big a deal.
Readers, does anyone know where I can get hold of pearwood round stock here in the US?
Looking a little closer it seems they may need a bit of sanding down before adding all the fittings, hopefully not too big a deal.
Readers, does anyone know where I can get hold of pearwood round stock here in the US?
Last edited:
While waiting for the yards to arrive from Ukraine, I've been, I was about to say, tying up a few loose ends...  (SORRY!) Meaning, I spent nearly ten hours on the shifting stays, which were an absolute pain to install. I have a lot of understanding for the concept of simplified rigging at this scale, but too late to go down that track now. Also attached the kevels/cleats that go on the bottom of the shroud stays, for the bow lines and yard lifts. I decided to use the kevels included in the kit, and had to break up my Glorieux kit also to get all 26 needed.
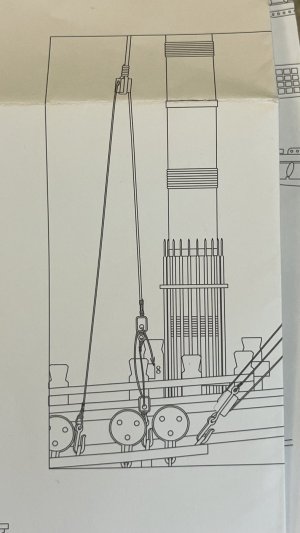
Detail from the Victory Models Vanguard kit plans, showing the fore mast shifting stay blocks. At 1:150 scale, the four shifting stays took me about ten hours to rig, incl. filing the blocks down to size. Getting the hooks (photo etched, from HiSModel) in place to the eye bolts in the channels is no joke when the shroud tackles are already in place.
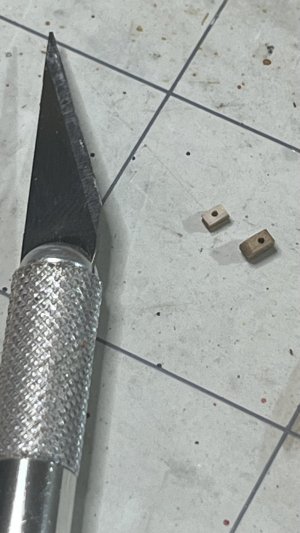
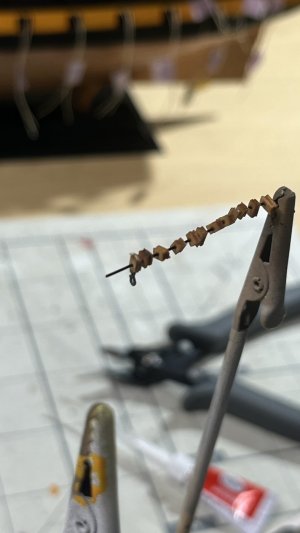
Filed down some of the Amati walnut blocks to use for the shifting stays
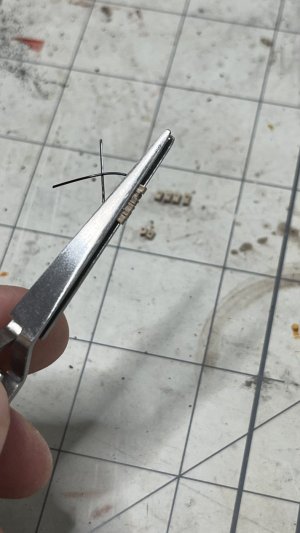
Helped to thread them on to a metal wire and file a few of them down to the same size at the same time.
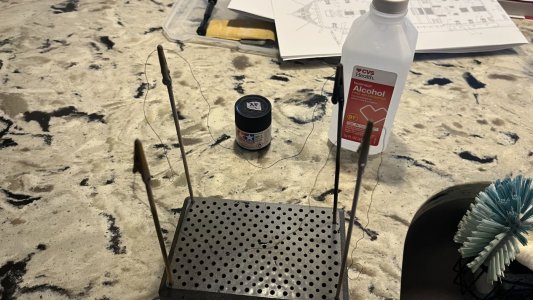
Light stain w/Tamiya XF-10, diluted 1:1 w/alcohol.
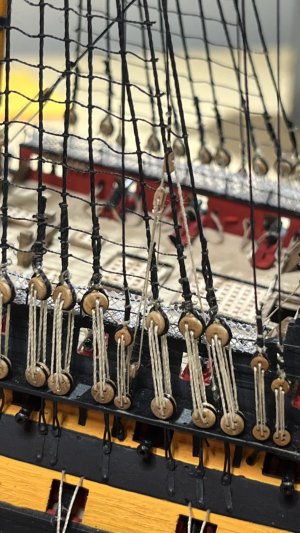
The Victory model plans for the main mast shifting stay shows the block much lower, around the second ratline instead of the fifth, but that wouldn't work since it's attached to a kevel on the inside railing of the half deck; and the hammock netting is in the way.
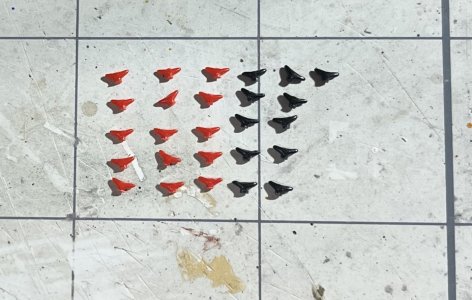
Kevels from original Heller Superbe in red, and Glorieux in black. Don't ask me why -- the kits are identical otherwise except for some ornamental details (see above). Filed clean and cut to size.
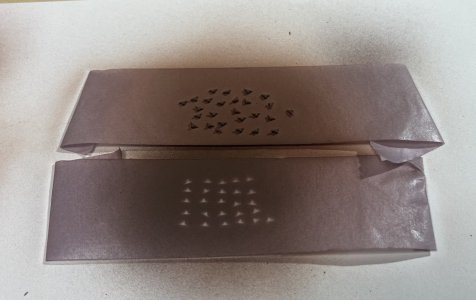
When painting small parts I usually place them on a strip of painter's tape and airbrush.
Dyeing some 10/25 Amati natural thread black. Tamiya XF-1 diluted 4:1 alcohol.
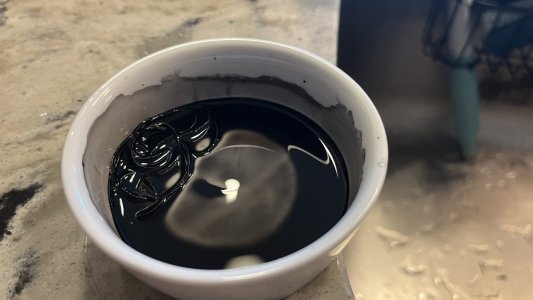
When diluted so much, only takes a couple minutes to dry.
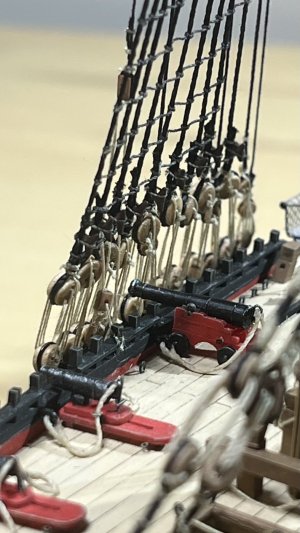
Inside of starboard fore mast shrouds. Attached the cleats to the inside of the shroud stay with a small drop of CA, then tied a single thread around it (plans show two ties). Note fore mast shifting stay block much lower down/closer to the deck than in the main mast image ^^. This is much closer to what the plans show, without the hammock netting and tied to the railing instead of a cleat.
Port fore mast shroud stay tackles with bowline & yard lift cleats attached.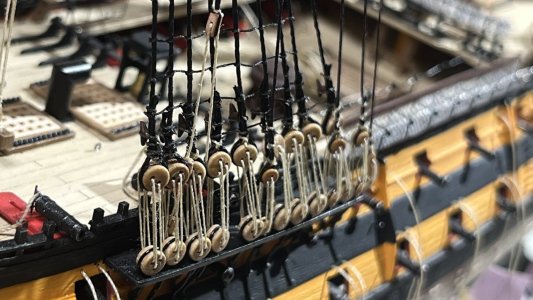
(SORRY!) Meaning, I spent nearly ten hours on the shifting stays, which were an absolute pain to install. I have a lot of understanding for the concept of simplified rigging at this scale, but too late to go down that track now. Also attached the kevels/cleats that go on the bottom of the shroud stays, for the bow lines and yard lifts. I decided to use the kevels included in the kit, and had to break up my Glorieux kit also to get all 26 needed.Detail from the Victory Models Vanguard kit plans, showing the fore mast shifting stay blocks. At 1:150 scale, the four shifting stays took me about ten hours to rig, incl. filing the blocks down to size. Getting the hooks (photo etched, from HiSModel) in place to the eye bolts in the channels is no joke when the shroud tackles are already in place.
Filed down some of the Amati walnut blocks to use for the shifting stays
Helped to thread them on to a metal wire and file a few of them down to the same size at the same time.
Light stain w/Tamiya XF-10, diluted 1:1 w/alcohol.
The Victory model plans for the main mast shifting stay shows the block much lower, around the second ratline instead of the fifth, but that wouldn't work since it's attached to a kevel on the inside railing of the half deck; and the hammock netting is in the way.
Kevels from original Heller Superbe in red, and Glorieux in black. Don't ask me why -- the kits are identical otherwise except for some ornamental details (see above). Filed clean and cut to size.
When painting small parts I usually place them on a strip of painter's tape and airbrush.
Dyeing some 10/25 Amati natural thread black. Tamiya XF-1 diluted 4:1 alcohol.
When diluted so much, only takes a couple minutes to dry.
Inside of starboard fore mast shrouds. Attached the cleats to the inside of the shroud stay with a small drop of CA, then tied a single thread around it (plans show two ties). Note fore mast shifting stay block much lower down/closer to the deck than in the main mast image ^^. This is much closer to what the plans show, without the hammock netting and tied to the railing instead of a cleat.
Port fore mast shroud stay tackles with bowline & yard lift cleats attached.
I felt quite happy to have finished all the 26 shroud cleats -- fiddly, boring, repetitive -- when I realized I missed that 8 more are needed on the mizzen mast shrouds.. 
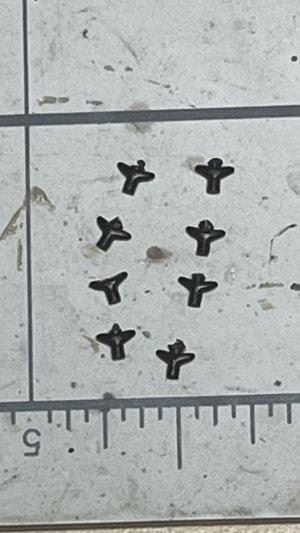
Cut straight from the sprue
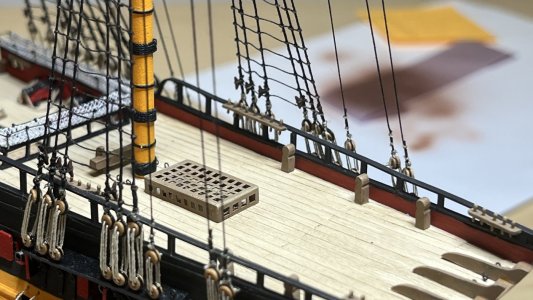
All done filed down, painted, glued in place, and tied up. DONE!
While still waiting for yards from Ukraine, I think I'll have time to finish one more little detail that's been bugging me for quite some time... stay tuned!
Cut straight from the sprue
All done filed down, painted, glued in place, and tied up. DONE!
While still waiting for yards from Ukraine, I think I'll have time to finish one more little detail that's been bugging me for quite some time... stay tuned!


 , pretty excited about this past week -- I finally had an idea how to create something I've been thinking about for a year now, that's stuck out like a missing tooth in the build... thought I'd give it a try. Let me know what you think!
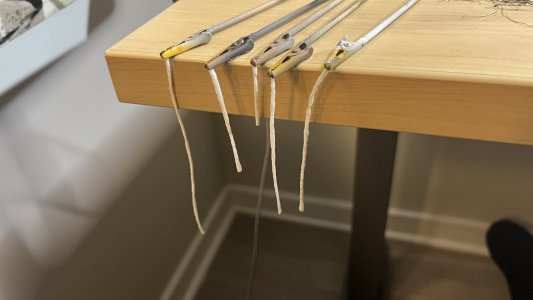
Cut a 4" x 1/2" strip of 2-ply, extra durable paper towel, and separated the two layers.
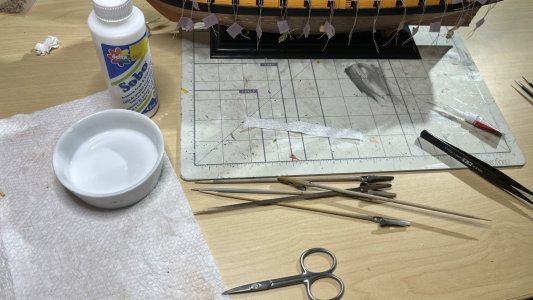
Mixed craft glue 1:1 with water, soaked up with the strip, rolled into a roll...
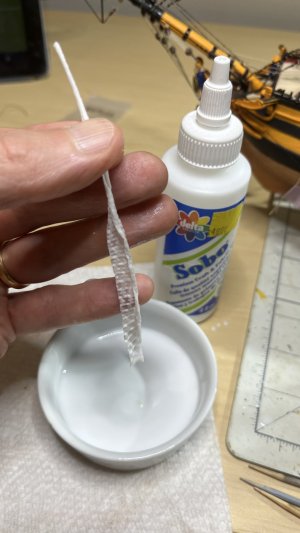
Leave to dry for about an hour. Made sure to really squeeze out as much of the liquid glue as possible, and re-roll the strand between my fingers every 20 minutes or so to give the drying "glue stick" a smooth, solid, finish.
Cut into 1/2" pieces and folded in half...
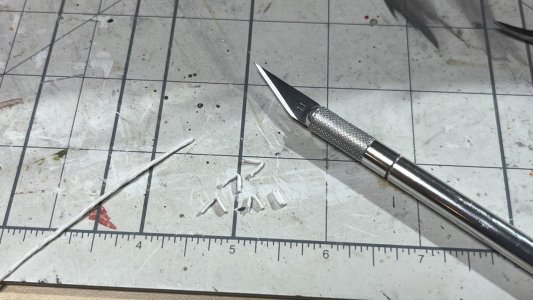
Glued a few of them together...
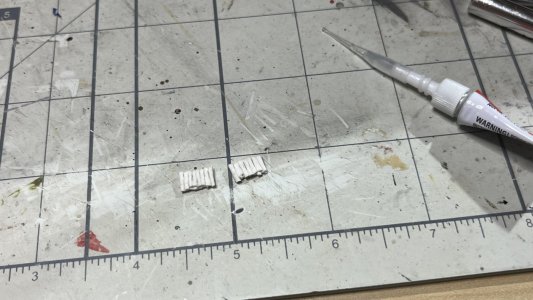
And gently pressed them into the hammock net...
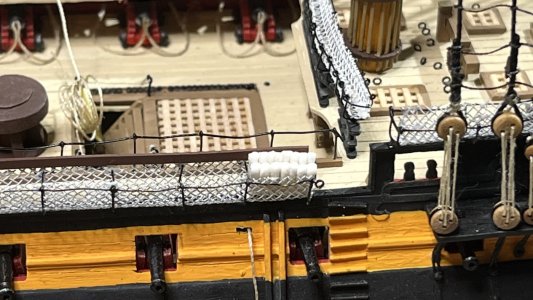
At this scale, I think I'll be able to fit ~700 hammocks into the nets... seems about right?
Bonus feature -- superglued together, they're solid enough to stop a musket ball.
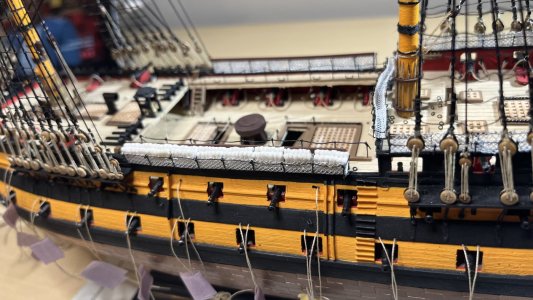
I've seen a few different references for how hammocks are stored in the nets -- in single rows, in double rows, or covered so that you don't actually see the hammocks. Can anyone shed some more light into different practices here? (I'll probably keep going with the current approach since I think it looks pretty nice
 This post by @HMSFly suggest rolled up and then tied up -- was this a consistent practice in RN?? I also came across this excellent thread from a build of Vanguard's big sister Victory -- thank you @Chestcutter -- I didn't realize the nets should be black...? I think I'll keep mine white though, looks really striking. Curious though if there's a true right/wrong here.

The main idea, as I've heard. was to make them dry in the fresh air and wind after the night. And to avoid a temptation to use one in the daytime to sleep!I've seen a few different references for how hammocks are stored in the nets -- in single rows, in double rows, or covered so that you don't actually see the hammocks. Can anyone shed some more light into different practices here? (I'll probably keep going with the current approach since I think it looks pretty nice
 So IMO - vertically, in one or two lines (depending on crew size), like on this late 19th century model (the plate reads: "Suspended sailor's hammocks, stowed in the hammock nettings during the day for airing."):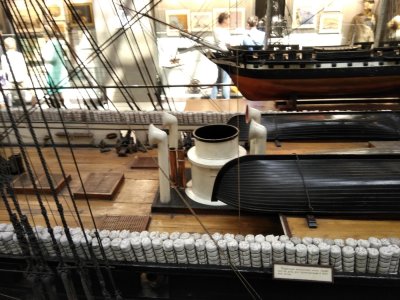
I like this look, great reference - thanks! (I may try it out evenThe main idea, as I've heard. was to make them dry in the fresh air and wind after the night. And to avoid a temptation to use one in the daytime to sleep!
View attachment 638337
Lavery’s The Ship of the Line (Vol II, p133-134) describes hammocks as 6x3 feet, “hanging a minimum of 14 inches apart”, but doesn’t elaborate on how they were rolled up for daytime storage in the hammock nets.
Longridge’s The Anatomy of Nelson’s Ships (pp135-138, 149-150) spends 5 (!) pages elaborating how to model stanchions and nets; but hardly mentions the actual hammocks… “lashed up into a sausage-shaped roll … stacked in orderly fashion in the hammock nettings”. (He does mention Nelson didn’t like the taller stanchions on the quarter deck; which might have saved his life at Trafalgar.)
Boudriot finally doesn’t mention hammocks at all — did the French navy not do this?
Two of @dafi’s projects using the “folded” hammock, beautifully weathered.
PQ, the hammock's look great! Nicely done, Magic Mike
Btw, I just found these topics, they might give some additional info (and actually there are more on the forum):I like this look, great reference - thanks! (I may try it out even
Lavery’s The Ship of the Line (Vol II, p133-134) describes hammocks as 6x3 feet, “hanging a minimum of 14 inches apart”, but doesn’t elaborate on how they were rolled up for daytime storage in the hammock nets.
Longridge’s The Anatomy of Nelson’s Ships (pp135-138, 149-150) spends 5 (!) pages elaborating how to model stanchions and nets; but hardly mentions the actual hammocks… “lashed up into a sausage-shaped roll … stacked in orderly fashion in the hammock nettings”. (He does mention Nelson didn’t like the taller stanchions on the quarter deck; which might have saved his life at Trafalgar.)
Boudriot finally doesn’t mention hammocks at all — did the French navy not do this?
https://shipsofscale.com/sosforums/threads/hammocks-on-ships.3401/
https://shipsofscale.com/sosforums/threads/hammock-rails-for-the-frigate-hermione.4173/ - including reference to Boudriot
I don't want to criticize, your hammocks look great, indeed. Just sharing info and thinking how would I do them myself!



Wow! This is an outstanding and overdue conversion! I would love to do the same. Where did you get the new stern and figurehead pieces?Originally posted February 11, 2025 on modelshipworld.com
The build is Heller’s Le Superbe converted to HMS Vanguard, in what might best be described in a kit-bash-mash-up conversion with some creative license for buildability.
Le Superbe was a Téméraire-class 74 and Vanguard was not. They have different dimensions, lines, proportions etc. and while there are several other more appropriate examples of converting a French 74-gunner to an RN historical equivalent (e.g. Spartiate, Belleisle, Hercules), I wanted to see how close I could get, and… it’s the Vanguard! Nelson’s flagship at his, in my mind, most consequential battle, and possibly the most well-known 74 in history? If I invest a few thousand hours in a project, I want some name recognition!
I picked her outfit for the Mediterranean campaign 1798 as main source of inspiration, both because it’s iconic as Nelson’s flagship, and well documented. I have been playing around with the idea of making a waterline diorama of her approaching the line of battle in Aboukir Bay.
First, about the kit itself. I’ve heard there’s a new re-release but this is an old version; not dated but guessing 40-50 years old (the Glorieux box art looks like it’s a 1970’s design). I have actually built this kit before, in my teens circa 1983, and still remember the poor fit and overall atrocious molding quality… You can expect to spend 75% of your build time cleaning off chaff and excess, and the rest spackling and sanding to fill in gaps and injection holes. Compared to contemporary plastic kits (I’m a big Tamiya fan) this is night and day. I often found myself cursing using the plastic pieces instead of scratch building, and if you have the skills and tools, I’d strongly recommend following Blue Ensign’s example and scratch building as much as possible.
Also a note about historical accuracy of this kit: Heller’s Glorieux and Superbe are identical kits except for stern, quarter-galleries, figurehead, hair brackets, railings, and name plate. In reality, they were completely different ships; different designs, classes, sizes, ship builders, and built almost 30 years apart. With 99% certainty, Glorieux did not have a coppered hull. It’s a headscratcher to me why Heller decided to pick these two particular ships to recreate with the same molds? Especially since neither of them had a particularly illustrious career.
My guess is Heller wanted to do a quick/dirty twofer, and picked the names Glorieux and Superbe simply because they’re pretty good product names to put on a box – certainly more eye-catching than say Dugay-Trouin or Mucius – and they also work okay for an English or German-speaking audience. They either didn’t know or blatantly ignored these two ships were quite different in reality.
Anyway… pulling myself out of this rabbit hole… and enough knocking Heller quality and accuracy - it’s a beautiful ship! Personally, I find the 74-gun ships-of-the-line the most beautiful and awe-inspiring naval design framework ever conceived – but that’s just me, who’s only seen a small fraction of all ships ever designed. The lines, proportions, elegance, and understated raw power make this a gorgeous, gorgeous model. (Especially with the yellow/black “Nelson checker” pattern; which I believe the Vanguard had at the Nile?)
After ordering a few components (notably, sails and standing rigging components) online (HiSModel), my second order of action was to contact igorcap to check if he’d be able to help me with a figurehead and taffrail; the two components I knew I’d never be able to get right on my own. Much gratitude, thoughts and prayers go out to Poltava/Ukraine – I can honestly say without Igor, this build would still be in the box. Thank you, Igor.
Also – huge thanks to @greenskin and @Lukasvdb for their Superbe build logs on this forum, as mentioned to Blue Ensign and dafi for inspiration, and of course… @glbarlow; I’ve very liberally used your pictures in your *amazing* Amati/Victory Vanguard build log as reference for pretty much everything.
Conversion and scratch build efforts (some complete, some still at planning stage):
- Adjust number, position, and size of gun ports (see more below)
- Upper deck: closed port #1, made ports #4-#10 smaller
- Quarter deck: converted windows to gun ports; moved port #1
- Extend and modify profile of poop and quarter deck railings, incl. extending poop deck forwards
- Reposition masts and channels (see below)
- Main- and mizzen mast ~10mm (~5ft) further back
- Fore mast 16mm (~8ft) further back
- Remove drift rails and add new ones
- I left the wales in place simply because it’d be way too much work to correct them. On the model / Boudriot plans, the wales generally follow the curve of the gun ports/decks, whereas on Vanguard / RN 74s they have a distinct curve; with gun ports cutting into them. I understand this was an intentional ship design feature, intended to add stability to the ship.
- New figure head, taffrail, and stern name plaque (thank you Igor!)
- Modify/rebuild quarter galleries. Attach stern and rudder with magnets for easy removal = allow better view of the hull interior
- Add quarter gallery interiors, incl. floors, cupboards, and of course - easements/latrines
- Rebuild head, incl. beakhead, catheads, cheeks, hair brackets, etc.
- New details throughout: railings, stairs, binnacle, bell, lantern, bitts, pumps, capstans, cannon balls (ball bearings from McMaster-Carr) in racks, gratings (mostly Amati), hatches, cabins, etc. etc. etc.
- Build Brodie firehearth based on Model Monkey’s 3D print as reference (I later found a better reference on RMG’s site).
- Ship boat storage: resting on boat booms across the waist, vs. sitting on the upper deck
- If I decide to go down the diorama / Battle of the Nile idea, I assume these would be in tow anyway; not on-board the ship?
- Align the copper plating pattern on the model with waterline
- Add breech lines, cap squares, and loops over the cascabel buttons (“pomellions”?)
- My understanding is these loops were standard on Blomefield guns after 1794; and it’s possible Vanguard at the Nile would have had these?
- Either way they make positioning the breech lines easier (and look nice)
- All standing and running rigging components using Amati thread and either Amati walnut blocks, or 3D printed/resin blocks from igorcap.
- Add chain stays, preventer plates, channel knee braces, etc.
- Insert metal rods into lower masts for extra stability
- Move side steps, add skid beams and boat beam
- Fabric sails and flags from HiSModel
A few notes…
I have taken quite a few liberties and shortcuts for the sake of aesthetics and convenience.
- Most notably…. the Superbe is a full 15ft (4.6m; 30mm at this scale) longer than Vanguard, which I understand can be attributed to a few reasons: a larger/longer hull provided room for an extra gun on the upper gun deck (30 vs. 28); which in turn provided more space (=more comfortable accommodations for officers) on the quarter deck (12 guns here instead of Vanguard’s 14), more space for crew and marines (~700 total complement vs. 600 on an Arrogant class), and perhaps most importantly, more space for provisions for longer journeys, as France did not have the same access to friendly ports as the British. My understanding is the ship’s length in and by itself did not meaningfully impact ship handling or gunnery – rather it’s the lines below the waterline that would determine sailing and handling characteristics – but I suspect I may be missing or misunderstanding something here.
- Anyway, Heller’s Superbe model has 15 gun ports on each side of the upper deck, whereas Vanguard had 14. While it was easy enough to close port #1, it means the spacing/position of the remaining 14 ports is slightly off; impacting position of the channels (which I wanted to keep in the same place relative to gun ports), although of course this also in turn impacts the position of the masts – it would look strange if the shrouds were pointing forward, at an angle. Final result: on “my” Vanguard, the forecastle and head will look like it’s extending a bit too far, like she has a little snout.
- I started the project using glbarlow’s Vanguard (Amati/Victory) build log as my main visual reference, until I realized I could just buy the plans from Amati. I wish I had done this sooner.
- I didn’t have plans or images of Vanguard’s gun deck (no such thing in the Amati/Victory model), and so instead have relied on dafi’s Victory build, with some inspiration from Boudriot.
- The trunnions on the Heller model are not in the center of the gun barrels; they’re distinctly offset from the bore. The sketch in the Heller instruction sheet specifically indicates the trunnions should be “up” = the barrel should “hang down” into the gun carriage, quite significantly. I believe in reality, at least on an English ship, it should be the other way around; trunnions “should” be either in the center of the barrel, or slightly below; meaning the barrel would sit a bit “above” the carriage. Unfortunately, on Heller’s model, both solutions cause problems: if the trunnions are “up” / “higher”, the bottom of the gun barrel hits the front of the carriage, whereas if the trunnions are “down” / “lower”, the gun barrel will point up and hit the top edge of the gun port (=you’ll need to sand down the wheels of the gun carriage to make it fit nicely in the center of the gun port). Oh Heller. I went with the former solution – “trunnions up”– and filed a semi-circle in the front of the gun carriage. It means the gun barrels now point down slightly, which I think gives them a nice, aggressive look, but more importantly they sit well centered in the gun ports.
- Like others on this forum, I scored planking (freehand) in the exterior hull and gun deck (with ruler). Note in this soft plastic this can result in quite significant “ridges”, which I recommend cutting/shaving off, rather than sand down (which grinds the plastic dust into the grooves).
- I contemplated getting wooden decks but (a) I don’t have a workspace for sanding wood at scale – too much dust in a relatively small apartment – and (b) scratch building deck beams to lay down a wooden deck instead of the plastic deck is beyond my current modeling comfort level; and the alternative – laying down wooden planking on top of the plastic decks (as I’ve seen some users do on YouTube using the wooden decks from HiSModel), would elevate the guns too high in the gun ports.
- Except for copper hull (Testor Enamel rattle can), I’ve used Tamiya acrylic paints throughout; either air brushed (decks, guns, hull interior) or hand painted (hull exterior, all details). I love the Tamiya paints but note they have to be thinned by as much as 2/3 when air brushing; for hand application, I usually add about 1/4 thinner. (You can’t really work with this paint undiluted.)
Some general build notes:
- On this model, you likely won’t be able to insert the upper gun deck into the hull, if the lower gun deck is already solidly glued in place (which it will have to be, in order to position the 32 pounders where they should). Chances are the hull will crack/break trying to squeeze in the upper gun deck. I ended up cutting he upper deck into two pieces lengthwise and mounted them separately.
- As mentioned, the fit on this model is not great and you’ll need to do a lot of filling and sanding to close gaps. On this relatively small model, this requires a lot of manual handling, increasing the risk of breaking off any small or protruding pieces. I recommend thoroughly thinking through the assembly order, e.g. finalize beakhead and hawses before adding gun deck details, gun ports, channels, and similar pieces that may easily break or break off while manually handling the model. Same goes for painting; even basic priming could (should?) wait until all main “architectural” components are assembled.
- The hardest part to get right (thus far; by far) has been the quarter-galleries; which needed to be modified both for shape/design, to fit new positions of drift rails and wales, and new shape taffrail. (They don’t fit that well out of the box, for that matter.) I have not modified the number of windows (Heller: 10, Vanguard: 8), at least not yet.
- I’m posting this very first build log about 7 weeks/180 hours in, ~90% of which is scratch-building or modifying existing conditions. I’m doing a lot of this for the first time, so takes a bit longer for sure.
Current state: hull nearly complete, channels in place, head ready for beakhead and gratings, stern ready for galleries. Then (1) deadeyes, (2) gun deck, (3) upper deck, (4) quarterdeck/gangways/forecastle and poop deck, (5) masts and standing rigging "one tier at a time", (6) running rigging and sails, (7) boats and anchors, (8) gun port lids. Easy!
View attachment 630628
Original: most/all quarter deck gun ports have moved, drift and sheer rails have been replaced, profiles of poop and quarter deck railings altered, and head, hawses, cheek, forecastle profile changed. (Note this black hull is from the Glorieux "sister kit"; same hull as Superbe, despite being two entirely different ships historically.)
View attachment 630629
Original head & hawses
View attachment 630630
Note new cheeks & hawse holes. Greek warrior figurehead courtesy of Igorcap, using the Victory/Amati model as reference.
View attachment 630631
View attachment 630632
Scratch built Brodie stove. Someone said somewhere "in this small scale, if it looks too big, it is too big".
So, so true - but it's so, so hard to make some details even smaller
View attachment 630633
Guns
View attachment 630634
- individually cleaned from chaff
- scored planking in carriage and assembled
- cut space in front of carriage (see above)
- added cascabel button loops (28 gauge brass wire)
- drilled boreholes
- airbrushed barrels: semi-gloss black, and carriages: flat red; hand painted wheels semi-gloss black
- weathering wash using Winsor & Newton raw umber oil color + odorless mineral spirits
- dry brushed barrels: flat aluminum, carriages: buff
- added cap squares (made from excess material from eye bolts), breeching lines, and eye bolts (next picture)
View attachment 630635
Stern, taffrail and stern gallery assembled and primed, awaiting final polish and painting. Cut off original taffrail and glued on 3D printed one from Igorcap. Cut off sides of original stern gallery to change its curve, created new railing and balusters from 22 gauge copper wire. Made new bottom part from plasticard, and added horizontal rail under the 3D printed name plate. Cut out the existing four-pane astrigals, will add new ones to make nine-pane windows (but will keep 10 windows instead of 8 as in the historial Vanguard - I think, for now at least).
View attachment 630636
Original stern, with igorcap's new 3D printed pieces overlaid for sizing.
View attachment 630637
New details and rails, made upper deck gun ports smaller, shaved down 4th wale. My Superbe kit is this milk chocolate brown color for the most part, with the Superbe-specific parts in gold (see stern above) in a distinctly different material that is more brittle and therefore hard to work with; and guns and running rigging pieces in red.
View attachment 630638
Before left, after right. Plasticard FTW!
View attachment 630639
Wow! This is an outstanding and overdue conversion! I would love to do the same. Where did you get the new stern and figurehead pieces?
Igor has a nice library of 3D-printable parts: https://drydockmodeler.com/index.php?/profile/49-igorcapinos/
Nice thanks for the tip -- yes found the references now in Boudriot, obvs. didn't look close enough! Some great color and detail, but sadly also doesn't clearly indicate just how the hammocks are rolled/folded, other than "as sausages".Btw, I just found these topics, they might give some additional info (and actually there are more on the forum):
https://shipsofscale.com/sosforums/threads/hammocks-on-ships.3401/
https://shipsofscale.com/sosforums/threads/hammock-rails-for-the-frigate-hermione.4173/ - including reference to Boudriot
I don't want to criticize, your hammocks look great, indeed. Just sharing info and thinking how would I do them myself!
- Joined
- Jun 20, 2026
- Messages
- 10
- Points
- 13

Amazing Build!
I have this kit. I wanted to Razee mine. But this is giving me all kinds of ideas. Thank you for sharing.
I have this kit. I wanted to Razee mine. But this is giving me all kinds of ideas. Thank you for sharing.
Welcome Ben to the forums and greetings from Texas! Magic Mike
- Joined
- Jun 20, 2026
- Messages
- 10
- Points
- 13
Thanks!
I lost my creative mojo for a long time. I started building a wood kit of a frigate and it has really helped me get back on it.
G'day, from Sydney.
I lost my creative mojo for a long time. I started building a wood kit of a frigate and it has really helped me get back on it.
G'day, from Sydney.
Thanks! Yes I found my Superbe on eBay a couple years ago, I got a Glorieux kit also and meant to make an Aboukir Bay diorama -- that was obviously before I started buildingAmazing Build!
I have this kit. I wanted to Razee mine. But this is giving me all kinds of ideas. Thank you for sharing.
A couple months later Heller announced they were re-releasing the kits so think they're readily available now.IMO it's strange there aren't more kits of the 74s, they're such iconic ships, elegant, powerful, and more proportionate than the three deckers.