HMS Victory Mantua 1:78 (first build) by Grant Tyler

Hello Grant. The boomkin lines are taut and perfectly symmetrical - job well done! And I simply adore the ropes next to the main entrance along the steps. They look SO realistic. It is all these nice touches that you are adding that all add up to an exquisite model.
 
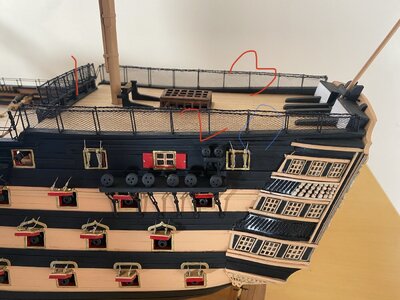
Ok here are my attempts. I have marked the 3 nettings as with each one I felt another method would be better:

1: I cut the netting wider than the measurements so the sides would fold over the side of the hammock cranes. I placed a center punch to weight the bottom on the crane and placed a small dab of CA glue on the frame of each crane to hold.(Sorry Heinrich). I then sewed the netting to the 0.75mm rope running though Cranes and painted the fold over with PVA and water dilution. 75% water.

2: I did not fold the netting over the crane and I sewed the bottom of netting to the crane frame rather than use CA glue. Painted top of netting where I sewed with the PVA dilution. Trimmed the netting.

3. I did exact measurements and ironed (at low temperature as these are plastic/poly mix netting and will melt- actually did on my first attempt) the shape to fit into the hammock cranes and a small fold over. Finished as per 2. This is the best so far.


CB3A2E04-84A9-4E23-9CF5-1E14010575D8.jpeg

I have seen other guys get good results using these so perhaps my skills need some work.

The blue circle is my Hammock crane not straight. Will fix this. Just love photos always show something to be fixed

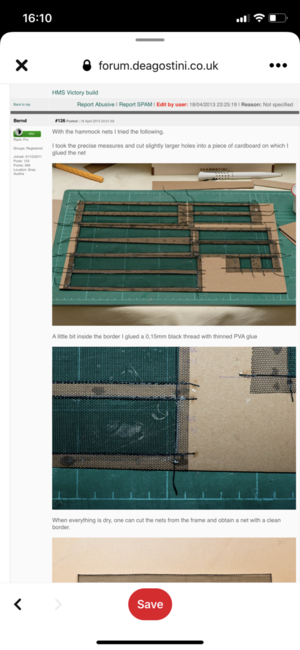
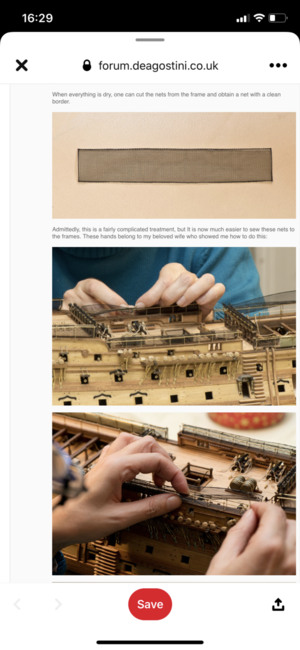
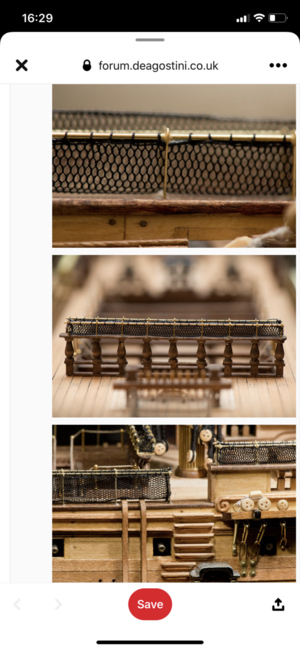
I saw the following method on Pinterest from Bernd who made a Deagostini Victory. This was on the Deagostini forum UK. Looks like a good method and I will give this a go on my remaining netting. Still loads to go.
E994C711-413A-4683-B222-5D172B9FFC6F.png

42F7CE53-5D4F-4D53-8D79-9E482C6D0533.png

E19C1AD4-89C0-458A-AB69-AE7231ECB165.png
 
Grant I agree that on your picture Option 3 looks the best, but my concern is repeating that consistently multiple times. Hence I would think that the diluted PVA and sewing method (as per the Agostini blog) would yield the most consistent result. Having said that, I am very glad I do not have to do it!
 
Hi Grant, (I do not know what I'm talking about here but just from observation) on the Pinterest site it looks like they had an additional brass handrail to sew the netting to which produces the very straight look along the top of the netting. Are the 'frames' what you are calling hammock 'cranes' rigid?
 
Hi Grant, (I do not know what I'm talking about here but just from observation) on the Pinterest site it looks like they had an additional brass handrail to sew the netting to which produces the very straight look along the top of the netting. Are the 'frames' what you are calling hammock 'cranes' rigid?
Hello Daniel. The cranes ( the u shaped stanchions) are rigid. They are drilled and glued into the ship. I thread a rope through each, which is not 100% taught as per McKay. On the Portsmouth Victory it has more sag than mine. You are correct re the brass being rigid to sew onto and like my build however the shaping with a thin thread ( per Bernd) PVa onto netting first may make it easier to work with. I think I should make a dummy practice crane line and try first?
 
Grant I agree that on your picture Option 3 looks the best, but my concern is repeating that consistently multiple times. Hence I would think that the diluted PVA and sewing method (as per the Agostini blog) would yield the most consistent result. Having said that, I am very glad I do not have to do it!
Cheers Heinrich. I’m thinking of making a dummy hammock crane line to test first- probably would have been wise before I charged in like a bull in a CHINA shop.(just for you;)). Good luck with your medical.
 
Worked on the bow section. My triangle blocks (AL) arrived so I was able to complete the standing rigging on the bowsprit. I used a needle file to make the holes bigger. Nothing new to my build process which was discussed before in my log so I will post some pictures.

Finished painting the figure head of the Victory and fitted with epoxy glue.

The netting was an impossible mission. Nothing worked. The kit netting is a plastic netting and is very slippery when sewing it on. On the My Victory I added the stanchions which the instructions did not include. This is more accurate.

View attachment 282543View attachment 282544View attachment 282545
Looks spot on to me Grant, love all that detail in the bowsprit of your model Thumbsup
 
I had a little bit of creative fun. Looking at picture of the Portsmouth Victory I notice a rope support up the side stairs past the main side entrance.

View attachment 282655
View attachment 282656

Used 1mm thread and attached to blacked eyelets.

PS I found out how to insert arrows on my iPhone pictures... ROTF
Great initiative Grant. I mean, imagine trying to mount those stairs without a decent handhold after a heavy Saturday night offshore? ROTF
 
Ok here are my attempts. I have marked the 3 nettings as with each one I felt another method would be better:

1: I cut the netting wider than the measurements so the sides would fold over the side of the hammock cranes. I placed a center punch to weight the bottom on the crane and placed a small dab of CA glue on the frame of each crane to hold.(Sorry Heinrich). I then sewed the netting to the 0.75mm rope running though Cranes and painted the fold over with PVA and water dilution. 75% water.

2: I did not fold the netting over the crane and I sewed the bottom of netting to the crane frame rather than use CA glue. Painted top of netting where I sewed with the PVA dilution. Trimmed the netting.

3. I did exact measurements and ironed (at low temperature as these are plastic/poly mix netting and will melt- actually did on my first attempt) the shape to fit into the hammock cranes and a small fold over. Finished as per 2. This is the best so far.


View attachment 283082

I have seen other guys get good results using these so perhaps my skills need some work.

The blue circle is my Hammock crane not straight. Will fix this. Just love photos always show something to be fixed

I saw the following method on Pinterest from Bernd who made a Deagostini Victory. This was on the Deagostini forum UK. Looks like a good method and I will give this a go on my remaining netting. Still loads to go.
View attachment 283084

View attachment 283085

View attachment 283089
Again, looks good to me Grant. Yes the camera does have a bad habit of highlighting small issues, although I think it is only more evdent to the modeller than to anyone else looking at it. A bit like those English essays at school, you just hope the teacher doesn't spot all the mistakes that you know are there ROTF
 
Again, looks good to me Grant. Yes the camera does have a bad habit of highlighting small issues, although I think it is only more evdent to the modeller than to anyone else looking at it. A bit like those English essays at school, you just hope the teacher doesn't spot all the mistakes that you know are there ROTF
Good morning Mark. Thanks for your comments appreciate them. Hopefully Admiral Nelson would have a gangplank when the staff went offshore to drink rum and frolic with the locals- I don’t think those rope rails would help them muchROTF.Oh Boy those Essay days....hmmm I got nailed every timeROTF
 
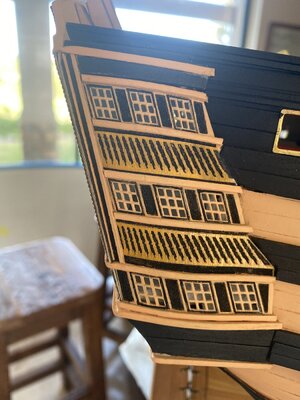
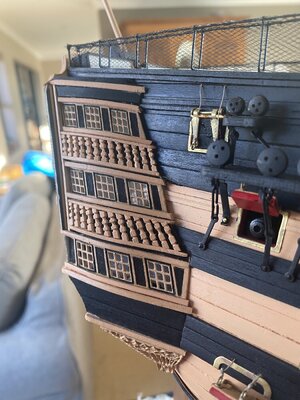
Every now and again I work on the balcony decorations of the stern cabins. I have previously discussed these (using my Dremel and needle files) and here is the outcome of the starboard side. I am happy with the improvement from the kit version- before and after photos. Apologies for jumping around but that is how I build.
12CC73B7-9972-491B-817B-674C27FEA6A2.jpeg

3330F775-CFDB-4EC6-8AC6-74402CE8E389.jpeg
 
WOW! What a difference! Respect my friend for the effort and the result.

Question. Bottom row - sixth column from the left. Is it upside down?
 
Last edited:
That netting looks SUPERB Grant! Now that very same netting needs to be filled with hammocks ... right?
 
Every now and again I work on the balcony decorations of the stern cabins. I have previously discussed these (using my Dremel and needle files) and here is the outcome of the starboard side. I am happy with the improvement from the kit version- before and after photos. Apologies for jumping around but that is how I build.
View attachment 283575

View attachment 283574
Excellent work Grant! Thumbsup
 
Back
Top