
-

Win a Free Custom Engraved Brass Coin!!!
As a way to introduce our brass coins to the community, we will raffle off a free coin during the month of August. Follow link ABOVE for instructions for entering.
You are using an out of date browser. It may not display this or other websites correctly.
You should upgrade or use an alternative browser.
You should upgrade or use an alternative browser.
HMS Victory Mantua 1:78 (first build) by Grant Tyler
- Thread starter GrantTyler
- Start date
- Watchers 102
Hi Frank- I’m going to have to run this somehow through google translate- my Italian is not that good- Ciao.Buongiorno alla ciurma, noto che manca qualche fonte di notizie base per le manovre (sartiame),provate questo libro The Masting and Rigging English of Ships è la bibbia dell'attrezzatura
Thanks Heinrich. I am putting aside the “incredible serving machine “ until I can make a better one- the tension on the line is variable and to keep it consistent is difficult. Was fun tho. My blocks for my bowsprit stays arrived today so I will move back to that section and finish the standing rigging. May also try my hand at netting. CheersMan oh man! That is superbly ingenious and the result is spectacular! Very very well done Grant!
- Joined
- Oct 17, 2020
- Messages
- 1,673
- Points
- 488

Ciao Grant Tyler se vuoi mi mandi la Tua EmailCiao Frank, dovrò eseguirlo in qualche modo tramite Google Translate - il mio italiano non è così buono - Ciao.

Grant, that is the coolest serving machine I've ever seen!!! Love It.Good morning. I refer @Philski excellent serving machine he made on Marks @Nomad bluenose log. I will attempt to copy this once I have sourced the parts locally here in Capetown.
I’m mean time I made a “jury rigg” or a “Macgygerism” from LEGO I found in cupboard. No laughing guys....
View attachment 282132
My first shrouds on the Mizzen mast where served using this incredible machine.I used a measurement of 7mm length being the served portion so that it will be served down to the lower end of the Bibb. As each shroud is added this measurement will increase accordingly so all the shroud served sections fall equally at the lower end of the Bibb.
1mm thread was served with 0.25mm. All the tread is stained black with Indian ink. I then run the line through a flame on a candle quickly to try and remove the fuzz. I have not lashed the shroud to the mast yet as I am not sure at which point the lashings are done. The pattern of how the shrouds fit as they are layered on one each other means the placement of the lashing needs to be accurate from the first one. This I will find out.
The result:
View attachment 282136
Too lateI’m mean time I made a “jury rigg” or a “Macgygerism” from LEGO I found in cupboard. No laughing guys....
...Hello Daniel. Was fun to put together and it worked ok. Too many unwinding and rewinding to keep the tension constant tho. It worked Way better than doing it by hand however Phil’s example will be made as soon as parts are sourced.Grant, that is the coolest serving machine I've ever seen!!! Love It.
Ingenious Grant, absolutely ingeniousGood morning. I refer @Philski excellent serving machine he made on Marks @Nomad bluenose log. I will attempt to copy this once I have sourced the parts locally here in Capetown.
I’m mean time I made a “jury rigg” or a “Macgygerism” from LEGO I found in cupboard. No laughing guys....
View attachment 282132
My first shrouds on the Mizzen mast where served using this incredible machine.
1mm thread was served with 0.25mm. All the tread is stained black with Indian ink. I then run the line through a flame on a candle quickly to try and remove the fuzz. I have not lashed the shroud to the mast yet as I am not sure at which point the lashings are done. The pattern of how the shrouds fit as they are layered on one each other means the placement of the lashing needs to be accurate from the first one. This I will find out.
The result:
View attachment 282136

Worked on the bow section. My triangle blocks (AL) arrived so I was able to complete the standing rigging on the bowsprit. I used a needle file to make the holes bigger. Nothing new to my build process which was discussed before in my log so I will post some pictures.
Finished painting the figure head of the Victory and fitted with epoxy glue.
The netting was an impossible mission. Nothing worked. The kit netting is a plastic netting and is very slippery when sewing it on. On the My Victory I added the stanchions which the instructions did not include. This is more accurate.
- Joined
- Jan 9, 2020
- Messages
- 10,534
- Points
- 938

Hello Grant. From the builds on the Dutch forum, I know that the netting on the galleon is very tricky to get right. It might have been impossible to work with, but your result looks very good. The stanchions are a nice touch which add detail. Also, I think you can be very happy with the way that your figure head turned out. Your Victory is looking beautiful my friend.
Beautiful painting on the figurehead!

I can’t believe this is your first ship Grant!! Fantastic build - I especially like your descriptions of improving on aspects of the build where you have considered the Mantua kit was lacking. Innovation to improve our builds along the way significantly improves your ship and your modelling skills.
Well done!!
PeterG
Well done!!
PeterG
Good morning Daniel. Thank you. Considering my first attempt with the oversized brass fittings the it is a massive improvement.Beautiful painting on the figurehead!
Hello Heinrich. Cheers my friend. I have been looking at how modelers here do the netting and it amazes me how each have their own method. I see many acquire new netting from anglers and fabric stores and I am not alone with this challenge. This is such an interesting hobby.Hello Grant. From the builds on the Dutch forum, I know that the netting on the galleon is very tricky to get right. It might have been impossible to work with, but your result looks very good. The stanchions are a nice touch which add detail. Also, I think you can be very happy with the way that your figure head turned out. Your Victory is looking beautiful my friend.

Hello Peter. Thank you. The encouragement and advice from guys on SOS is the biggest motivation to keep improving the kit and my modeling. My only frustration is getting accessories here- takes forever or almost doubles the cost with import duty and courier fees. Appreciate your encouragement. CheersI can’t believe this is your first ship Grant!! Fantastic build - I especially like your descriptions of improving on aspects of the build where you have considered the Mantua kit was lacking. Innovation to improve our builds along the way significantly improves your ship and your modelling skills.
Well done!!
PeterG
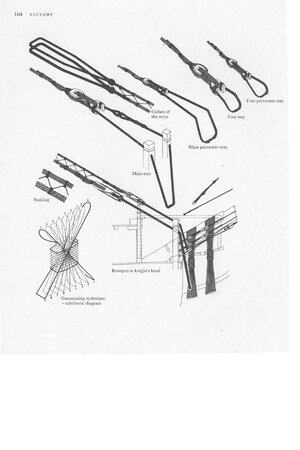
Worked on the boomkin stays- fitted the eyelets to the bow(I have used the more square shaped than rounded) , notched the end of each boomkin and served the stays to the eyelets. Rather than using a loop knot on the boomkin, I served the stays where they pass through the”notch” on each boomkin end. The stays held a better line this way and looked better.

My trimming needs improvement. Have sorted this.
My trimming needs improvement
. Have sorted this.I had a little bit of creative fun. Looking at picture of the Portsmouth Victory I notice a rope support up the side stairs past the main side entrance.


Used 1mm thread and attached to blacked eyelets.
PS I found out how to insert arrows on my iPhone pictures...
Used 1mm thread and attached to blacked eyelets.
PS I found out how to insert arrows on my iPhone pictures...
Hello Frank- sorry for late reply. Finally got the translation . Yes thank you for this reference. I do need to buys some books for this ship and my rigging. Appreciate it. CheersBuongiorno alla ciurma, noto che manca qualche fonte di notizie base per le manovre (sartiame),provate questo libro The Masting and Rigging English of Ships è la bibbia dell'attrezzatura
- Joined
- Oct 17, 2020
- Messages
- 1,673
- Points
- 488
Ciao Grant, i libri in merito alla nave di che argomenti devi comprareCiao Frank, scusa per la tardiva risposta. Finalmente ho la traduzione. Sì, grazie per questo riferimento. Devo comprare dei libri per questa nave e il mio sartiame. Apprezzalo. Saluti
Attachments
Last edited: