HMS Victory Mantua 1:78 (first build) by Grant Tyler

Good morning. I have been working on the Victory boats. For the Pinnace I started the gold strips on the water wash. Used masking tape cut to size and painted gold. Also started the paint details to the oars and cut a rudder (smaller than kit was too big).WIP.

View attachment 309301

The Launch has been built over the past weeks, bashing the kit in a similar manner to the Pinnace. I have used the Caldercraft drawings and other builds to try and find something a little more resembling the launch than the kit. I decided not to stain the Launch And Barge as these will be on the deck of the Victory, while the Pinnace and the cutter (also dark stain) will be hung from the quarter Davits. Simply put- I don’t like the dark stain when on the deck.

Launch to date:
View attachment 309300View attachment 309302View attachment 309303
Basically scratch built. The windlass I made a octagon from a 3mm dowel (well sort of an octagon ;) ) and the mast fittings from 2x2 birch stained. The ribs and seat fitting strakes are cardboard. TIP: (don’t dye your hair greenROTF)- seriously think ahead- I fitted the windlass and then attempted to add the rope and coil. Would have been easier if I did this prior to fitting the windlass. The sailor who did that coil is not having rum for a while for sureROTF.

Now for details on both and loads of paintwork and light poly- From my disappointment of the kit boats to now I am happy and holding thumbs they will look good enough for Grants Victory ;).

Cheers Grant
Excellent detail Grant, great work Thumbsup
 
Good afternoon. I have packed my boats into my WIP box, along with my Anchors, quarter Davits and lanterns. (A gift from one of the HR managers - “Grants Doos” - literal translation is Grants box, however in SA slang I cannot translate on this forum)...... It is time to get back to some rigging. Cheers GrantView attachment 309353View attachment 309354
I won't comment here ROTF
 
Good morning. A special thanks to @Frank48 who kindly shared some documents with me. I have some reading to do for sure. I scaned through some of the pages and I realize that after 15odd months of building my knowledge is less than zero.

Ratlines- (this is Johanns @RDN1954 fault for sure ;), he had to comment where mine are) From research it is clear that these are tarred. Hemp and other ropes of the era (made from many different natural resources, including Horse hair at a point) when exposed to moisture and heat decay rapidly if not protected. These are pulled though a “tarring kettle”- the absorption is around 25% tar. Some “white rope” is used on board for lead and log lines, ensign lines and some halyards. Interesting that the natural rope is stronger.

I am happy with this as it supports what I wanted to do. Colourwise.

Ratlines are fitted to the shrouds by a spliced loop and Clove hitches- clearly splicing a 0.2mm line cannot work for Grants Victory. Anyway so much more (3 pages on ratline and ratling down ) however it is time to attempt some ratlines.

Last point from the research- which I kind of like: The neatness of these varied from ship to ship and no guide was determined and left to the sufficiency and or negligence of each rigger. Gives Grant some latitude on my attempt. :D:D;) .....just as well. Here is my start.
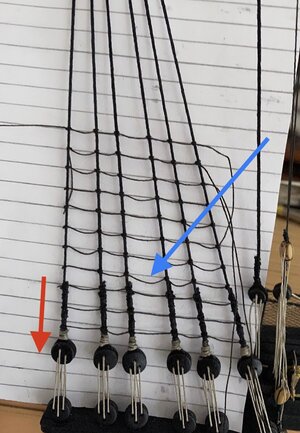
7DF0B51E-A501-4D67-9A23-7D017A1E4DDF.jpeg
Red arrow: was difficult to get the lines in shape and in line over the whipping of the shrouds. Need to measure and ensure these are spaced correctly on the main and foremasts for the ratlines when I do these.

Blue arrow: how to get each ratline “tensioned “ correctly for the “loose pattern” is a mission. Would have been easier to go for a straighter linear line I think. I do like it tho.

The gap between the fades is slightly more than Sasha’s 4 mm (4.7mm) due to Grant having brain fade. In the documentary I received the gap is 15 to 16inches, while Sasha research is 12 to 13 so I don’t think my error will make too much impact on the look of my Victory.

Anyway committed now and so we go on.

Cheers Grant
 
Good morning. A special thanks to @Frank48 who kindly shared some documents with me. I have some reading to do for sure. I scaned through some of the pages and I realize that after 15odd months of building my knowledge is less than zero.

Ratlines- (this is Johanns @RDN1954 fault for sure ;), he had to comment where mine are) From research it is clear that these are tarred. Hemp and other ropes of the era (made from many different natural resources, including Horse hair at a point) when exposed to moisture and heat decay rapidly if not protected. These are pulled though a “tarring kettle”- the absorption is around 25% tar. Some “white rope” is used on board for lead and log lines, ensign lines and some halyards. Interesting that the natural rope is stronger.

I am happy with this as it supports what I wanted to do. Colourwise.

Ratlines are fitted to the shrouds by a spliced loop and Clove hitches- clearly splicing a 0.2mm line cannot work for Grants Victory. Anyway so much more (3 pages on ratline and ratling down ) however it is time to attempt some ratlines.

Last point from the research- which I kind of like: The neatness of these varied from ship to ship and no guide was determined and left to the sufficiency and or negligence of each rigger. Gives Grant some latitude on my attempt. :D:D;) .....just as well. Here is my start.
View attachment 310218
Red arrow: was difficult to get the lines in shape and in line over the whipping of the shrouds. Need to measure and ensure these are spaced correctly on the main and foremasts for the ratlines when I do these.

Blue arrow: how to get each ratline “tensioned “ correctly for the “loose pattern” is a mission. Would have been easier to go for a straighter linear line I think. I do like it tho.

The gap between the fades is slightly more than Sasha’s 4 mm (4.7mm) due to Grant having brain fade. In the documentary I received the gap is 15 to 16inches, while Sasha research is 12 to 13 so I don’t think my error will make too much impact on the look of my Victory.

Anyway committed now and so we go on.

Cheers Grant
Welcome to the band of merry ratliners!
You're off to a good start.
 
While I had only a maximum of thee shrouds to deal with, while installing ratlines, I just couldn't get them perfect. So yes, there's quite a few showing a little sag. In my view these "imperfections" add to the authenticity, if you will, of the model
 
Last edited:
Blue arrow: how to get each ratline “tensioned “ correctly for the “loose pattern” is a mission.
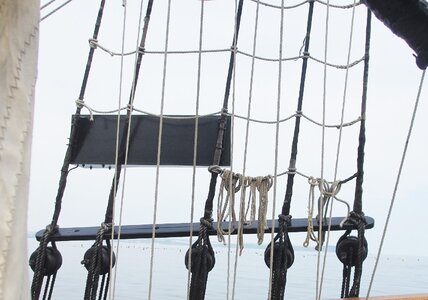
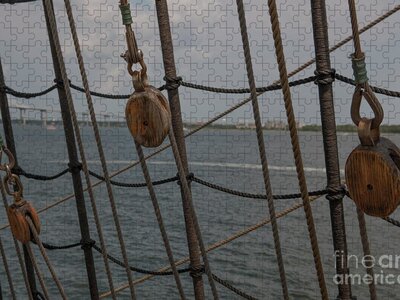
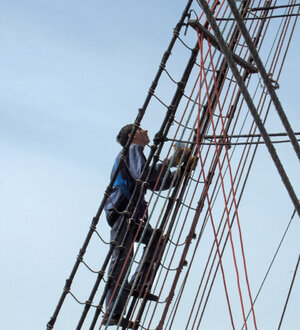
I think usualy the ratlines are not streight or even tensioned, but have a slight bow downwards, so these are not loooking bad.
This was ncessary that the bare feet of the seamen had a safe stand on the ratlines

ratlines (1)a.jpg ratlines (2).jpg

ratlines (3).jpg

The best ratlines I have seen actually on a model are these done by Johann alias @archjofo

 
I think usualy the ratlines are not streight or even tensioned, but have a slight bow downwards, so these are not loooking bad.
This was ncessary that the bare feet of the seamen had a safe stand on the ratlines

View attachment 310249 View attachment 310250

View attachment 310251

The best ratlines I have seen actually on a model are these done by Johann alias @archjofo


If these ratline have the same behavior than the electric main cable outdoor, the weight gived them and hyperbole curve.
 
Last edited:
Hey Grant,

Be sure to think through the order of things. Shrouds alone make access to the area around the mast difficult - ratlines make it even more challenging. You like to jump around a bit (ROTF - not a criticism - just an observation) so I'm not sure what else needs to get done at the centerline that will be easier without fully dressed out shrouds with rats...

Speaking from experience here...
 
I’m just itching to get started on my ratlines, but I will wait until after many of my running rigging lines are done for that very reason. Belaying lines using long tweezers stuck through ratlines is quite annoying.
 
I think usualy the ratlines are not streight or even tensioned, but have a slight bow downwards, so these are not loooking bad.
This was ncessary that the bare feet of the seamen had a safe stand on the ratlines

View attachment 310249 View attachment 310250

View attachment 310251

The best ratlines I have seen actually on a model are these done by Johann alias @archjofo

Good evening Uwek. Thanks for this - when I look at Johann build of La Creole it is like “I wish I could....maybe when I am big”- beautiful work. It is great to see something for which to strive for tho. Cheers Grant
 
Hey Grant,

Be sure to think through the order of things. Shrouds alone make access to the area around the mast difficult - ratlines make it even more challenging. You like to jump around a bit (ROTF - not a criticism - just an observation) so I'm not sure what else needs to get done at the centerline that will be easier without fully dressed out shrouds with rats...

Speaking from experience here...
Hello Paul.... now you tell me RedfaceROTF. I always knew my jumping around would catch up with me at a point. Why I do this....who knows. I do have a plan (scrambled as it may be) and there is room( I hope...first timer fools hope maybe) for the rigging at belay pins and tackle points at mast base. It is why I’m rigging Mizzen from top to bottom before I do the others.My test run mast so to speak. Cheers Grant
 
Dear Grant. I think you are off to an excellent start on your ratlines. What Paul says though (about the order of things) is very sound advice.
Hello Heinrich. Thank you. Everything I do is a new experience and I do experiment and make many errors. I look at other builds and many do things differently so I see what works for me using others examples. My Mizzen is the classroom so hopefully when I get to the main and foremast I will have learnt a little. I thought a good analogy for you;).Cheers Grant
 
I’m just itching to get started on my ratlines, but I will wait until after many of my running rigging lines are done for that very reason. Belaying lines using long tweezers stuck through ratlines is quite annoying.
Hello Vic- you guys are making sense here. I know I am naive here, but there seems plenty of room on my Victory to access the belay and tackle hooks at mast base. I could be heading into a world of pain tho....:oops::rolleyes:.
 
Good morning. A special thanks to @Frank48 who kindly shared some documents with me. I have some reading to do for sure. I scaned through some of the pages and I realize that after 15odd months of building my knowledge is less than zero.

Ratlines- (this is Johanns @RDN1954 fault for sure ;), he had to comment where mine are) From research it is clear that these are tarred. Hemp and other ropes of the era (made from many different natural resources, including Horse hair at a point) when exposed to moisture and heat decay rapidly if not protected. These are pulled though a “tarring kettle”- the absorption is around 25% tar. Some “white rope” is used on board for lead and log lines, ensign lines and some halyards. Interesting that the natural rope is stronger.

I am happy with this as it supports what I wanted to do. Colourwise.

Ratlines are fitted to the shrouds by a spliced loop and Clove hitches- clearly splicing a 0.2mm line cannot work for Grants Victory. Anyway so much more (3 pages on ratline and ratling down ) however it is time to attempt some ratlines.

Last point from the research- which I kind of like: The neatness of these varied from ship to ship and no guide was determined and left to the sufficiency and or negligence of each rigger. Gives Grant some latitude on my attempt. :D:D;) .....just as well. Here is my start.
View attachment 310218
Red arrow: was difficult to get the lines in shape and in line over the whipping of the shrouds. Need to measure and ensure these are spaced correctly on the main and foremasts for the ratlines when I do these.

Blue arrow: how to get each ratline “tensioned “ correctly for the “loose pattern” is a mission. Would have been easier to go for a straighter linear line I think. I do like it tho.

The gap between the fades is slightly more than Sasha’s 4 mm (4.7mm) due to Grant having brain fade. In the documentary I received the gap is 15 to 16inches, while Sasha research is 12 to 13 so I don’t think my error will make too much impact on the look of my Victory.

Anyway committed now and so we go on.

Cheers Grant
Welcome to the world of ratlines Grant, so much fun. Especially the higher you go. What you have so far looks spot on as far as I'm concerned. Surely, back in the day, after several days (weeks, months) of sailors running up and down shrouds the ratlines were unlikely to be evenly tensioned? I imagine the ratlines in the middle would end up more loopy than the ones at the ends.

But I do agree with Paul on the order of work; shrouds and ratlines essentially form a net that makes access to your masts or anything else behind them a bit more challenging. As for Sasha and his scale calculations ... well he made me weave far more ratlines than I had anticipated. Although to be fair, the extra effort did make a big visual difference so I'll let him off the hook :p

It's all about the tension, good luck! Thumbsup
 
Last edited:
Welcome to the world of ratlines Grant, so much fun. Especially the higher you go. What you have so far looks spot on as far as I'm concerned. Surely, back in the day, after several days (weeks, months) of sailors running up and down shrouds the ratlines were unlikely to be evenly tensioned? I imagine the ratlines in the middle would end up more loopy than the ones at the ends.

But I do agree with Paul on the order of work; shrouds and ratlines essentially form a net that makes access to your masts or anything else behind them a bit more challenging. As for Sasha and his scale calculations ... well he made me weave far more ratlines than I had anticipated. Although to be fair, the extra effort did make a big visual difference so I'll let him off the hook :p

It's all about the tension, good luck! Thumbsup
Good morning Mark. Thanks. You are absolutely correct. I certainly wanted the “loose effect” it just in my opinion makes them more difficult. Sasha knows what he is talking about and I can’t believe I added 0.7mm to my fades. Plain silly. They are still way narrower than the kit 6mm so and I think will look good. Taking on Victory as first build was also a rookie error, although the challenge and learning curve has been an is super fun. The advice from all you guys is brilliant and scary at times....Cheers Grant.
 
Not to worry about the rat lines Grant, you'll make it all work regardless. One skill that I learned was using a long tweezer in each hand. I'll bet you've already had some experience with it.
Good Morning Daniel. Your confidence in my “tweezer” ability is appreciated....at this stage I’m still one handed in my ability Redface. After reading they guys advice I better start practicing“dual tweezer “ techniques. Thank you Daniel. Cheers Grant
 
The thing with taking on Victory as a first ship, means there is a much steeper learning curve than on a less challenging model. You are however, very much up to it - in fact you have nailed it. The upside is that what you have learnt is now acquired knowledge which makes the library in the mind so much more effective than the one in books.
 
Back
Top