I thinking about getting into milling!

OK LET ME TRY TO EXPLAIN MY QUESTION, HERE FIRST I DO NOT OWN A PROXXON MF 70 MILL, JUST THINKING COMING TO TERMS WITH AGE AND EYESIGHT, I HAVE A VANDA-LAY MILL WORKS OF A DREMEL JUST OK WHEN MILLING FOR KEEL NOTHES I SET THE Z AXIS FOR THE NOTCH CAN NOT KEEP THE DEPTH OF CUT THE SAME DEPTH ESPECIALLY WHEN HAVING TO MOVE THE PIECE THAT IS WHAT HAPPENED ON THE LE ROCHEFORT SO NOW GOING TO A LOT OF SEMI/SCRATCH BUILDS AKA KRIS FROM POLAND SO NOT TO SURE WHAT I AM GOING TO DO THAT IS THE QUESTION HOPE I AM EXPRESSING MY SELF BTW DON ROBINSON ANSWERED MY QUESTION IT MAKES SENCE TO KEEP TRACK OF THE ROTATION ON THE HANDELS. GOD BLESS STAY SAFE ALL DON
The question is not easy to answer without all the details. However, what I can observe, is the fact that your mill doesn't have a stationary head, and you attach the Dremel rotary tool.
  • First, make sure the Dremel tool tightened in the mill housing very tight and perpendicular to Z, Y table at 90 degrees
  • Make sure the collet for the size of your end mill, and also tight firmly
  • Tight the milling part on the table: Here we have to know whether you use a vise or holding clamps. No matter what do you use, you have to tight the part 90 degrees to the Z column.
  • All work should be done by one installment e.g. if you doing the keel notches, tight the piece from both ends on the X table, set the deep for the notch, and operate only on X and Y handles until you make all the notches.
Hope you understand my broken English
 
I THINK WE ARE TALKING DIFFERENT THINGS I AM TALKING ABOUT A PROXXON MF70 MILL

HERE FIRST I DO NOT OWN A PROXXON MF 70 MILL, JUST THINKING COMING TO TERMS WITH AGE AND EYESIGHT, I HAVE A VANDA-LAY MILL WORKS OF A DREMEL
DON

ok that is a bit confusing

but anyhow i found this

If you buy Proxxon looking for an advanced Dremel you will be very happy. If you're looking for a mini Bridgeport,
you may be a bit disappointed.

The Proxxon Micromot MF 70 Milling Machine is for work with extremely small cutters

Another review mentions the Z axis has a lot of play or backlash. Most likely the problem is that the Z axis
stop nut was set too loosely at the factory. Here's the fix: You'll need a 2.5mm allen wrench and a deep 10mm socket.
Remove the four allen bolts on the top cover of the Z pillar, unscrew the Z leadscrew from the spindle nut, and remove
the top assembly from the mill. Slip the 10mm socket over the leadscrew and tighten the nylock stop nut under the cover
(it's left hand threaded so tighten to the left). Lightly snug the nut then back it off a bit so there's minimal axial
play and the handwheel turns freely. Reassemble and test. The Z axis will be much tighter
 
THANKS ALL JIM AND DON ROBINSON, GOOD ADVICE JIM UNDERSTAND IT WELL RIGHT NOW DO NOT KNOW IF I AM GOING TO GET THGE MF 70 OR NOT HAVE TO WAIT AND SEE IF MY NEEDS AND USES DETERMINE THE INVESTMENT NOT SURE IF YOU ALL WANT TO SEE WHAT I HAVE I WILL TAKE A PICTURE OF IT AND POST IT, JUST LET ME KNOW. GOD BLESS STAY SAFE ALL DON
 
Hello Don,
My answer\ suggestion is not to buy a Proxxon Mill. More of it, DO NOT buy it!! You already have a mill, and if you really need to use one, you can use it!

But, honestly, why struggle? There are so many kits out there, you can simply enjoy assembling, without the tools like Mill, lathe, tablesaw...The frustrations\disapoitments will take away the most important part of our hobby- The Fun!!!! Think about it...You certainly have all the skills to assemble complicated kits, go for it, have fun while building them.

You have enough frustrations in the hobby, time to enjoy!
 
YEA THANKS JIM YOU ARE RIGHT I DO NOT NEED IT, WOULD BE A WASTE, I WILL CONTINUE WITH THE SEMI SCRATCH AKA KRIS ALONG WITH QUALITY KITS, YEA HAVING FUN IS THE NAME OF THE GAME, GOD BLESS YOU AND YOURS DON
 
I have to agree with Philski, I use my 10" table saw with a 7 1/4' blade, 40 tooth, for smooth cuts, make a thin stripper guide, one that does not require moving the rip fence, lots of info on the internet for stripping gigs. As Philski said as a bandsaw ( I have a 10" bandsaw, a dream for model shipbuilding), and here is where I slide away from Philski, I don't like getting my fingers close to a planer or a joiner, so I made a router planer, an 18" x 13"x 3/4" plywood base with 2 1/2" x 20 " x 3/4" plywood rails screwed to either side, now I made a Tray to hold my router which slides back and forth across the base and slides up and down the base, underneath you will have to place a stop at either end of the slide tray so the tray doesn't slide off the rails and it doesn't slide far enough so the router bit does not cut into your side rails on the inside. This is the hardest part of figuring out when building the jig. I use double-sided carpet tape to hold the wood to the base and I can plane as thin as 1/64" and on my table saw I can strip as thin as 1/16". I've milled probably hundreds of feet of lumber for my railroad buds(1/87 scale) wood siding, window and door framing even actually did wood shingles, did timbers for trestle bridges, so this system was only about a 700.00$ investment for my woodshop and my model hobby and I keep my fingers, I still have 10 Digits. The commercial units are called Slab Flattening Mills', and seeing I broke my camera, you can find this information online or in mags such as Woodsmith, just scale to the size that is appropriate for your needs. To cut them to the width you need just use a balsa stripper and again plenty of info online then figure what you need and build it, you'll be amazed how many tools you can accumulate for next to nothing so save your scraps. Sorry about the book guys!
 
Sorry guys I forgot when I cut 3/4" strips I can plane 12 - 18"x 3/4" strips at a time on my planer which is the equivalent to a full deck +
 
OK GOT ANOTHER ONE MAYBE WRONG PLACE TO POST ANYHOW HERE IT IS HAS ANY ONE GOT THE MICROMART VARIABLE SPEED MULTI SAW, HAVE SOME QUESTIONS HOW IS THE VIBRATION ON THIS AND CAN IT CUT 1/4 INCH BALTI BIRCH PLYWOOD WOULD LIKE TO HERE COMENTS PLEASE. GOD BLESS STAY SAFE ALL DON
 
I started the topic and have no problem with it veering off into CNC! Interesting stuff.

I would start with a first rate practicum on 3D cnc milling and printing. My recommendation is to consider lauckstreetshipyard.com and Bob Hunt’s practicum “Using 3D Technology for Model Shipbuilding.” There is more to consider than just equipment. This practicum will take you through the computer software requirements as well as help with equipment selections. Bob Hunt is an expert in the use of cnc milling and 3D printing for ship modeling and the practicum is focused on the beginner. You should absolutely go through this practicum before you purchase anything!

Killer tip, Jim! I built my Swift while working through Bob Hunt's beginner practicum and learned a lot from it. This one sounds exactly what I was looking for.
 
But I have no idea where to start. Obviously, this would be for model ship making so I don't want to break the bank or go overboard on equipment I'll never need. But I think it would be pretty handy to be able to fabricate my own lumber and cut pieces, either manually or computer assisted.

Where should the rank beginner go to get started? Also curious if there are equipment recommendations.
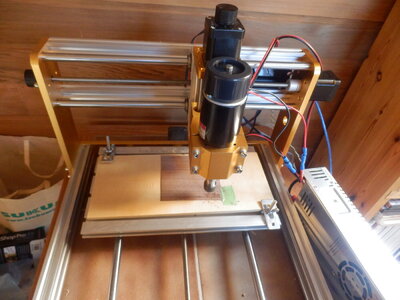
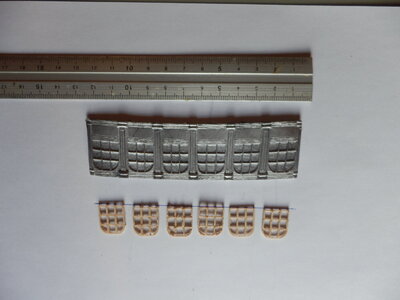
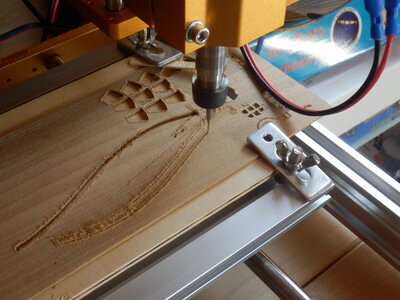
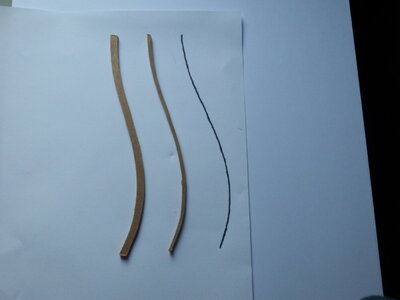
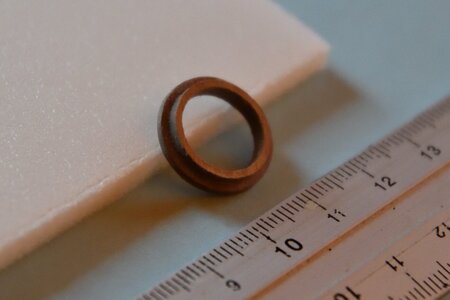
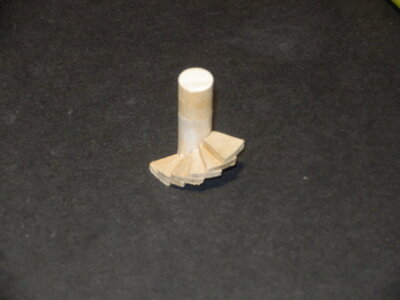
I am now working to build Euro Model Royal William. This is a scratch build except hull and metal decorations. So I bought 3018 CNC plus router from Ali Express. It cost about $450 including shipping fee to Japan. I attach some photos to show how convenient to use this machine. Since this is CNC, you need to connect to PC. I am using old Windows8.1 laptop and open source software like Inkscape, Jscut, Candle etc.. I also purchased several end mills from Ali Express. End mills sold in Japan or US are quite expensive, but the ones I bought from Ali Express are reasonable, like $5-10 for 10 mills. They are good enough to mill wood. The pars I made using CNC are window frame, fender and mast base and spiral steps. I think I can easily make round part of rails.
 

Attachments

  • P1130726.JPG
    P1130726.JPG
    227.9 KB · Views: 35
  • P1130730.JPG
    P1130730.JPG
    157.5 KB · Views: 36
  • P2210745.JPG
    P2210745.JPG
    233.3 KB · Views: 35
  • P2210746.JPG
    P2210746.JPG
    109.4 KB · Views: 33
  • JAP_2481_01.jpg
    JAP_2481_01.jpg
    142.8 KB · Views: 33
  • P2170740.JPG
    P2170740.JPG
    191.3 KB · Views: 34
  • P2180744.JPG
    P2180744.JPG
    145.7 KB · Views: 35
I THINK WE ARE TALKING DIFFERENT THINGS I AM TALKING ABOUT A PROXXON MF70 MILL

HERE FIRST I DO NOT OWN A PROXXON MF 70 MILL, JUST THINKING COMING TO TERMS WITH AGE AND EYESIGHT, I HAVE A VANDA-LAY MILL WORKS OF A DREMEL
DON

ok that is a bit confusing

but anyhow i found this

If you buy Proxxon looking for an advanced Dremel you will be very happy. If you're looking for a mini Bridgeport,
you may be a bit disappointed.

The Proxxon Micromot MF 70 Milling Machine is for work with extremely small cutters

Another review mentions the Z axis has a lot of play or backlash. Most likely the problem is that the Z axis
stop nut was set too loosely at the factory. Here's the fix: You'll need a 2.5mm allen wrench and a deep 10mm socket.
Remove the four allen bolts on the top cover of the Z pillar, unscrew the Z leadscrew from the spindle nut, and remove
the top assembly from the mill. Slip the 10mm socket over the leadscrew and tighten the nylock stop nut under the cover
(it's left hand threaded so tighten to the left). Lightly snug the nut then back it off a bit so there's minimal axial
play and the handwheel turns freely. Reassemble and test. The Z axis will be much tighter

Thanks, Dave, this is great, I will try to decreasing the backlash this way. I assume the same applies to the X and Y backslashes too.
János
 
Hello Don,
My answer\ suggestion is not to buy a Proxxon Mill. More of it, DO NOT buy it!! You already have a mill, and if you really need to use one, you can use it!

But, honestly, why struggle? There are so many kits out there, you can simply enjoy assembling, without the tools like Mill, lathe, tablesaw...The frustrations\disapoitments will take away the most important part of our hobby- The Fun!!!! Think about it...You certainly have all the skills to assemble complicated kits, go for it, have fun while building them.

You have enough frustrations in the hobby, time to enjoy!


Don i have to agree with Jimsky, Don you are one heck of a good builder i watched you from rank beginner to a respectable builder.
there is no need to frustrate yourself trying to be a machinist that requires another set of skills, not that you can't do it, it comes down to invested time to learn and get good at it.

i am in my 70's and realize i am not the young buck i once was and no longer like the guys that works for me taking down trees and pushing around 800 pound logs.
Do what you can and most of all enjoy what you do.
 
Back
Top