Ingermanland 1715 (2014) * Shi Cheng * 1:50 Scale

Alright, now that the first layer of planking is complete, and the hull is nicely shaped, I've began to read about the second planking and have come across the garboard plank, which is leaving me a little confused due to the lack of "How To" instructions. I've looked for videos; or even good photo details, but have come up short on both. I have also read that this plank is wider for the first planking and narrower for the second. Is this true? If it needs to be wider, even for the second planking, I will need to purchase wood from some place as all of the planks that came with the kit are the same width.
 
I will need to purchase wood from some place as all of the planks that came with the kit are the same width.

that is one big problem with kits they do not provide the proper widths of planking to do a proper job

depending on the wood in the kit it might be tough to match it so you might have to replace all of it. another way around the narrow width is to use stealers.
 
Alright, now that the first layer of planking is complete, and the hull is nicely shaped, I've began to read about the second planking and have come across the garboard plank, which is leaving me a little confused due to the lack of "How To" instructions.

start here go to page 7
http://www.navyboardmodels.com/sites/default/files/documents/journal/msbj-2008-feb.pdf

This link and zoly99sask's link is really, really helpful. But they can get lost in a build log.
Can you post a reply to the following page so that we can find this info more easily?
https://www.shipsofscale.com/sosforums/index.php?threads/garboard-strake.627/
 
I will need to purchase wood from some place as all of the planks that came with the kit are the same width.

that is one big problem with kits they do not provide the proper widths of planking to do a proper job

depending on the wood in the kit it might be tough to match it so you might have to replace all of it. another way around the narrow width is to use stealers.
Yes, these are all the same width, I'm afraid. Which would explain the incorrect planking of this hull, I believe. As a beginner, I feel that this will be my biggest challenge yet. o_O
Something else that I have not done is cut the rabbet. :confused:


DSC_1391.JPG
 
Alright, here I go again with the questions:confused: :rolleyes: :p

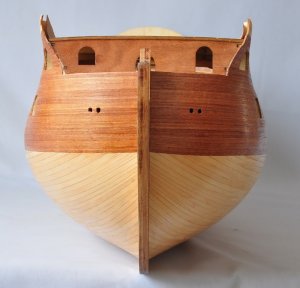
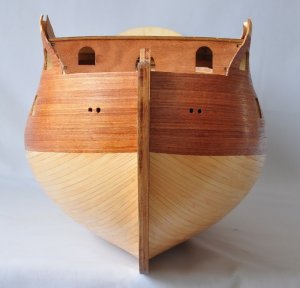
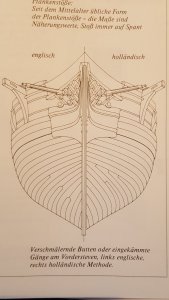
I've been practicing with the garboard plank, and I've tried a few different methods, but it's led me into questioning the planks that stretch to the stem. It seems that, no matter what, the bow planks, following their natural flow, take a drastic upward curve just like in the photo in Post #210. Now, with that being said, Maarten posted a photo of the bow of a Holland and English ship, and the planking looks nothing like what I described. In fact, it looks as if all of their planks would have to be spiler planks in order to keep that horizontal run. Now, the laser cut planks for the bow were all spiler planks, but they were drastically hooked in order to take the required form of the bow (I can't imagine the original ship builders being able to make such a spiler plank), but by just using the supplied planks, it seems as though the dramatic "V" in the first photo is inevitable. :confused:

DSC_1391.JPG 20180723_075847.jpg
 
Hi John, A good starting point of a planking the hull would be the really tinny book written by Jim Roberts - Planking The Built-UP Ship Model. The cost is a fraction what we spend buying kits. It is an invaluable source of information in my opinion and I am always using it as a reference. I hope this will help.
 
Hi John,

The best way to create the planking at the bottom part of the hull is as follows:
Measure the width of a plank and temporary fit strokes from at the main frame with the space of 4 planks in between. Let this stroke follow its natural line along the hull towards the bow stem and towards the stem at the stern.
Now you can measure the width of the planks at every frame by measuring the space between the stroke and the finished planking above and devide it by 4. Note this width at every plank to be fitted at the space where it meets the specific frame. When the planks become smaller then half the width you have to stop one plank and continue with three as shown in the German book. If the planks become smaller you can better shape them along the bow.

Hope it helps.
 
I purchased the book that epicdoom and Jimsky recommended. Amazon Prime is fantastic! Thanks for the recommendation, guys! :D

Zoltan, I haven't actually made the garboard plank just yet. I'm really just trying to visualize how it will all fall together and it just seems like such a drastic upward direction of the planks (exactly like the photo I posted of the Ingermanland's bow), but I'm guessing that the narrowing of the planks and adding in Drop Planks and Stealers will remedy all of that. :cool:

Maarten, this method makes a lot of sense to me, also. I will run a few strokes today, just to get a feel for it ;) :D

No matter what, I will have a beautiful ship at the end of this journey :p:D:cool:
 
John,you might pushing too far ahead the garboard strake,can you take a picture holding the plank at the bow that we can see whats hapening??

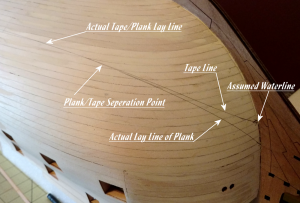
From a book on planking, I separated the upper and lower hull sections by laying tape from the center point of the keel & wale line. Then I went forward to the assumed waterline (as per the kit drawings), and then aft to the joint of the upper sternpost. Then I drew a line along the tape edge and removed the tape. Because I was happy with the location of the dividing line, I laid a plank, provided in the kit, along the line to the stem and marked the separation of the tape line and plank line. I did the same at the stern, but the tape and plank took the same path to the post. My only concern is that the actual plank line will intersect the wale at the stem, or maybe just a bit lower.

IMG_20181209_120931603.png
 
[QUOTE = "Viktor98, post: 47509, medlem: 5184"] Fra en bok på planking adskilt jeg de øvre og nedre skrogdelene ved å legge tape fra midtpunktet til køl- og wale-linjen. Så gikk jeg videre til den antatte vannlinjen (i henhold til tegningstegningene), og deretter bakover til skjøten av øvre sternpost. Da trakk jeg en linje langs båndkanten og fjernet båndet. Fordi jeg var fornøyd med plasseringen av skillelinjen, la jeg en plank, som ble levert i settet, langs linjen til stammen og markerte separasjonen av tapelinjen og planklinjen. Jeg gjorde det samme på sternen, men båndet og planken tok samme sti til stolpen. Min eneste bekymring er at den faktiske planklinjen vil krysse walen ved stammen, eller kanskje bare litt lavere.

View attachment 67033[/SITAT]

Hvordan går det med modellen din, håper jeg å se mer av bildloggen din i fremtiden:)Tommel opp
by the way, merry cristmas and a wery god yearFlaskeEksplosjon
 
Hvordan går det med modellen din, håper jeg å se mer av bildloggen din i fremtiden:)Tommel opp
by the way, merry cristmas and a wery god yearFlaskeEksplosjon

ENG. translation: How is your model going, I hope to see more of your picture log in the future Thumbs up, by the way, Merry Christmas and a very good year Bottle Explosion
 
[QUOTE = "Viktor98, post: 47509, medlem: 5184"] Fra en bok på planking adskilt jeg de øvre og nedre skrogdelene ved å legge tape fra midtpunktet til køl- og wale-linjen. Så gikk jeg videre til den antatte vannlinjen (i henhold til tegningstegningene), og deretter bakover til skjøten av øvre sternpost. Da trakk jeg en linje langs båndkanten og fjernet båndet. Fordi jeg var fornøyd med plasseringen av skillelinjen, la jeg en plank, som ble levert i settet, langs linjen til stammen og markerte separasjonen av tapelinjen og planklinjen. Jeg gjorde det samme på sternen, men båndet og planken tok samme sti til stolpen. Min eneste bekymring er at den faktiske planklinjen vil krysse walen ved stammen, eller kanskje bare litt lavere.

View attachment 67033[/SITAT]

Hvordan går det med modellen din, håper jeg å se mer av bildloggen din i fremtiden:)Tommel opp
by the way, merry cristmas and a wery god yearFlaskeEksplosjon

Det går veldig bra, takk for at du spør! På grunn av ferien har jeg ikke jobbet med den så mye jeg vil. Kanskje snart begynner jeg å plankere skroget med det andre laget av planker :)
 
Back
Top