Right; I'd better make a start on the actual build!
First thing to do - open the box and find out what I've got. The kit comes in a very nice, sturdy plywood box with a sliding lid. Inside there is a multitude of plastic bags containing all sorts of interesting parts in white metal, photoetched sheets, rubber, and so on, with about a dozen bags of assorted bolts, nuts, screws - all
very small, and sure to pose problems for my eyesight as the build progresses!
Time for some photos:

Nice box - sure I will find a use for it when the model is finished

Loads of bits; three sheets of photoetch in different thicknesses, and a 36 page build manual

The biggest photoetch sheet, 0.4mm thick

Detail of the sheet - you couldn't ask for better etching quality

Lots of packages with nuts and bolts - all very small!

And finally, the white metal castings (Picture from Autograph website)
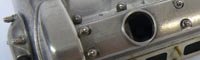
Everything hangs off the engine block, and more and more parts are bolted on as you build it up. In addition, when I say 'bolted on', I mean
'bolted on' - Nearly the whole model is bolted together using minute nuts and bolts (there are a few bits which have to be glued) The engine block and the gearbox are painted black, and I was concerned the paintwork might be damaged during subsequent steps, so I decided to drill as many of the holes needed for the bolts before I did the painting.
The following photos show the main parts to worry about:

Most of the holes are 0.8 or 1.0mm, and you can see them on the castings above. Generally, the 1.0mm holes are to allow the bolts to pass through a part to be bolted on, while the 0.8mm holes allow for the bolt to be screwed in to the block, cutting it's own thread as it goes (the white metal is soft enough to allow this)

Obviously, the drilling of all these holes requires a high degree of accuracy, so Autograph provide a lot of templates just for this. Some are shown above.

Some parts require both a nut and a bolt, as you can see on the above photo of the sump and gearbox extension. Couldn't find any spanners small enough, so had to make my own! (The spanners shown on the photoetch are for display only)

Detail
All for today!
Ted


")