Jaguar c-type engine. 1/8 scale

Talking about car models, I have also some 1/18 scale models made by CMC and would like to buy more, but as somebody said earlier, most of them are out of stock.

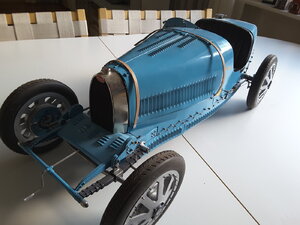
I am also a great lover of old racing cars and have built few years ago a 1/6 scale Bugatti 35 all from scratch. Enclosed a few pictures of her.


20200824_182426.jpg20200824_182511_001.jpg20200824_182554.jpg


Now I really would like to start building a Mercedes Grand Prix car of 1914 in the same scale, but it seems to be very difficult to get drawings and reference photos of this car. So if somebody of you could give me advice where to ask this kind of information, I would be most happy.
 
Hi Uwe,
As far as I know, you can only get them from CMC direct, and they seem to have run in to a few problems with Covid-19, in that practically everything they advertise seems to be out of stock!

Ted
Talking about car models, I have also some 1/18 scale models made by CMC and would like to buy more, but as somebody said earlier, most of them are out of stock.

I am also a great lover of old racing cars and have built few years ago a 1/6 scale Bugatti 35 all from scratch. Enclosed a few pictures of her.


View attachment 175129View attachment 175130View attachment 175131


Now I really would like to start building a Mercedes Grand Prix car of 1914 in the same scale, but it seems to be very difficult to get drawings and reference photos of this car. So if somebody of you could give me advice where to ask this kind of information, I would be most happy.
What a beautiful model, mostly metal or plastic? Great job!
 
Thanks Vintagemodeler, I am glad you like it. The model is mostly metal, chassis is made of brass, body is 0,5 mm aluminium plate. Wheels are cast of PU resin, tires are also cast of flexible PU resin. Engine is machined of plastic and small parts are brass, aluminum, styrene etc.
 
Apropos the Bugatti, when I was a GP, my Midwife, Paul (!), used to do his home visits in his replica Bugatti 35, including leather helmet...! Not directly Ships of Scale but...
 
Talking about car models, I have also some 1/18 scale models made by CMC and would like to buy more, but as somebody said earlier, most of them are out of stock.

I am also a great lover of old racing cars and have built few years ago a 1/6 scale Bugatti 35 all from scratch. Enclosed a few pictures of her.


View attachment 175129View attachment 175130View attachment 175131


Now I really would like to start building a Mercedes Grand Prix car of 1914 in the same scale, but it seems to be very difficult to get drawings and reference photos of this car. So if somebody of you could give me advice where to ask this kind of information, I would be most happy.
Very nice indeed!
Ted
 
Right; I'd better make a start on the actual build!

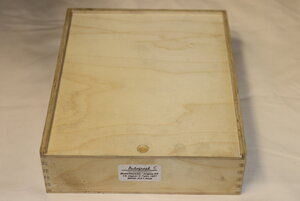
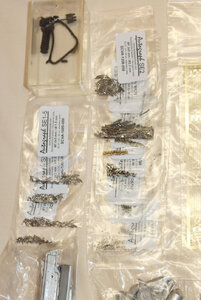
First thing to do - open the box and find out what I've got. The kit comes in a very nice, sturdy plywood box with a sliding lid. Inside there is a multitude of plastic bags containing all sorts of interesting parts in white metal, photoetched sheets, rubber, and so on, with about a dozen bags of assorted bolts, nuts, screws - all very small, and sure to pose problems for my eyesight as the build progresses!
Time for some photos:
IMG_0108.JPG
Nice box - sure I will find a use for it when the model is finished

IMG_0079a.jpg
Loads of bits; three sheets of photoetch in different thicknesses, and a 36 page build manual

IMG_0099.JPG
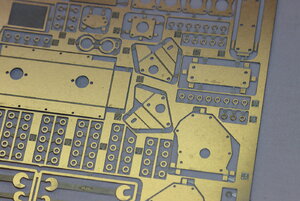
The biggest photoetch sheet, 0.4mm thick
IMG_0104.JPG
Detail of the sheet - you couldn't ask for better etching quality
IMG_0094a.jpg
Lots of packages with nuts and bolts - all very small!

Autograph-1-8-Motorbausatz-JAGUAR-C-Type-Le-Mans-1951_1_b13.jpg
And finally, the white metal castings (Picture from Autograph website)

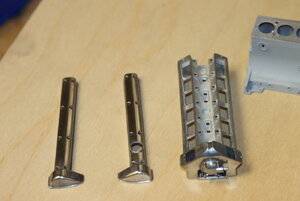
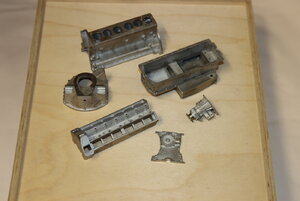
Everything hangs off the engine block, and more and more parts are bolted on as you build it up. In addition, when I say 'bolted on', I mean 'bolted on' - Nearly the whole model is bolted together using minute nuts and bolts (there are a few bits which have to be glued) The engine block and the gearbox are painted black, and I was concerned the paintwork might be damaged during subsequent steps, so I decided to drill as many of the holes needed for the bolts before I did the painting.
The following photos show the main parts to worry about:
IMG_0119.JPG
Most of the holes are 0.8 or 1.0mm, and you can see them on the castings above. Generally, the 1.0mm holes are to allow the bolts to pass through a part to be bolted on, while the 0.8mm holes allow for the bolt to be screwed in to the block, cutting it's own thread as it goes (the white metal is soft enough to allow this)

IMG_0144.JPG
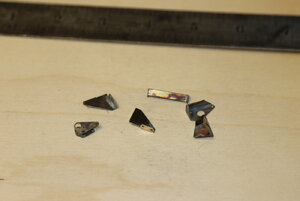
Obviously, the drilling of all these holes requires a high degree of accuracy, so Autograph provide a lot of templates just for this. Some are shown above.

IMG_0121.JPG
Some parts require both a nut and a bolt, as you can see on the above photo of the sump and gearbox extension. Couldn't find any spanners small enough, so had to make my own! (The spanners shown on the photoetch are for display only)

IMG_0123.JPG
Detail

All for today!

Ted
 
Great - I really want one..... is someone wants to sell or knows who has one for selling - please send me a PM
 
Hi Ted,
Stunning kit!!!
Thanks for sharing your build.
I hope I am not telling you how to suck eggs here but if you are looking for a small "socket" small grub screws provide a nice socket for example M3 grub screw has a 2mm hex ( depending on manufacturer ). If you get a long grub screw the thread can be removed at the socket end and a hex nut or two can be loctited on the other end to provide something to grip.
Cheers,
Stephen.
 
Don't envy you drilling all those nuts and bolts for lock-wire......or are they pre-drilled?
Hi Pugwash,
Fortunately, none of the bolts or nuts on the c-type engine were wire locked!

Ted
 
Wow that is totally impressive! I hope they give you some extras as this looks like carpet monster food. The white metal looks super clean or have you cleaned it up? All the white metal kits I have built require lots of clean up.
I keep all the nuts, bolts and washers in separate, shallow containers, and so far haven't lost any! The kit does in general provide a few spares.
I was blown away by the quality of the white metal castings - minimal flash, and no flaws - very good quality control! Minimal clean-up required.

Ted
 
Hi Ted,
Stunning kit!!!
Thanks for sharing your build.
I hope I am not telling you how to suck eggs here but if you are looking for a small "socket" small grub screws provide a nice socket for example M3 grub screw has a 2mm hex ( depending on manufacturer ). If you get a long grub screw the thread can be removed at the socket end and a hex nut or two can be loctited on the other end to provide something to grip.
Cheers,
Stephen.
Now that is a really clever idea - kicking myself for not seeing it before!
Thanks very much.
I would have to grind down the sides of the grub screws to some extent, as the clearance at the back of the nuts is very small in some instances, but will give it a try.

Ted
 
I was now in contact with the producer of this Jaguar motor kit Autograph....... and ......
got the info, that they will re-issue in some time the Ford GT40 motor and also the Jaguar C-type motor in scale 1:8.
They will produce 20 times GT40 and only 6 times the Jag.......


So I pre-ordered both kits for me

If somebody else is interested in these kits, you should be fast and get into contact with them

Hi Uwe,
I think you are going to enjoy the kit when it lands! On the website, if you click on the Jag engine and then scroll down, you will find a set of photos of the engine built by a doctor - I think his is the standard to aim for!

Regards

Ted
 
Have managed a little more work on the engine.

IMG_0161.JPG
Crankcase and gearbox cleaned up and primed. Very little clean-up to do, as the castings are very good.

IMG_0166.JPG
And sprayed satin black.

IMG_0159.JPG
Cylinder head bored and timing chain cover and vent polished. Cam covers polished, and all the shiny bits sprayed with a varnish to stop any further oxidation of the white metal.

IMG_0155.JPG
Engine mountings, clutch mechanism support and dynamo mount etchings bent up and soldered. Still to be painted.

IMG_0110.JPG
Decided I would leave the engine for a short while and build the engine trolley ready to hold the engine. Remember this was the 1950's and all the handling equipment you see on car production lines in 2020 didn't exist - It was all pretty basic.
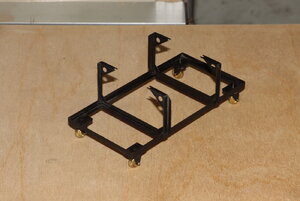
The trolley is built from 0.4mm thick photo etchings. the main frame is a single etching with flanges that you bend up to look like 90 degree angle. The score lines are perfectly dimensioned so that they disappear when the metal is bent. Everything is then soldered using a paint-on flux (supplied in the kit) solder and a flame gun. Capillary action then pulls the solder into all the creases and joints.
The wheels and castors are cast in bronze.

IMG_0147.JPG
Trolley all soldered up and ready to paint.

IMG_0185.JPG
Fully painted and awaiting the engine.

Hope you like the build so far - More to follow

Ted
 

Attachments

  • IMG_0157.JPG
    IMG_0157.JPG
    172.2 KB · Views: 13
  • IMG_0161.JPG
    IMG_0161.JPG
    124 KB · Views: 13
Tedboat, that is really an awesome engine. I thought working on the plastic was fun but metal looks great. Are the pistons and all included? I did a couple Pocher kits with engines you could crank over but this looks even more detailed. I guess you get what you pay for. Keep up the good work

Vintage Modeler
 
Hi Ted,
Loving the build, the quality of this kit looks amazing combine that with your skills and care in building end result very enjoyable looking at the progress.
Cheers,
Stephen.
 
Back
Top