Thanks Mirek!Welcome
Beautifully made beams Paweł, you had a little bit of fun with the milling machine. Greetings Mirek
You are using an out of date browser. It may not display this or other websites correctly.
You should upgrade or use an alternative browser.
You should upgrade or use an alternative browser.
Kingfisher 1770 1:48 POF
- Thread starter dockattner
- Start date
- Watchers 136
Thank you, Peter!A nice set of deck beams, Paul. With a lot a straight square cutouts.
Regards, Peter
Agreed. There are many things to like about this kit (not the least of which is the truly beautiful boxwood). Sometimes I get frustrated that a number of shortcuts have been taken but nothing that can't be remedied by a motivated model builder.The quality of the kit is superb.
Those deckbeams are looking great Paul.
Hello Michael. Ha! The numbers only line up because they sit next to a line that establishes the centerline of the beam. When fitting the beams into position I need to remove the same amount of wood on each side of the beam, or the run of the carlings will be all wonky.Wow Paul. Beautiful work even with the most mundane of parts.
Even your numbering lines up perfectly.
Can you please elaborate on how you achieved the camber in the beams?
Also how to get such perfect small square cuts in the wood?
Please don’t say sandpaper or I will definitely cry.
Michael
The camber of these upper deck beams was CNC cut by the kit manufacturer. For the lower deck beams (not provided in the kit) I just used patterns of the beams and a scroll saw to cut the upper surface (and then a mill to cut the underside).
The square cuts of these particular beams are part of the lamination process. For the lower deck beams I used a mill and chisels.
Thank you kindly, Peter! Lots of hoursThose deckbeams are looking great Paul.
Now you tell me…..no wonder I thought you became a master ship builderYup. Looking at the images on your phone through muddy goggles while crossing a river on your bike won't expose all the shortcomings of my work.


Indeed, almost all the parts could be made from scratch, I think!Agreed. There are many things to like about this kit (not the least of which is the truly beautiful boxwood). Sometimes I get frustrated that a number of shortcuts have been taken but nothing that can't be remedied by a motivated model builder.
Paul, welcome home from your fabulous trip to Hawaii!A small but significant update...
The lower deck has been placed:
View attachment 442312
View attachment 442321
You will notice that I have made several (potentially controversial) design choices. I did not include any ledges on this deck level (and I also did not cut out the tabled joints on the carlings that would ordinarily house/receive those ledges). I may regret these decisions but now those of you building POF models can at least see what this looks like.
Another design decision you may not agree with...I included a waterway on both sides of the ship (the finished side with knees, but also on the unfinished side without knees). Why did I do it this way? Hiding bad fitting beams on the unfinished side.
View attachment 442311
View attachment 442313
View attachment 442314
View attachment 442315
View attachment 442316
Some hard to see hanging knees:
View attachment 442319
View attachment 442320
And an iron knee in association with the beam arm:
View attachment 442317
View attachment 442318
Looking fore and aft:
View attachment 442323
View attachment 442322
I didn't notice the gap between the waterway and the ceiling planks on the model - but I surely see it in these photos! Yikes! In retrospect I think it would have been better to add the lowest strake AFTER the waterway was installed. Always learning...
Will the do-overs never end!
The kit does include upper deck beams as a three-layered laminated affair. I'm going to build up a few of these and see if I want to use them or whether I need to create scratch beams. And I also need to figure out the bitts...
Thanks for the visit!
I've learned to always go back three pages from whatever page your log is on. I'm sorry for always being late to the party, but the midnight hour is when all the good stuff happens
Your decision to omit ledges on the lower deck is an interesting one and it has given me food for thought. In a nut-shell, I agree with that decision.
As I plan to eventually design a 3-decker monograph, the advantage of omitting certain specific deck-framing elements becomes ever more clear to me. As long as the main deck has all of the expected elements, the advantage of less clutter below decks is obvious.
As always, I am inspired by your fidelity to scale, craft, and finish. She's rounding into a beautiful ship!
Well, that's an unexpected post Marc. I would have put you firmly in the camp "I wouldn't have done it that way" over the decision to omit details that are expected (and even attractive in and of themselves). And as you have guessed I will be adding back more of the ledges as I build higher and higher though the precise locations remain an open question. I have now committed myself to leaving certain sightlines in place, but I'll only know the details when I see what it looks like.Paul, welcome home from your fabulous trip to Hawaii!
I've learned to always go back three pages from whatever page your log is on. I'm sorry for always being late to the party, but the midnight hour is when all the good stuff happens
Your decision to omit ledges on the lower deck is an interesting one and it has given me food for thought. In a nut-shell, I agree with that decision.
As I plan to eventually design a 3-decker monograph, the advantage of omitting certain specific deck-framing elements becomes ever more clear to me. As long as the main deck has all of the expected elements, the advantage of less clutter below decks is obvious.
As always, I am inspired by your fidelity to scale, craft, and finish. She's rounding into a beautiful ship!
As friends have visited my home and seen the Vasa I can tell you that NO ONE cares about historical or architectural accuracy - but they do see art. I guess that has shaped my thinking in certain ways...
I appreciate that you were willing to engage and share your perspective.
" I can tell you that NO ONE cares about historical or architectural accuracy -"
From my point of view I find this quite disappointing, Makes me think about all the hours I've "wasted" researching this stuff.
From my point of view I find this quite disappointing, Makes me think about all the hours I've "wasted" researching this stuff.
What else would you do with your oftime Paul, sitting behind the geraniums looking outside??Thank you kindly, Peter! Lots of hours...


- Joined
- Sep 3, 2021
- Messages
- 4,857
- Points
- 688

Although the lamination of the beams is visible, it's not disturbing in the slightest. I could even argue the laminate adds a "manufactured" look to the beams.Another small update with this one representing much more work than the previous small update...
I mentioned that I was going to put together a few of the upper deck beams supplied with the kit to see if they would work for me. The LSS kit design cleverly uses a laminated system on the athwartship beams to create tabled mortise joints for the longitudinal carlings. I have seen this on several other builds here on the forum.
The downside of this approach is that the laminations are discernable on the upper surface of the beam which can be off-putting. But these boxwood versions passed my test, so I made up the full set of them:
View attachment 443008
A discerning eye can detect the laminations - more so on some beams than on others. I suppose it would have been possible to color match the sheets of boxwood before the CNC milling operation but that would have likely added to the cost of an already expensive kit and still provided a less than perfect result (the joint between each slice of wood would always be visible). Anyway, I have decided to run with these.
By the way, this happens to be the first kit-supplied part I have used in seven months and 55 pages.
I might mention, also, that using the kit parts was NOT a time-saver. It took roughly the same amount of time to get the scratch built lower deck beams to this same stage of preparation. Some of this is my own fault as I wanted these upper deck beams to have the same level of finish as the rest of the model and that took some work.
I will say that the kit parts do build into a very nice piece:
View attachment 443009
Next, I need to lay out the upper deck and fit these beams into place. And in the background I'm continuing to research the three sets of bitts found on this ship.
You are very kind to take the time to visit!
- Joined
- Sep 3, 2021
- Messages
- 4,857
- Points
- 688

" I can tell you that NO ONE cares about historical or architectural accuracy -"
From my point of view I find this quite disappointing, Makes me think about all the hours I've "wasted" researching this stuff.
1. My view on this is that as soon as you deviate too much from the generally known/accepted historical or architectural "accuracy", people WILL notice...
2. Even if not noticed or appreciated how much research was done, you still expanded your knowledge about your subject, which in my book is always a plus.
- Joined
- Jul 27, 2021
- Messages
- 341
- Points
- 323

The Lamination is indeed looking fine here. I hated that on my Cross Section build. Love your Build Log! 
cheers
Dirk
cheers
Dirk
I hear you, Don. I guess if I presented my models at an exhibition or competition to an informed audience then all the details would be appreciated. But the people who come over for dinner and see my model have never commented or asked about any of the stuff I (we) agonize over." I can tell you that NO ONE cares about historical or architectural accuracy -"
From my point of view I find this quite disappointing, Makes me think about all the hours I've "wasted" researching this stuff.
Last edited:
Agreed Johan. And it turns out an accurate model is also a beautiful model. But in my case I decided that accuracy was going to prevent someone from seeing some of the details I've agonized over in the hold...Even if not noticed or appreciated how much research was done, you still expanded your knowledge about your subject, which in my book is always a plus.
It would appear the members of the Big Cut Club have it right!
Thanks Dirk. Having your section model in my mind was the reason I was hesitant. It may be that my boxwood sheets are more uniform than your pearwood sheets. I'm still worried that once I get a finish on these beams the laminations will be distracting...The Lamination is indeed looking fine here. I hated that on my Cross Section build. Love your Build Log!
cheers
Dirk
With that said, your fit and finish is the standard I strive for!
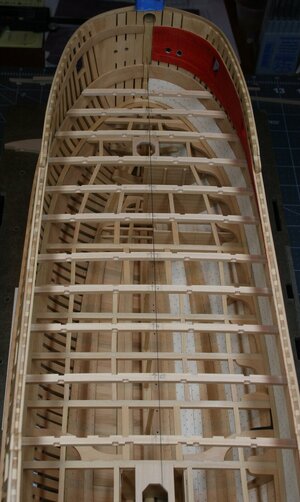
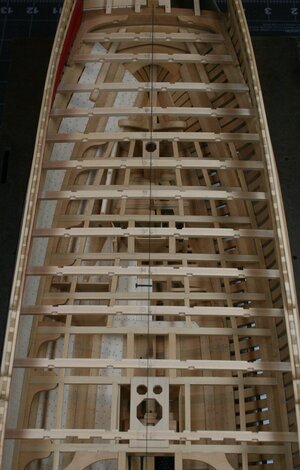
Upper deck beams roughly/loosely fit into place.


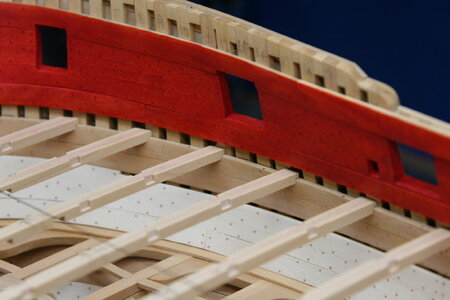
I took a bit more care on this deck to make sure the joinery was tight (though it will not be visible, it is still good practice for me):


Now that I am this far, I am able to fabricate some of the vertical pieces that run alongside (or in relationship to) the upper and lower deck beams (for example: riding bitts, pillars that support the upper deck beams, the upper well, etc.). I will then remove the upper deck beams in order to build out the rooms on the lower deck.
Oh, and I also need to scratch some breast and deck hooks - the shape of my bow makes the kit parts unusable... .
.


I took a bit more care on this deck to make sure the joinery was tight (though it will not be visible, it is still good practice for me):


Now that I am this far, I am able to fabricate some of the vertical pieces that run alongside (or in relationship to) the upper and lower deck beams (for example: riding bitts, pillars that support the upper deck beams, the upper well, etc.). I will then remove the upper deck beams in order to build out the rooms on the lower deck.
Oh, and I also need to scratch some breast and deck hooks - the shape of my bow makes the kit parts unusable...
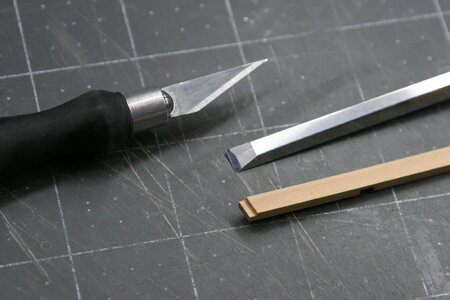
Again a big WOW for this work, Paul. Neatly recessed into the sides. And yes, sharp tools are a must!Upper deck beams roughly/loosely fit into place.
View attachment 443578
View attachment 443579
View attachment 443580
I took a bit more care on this deck to make sure the joinery was tight (though it will not be visible, it is still good practice for me):
View attachment 443581
View attachment 443582
Now that I am this far, I am able to fabricate some of the vertical pieces that run alongside (or in relationship to) the upper and lower deck beams (for example: riding bitts, pillars that support the upper deck beams, the upper well, etc.). I will then remove the upper deck beams in order to build out the rooms on the lower deck.
Oh, and I also need to scratch some breast and deck hooks - the shape of my bow makes the kit parts unusable....
Making scratch parts is the most satisfying.
Regards, Peter


