- Joined
- Aug 8, 2019
- Messages
- 4,826
- Points
- 688

Black cutting mat problem.I didn't notice the gap between the waterway and the ceiling planks on the model

Black cutting mat problem.I didn't notice the gap between the waterway and the ceiling planks on the model
Indeed, the waterways hid multiple sins on my BN too! Beautiful work Paul.Hiding bad fitting beams on the unfinished side
I am in the same situation. Your work is very convincing, simply beautiful and clean.Just amazing work ! I am always excited when I come to review your progress !

Agreed Herman, except I think the master has now been exposed….Paul, this is exceptional work. Stunning my friend. Cheers GrantWonderful result and now also a master in hiding.
Thanks Geoff. I'm having a blast!Your skills are truly outstanding and show lots of attention to the details this model requires. Great job
Thank you, Peter! Now that the joinery is hidden I can't remember eitherA beautifull waterway Paul, but i could not even remember seeing bad fitting beams. Perhaps my memory is teasing me, or they where fitting better as when a normal model builder would ( could ) have made them
 .
.
 .
.
 .
.Wow Paul. Beautiful work even with the most mundane of parts.Another small update with this one representing much more work than the previous small update...
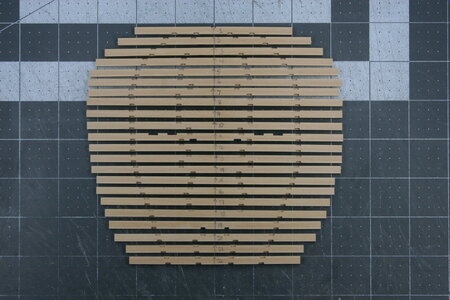
I mentioned that I was going to put together a few of the upper deck beams supplied with the kit to see if they would work for me. The LSS kit design cleverly uses a laminated system on the athwartship beams to create tabled mortise joints for the longitudinal carlings. I have seen this on several other builds here on the forum.
The downside of this approach is that the laminations are discernable on the upper surface of the beam which can be off-putting. But these boxwood versions passed my test, so I made up the full set of them:
View attachment 443008
A discerning eye can detect the laminations - more so on some beams than on others. I suppose it would have been possible to color match the sheets of boxwood before the CNC milling operation but that would have likely added to the cost of an already expensive kit and still provided a less than perfect result (the joint between each slice of wood would always be visible). Anyway, I have decided to run with these.
By the way, this happens to be the first kit-supplied part I have used in seven months and 55 pages.
I might mention, also, that using the kit parts was NOT a time-saver. It took roughly the same amount of time to get the scratch built lower deck beams to this same stage of preparation. Some of this is my own fault as I wanted these upper deck beams to have the same level of finish as the rest of the model and that took some work.
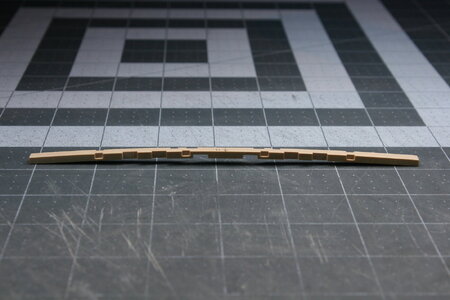
I will say that the kit parts do build into a very nice piece:
View attachment 443009
Next, I need to lay out the upper deck and fit these beams into place. And in the background I'm continuing to research the three sets of bitts found on this ship.
You are very kind to take the time to visit!
A nice set of deck beams, Paul. With a lot a straight square cutouts.Another small update with this one representing much more work than the previous small update...
I mentioned that I was going to put together a few of the upper deck beams supplied with the kit to see if they would work for me. The LSS kit design cleverly uses a laminated system on the athwartship beams to create tabled mortise joints for the longitudinal carlings. I have seen this on several other builds here on the forum.
The downside of this approach is that the laminations are discernable on the upper surface of the beam which can be off-putting. But these boxwood versions passed my test, so I made up the full set of them:
View attachment 443008
A discerning eye can detect the laminations - more so on some beams than on others. I suppose it would have been possible to color match the sheets of boxwood before the CNC milling operation but that would have likely added to the cost of an already expensive kit and still provided a less than perfect result (the joint between each slice of wood would always be visible). Anyway, I have decided to run with these.
By the way, this happens to be the first kit-supplied part I have used in seven months and 55 pages.
I might mention, also, that using the kit parts was NOT a time-saver. It took roughly the same amount of time to get the scratch built lower deck beams to this same stage of preparation. Some of this is my own fault as I wanted these upper deck beams to have the same level of finish as the rest of the model and that took some work.
I will say that the kit parts do build into a very nice piece:
View attachment 443009
Next, I need to lay out the upper deck and fit these beams into place. And in the background I'm continuing to research the three sets of bitts found on this ship.
You are very kind to take the time to visit!
Yup. Looking at the images on your phone through muddy goggles while crossing a river on your bike won't expose all the shortcomings of my workGood morning Paul - “another small update “. As for those beams- pretty much perfect. I need to get new glasses as I don’t see laminations- perhaps I should use my laptop when viewing work as good as yours….or maybe I do need new glasses
.
The photo of the single beam is beautiful. Love your work Paul. Cheers Grant
 .
.