-

Win a Free Custom Engraved Brass Coin!!!
As a way to introduce our brass coins to the community, we will raffle off a free coin during the month of August. Follow link ABOVE for instructions for entering.
-

PRE-ORDER SHIPS IN SCALE TODAY!
The beloved Ships in Scale Magazine is back and charting a new course for 2026!
Discover new skills, new techniques, and new inspirations in every issue.
NOTE THAT OUR FIRST ISSUE WILL BE JAN/FEB 2026
You are using an out of date browser. It may not display this or other websites correctly.
You should upgrade or use an alternative browser.
You should upgrade or use an alternative browser.
Krick “Alert” U.S. Cutter, 1/25 scale
- Thread starter Pathfinder65
- Start date
- Watchers 23
-
- Tags
- krick u.s.cutter alert
Hi Heinrich,Well for the sake of all of us, I hope the cold weather continuesBut I was expecting some "nibbing" on the deck.
What happened?
The “nibbling” was put on hold for this build. The deck planks are 10mm wide, I guesstimated I would need a plank about 14 to 15mm by 0.5 mm to edge into. The best order I could do locally was 1/2 inch/12.7mm wide planks. I also didn’t want to wait for an out of country order. I had some 1/8 inch by 1/2 inch Basswood. I made a small ”nibbling” test sample and decided that it just would not work for me. The deck planks were just to wide.
Jan
Planking the deck part 2:
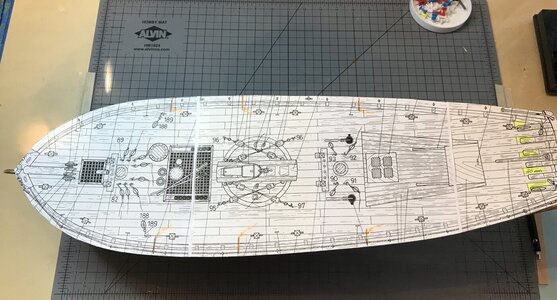
BRRR cold outside, no outside cleanup, so there was an opportunity to work in the boatyard. I’m very pleased with the pattern I’m working with. I started the planking differently than what is shown in the kits plans. The plans indicate laying the initial planks on either side of the deck’s centerline. That procedure makes for a pattern that isn’t equal on the Port or Starboard sides.
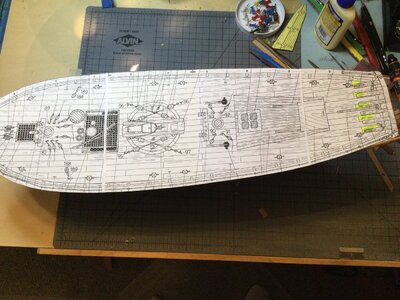
It’s not much of a difference but I decided to lay the first plank down the middle of the deck centerline. Other than at the stern, all planks are 100mm long. The start of the planking pattern at the stern was with 40mm and 80mm planks. I used a number H soft lead pencil on the upper edge of the planks to simulate caulking. The center plank had both edges colored and the end facing the Stem. All other planks had one end and the side that would face the bulwarks treated.
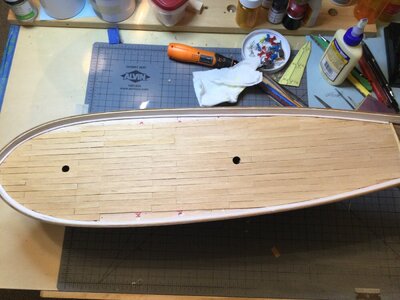
There are only two planks per side left to be trimmed and fitted. I’m extremely satisfied with result. My next step will be to scrape, sand and lightly stain the deck.
Jan
BRRR cold outside, no outside cleanup, so there was an opportunity to work in the boatyard. I’m very pleased with the pattern I’m working with. I started the planking differently than what is shown in the kits plans. The plans indicate laying the initial planks on either side of the deck’s centerline. That procedure makes for a pattern that isn’t equal on the Port or Starboard sides.

It’s not much of a difference but I decided to lay the first plank down the middle of the deck centerline. Other than at the stern, all planks are 100mm long. The start of the planking pattern at the stern was with 40mm and 80mm planks. I used a number H soft lead pencil on the upper edge of the planks to simulate caulking. The center plank had both edges colored and the end facing the Stem. All other planks had one end and the side that would face the bulwarks treated.

There are only two planks per side left to be trimmed and fitted. I’m extremely satisfied with result. My next step will be to scrape, sand and lightly stain the deck.
Jan
- Joined
- Jan 9, 2020
- Messages
- 10,566
- Points
- 938

@Pathfinder65 You can rightly be extremely satisfied. The deck looks beautiful. Make sure that the stain is not too dark - the lighter deck colour will be beautifully offset against the dark walnut hull. Well done my friend!
Scuppers:
The deck is planked and ready for a final finish, but looking at the German instructions page 7, abb 9, a cross section of planking, the instructions shows a "SPEIGAT". I've looked at the side view and top view of the plans and can't find their location.
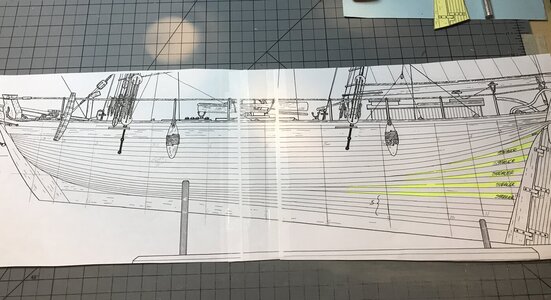
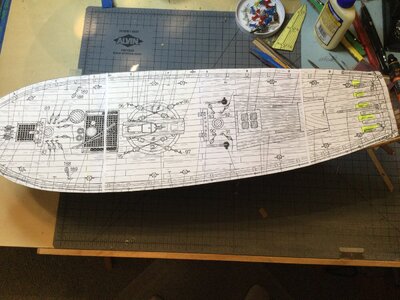
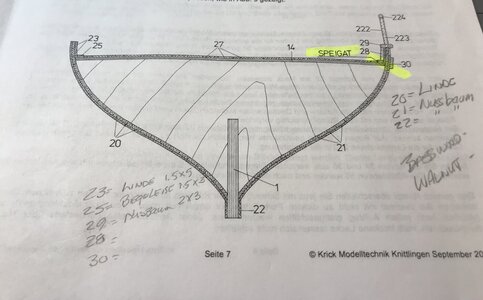
I can't tell from the instructions or the plans how many are required or their location on the deck waterway.
Jan
The deck is planked and ready for a final finish, but looking at the German instructions page 7, abb 9, a cross section of planking, the instructions shows a "SPEIGAT". I've looked at the side view and top view of the plans and can't find their location.


I can't tell from the instructions or the plans how many are required or their location on the deck waterway.
Jan
- Joined
- Jan 9, 2020
- Messages
- 10,566
- Points
- 938

@Thomas Marocke So does "speigat" refer to the scupper holes?
Hi Heinrich!
Yes! "Speigat" is the translation for" scupper" from english. It is the water drain between deck and the ship's side. In newer sailing ships, the angular scuppers were protected against water penetration by external flaps.
With best regards
thomas
Yes! "Speigat" is the translation for" scupper" from english. It is the water drain between deck and the ship's side. In newer sailing ships, the angular scuppers were protected against water penetration by external flaps.
With best regards
thomas
Last edited:
Thank you Thomas for your research. That gives me a good idea of what to do. The cross view shows scuppers cut in at an angle from the edge of waterway to the outside of the hull. I think a small jig to get the angle right will need to be invented, also I should be able to scale the locations from your photoHi Jan!
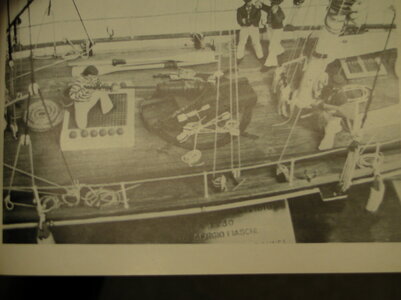
Unfortunately only one bad photo with a total of three scuppers per side of the ship.
View attachment 191105
Source: Historical ships as model, Publisher Krick, 1976.
With best regards
Thomas
Jan
Last edited:
Hi Jan!


Thomas
Thomas
The Deck Stuff:
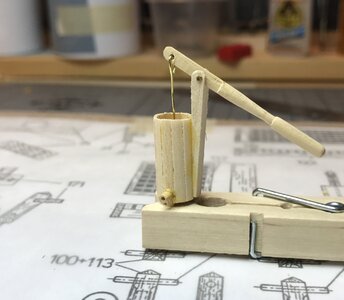
Thought I would take a break from the hull and deck planking and fiddle with the deck apparatus. This piece caught my interest first.
A 8mm dowel wrapped in 1x2mm Walnut, the handle support is 3x3 Walnut and the handle is 3mm diameter Ramin.
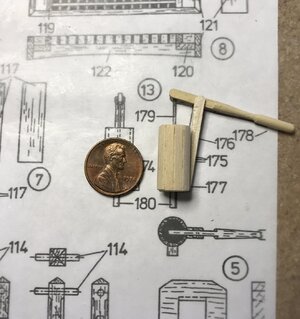
A little bit different from things I've done in the past, but fun to build.
Jan
Thought I would take a break from the hull and deck planking and fiddle with the deck apparatus. This piece caught my interest first.
A 8mm dowel wrapped in 1x2mm Walnut, the handle support is 3x3 Walnut and the handle is 3mm diameter Ramin.

A little bit different from things I've done in the past, but fun to build.
Jan
Last edited:
Hi Heinrich,That pump looks great and nothing that a sheet of 320 grit sandpaper won't fix. Do you use Titebond Glue, Jan?
I use Titebond II. Those other fancy glues scare me, especially the CA ones. I brush on Titebond using Testors paint brushes on both surfaces to be glued, let the glue set about thirty second or so and press the parts together. If needed there is still time to wiggle things around. Excess glue gets wiped away with a cloth. Places where parts are perpendicular get a good scrape with the end of a toothpick along the glue seam.
Jan
- Joined
- Jan 9, 2020
- Messages
- 10,566
- Points
- 938

I asked about the Titebond, because I can see the yellow discoloration on your pumps where it has dried - and this I have noticed in all instances where Titebond is used. I ordered Titebond III when I started the Haarlem and discarded it because of that. Now I use Chinese PVA which costs me the equivalent of 1.50 USD and which is brilliant. It is very strong (takes a bit longer to dry than Titebond) and dries crystal clear! I wish I could send you some!


Hi Heinrich,
Excellent point on the the glue. My use of Titebond is something I've become familiar with while learning this great hobby. Like you I don't care for the yellow of the dried glue. I'll have to do some research to see if I can find a product that matches yours.
Jan
Excellent point on the the glue. My use of Titebond is something I've become familiar with while learning this great hobby. Like you I don't care for the yellow of the dried glue. I'll have to do some research to see if I can find a product that matches yours.
Jan


