-

Win a Free Custom Engraved Brass Coin!!!
As a way to introduce our brass coins to the community, we will raffle off a free coin during the month of August. Follow link ABOVE for instructions for entering.
-

PRE-ORDER SHIPS IN SCALE TODAY!
The beloved Ships in Scale Magazine is back and charting a new course for 2026!
Discover new skills, new techniques, and new inspirations in every issue.
NOTE THAT OUR FIRST ISSUE WILL BE JAN/FEB 2026
You are using an out of date browser. It may not display this or other websites correctly.
You should upgrade or use an alternative browser.
You should upgrade or use an alternative browser.
Krick “Alert” U.S. Cutter, 1/25 scale
- Thread starter Pathfinder65
- Start date
- Watchers 23
-
- Tags
- krick u.s.cutter alert
Hi Jan!
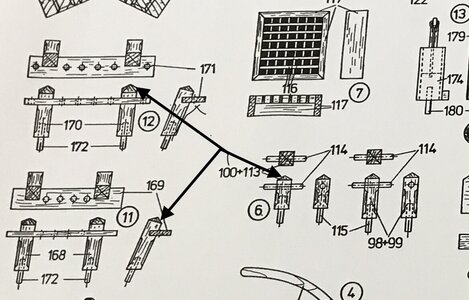
After I had built almost all Revell sailing ships I thought it was time for a wooden ship and started a Viking ship. I failed miserably. Years later came a small brig without details and very simple. I got it together with a lot of wooden spatula and I was proud already once. A few years later it had to be a French Corvette - I even got myself a construction plan from the Naval Museum in Paris. The model turned out to be very good for me, but over the years, as I built more and more, I noticed more and more mistakes both in me and in the plan.
My library became more and more extensive and through practice my building results improved. Neverless, I try with some parts until I get a good result and throw the errors away. There are always photos of the successful work.
At SOS you can see many excellently built models. Until the master builders were ready it was a learning process for them too.
You are on the right track.
Best regards
Thomas
Hi Thomas,
Thank you for the great response. I build many Balsa rubber band powered airplanes as a youngster and one Christmas received an HO train set. This led to building, rebuilding layouts and many hours of model rail time. After a stint in the military I resumed that hobby but in N scale due to the small hobby space available. The Reserve Unit I was a member off had a model aviation club, mainly RC aircraft, control line and static models. That was my hobby interest for many years. My favorites were WW I aircraft, especially Sopwiths and Spads. A business trip changed all that. While attending a conference years ago I spied some model railroad layouts in another part of the building. These were large scale, I bought an LGB Mogul and had it shipped home. Layout space was no longer a problem and I’ve continued that interest for many years. BUT my boys decided that since I was retired I needed something to while away my free time. The Constructo 1799 Enterprise kit arrived for my 75th birthday. Well the rest is history, I now divide my “FREE” time between the two hobbies.
Jan


Color time:
I‘m looking at the possibilities of stain, paint or varnish for the hull and deck. So far I’ve tried two coats of True North Gloss Coat with light sanding between (400 grit), a light coat of beeswax polished in with a soft cloth.

I think it will look good on the Walnut covered hull. I would like to leave the deck a very light in color,, I tried several coats of the Gloss Coat, but...
Two coats of Gloss Coat on the bilge pumps does look good.
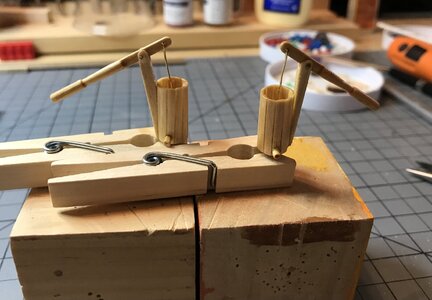
That leaves the deck. Maybe light Oak stain?
Jan
I‘m looking at the possibilities of stain, paint or varnish for the hull and deck. So far I’ve tried two coats of True North Gloss Coat with light sanding between (400 grit), a light coat of beeswax polished in with a soft cloth.

I think it will look good on the Walnut covered hull. I would like to leave the deck a very light in color,, I tried several coats of the Gloss Coat, but...
Two coats of Gloss Coat on the bilge pumps does look good.

That leaves the deck. Maybe light Oak stain?
Jan
More Color choices:
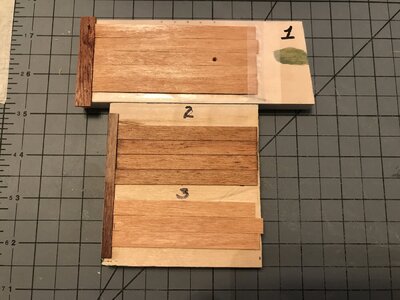
Color sample choices for deck,
1) Two coats of True North Gloss Coat
2) Two coats of Minwax Golden Oak 210B
3) Two coats of Minwax Satin Spray
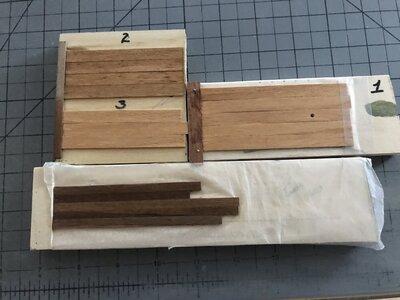
The three deck samples versus the Walnut hull planking with natural light.
I'm sort of leaning towards #3 - the Minwax Satin Spray because of the darker color of the hull planks.
Any opinions??
Jan

Color sample choices for deck,
1) Two coats of True North Gloss Coat
2) Two coats of Minwax Golden Oak 210B
3) Two coats of Minwax Satin Spray

The three deck samples versus the Walnut hull planking with natural light.
I'm sort of leaning towards #3 - the Minwax Satin Spray because of the darker color of the hull planks.
Any opinions??
Jan
Hello Jan, I would go with the lighter colors e.g. #1 or #3, they are pretty similar #3 is a bit lighter, thought.
Hi Heinrich and Jimsky.#3 would be my choice, Jan!
I think #3 is going to be the method. The Admiral pointed out that you fellows have fine artistic talent and she is glad you agree with her choice.
Jan
Hi Heinrich,Well you should have known better in the first instance never to even as much as doubt the Admiral!
Yes indeed, my error, I should have consulted her in the first place.
Jan
Hi Jan!
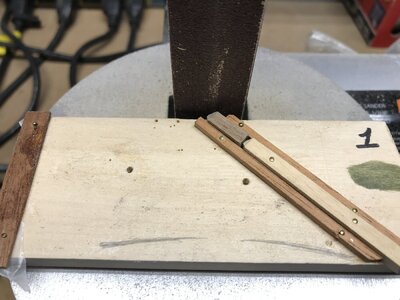
The cleanest way is with a small circular saw. Set the correct angle and glue on a boundary wood to the angle. Make sure there is enough distance to the saw blade because of the fingers.
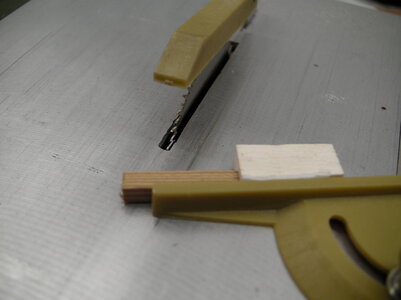
Then sawing the wood and turn it three more times and after each turn sawing.
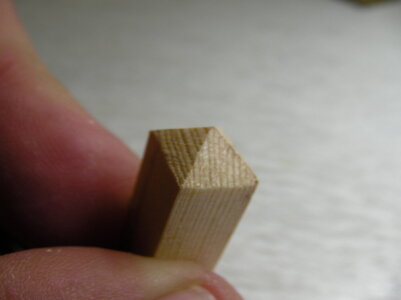
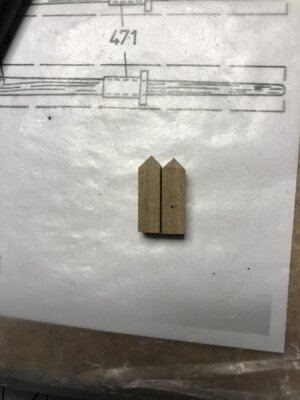
Result ! ! ! Now cut the wood to the finished length. Finished.
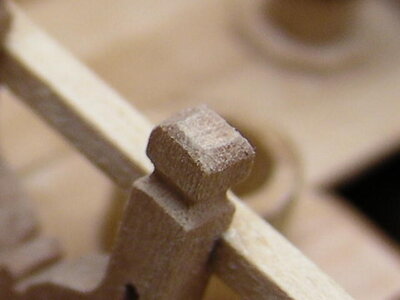
If you do not have a circular saw, it is enough to touch the edges.
Best regards
Thomas
The cleanest way is with a small circular saw. Set the correct angle and glue on a boundary wood to the angle. Make sure there is enough distance to the saw blade because of the fingers.

Then sawing the wood and turn it three more times and after each turn sawing.

Result ! ! ! Now cut the wood to the finished length. Finished.

If you do not have a circular saw, it is enough to touch the edges.
Best regards
Thomas
Last edited:
Hi Thomas,Hi Jan!
The cleanest way is with a small circular saw. Set the correct angle and glue on a boundary wood to the angle. Make sure there is enough distance to the saw blade because of the fingers.
View attachment 193166
Then sawing the wood and turn it three more times and after each turn sawing.
View attachment 193167
Result ! ! ! Now cut the wood to the finished length. Finished.
View attachment 193168
If you do not have a circular saw, it is enough to touch the edges.
Best regards
Thomas
That‘s a neat way of getting it done. Thank you for taking the time to post it. Unfortunately I don’t have a small power saw, I have an old Jig saw, a Dremel tool and bought a min belt/disk sander over the summer, other than that my little shop is all hand tools. BUT maybe I can plead with the Admiral to dispense a few coins and add such a tool to my inventory
Last edited:
Hi Heinrich,Hi Jan - I am very glad that Thomas could help. I have never done that kind of thing so I am clueless.
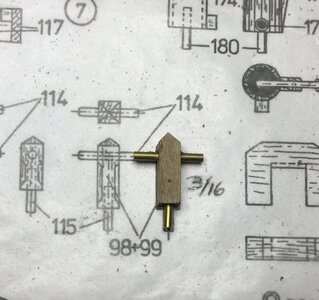
That is the great part of this forum, members sharing methods and ideas. I only have twenty four more of those posts to manufacture. By the time I finish I’ll have the procedure down pat.
Jan
Hi Heinrich,And another "I can do that" to add to your list. All I do at the moment is to eat sleep and drink Bluenose. Both the Haarlem and Leudo are at a complete standstill.
Indeed, I’ve been following your log on the Bluenose. Once again I applaud your Herculean effort.
Jan
Hi Jan!
The cleanest way is with a small circular saw. Set the correct angle and glue on a boundary wood to the angle. Make sure there is enough distance to the saw blade because of the fingers.
View attachment 193166
Then sawing the wood and turn it three more times and after each turn sawing.
View attachment 193167
Result ! ! ! Now cut the wood to the finished length. Finished.
View attachment 193168
If you do not have a circular saw, it is enough to touch the edges.
Best regards
Thomas
Hi Thomas,
I have it on good authority that a small table saw could find its way to my house by the 25th of next month. Now I need some hints. Nothing complicated, fancy or pricey.
Jan


