-

Win a Free Custom Engraved Brass Coin!!!
As a way to introduce our brass coins to the community, we will raffle off a free coin during the month of August. Follow link ABOVE for instructions for entering.
-

PRE-ORDER SHIPS IN SCALE TODAY!
The beloved Ships in Scale Magazine is back and charting a new course for 2026!
Discover new skills, new techniques, and new inspirations in every issue.
NOTE THAT OUR FIRST ISSUE WILL BE JAN/FEB 2026
You are using an out of date browser. It may not display this or other websites correctly.
You should upgrade or use an alternative browser.
You should upgrade or use an alternative browser.
Krick “Alert” U.S. Cutter, 1/25 scale
- Thread starter Pathfinder65
- Start date
- Watchers 23
-
- Tags
- krick u.s.cutter alert
ThomasHi Jan!
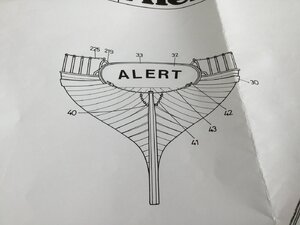
One more picture for the planks at the stern.
View attachment 169485
With best regards
Thomas
Thank you for the information, as a novice builder I often find that the build instructions are lacking.
Jan
I must say that planking the bow was the hardest part of my planking experience.
I never got the angle,s right and the planks never laid exactly how I wanted them to.
Thus, I am interested to see how Jan resolves this.
I never got the angle,s right and the planks never laid exactly how I wanted them to.
Thus, I am interested to see how Jan resolves this.
The theory on Planking step one:
Measure all the frames from the top edge of the deck to a line drawn parallel to the keel.
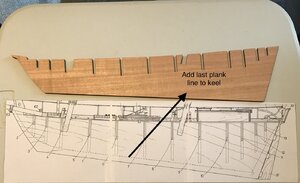
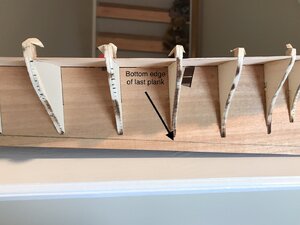
Measurements of frames added to spreadsheet.
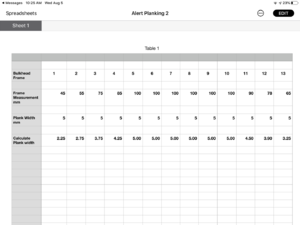
1st planks provided in kit are 5mm wide. Largest frame measurement was 100mm. So 100mm/5mm equals 20 planks. The last row shows the approximate taper required towards the bow and stern of a typical plank.
I think to have good base for the bulwark planks I’ll need to start the hull planking even with the upper edge of the false deck.
Jan
Measure all the frames from the top edge of the deck to a line drawn parallel to the keel.


Measurements of frames added to spreadsheet.

1st planks provided in kit are 5mm wide. Largest frame measurement was 100mm. So 100mm/5mm equals 20 planks. The last row shows the approximate taper required towards the bow and stern of a typical plank.
I think to have good base for the bulwark planks I’ll need to start the hull planking even with the upper edge of the false deck.
Jan
I hold both thumbs, Jan! The formal calculations that you have used is indeed The Standard when it comes to planking, but that is just not my cup of tea!
I agree Heinrich, that whole process is pretty technical. Unfortunately it’s the result of getting to much information from the various books, different techniques by many builders and an over abundance of “Google” and “YouTube” information.
Seriously I’m just going to bumble along on my own path and plank this hull the same way as my last three builds
Jan
Being a technical person, I like the charting of the data.
First, it gives a better idea on the number of planks and plank sizes needed.
Second, adding the taper numbers assists not only as a measurement but also a reminder (forgot to taper a few planks in my build).
Lastly, it's gauge to guide a newbie.
Let's not forget that everything will not fit exactly to the measurements. This is art we are building.
Morning coffee planking musing:
Sitting here this morning at poolside I’m thinking of how to start the planking process.
One option is start at the keel and work up to the deck.
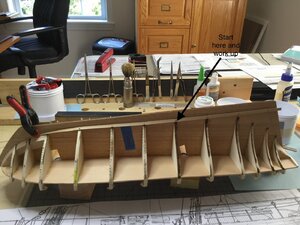
or start about midway and work in both directions.
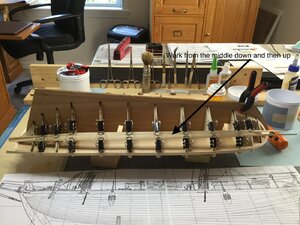
I’ve got a bit of time to think about it because of other commitments over the next three weeks.
All comments, hints, criticisms, etc. are welcome.
Jan
Sitting here this morning at poolside I’m thinking of how to start the planking process.
One option is start at the keel and work up to the deck.

or start about midway and work in both directions.

I’ve got a bit of time to think about it because of other commitments over the next three weeks.
All comments, hints, criticisms, etc. are welcome.
Jan
- Joined
- Jan 9, 2020
- Messages
- 10,566
- Points
- 938

Hi Jan. No ... no ... and no ... about the midway part. That gives you two possible ends where you might end up with funny configurations. I would start in the conventional way at the wales (lay down three or four planks) and then start at the keel with the garboard strake. That way you work towards the middle of the hull and there will only be one plank that might potentially need to be adjusted.
Heinrich,Hi Jan. No ... no ... and no ... about the midway part. That gives you two possible ends where you might end up with funny configurations. I would start in the conventional way at the wales (lay down three or four planks) and then start at the keel with the garboard strake. That way you work towards the middle of the hull and there will only be one plank that might potentially need to be adjusted.
Great advice, thanks. The picture starting in the “middle” has two planks cut to fit from the top down. I picked a spot about five planks down from the false deck (the planks are 5mm wide) and temporarily fastened a plank there to get an idea of how the planks would lay up against the hull. The planks below and above that one gave me a good view of how they would fit at the bow and stern and also an idea of how much trimming will be required. The second picture also shows the hull planking. You can see the shapes of the planks, from the 7th frame to the bow the planks tapers down to about 1mm, from the 10th frame to the stern the planks taper down to about 1.5mm. But at about the waterline the is no taper on the planks from frame 10 to the stern.
So a long story short, that’s the reason for all the various ideas. All the other hulls I’ve done have been straight forward with very little fiddling and trimming while planking. This hull with the sharp bow and shallow curve at the stern is a head scratcher.
Jan
Hi Jan!
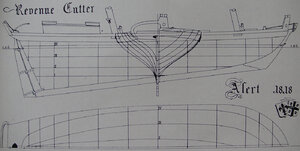
Plan from Krick from the book "Historical ships as model", Edition Krick, courtesy of Fa. Klaus Krick.
They would have to have a rib drawing on their construction plan. You can put a plank on the hull and there is no dent. You must attach the bottom plank to the keel parallel to it. You have two plankings. When the first one is finished, you can use it to record corrections for the second planking.
With best regards
Thomas
Last edited:
I divided my hull into 4 sections, however that did not turn out as I intended.
A more experienced builder may have been able to pull it off.
The difficulty was in how to taper each end of the planks.
Initially I had no tapering for the top section, learned that was a mistake.
Heinrich mentions starting at the wales, is he implying that the whale planks be laid first? Is it the same for the second planking?
Hi Rowboat!
I would plank as Heinrich wrote # 150.
The beginning of the keel plank on Jan's bow is correct. The plank only has to be parallel to the keel. The wales have a uniformly wide. From the middle of the ship, the planks become narrower only towards the bow. At the stern there are 1 or 2 planks that become narrower in the arc from the horizontal in the vertikal. The deadwood is filled with inserted 3rd planks between each 2 planks. Unfortunately, Jan's krickplan shows this to some extent.
With best regards
Thomas
- Joined
- Jan 9, 2020
- Messages
- 10,566
- Points
- 938

@Thomas Marocke I agree 100%, Thomas!
Thomas,Hi Jan!
View attachment 173191
Plan from Krick from the book "Historical ships as model", Edition Krick, courtesy of Fa. Klaus Krick.
They would have to have a rib drawing on their construction plan. You can put a plank on the hull and there is no dent. You must attach the bottom plank to the keel parallel to it. You have two plankings. When the first one is finished, you can use it to record corrections for the second planking.
With best regards
Thomas
Thank you for the information, the picture will be an excellent reference. The Krick kit plans have a stern view of the planking but no bow view other than the one I have above.
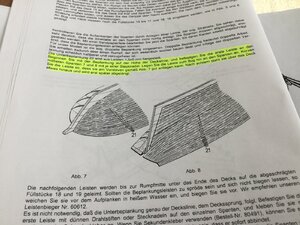
I think my difficulty was trying to infer from the three given plans how to start the planking.
Jan
Thomas, Heinrich and Rowboat,
Thank you for your help. I think I’ve got the process figured out. I have a temporary hold working on the build as I have some eye surgery scheduled at the end of next week.
Jan
Thank you for your help. I think I’ve got the process figured out. I have a temporary hold working on the build as I have some eye surgery scheduled at the end of next week.
Jan
Heinrich,Oohhh! That is a curveball, Jan. I trust that the surgery will be straightforward and uncomplicated - wishing you all the best. That is not a nice a sword to have hanging over your head.
The surgery is to relieve/correct the pressure in one eye and get that eye back to corrected 20/20 vision.
Jan
Sugery:
Jan
Surgery was yesterday On both eyes. Good news: Surgery went well, Bad new: No fine work, sanding, shipbuilding, reading, etc. for A minimum of two weeks. Vision right now is somewhat cloudy, like looking through glass of liquid.Heinrich,
The surgery is to relieve/correct the pressure in one eye and get that eye back to corrected 20/20 vision.
Jan
Jan


