Le Coureur 1:48 CAF model by Christian

Joined
Sep 28, 2020
Messages
281
Points
168

Hi everybody!

Received my kit on monday, shipping was very very quickly!
Book by Ancre arrived yesterday.

Went through the parts and recognised, that the parts of the jig are warped.
Does this matter or is that fixed by building it and fixing the bottom parts on a solid plate?

I also browsed the book and saw, that the stern windows are named "false windows". Does that mean they were only painted black or
were they real glassed windows although the room behind is not really usable for the crew?

Will start building tomorrow!

Happy new year!
 
Hello Gebirgsmarine and welcome and happy nee year to you too
for what concerns the warped pieces without an image it is difficult to say
but when it comes to the fund, I'm sure nothing changes
once the plywood has been screwed to a solid base (I preferred to use double-sided tape so as not to make holes in the board that I can recover for other uses)
I don't think it's a problem for the other pieces either
the joints are so precise that I think that the whole kit will result solid and anyway and in a precise way ..
 
I would cross check the dimensions on both sides of the jig to make sure they match. The rear port side of the jig had the slots in different places than the right, which has caused some issues with the frames. I am trying to rectify that now but with some of the planking already installed, it's not going to be possible to get it perfect.
 
Hallo Christian,
I am very happy, that you started the building log - and we all hope to see soon some first photos.
Especially with ths problem with the plywood, I agree here with sisco, it will be not a big problem, but to be sure show us the problem.
If it is really one @CAFmodel has a very good and fast aftersale service helping to solve problems .....
 
I also browsed the book and saw, that the stern windows are named "false windows". Does that mean they were only painted black or
were they real glassed windows although the room behind is not really usable for the crew?

The room is definitely not usable and was I guess a pure storage room and for the rudder, so I guess they did not use here real glass windows - but it is a good question I will try to make some research for this in addition - maybe Jean Boudriot was writing something

IMG-5236.jpg
 
After more than 20 years a new keel was laid down far off the sea.
In the background the keel......
As I mentioned before, the parts for the cradle D1, D2 and A0-3 are heavy warped as you can see on the photo (sorry, I am a bad photographer and have a very old camera. Maybe my phone works better)
I don´t think I can fix them. Have to mail CAF for new ones :(

Verzogen2.JPG
 
Last edited by a moderator:
The room is definitely not usable and was I guess a pure storage room and for the rudder, so I guess they did not use here real glass windows - but it is a good question I will try to make some research for this in addition - maybe Jean Boudriot was writing something

View attachment 202888
In Boudriots book he is really writing several times "false windows", so I guess that there were only wooden frames installed at the stern of the Le Coureur.
Luggers had typically no decorations at the stern, the Le Coureur was an exception.

Therefore the stern was looking like the stern of the model shown on the ancre page:
monographie-du-coureur-lougre-1776 (3).jpg

To get an impression how small these "windows" were in comparison with a person - here an excerpt of a Jean Boudriot drawing of the monograph Le Coureur
coureur12.jpg

or the scratch model by Patrick Joly:

or the scratch model by Alexander Gurau

After more than 20 years a new keel was laid down far off the sea.
In the background the keel......
As I mentioned before, the parts for the cradle D1, D2 and A0-3 are heavy warped as you can see on the photo (sorry, I am a bad photographer and have a very old camera. Maybe my phone works better)
I don´t think I can fix them. Have to mail CAF for new ones :(

I would try to install the jig with the warped plywood and you will see, if it would work - in addition I guess Tom from @CAFmodel will be open for replacement.
For me it is looking like, that the plywood was exposed to some humidity maybe during the postage. So maybe you write him a PM
 
While waiting for the replacement parts for the jig, I started with dry fitting the frames.
First I picked the ones where no beveling is needed and started with number 16.
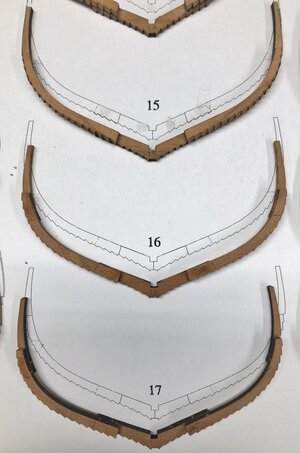
Now I have a question: there is a difference between fit on the lasered marks or the joggs (or teeth).
If I take the marks as reference teeth are slightly offset and vice versa.
What is the true reference: marks or teeth?

Christian
Hallo Christian,
can you show the problem somehow on photo(s) ? Would be helpful to understand
 
Hallo Christian,
can you show the problem somehow on photo(s) ? Would be helpful to understand
Here is the photo of "my" frame 16
IMG-4619.jpg

 
Now I understand.
This difference is only on some of the frame wooden parts.
I followed usually the teeth / joggs and not the small laser mark.
If you lay the frame parts on top of the frame drawing you can see that also !! - I think that the frame drawing is the most important one for this job
And I realized with the ongoing planking job, that this was not wrong, when I made the frames -> Anyhow you will need a good chisel for the planking later on, so you can adjust slightly these teeth
 
Thank you Uwe!
Built the first 5 frames now and it works properly.
remove the coal with a plastic brush on my power tool.
goes quickly, doesn't get hot nor hurt my fingers.
Can you show us the plastic brush on a photo?
It is a good tip also for other situations and kits where laser cut is used.....
 
Hi everybody!

Just to make sure, that I am making no mistakes.
How do I put the parts of the frames together?
Laser mark on laser mark? (pic 1)
or all laser marks up (pic 2)IMGP0015.JPGIMGP0016.JPGIMGP0016.JPG
 
Back
Top