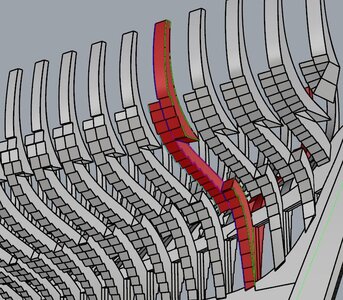
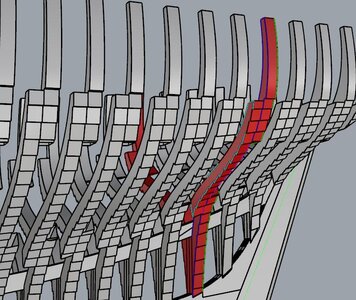
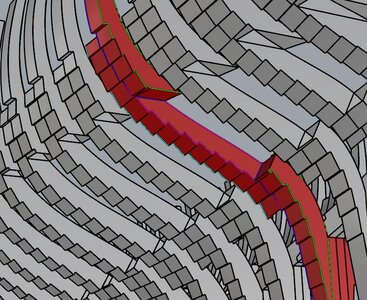
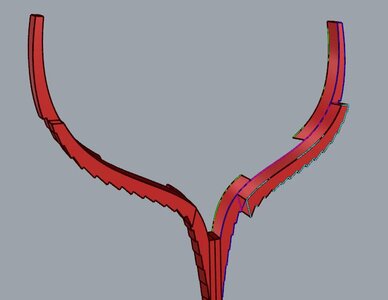
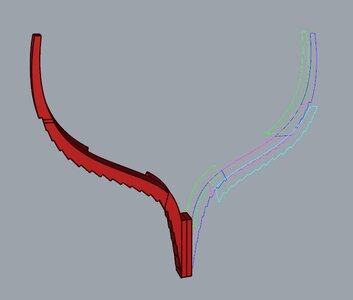
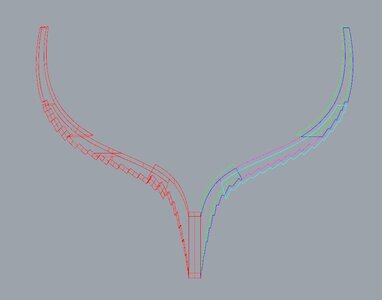
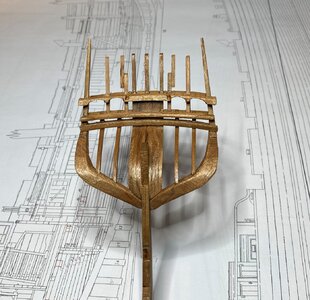
So I also can't imagine that these edges have to be bevelled. Doesn't make sense somehow.
-

Win a Free Custom Engraved Brass Coin!!!
As a way to introduce our brass coins to the community, we will raffle off a free coin during the month of August. Follow link ABOVE for instructions for entering.
-

PRE-ORDER SHIPS IN SCALE TODAY!
The beloved Ships in Scale Magazine is back and charting a new course for 2026!
Discover new skills, new techniques, and new inspirations in every issue.
NOTE THAT OUR FIRST ISSUE WILL BE JAN/FEB 2026
- Home
- Forums
- Ships of Scale Group Builds and Projects
- Le Coureur 1776 1:48 PoF Group Build
- Le Coureur 1776 1:48 Group Build Logs
You are using an out of date browser. It may not display this or other websites correctly.
You should upgrade or use an alternative browser.
You should upgrade or use an alternative browser.
- Joined
- Mar 19, 2020
- Messages
- 206
- Points
- 213

I did bevelled them and looking at Tom’s own build pictures he did the same to frame 37. Not sure about the purpose but I’m sure it will become clear later on in the buildBut before posting I looked at the pictures in your log, Uwe, and it did not look as if you had beveled these edges? Also, I don't understand why they should be beveled - if so. Maybe Tom @CAFmodel can explain?
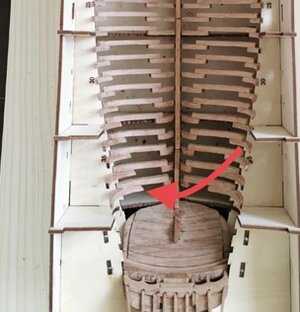
Yes @Chello, I see they are indeed bevelled at Tom's build. However that makes it even more strange because the line is at the aft side of the top timber (where the black arrow is pointing). Thus the line is indicating a bevel in the opposite direction (like the red line):I did bevelled them and looking at Tom’s own build pictures he did the same to frame 37. Not sure about the purpose but I’m sure it will become clear later on in the build
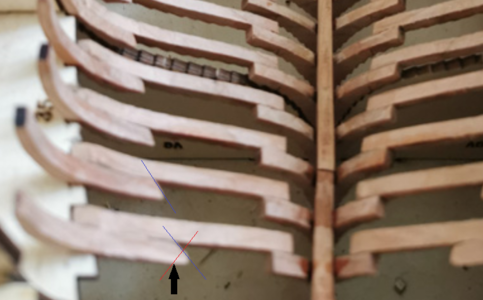
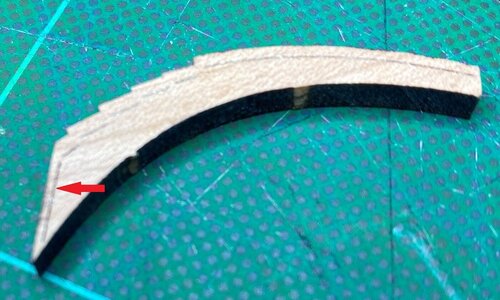
Looking at the bevel line at the step side, this must be the aft side of the top timber:
Last edited:
I'll show you three-dimensional pictures later
I'm sorry Tom but I still don't get it. In some of your drawings / pictures it seems like there is absolutely no bevel at all at the bottom edge of the top timber. In other pictures like the one below it seems as if there is a slight bevel I have indicated with red lines:
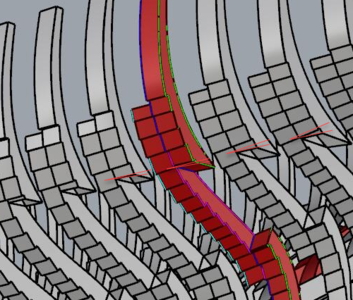
But this is in opposite direction of the laser marking on the top timber.
What is the idea with the laser marked line on the bottom end at the aft side of the top timber (the line pointed by the red arrow)?
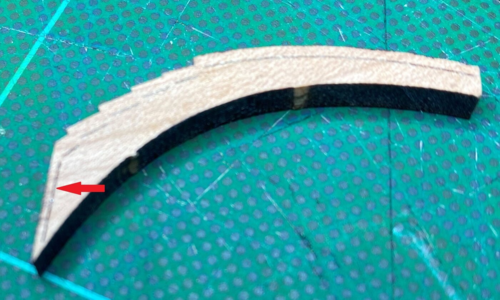
Should this line have been on the front side instead?
Does it matter at all if the horizontal edge has a bevel or not?

But this is in opposite direction of the laser marking on the top timber.
What is the idea with the laser marked line on the bottom end at the aft side of the top timber (the line pointed by the red arrow)?

Should this line have been on the front side instead?
Does it matter at all if the horizontal edge has a bevel or not?
I think I got it now (after studying the 2D CAD drawing). The laser marking is correct. In reality the bevel is the opposite way as it looks like on the 3D perspective drawings. It is kinda optical illusion caused by the bevel on the vertical eddge. Without any bevel at the horizontal face it would be like my blue lines here:
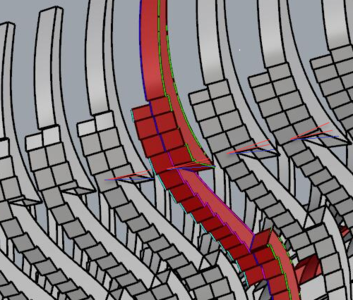
Clearly I'm a little slow. Sorry about that. Here an STL file would have helped.
Many thanks for your help @CAFmodel, @Uwek and @Chello

Clearly I'm a little slow. Sorry about that. Here an STL file would have helped.
Many thanks for your help @CAFmodel, @Uwek and @Chello
Last edited:
Hallo Poul, alias @PoulDI'm still waiting for the HMS Alert 1776 kit which I wanted to make my very first build. For now I do not want to build 2 kits simultaneously so it will most likely take a long time before I start on Le Coureur. However, I have been waiting since May and since I received Le Coreur kit from CAF I have struggled daily to keep my hands away from the boxes. Yesterday evening I could no longer resist to at least try to put one of the small accessories together. Thus I started on one of barrels and already there I run into a few questions so I decided to make a premature build log. The sole purpose of also this log will also be to ask questions and receive all the help and guidance I can get so that I and perhaps other rookies can learn and improve. Hence once again, please don't be shy with the criticism and advise. All comments are appreciated.
Coming back to my barrel questions: The instructions calls for 2 layers of staves. I wonder why that is? Was barrels back then made with 2 layers IRL? It is also not clear to me if the outer staves should be located directly on top of the inner staves or should the outer stave overlap the joint between 2 inner staves?
Also, the circumference has now increased by approx. 2.83mm. At least in the center of the barrel 12 staves fitted pretty accurate in the first layer, so should I now leave a gab of 2.83/12 between each of the staves? Or should I have sanded the inner structure much more than I did? (too late for this barrel)
As of now it look like this:
View attachment 183916
we wish you all the BEST and a HAPPY BIRTHDAY
Enjoy your special day

Happy Birthday, Poul! Many more years to come happy and healthy life! Enjoy your special day!
Happy Birthday, my very best congratulations, especially health and satisfaction.
Not an interesting update for current builders of the kit.
Just wanted to share a few minor mods. I've made, just in case it could be of help to other rookies who might build this kit in the future.
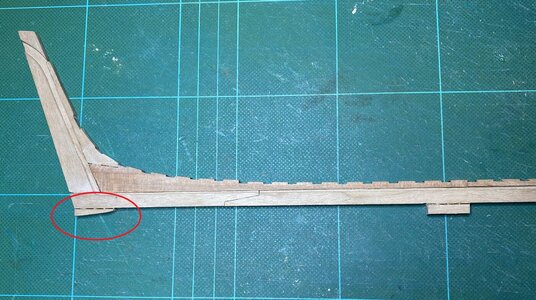
In order to be able to take the keel in and out of the building berth while building the stern structure I modified the aftmost tab under the keel so that the keel can be slided forwards when the stem is lifted a little:
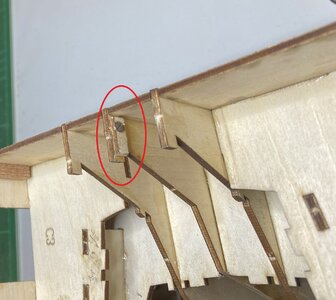
I also cut away the tab blocking the post timber from being lifted , glued it to a small piece of plywood and fixed it again with a small screw so it can removed at any time. Later I'll do the same with the small tabs that holds the side counter timber in place:
Just wanted to share a few minor mods. I've made, just in case it could be of help to other rookies who might build this kit in the future.
In order to be able to take the keel in and out of the building berth while building the stern structure I modified the aftmost tab under the keel so that the keel can be slided forwards when the stem is lifted a little:

I also cut away the tab blocking the post timber from being lifted , glued it to a small piece of plywood and fixed it again with a small screw so it can removed at any time. Later I'll do the same with the small tabs that holds the side counter timber in place:

Many Thanks for showing us these hints, which are helping very much, especially the first one is a "Must Have"Not an interesting update for current builders of the kit.
Just wanted to share a few minor mods. I've made, just in case it could be of help to other rookies who might build this kit in the future.
In order to be able to take the keel in and out of the building berth while building the stern structure I modified the aftmost tab under the keel so that the keel can be slided forwards when the stem is lifted a little:
View attachment 193396
I also cut away the tab blocking the post timber from being lifted , glued it to a small piece of plywood and fixed it again with a small screw so it can removed at any time. Later I'll do the same with the small tabs that holds the side counter timber in place:
View attachment 193400
very nice!At last I got the courage to glue the stern section.
My dad is a blacksmith . . . he can make iron glow just by hammering on it . . . he has palms as big as a frying pan . . .my hands are even bigger . . . I'm never gonna build anything less than 1:48.
View attachment 193933
well done Poul
Its a great idea varnishing the pieces before assembly like that, but would need to scrape off the areas to be glued.
The stern structure is looking very good - very accurate work
I am sure it is fitting very well inside the jig
I am sure it is fitting very well inside the jig

Big hands, big work. it looks absolutely great.
Thanks for the interest, the likes and the comments 
It is not real varnish Brian but a thin layer of cellulose sanding sealer (meant to leave a smoother surface after sanding). I hope I did not make a mistake by applying that?
My understanding is that waterbased PVA sticks to cellulose and since the sealer is cellulose based (not oil based) I thought it would actually make PVA stick even better. But it was just reasoning, I have no experience in this hobby so I totally depend on you guys. Maybe I should have asked before I did it instead of after Do you or some of the other gentlemen here have experience with this?
Actually it is supposed to be sanded back off but I got the idea to brush it with steel wool and use it as a final finish. Again this is pure reasoning but I'm thinking that poly becomes very hard and over time it becomes brittle and may crack. Sanding sealer is supposed to stay soft. Bad idea?
It is not real varnish Brian but a thin layer of cellulose sanding sealer (meant to leave a smoother surface after sanding). I hope I did not make a mistake by applying that?
My understanding is that waterbased PVA sticks to cellulose and since the sealer is cellulose based (not oil based) I thought it would actually make PVA stick even better. But it was just reasoning, I have no experience in this hobby so I totally depend on you guys. Maybe I should have asked before I did it instead of after
Actually it is supposed to be sanded back off but I got the idea to brush it with steel wool and use it as a final finish. Again this is pure reasoning but I'm thinking that poly becomes very hard and over time it becomes brittle and may crack. Sanding sealer is supposed to stay soft. Bad idea?
Last edited:
Well we will know more when you find out how well it holds together.


