Thanks Dean.Great to see the frames going on the keel Daniel. Looks very promising so far!
-

Win a Free Custom Engraved Brass Coin!!!
As a way to introduce our brass coins to the community, we will raffle off a free coin during the month of August. Follow link ABOVE for instructions for entering.
-

PRE-ORDER SHIPS IN SCALE TODAY!
The beloved Ships in Scale Magazine is back and charting a new course for 2026!
Discover new skills, new techniques, and new inspirations in every issue.
NOTE THAT OUR FIRST ISSUE WILL BE JAN/FEB 2026
You are using an out of date browser. It may not display this or other websites correctly.
You should upgrade or use an alternative browser.
You should upgrade or use an alternative browser.
Good morning Daniel. As we say “good thinking Batman”. It is always good to watch you build as you make sure you “cross your T’s and dot your i’s”. A good example for the rest of usGood morning, all,
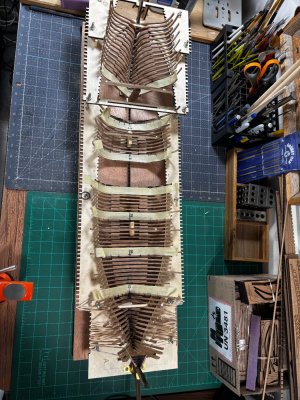
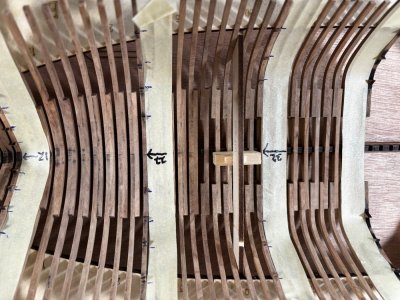
I have just a little more progress to show. I began setting the stern ribs to see how well their deep vee design was going to fit. I made sure the bottoms were seated all the way down into the keel/stern post but had no way of knowing if the tops of the ribs were actually sticking up the correct amount. I had heard from other builders that the stern ribs were problematic like the bow pieces were. So, I measured off of Ancre's plans which are identical to ZHL's but much cleaner the distance from bottom of keel to top of rib and sure enough my rib sections are anywhere from 4mm to 13mm taller than the plans. If they have to be off, I would rather be too long than short. I had been forewarned that the keel has a strong tendency to rise up off the floor bed as you glue down each rib and it certainly does with mine as well. Obviously, you cannot achieve accuracy on any aspect of the build with a keel out of alignment, so I focused this update on the hold down shims for future builders' consideration. First the stern ribs and height measurements off the plans.
View attachment 518899View attachment 518900
Here are close ins of the keel hold downs. It's amazing but there is enough tension in the ribs against the jig that makes the keel want to rise vertically.
View attachment 518901View attachment 518902View attachment 518903View attachment 518904
In the next photo I closed in on these little shelfs that stick out of every tenth rib. They proved support for certain bilge ceiling and clamp planks for interal support. Had I thought ahead I would have left them out until I faired the inside of the ribs, now they are just in my way. I may map the shelf and clamp strakes and just grind those little supports off???
View attachment 518905
Well for now that's my story and I'm sticking to it.
Thanks for checking in hope you all have a great weekend.
Thanks Grant, the challenge here is not to catch the tops of these fragile frames while working around them and snap em off. I've accidentally plucked a couple of em pretty hard but nothing broken yet.Good morning Daniel. As we say “good thinking Batman”. It is always good to watch you build as you make sure you “cross your T’s and dot your i’s”. A good example for the rest of us. Looks like a challenging project with some fragile frames, but is a peach of a ship. Awesome work. Cheers Grant
Thank you Günther, glad you could join in.Hey Daniel,
Wow very nice work. It looks like beautiful.
Regards Günther
- Joined
- Oct 15, 2017
- Messages
- 1,191
- Points
- 443

Great stuff, Daniel! I so enjoy reading posts like this. As Jim stated, sharing our experiences helps others understand where issues exist, avoid them, and avoid the frustration that comes with them. Again, it's what makes SoS a community and not just a forum site. Wonderful work. Thanks for sharing.
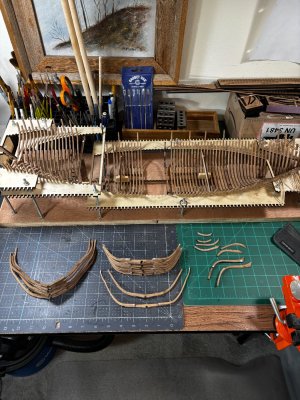
I'm getting close to a milestone here, all heavy char has been removed from the frames, still a lot of finish sanding to go. In my last post I mentioned the little triangular tabs sticking out of every eleventh frame and I decided to map them out so I could grind them off making internal fairing so much easier. My method of using masking tape should allow me to map the original location back to the frames. Check it out.


There is still quite a bit of mottled coloration on the installed frames which I intend to sand out during the fairing process. The pieces on the table still need a lot of sanding prep before I glue them into place.
Till next time, thanks for looking in.


There is still quite a bit of mottled coloration on the installed frames which I intend to sand out during the fairing process. The pieces on the table still need a lot of sanding prep before I glue them into place.
Till next time, thanks for looking in.
Nice product placement on the Grobet files  . They owe you...
 . They owe you...
- Joined
- Dec 3, 2022
- Messages
- 1,547
- Points
- 488

More useful stuff, thank youI'm getting close to a milestone here, all heavy char has been removed from the frames, still a lot of finish sanding to go. In my last post I mentioned the little triangular tabs sticking out of every eleventh frame and I decided to map them out so I could grind them off making internal fairing so much easier. My method of using masking tape should allow me to map the original location back to the frames. Check it out.
View attachment 519976View attachment 519977View attachment 519978View attachment 519979
There is still quite a bit of mottled coloration on the installed frames which I intend to sand out during the fairing process. The pieces on the table still need a lot of sanding prep before I glue them into place.
Till next time, thanks for looking in.
Yea wouldn't it be nice to get an advertising fee; they are great files though, worth the cost.Nice product placement on the Grobet files. They owe you...
Your welcome Smithy.More useful stuff, thank you
- Joined
- Jun 17, 2021
- Messages
- 3,200
- Points
- 588

Very clever use of the tape for reusable tick strips!
Thanks Peter, they should be able to put me very close to the original positions.Very clever use of the tape for reusable tick strips!
- Joined
- Sep 3, 2021
- Messages
- 5,190
- Points
- 738

Hey Dan,
Just found your Xebec build log. It appears as if the Bluenose char removal exercise got you hooked on this action...
While looking familiar in terms of parts, frame and jig build-up, I'm guessing the Xebec presents it's own set of challenges, so I'll tag along for the ride.
Johan
Just found your Xebec build log. It appears as if the Bluenose char removal exercise got you hooked on this action...
While looking familiar in terms of parts, frame and jig build-up, I'm guessing the Xebec presents it's own set of challenges, so I'll tag along for the ride.
Johan
Hey Johan, I'm glad you found my build here. Progress is coming slow as I plod through the dechar/sanding process. I'll actually be covering most of the framework but allowing limited internal views from the starboard side (thinking long oval viewing window) and maybe a removable deck portion. The wide expanse deck and all lateen sails are the main attraction for me.Hey Dan,
Just found your Xebec build log. It appears as if the Bluenose char removal exercise got you hooked on this action...
While looking familiar in terms of parts, frame and jig build-up, I'm guessing the Xebec presents it's own set of challenges, so I'll tag along for the ride.
Johan
Good morning DanielI'm getting close to a milestone here, all heavy char has been removed from the frames, still a lot of finish sanding to go. In my last post I mentioned the little triangular tabs sticking out of every eleventh frame and I decided to map them out so I could grind them off making internal fairing so much easier. My method of using masking tape should allow me to map the original location back to the frames. Check it out.
View attachment 519976View attachment 519977View attachment 519978View attachment 519979
There is still quite a bit of mottled coloration on the installed frames which I intend to sand out during the fairing process. The pieces on the table still need a lot of sanding prep before I glue them into place.
Till next time, thanks for looking in.
Lovely progress with those frames, she is pleasantly starting to take shape. Cheers Grant
Hey good afternoon at your time Grant. I am so looking forward to finishing out the frames but at the same time not in any big hurry.
- Joined
- Sep 3, 2021
- Messages
- 5,190
- Points
- 738

I became rather passionate about thoroughly disliking char removal after frame four... It was a very time consuming task.Hey Johan, I'm glad you found my build here. Progress is coming slow as I plod through the dechar/sanding process. I'll actually be covering most of the framework but allowing limited internal views from the starboard side (thinking long oval viewing window) and maybe a removable deck portion. The wide expanse deck and all lateen sails are the main attraction for me.
As far as you ideas about showing the interrior; it might be beneficial to look into the methods used by @janzwart and @Canoe21. If I remember correctly, they incorporated features, exposing parts of the interior on their fluyt and Bluenose respectively.
Will do Johan, thanks for the heads up.As far as you ideas about showing the interrior; it might be beneficial to look into the methods used by @janzwart and @Canoe21.
I became rather passionate about thoroughly disliking char removal after frame four
 yup me too!
