Very beautiful, as always! It's a pleasure to look at these lines. And by the way, very cool clamps!Just a little update to wrap up our weekend here in the US.
In order to provide some additional strength to the stern assembly I have now added the deck clamps. There are five formal decks on the aft portion of the Saint Philippe. From top down: a poop deck, a quarterdeck, and the 3rd, 2nd, and 1st decks. There are also some deck structures below the first deck, but they don't have deck clamps.
Each deck clamp is dimensionally different - and the clamp for the 1st deck is quite substantial (indeed, it had to be fabricated as a curved piece - bending it to the shape of the hull would have been impossible)..
Students of period French Naval Architecture know that the deck beams are joined with their respective deck clamps via blind dovetail joints. As you will notice in the images below, I have chosen to omit that detail. Once the beams have been installed the dovetail joint is invisible - and while I am not averse to including details that will ultimately be hard to appreciate (see my Kingfisher build) - the additional complication just didn't seem worth it.
Adding the deck clamps is a fairly serious matter and required careful measuring. I guess only time will tell if I got everything in the right place.
View attachment 538488
View attachment 538489
View attachment 538490
I do wish @Donnie would restore the Image Editor function. It's kind of a bother to post images without it (love you, Donnie!).
-

Win a Free Custom Engraved Brass Coin!!!
As a way to introduce our brass coins to the community, we will raffle off a free coin during the month of August. Follow link ABOVE for instructions for entering.
-

PRE-ORDER SHIPS IN SCALE TODAY!
The beloved Ships in Scale Magazine is back and charting a new course for 2026!
Discover new skills, new techniques, and new inspirations in every issue.
NOTE THAT OUR FIRST ISSUE WILL BE JAN/FEB 2026
You are using an out of date browser. It may not display this or other websites correctly.
You should upgrade or use an alternative browser.
You should upgrade or use an alternative browser.
Le Saint Philippe 1693 after Jean-Claude Lemineur (Ancre) in scale 1:48
- Thread starter dockattner
- Start date
- Watchers 78
-
- Tags
- 1:48 ancre saint philippe
Thanks, Sergey. The clamps are very easy to make - just be certain to use small screws. I think those are M2. I suspect you could also find them for purchase already made from somewhere.Very beautiful, as always! It's a pleasure to look at these lines. And by the way, very cool clamps!
Beautiful work as usual Paul, I know what you mean about the importance of the deck clamps being at just the right height. If I had a dovetail slot jig for model size joints I would make em, otherwise not so much. Hey there's an idea for monetization, design a jig, Paul!
Greetings, Gunther. The clamp is very simple. M2 threaded screws, a knurled turning handle, a nut to hold the turning handle in place, a washer, and an integrated nut. I have both 35 mm and 25 mm (roughly) screws and a total of about 20 of these clamps - that seems to be enough for the way I use them. The wood is just from scraps.Hey Paul,
this is amazing. As always, indescribably cool and soooooo cleanly built. Respect. By the way, how did you make the clamp? A little tip would be great ...
Cheers, Günther.
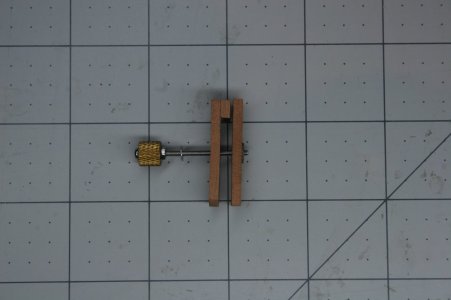
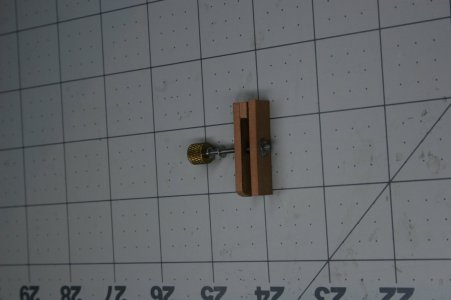
I can't imagine building a POF model without something similar.
Thanks, Daniel. If my deck clamps are in the wrong place, it won't be for lack of measuringBeautiful work as usual Paul, I know what you mean about the importance of the deck clamps being at just the right height. If I had a dovetail slot jig for model size joints I would make em, otherwise not so much. Hey there's an idea for monetization, design a jig, Paul!
 .
.And I agree that either a cutting jig or a marking jig would be essential - of course you would need a unique one for each deck as the beams are all different sizes and the set-down into the clamp is different for each deck level. It could be done - but I've only seen it done once on a five-deck ship model (by a guy who makes my work look like the dog's breakfast).
That’s alright, Paul. Your work makes mine look like the after-effect of the dog’s breakfastThanks, Daniel. If my deck clamps are in the wrong place, it won't be for lack of measuring.
And I agree that either a cutting jig or a marking jig would be essential - of course you would need a unique one for each deck as the beams are all different sizes and the set-down into the clamp is different for each deck level. It could be done - but I've only seen it done once on a five-deck ship model (by a guy who makes my work look like the dog's breakfast).

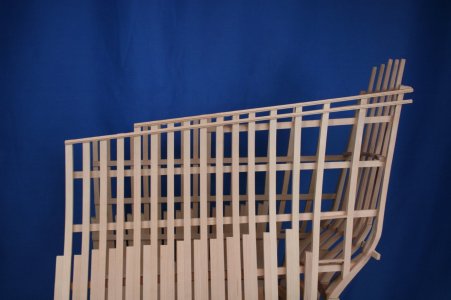
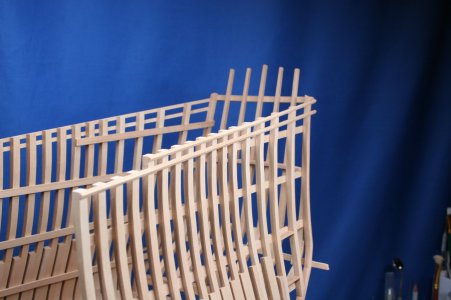
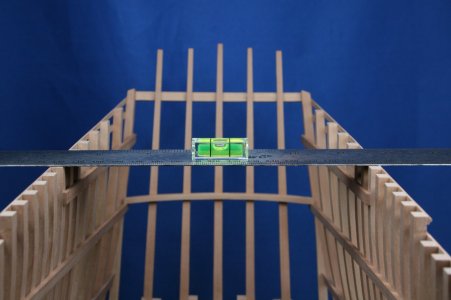
This week I completed the stabilization of the counter timbers with the addition of two rails. But not just any two rails - the rails that establish the top of the frames. Once again this required some very careful measuring - followed by even more careful cutting - followed by even more careful sanding to make the tops level and straight (without which the cap rail won't be situated correctly).
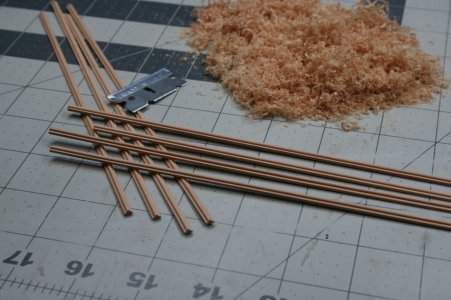
Of course, the rails first had to be profiled:
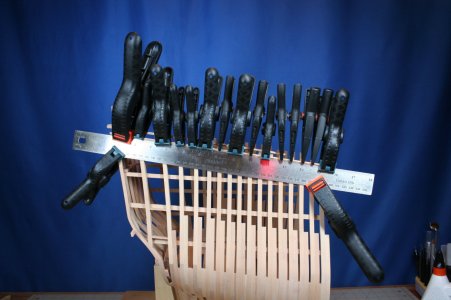
Too many clamps???
As a curiosity, today marks my five-year anniversary since joining Ships of Scale. What a wonderful journey this has been. I've made some friends, picked up more than a few tips and techniques, and maybe even helped others along the way as well. Thanks to the many people who have helped me become a better ship modeler these past five years. I'm excited for what the future holds!
Onward!
Of course, the rails first had to be profiled:


Too many clamps???


As a curiosity, today marks my five-year anniversary since joining Ships of Scale. What a wonderful journey this has been. I've made some friends, picked up more than a few tips and techniques, and maybe even helped others along the way as well. Thanks to the many people who have helped me become a better ship modeler these past five years. I'm excited for what the future holds!
Onward!
Last edited:
Happy anniversary.This week I completed the stabilization of the counter timbers with the addition of two rails. But not just any two rails - the rails that establish the top of the frames. Once again this required some very careful measuring - followed by even more careful cutting - followed by even more careful sanding to make the tops level and straight (without which the cap rail won't be situated correctly).
Of course, the rails first had to be profiled:
View attachment 539363
View attachment 539364
Too many clamps???
View attachment 539365
View attachment 539366
View attachment 539367
As a curiosity, today marks my five-year anniversary since joining Ships of Scale. What a wonderful journey this has been. I'm made some friends, picked up more than a few tips and techniques, and maybe even helped others along the way as well. Thanks to the many people who have helped me become a better ship modeler these past five years. I'm excited for what the future holds!
Onward!
Your work is beautiful, as always !
- Joined
- Sep 10, 2024
- Messages
- 1,020
- Points
- 393

Too many clamps???
Never!!!
Happy anniversary Paul. Your workmanship has certainly inspired me. As I recall, the first time I explored SOS, your Kingfisher log was the first thing I opened and I was just blown away. I knew then that I had to get involved with this great group of people - mainly to learn, but hopefully to share as well - and to have fun along the way.

- Joined
- Jan 25, 2023
- Messages
- 542
- Points
- 308

Blasphemy! Shun the non-believer!Too many clamps???
- Joined
- Aug 8, 2019
- Messages
- 5,568
- Points
- 738

again,, no comment, just perfect!
@GIG1810 look here https://shipsofscale.com/sosforums/threads/le-redoutable-1-48.6569/post-324874
@GIG1810 look here https://shipsofscale.com/sosforums/threads/le-redoutable-1-48.6569/post-324874
Hey 5 years, that's right! Congrats Paul. This has been among my favorite journeys so far in life, looking forward to many more years.
Thank you kindly, Jeff!Happy anniversary.
Your work is beautiful, as always !
What a nice post, Russ. I am happy that you find something helpful in my work. Yours has certainly inspired many!Never!!!
Happy anniversary Paul. Your workmanship has certainly inspired me. As I recall, the first time I explored SOS, your Kingfisher log was the first thing I opened and I was just blown away. I knew then that I had to get involved with this great group of people - mainly to learn, but hopefully to share as well - and to have fun along the way.
Thanks, Mirek!witaj
Baw się dobrze Pawle. Pozdrawiam Mirek
Blasphemy! Shun the non-believer!
Thanks, Chris. It looks deceptively simple, until you have to do it...Nioe ! Congrats Paul - Happy Anniversary
Thanks, Stephan! Oliver's work is next level...again,, no comment, just perfect!
@GIG1810 look here https://shipsofscale.com/sosforums/threads/le-redoutable-1-48.6569/post-324874
I agree, Daniel. A nice journey with some really special people.Hey 5 years, that's right! Congrats Paul. This has been among my favorite journeys so far in life, looking forward to many more years.
Good morning Paul. Perfect rails....Happy SOS anniversary. Cheers GrantThis week I completed the stabilization of the counter timbers with the addition of two rails. But not just any two rails - the rails that establish the top of the frames. Once again this required some very careful measuring - followed by even more careful cutting - followed by even more careful sanding to make the tops level and straight (without which the cap rail won't be situated correctly).
Of course, the rails first had to be profiled:
View attachment 539363
View attachment 539364
Too many clamps???
View attachment 539365
View attachment 539366
View attachment 539367
As a curiosity, today marks my five-year anniversary since joining Ships of Scale. What a wonderful journey this has been. I've made some friends, picked up more than a few tips and techniques, and maybe even helped others along the way as well. Thanks to the many people who have helped me become a better ship modeler these past five years. I'm excited for what the future holds!
Onward!
- Joined
- Jun 17, 2021
- Messages
- 3,199
- Points
- 588

Nice mini scrapers!
Is this even legal? Where is the glue, where are the drips?This week I completed the stabilization of the counter timbers with the addition of two rails. But not just any two rails - the rails that establish the top of the frames. Once again this required some very careful measuring - followed by even more careful cutting - followed by even more careful sanding to make the tops level and straight (without which the cap rail won't be situated correctly).
Of course, the rails first had to be profiled:
View attachment 539363
View attachment 539364
Too many clamps???
View attachment 539365
View attachment 539366
View attachment 539367
As a curiosity, today marks my five-year anniversary since joining Ships of Scale. What a wonderful journey this has been. I've made some friends, picked up more than a few tips and techniques, and maybe even helped others along the way as well. Thanks to the many people who have helped me become a better ship modeler these past five years. I'm excited for what the future holds!
Onward!


ОК, just kidding, great job as always. I love it when work is neat.
Quite simply outstanding Paul !!
Beautiful lines and super crisp work.
Beautiful lines and super crisp work.


