• Win a Free Custom Engraved Brass Coin!!!
    As a way to introduce our brass coins to the community, we will raffle off a free coin during the month of August. Follow link ABOVE for instructions for entering.

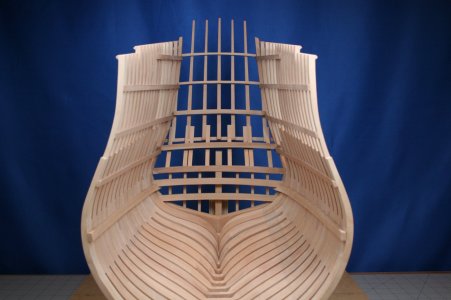
Le Saint Philippe 1693 after Jean-Claude Lemineur (Ancre) in scale 1:48

Good morning Paul. Perfect rails....Happy SOS anniversary. Cheers Grant
Thank you, Grant. Your POF build is coming along beautifully! And you were worried...

Nice mini scrapers!
Thanks, Peter. The pearwood shapes very nicely.

Is this even legal? Where is the glue, where are the drips? ROTF ROTF
ОК, just kidding, great job as always. I love it when work is neat.
Thank you kindly, Sergey. I recognize your affinity for neat work in your posts as well.

Quite simply outstanding Paul !!

Beautiful lines and super crisp work.:cool:
Much appreciated, Nigel. This really is a very pretty ship that is fun to model (once I figure stuff out).
 
This week I completed the stabilization of the counter timbers with the addition of two rails. But not just any two rails - the rails that establish the top of the frames. Once again this required some very careful measuring - followed by even more careful cutting - followed by even more careful sanding to make the tops level and straight (without which the cap rail won't be situated correctly).

Of course, the rails first had to be profiled:

View attachment 539363

View attachment 539364

Too many clamps??? ROTF

View attachment 539365

View attachment 539366

View attachment 539367

As a curiosity, today marks my five-year anniversary since joining Ships of Scale. What a wonderful journey this has been. I've made some friends, picked up more than a few tips and techniques, and maybe even helped others along the way as well. Thanks to the many people who have helped me become a better ship modeler these past five years. I'm excited for what the future holds!

Onward!
After the bike-trip I now had time to read and look carefully to your up-date, Paul. The sides with the rails are nicely leveled. The rails have a beautiful profile!
And congratulations with your 5-years SoS-joining anniversary! I hope we can enjoy your presence for many years to come.
Regards, Peter
 
Hello Friends,

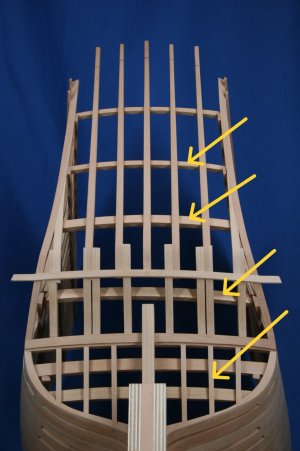
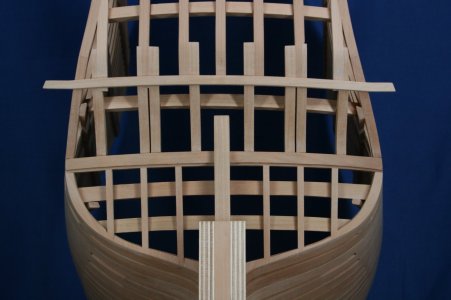
Over the past week I have continued to add components to the stern facade. Three more aft deck beams were installed along with six vertical stern counter timbers. I marked these elements with arrows...

IMG_1422b.JPG

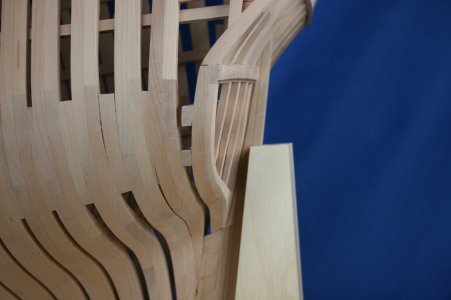
A keen eye will notice the apparent 'thinness' of the fashion timbers - especially on the starboard side. Here is a closer look:

IMG_1420.JPG

This thinness is an illusion of sorts. While installing the stern counter timbers (again, the six vertical pieces) it became quite clear that I had the fashion pieces either fabricated incorrectly or installed incorrectly. I can't explain how - but relative to the wing transom (the large horizontal timber at the top end of the counter timbers) as well as to the rabbet in the sternpost - the fashion pieces were either too far forward or not wide enough (when viewed from the side).

I thought about taking everything apart and trying again - but then reason took over and I decided to just laminate a thin layer of wood to the aft surface of the fashion timbers. Since it would be virtually impossible to fair the inner/upper surface of the lamination, I made it narrower than what I was laminating it to. Once the counter is planked this will all disappear.

Here is a view of the lamination from the side - I think the fashion piece now has an improved appearance (more robust):

IMG_1423.JPG

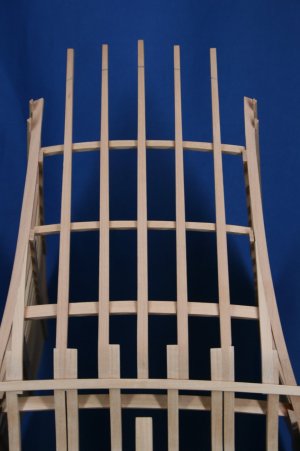
Here is a closer look at the upper counter:

IMG_1421.JPG

And now from the inside:

IMG_1417.JPG

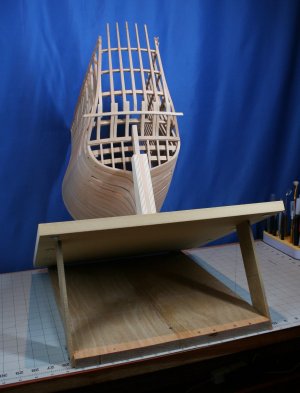
I have always struggled to work on the stern of the models I have made. On the Vasa I ended up standing the ship vertically on the floor with a pillow cushioning the bow - and on the Kingfisher I sat on a small step stool with the ship above me on my worktable.

I have LOTS of work to do on the SP stern, so I made this gizmo. I think this will be a good solution...

IMG_1419.JPG

My wife and I are off on holiday for a bit, though I will certainly have some opportunities to check in on your respective projects.

Thanks for the visit!
 
Last edited:
After the bike-trip I now had time to read and look carefully to your up-date, Paul. The sides with the rails are nicely leveled. The rails have a beautiful profile!
And congratulations with your 5-years SoS-joining anniversary! I hope we can enjoy your presence for many years to come.
Regards, Peter
Thanks for these nice comments, Peter!
 
Hello Friends,

Over the past week I have continued to add components to the stern facade. Three more aft deck beams were installed along six vertical stern counter timbers. I marked these elements with arrows...

View attachment 540819

A keen eye will notice the apparent 'thinness' of the fashion timbers - especially on the starboard side. Here is a closer look:

View attachment 540816

This thinness is an illusion of sorts. While installing the stern counter timbers (again, the six vertical pieces) it became quite clear that I had the fashion pieces either fabricated incorrectly or installed incorrectly. I can't explain how - but relative to the wing transom (the large horizontal timber at the top end of the counter timbers) as well as to the rabbet in the sternpost - the fashion pieces were either too far forward or not wide enough (when viewed from the side).

I thought about taking everything apart and trying again - but then reason took over and I decided to just laminate a thin layer of wood to the aft surface of the fashion timbers. Since it would be virtually impossible to fair the upper surface of the lamination, I made it narrower than what I was laminating it to. Once the counter is planked this will all disappear.

Here is a view of the lamination from the side - I think the fashion piece now has an improved appearance (more robust):

View attachment 540820

Here is a closer look at the upper counter:

View attachment 540817

And now from the inside:

View attachment 540814

I have always struggled to work on the stern of the models I have made. On the Vasa I ended up standing the ship vertically on the floor with a pillow cushioning the bow - and on the Kingfisher I sat on a small step stool with the ship above me on my worktable.

I have LOTS of work to do on the SP stern, so I made this gizmo. I think this will be a good solution...

View attachment 540815

My wife and I are off on holiday for a bit though I will certainly have some opportunities to check in on your respective projects.

Thanks for the visit!
If you hadn't mentioned the lamination, I think that... I would not noticed it.;) It's a nice modification, Paul.
The stern is getting impressive more and more. Your own made support give also a nice angle of view.
Enjoy your holiday!
Regards, Peter
 
If you hadn't mentioned the lamination, I think that... weel I would not noticed it.;) It's a nice modification, Paul.
The stern is getting impressive more and more. Your own made support give also a nice angle of view.
Enjoy your holiday!
Regards, Peter
Thanks, Peter. It may be that there will eventually be some untoward consequence to my solution, but right now it has a good feel. The diagonal planks should fall right into the rebate of the wing transom as well as the rabbet in the sternpost.
 
Everything looks so neat and perfect, I can’t even spot the “fix”!
It´s proven that fixs can also become an art. Your work is incredible.
Thank you, gentlemen. Making the fix not look like a fix was certainly the goal... In this case the fix seems to have been the correction of an earlier mistake I cannot isolate. The difficulties associated with scratch building are not limited to what I thought they would be.
 
Last edited:
Hi Paul. I for one was very excited to see your build in the Scratch-Build section (it shows the time that has passed since I've last been here). To me it's a perfectly logical progression from the VASA and the Kingfisher. Your model choice is a perfect one as it allows for plenty of detailed and decorative work - your forte! Up to now it's business as usual for your work - just perfect!
 
Hi Paul. I for one was very excited to see your build in the Scratch-Build section (it shows the time that has passed since I've last been here). To me it's a perfectly logical progression from the VASA and the Kingfisher. Your model choice is a perfect one as it allows for plenty of detailed and decorative work - your forte! Up to now it's business as usual for your work - just perfect!
Well, hello Heinrich! How nice to see you up and about. I noticed you were lurking about the forum and I'm happy to see you found me over here. I hope you are well and enjoying the satisfaction of being so needed that you have little spare time for the frivolous world of ship modelling. We do all truly miss you here! Between your absence and Uwe's absence it's just not quite the same. We will welcome you back with open arms when the time is right - until then we'll just muddle along as best we can... Be well my friend!
 
Hello Friends,

Over the past week I have continued to add components to the stern facade. Three more aft deck beams were installed along with six vertical stern counter timbers. I marked these elements with arrows...

View attachment 540819

A keen eye will notice the apparent 'thinness' of the fashion timbers - especially on the starboard side. Here is a closer look:

View attachment 540816

This thinness is an illusion of sorts. While installing the stern counter timbers (again, the six vertical pieces) it became quite clear that I had the fashion pieces either fabricated incorrectly or installed incorrectly. I can't explain how - but relative to the wing transom (the large horizontal timber at the top end of the counter timbers) as well as to the rabbet in the sternpost - the fashion pieces were either too far forward or not wide enough (when viewed from the side).

I thought about taking everything apart and trying again - but then reason took over and I decided to just laminate a thin layer of wood to the aft surface of the fashion timbers. Since it would be virtually impossible to fair the inner/upper surface of the lamination, I made it narrower than what I was laminating it to. Once the counter is planked this will all disappear.

Here is a view of the lamination from the side - I think the fashion piece now has an improved appearance (more robust):

View attachment 540820

Here is a closer look at the upper counter:

View attachment 540817

And now from the inside:

View attachment 540814

I have always struggled to work on the stern of the models I have made. On the Vasa I ended up standing the ship vertically on the floor with a pillow cushioning the bow - and on the Kingfisher I sat on a small step stool with the ship above me on my worktable.

I have LOTS of work to do on the SP stern, so I made this gizmo. I think this will be a good solution...

View attachment 540815

My wife and I are off on holiday for a bit, though I will certainly have some opportunities to check in on your respective projects.

Thanks for the visit!
Wow Paul. Enjoy your holiday. Cheers Grant
 
Back
Top