
Piatto sul Ponte? Flat on the deck?Dovrebbe essere al contrario

-

SUBSCRIBE TO SHIPS IN SCALE TODAY!
The beloved Ships in Scale Magazine is back and charting a new course for 2026!
Discover new skills, new techniques, and new inspirations in every issue.
NOTE THAT OUR NEXT ISSUE WILL BE MARCH/APRIL 2026 -

Win a Free Custom Engraved Brass Coin!!!
As a way to introduce our brass coins to the community, we will raffle off a free coin during the month of August. Follow link ABOVE for instructions for entering.
You are using an out of date browser. It may not display this or other websites correctly.
You should upgrade or use an alternative browser.
You should upgrade or use an alternative browser.
- Joined
- Oct 17, 2020
- Messages
- 1,759
- Points
- 488


Last edited:
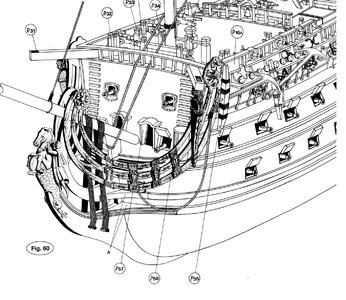
This shows flat. Unfortunately, the ZHL kit has the bulkhead raised here, not like the museum model. I assume I must cut through the railing and bulkhead to make it lie flat on this model.
- Joined
- Oct 17, 2020
- Messages
- 1,759
- Points
- 488
la ringhiera no tagliarla ,vedi se ci sta spazio sotto la ringhiera poggiandolo sulla paratia leggermente inclinatoQuesto mostra piatto. Sfortunatamente, il kit ZHL ha la paratia sollevata qui, non come il modello da museo. Presumo di dover tagliare la ringhiera e la paratia per farlo stare piatto su questo modello.
These pictures show the cathead lying flat on the deck.the railing does not cut it, see if there is space under the railing resting it on the bulkhead slightly inclined
- Joined
- Oct 17, 2020
- Messages
- 1,759
- Points
- 488
se non c'è troppo spazio facci un po di scarico sulla paratia, mi dispiace che non ho i disegni del Tuo Kit per aiutare di più ,vedi fotoQueste immagini mostrano la testa di gatto distesa sul ponte.
Attachments

Vic, not sure I understand how this jig works. On the left, you have to set the size of the stacions. On the right, you have to feed the stock until it gets to the jig, and cut. Am I on the same sheet of music as you?Miter jig to help keep stanchions at the same height
Jim, I cut a piece at the correct length. Then, I placed a longer piece to butt up against it and clamped it down with a clamp. Afterwards, all I had to do is insert an uncut piece and place it against the clamped piece and cut it. All the new pieces are now the same size. It worked beautifully. I thank you for the earlier suggestion. I just did it my way.Vic, not sure I understand how this jig works. On the left, you have to set the size of the stacions. On the right, you have to feed the stock until it gets to the jig, and cut. Am I on the same sheet of music as you?

Good morning Vic. I think you got these catheads really good. It is so good to see an extended picture of of your ship. Sometimes we keep showing macro pics of what we do we forget to step back and admire. It really looks beautiful. Well done.
Thanks, Grant. But this last picture is not my ship. It was an example of @paulb, who also built the SR. I was just doing research on how others did the cathead on this model. I need to go back and see how they looked on real ships now.Good morning Vic. I think you got these catheads really good. It is so good to see an extended picture of of your ship. Sometimes we keep showing macro pics of what we do we forget to step back and admire. It really looks beautiful. Well done.
Ahhh- that is funny. Sorry Vic. He did an magnificent job Paul. CheersThanks, Grant. But this last picture is not my ship. It was an example of @paulb, who also built the SR. I was just doing research on how others did the cathead on this model. I need to go back and see how they looked on real ships now.
So, this is what I found when googling cathead pictures.

I agree. His build is an inspiration. I cannot attain to his degree of skill.Ahhh- that is funny. Sorry Vic. He did an magnificent job Paul. Cheers
That makes two of us...but we have loads of fun tryingI agree. His build is an inspiration. I cannot attain to his degree of skill.

I think I know who's the cat he\she is. Because of the Russian officer Navy hat, It does look like a cat of a modeler @dantist sovereignSo, this is what I found when googling cathead pictures.
I've seen his work!I think I know who's the cat he\she is. Because of the Russian officer Navy hat, It does look like a cat of a modeler @dantist sovereign
Is this your cat, @dantist sovereign ?So, this is what I found when googling cathead pictures.
View attachment 286590
Maybe someone can help me out with these instructions. They say to combine the two c7 cathead pieces together, but those two pieces are actually c6s. 
Then they say to join the real c7s and place them in the the cavity of the two c6s.

The fun part is the two c7 pulleys are just as wide as the combined c6s. No way to cut out a rectangle big enough to accommodate them.

It looks like I can only use one pulley. How did @BigMike, @paulb, and @Gilbertm do it, I wonder. Did they run into the same problem?
Then they say to join the real c7s and place them in the the cavity of the two c6s.
The fun part is the two c7 pulleys are just as wide as the combined c6s. No way to cut out a rectangle big enough to accommodate them.
It looks like I can only use one pulley. How did @BigMike, @paulb, and @Gilbertm do it, I wonder. Did they run into the same problem?
The instructions have some errors. All kit instructions have errors. Since catheads had two or sometimes three sheaves, I would scratch build some more detail into one of the examples below, and use two sheaves (pulley wheels) separated by a thing square of scrap wood inside the hole you carve out of each side of the set of pieces C6. The two C6 parts are really supposed you be one piece, but having two makes it easier to cut the rectangular hole for the sheaves. Instead of using the kit parts C7 for the sheaves, get a dowel of similar diameter, and use a table saw or band saw to cut two, thin slices to make your own sheaves, then use a small needle file to file a shallow groove around the edge of each sheave. Better yet, spin the dowel in a drill and cut the shallow groove which accepts the rope first using the sharp edge of a needle file, then slice off the wheel from the dowel with a saw. If the sheaves are really tiny, skip the step which cuts the groove and just use the disc as the sheave. If you want to get really fancy, make the sheaves from slices off the end of a brass rod of the desired diameter. If you don't have a copy of the book below, you may want to find one. It has so many pictures which allow you to build beyond the overly simplified features found in kits and make your model more detailed.
From Historic Ship Models by Wolfram zu Mondfeld

From Historic Ship Models by Wolfram zu Mondfeld
Last edited: