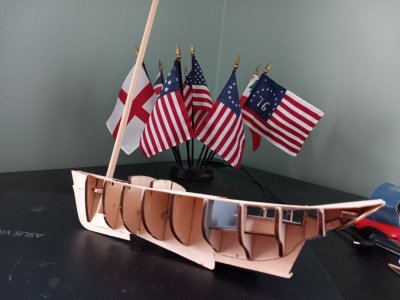
I believe the kit is 1/24, and there is a 1/12 kit too, larger pieces are easier to work. The kit is about 10 inches, the larger kit is 15 inches (lengyh)Continued on with the build, occupied with other things slowed down posting.
I added in the side cleats and the false stem.
View attachment 533396
View attachment 533397
After installing the false stem, and seeing how poorly it looked, I realized I used the wrong piece of wood. I will be building this kit again, so won't make that mistake again. Just new ones.
Next up, I trimmed the cleats and false stem, and added the seat risers. I was a bit too zealous and trimmed the stem and false stem right down to the strakes.
View attachment 533398
Next up were adding the bands, and sanding down the tops of the bands and the sheer strakes.
I trimmed down the frames to make way for the gunwales.
View attachment 533399
I need a new ruler or new eyes. I trimmed down an 1/8" but it still seemed too much.
[I don't have a pic of the gunwales and breast hook being installed.]
Next up was a light sanding and priming for painting.
View attachment 533400
Boy, did all of my sins get revealed. After sanding it looked good and felt good. After priming it was like a well established 5 o'clock shadow.
View attachment 533401
More sanding. Even after using 220 on the hull the paint job still looked bad.
I ended up applying three coats, sanding lightly between coats.
First Coat
View attachment 533402
Third Coat. Cap rails show their first coat.
View attachment 533403
After three coats of paint, and fitting and trimming, the cap rails are installed. Beckets soon followed.
View attachment 533404
I whittled and shaped a single oar. One seemed enough to be representative.
It was at this point I worked on the tholes. Instead of sanding, I drew the wood through a draw plate. I could only go so far before the wood was too thin and brittle to pass through the last hole that would have made them fully round. At this size one needs to get really close up to see that they are not 'fully' round.
I sanded the thwarts, and decided to use the ModelExpo Wood Conditioner before painting the oar and thwarts with the ModelExpo Natural Stain. Much to my dismay it was NOT stain, but paint to look like natural wood. After conditioning I lightly sanded. I applied a coat of Natural Stain, and lightly sanded again, followed by another coat of paint and sanding.
View attachment 533405
All of my thwarts are a bit short. I probably had my frames too wide.
View attachment 533406
The final finish of the boat is not too hideous. One one hand the hull looks like it has years paint added. On the other, it shows my insufficient sanding.
View attachment 533407
Even though I am my own worst critic, I am happy with the outcome, as it is my first ever wood model.
I have purchased a second copy of the Dory, to make, and earn store credit for future purchases. Seeing where I made mistakes, and where I can improve, I expect the second version to be greatly improved over this one.
I will certainly go with the three piece bottom, beveling the longitudinal edges a bit, both sides, to make sure you can see the three planks, once painted. Right now the bottom looks like it was made with plywood.
I am planning on attaching the frame templates to a piece of foam board. I will then use pins to align the frame pieces with the templates, to ensure proper alignment, instead of eyeballing like I did this time.
The final big piece I need to improve on is sanding. Any tips out there would be greatly appreciated.
Cheers
-

Win a Free Custom Engraved Brass Coin!!!
As a way to introduce our brass coins to the community, we will raffle off a free coin during the month of August. Follow link ABOVE for instructions for entering.
-

PRE-ORDER SHIPS IN SCALE TODAY!
The beloved Ships in Scale Magazine is back and charting a new course for 2026!
Discover new skills, new techniques, and new inspirations in every issue.
NOTE THAT OUR FIRST ISSUE WILL BE JAN/FEB 2026
You are using an out of date browser. It may not display this or other websites correctly.
You should upgrade or use an alternative browser.
You should upgrade or use an alternative browser.
I believe the kit is 1/24, and there is a 1/12 kit too, larger pieces are easier to work. The kit is about 10 inches, the larger kit is 15 inches (length), with clearer instructions and pix.
In any case, I'm working on the Norwegian Pram too. Broke the center piece twice, the rudder three times, ready to fair the ribs. A lot of repair practice.
You did a great job on your Dory
You did a great job on your Dory
After finishing the third model of Midwest's beginner series, I am contemplating the New York Harbor Boat.
With thin pieces you can put some CA on them to strengthen the wood.Repaired rudder, broken 3 times, for the Norwegian Pram. It seems that when working with Balsa, attention must be paid to the grain. it's easy to snap.
View attachment 538395
Never thought of that, will try it. There are some things that I think are too short...rudder hinges. I think I'll hit up the hobby shop for some brass sheets and make my own. Thanks!With thin pieces you can put some CA on them to strengthen the wood.
The hinges are very finicky. I found that soldering the pins using silver solder into them worked best. If you get brass, you should anneal it by putting it into a fire until it turns red and then let it cool. It will be much easier to shape and cut.
Last edited:
Did that, going to try soldering.The hinges are very finicky. I found that soldering the pins using silver solder into them worked best. If you get brass, you should anneal it by putting it into a fire until it turns red and then let it cool. It will be much easier to shape and cut.
for the rigging would you use clinch knots?
Got the hinges for the rudder on using Testor's metal glue. Rudder is on but looks like it is stored battered.Did that, going to try soldering.
Now putting the mast in
Nice job! What's evident is your commitment to getting the details right. Ship modeling is an exercise in making one tiny part at a time and then assembling them and you've got that skill down pat.
Just to add to what others have said, a few answers to your questions:
Shellac is wonderful stuff. It soaks into the wood and eliminates further "five o'clock shadow" on your surfaces. (That's the first time I've heard that term and it's the best description I've heard yet! ) Shellac thins with alcohol. I buy Zinsser's Bull's Eye brand in the can from the hardware store. If you recap the can tightly, it lasts a long time and if it thickens, just add more denatured alcohol to the mix.) One coat is all it takes to seal the wood. Unlike other primer coatings, especially the ones that are synthetic based, everything sticks to shellac. As mentioned above, it pays to seal your parts before assembly.
You're right about preferring oil-based paints. Acrylics have their place, I suppose, but I haven't really found it yet. Others claim to have, though. I prefer to use quality tubed artists' oils, conditioned as required. (A drop or two of Japan drier is required or they'll take forever to dry.) They have a much longer shelf life than the overpriced one- or two-ounce bottles of pre-thinned "model paint" sold for modeling use, which needs conditioning, as well. Don't believe that "ready to use right out of the bottle" hype.
If you want your bottom plank seams to show, you don't have to make individual planks. Before you paint, you can just score the surface of the bottom by running a scratch awl or the like along a straight edge to leave a fine indented line. When people complement you on your fine planking job, you don't have to tell them your secret.
Looking at your photos, my hunch is that the "shortness" of your thwarts isn't the result of your frames being too wide, but perhaps is the result of your stringers upon which the thwarts rest being a bit high. If they were a smidgen lower, the thwarts should be just right.
It looks like you are on your way to ever greater accomplishments. Your previous manual arts training has stood you in good stead.
Just to add to what others have said, a few answers to your questions:
Shellac is wonderful stuff. It soaks into the wood and eliminates further "five o'clock shadow" on your surfaces. (That's the first time I've heard that term and it's the best description I've heard yet!
You're right about preferring oil-based paints. Acrylics have their place, I suppose, but I haven't really found it yet. Others claim to have, though. I prefer to use quality tubed artists' oils, conditioned as required. (A drop or two of Japan drier is required or they'll take forever to dry.) They have a much longer shelf life than the overpriced one- or two-ounce bottles of pre-thinned "model paint" sold for modeling use, which needs conditioning, as well. Don't believe that "ready to use right out of the bottle" hype.
If you want your bottom plank seams to show, you don't have to make individual planks. Before you paint, you can just score the surface of the bottom by running a scratch awl or the like along a straight edge to leave a fine indented line. When people complement you on your fine planking job, you don't have to tell them your secret.
Looking at your photos, my hunch is that the "shortness" of your thwarts isn't the result of your frames being too wide, but perhaps is the result of your stringers upon which the thwarts rest being a bit high. If they were a smidgen lower, the thwarts should be just right.
It looks like you are on your way to ever greater accomplishments. Your previous manual arts training has stood you in good stead.
Bob,Nice job! What's evident is your commitment to getting the details right. Ship modeling is an exercise in making one tiny part at a time and then assembling them and you've got that skill down pat.
Just to add to what others have said, a few answers to your questions:
.....
Thanks, much appreciated.
Ed
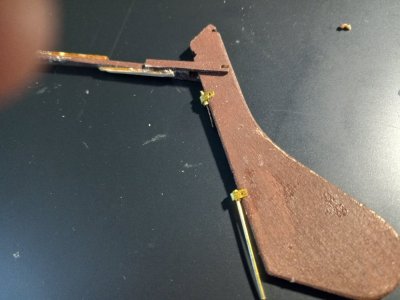
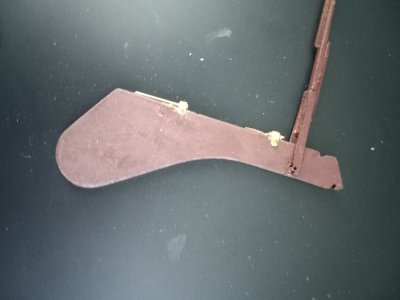
Having trouble with the kit hinges, they are too small. This hinge should be long enough. I saw a Pram at Hyannis Harbour and it had the long straps, unlike those in the kit. First pix is of the new hinge, other side glued, this side to be glued. Next step is to drill for the mounting hardware. The second pick is of the upper bracket. This rudder is turning out to be quite a pain for me. These kits are learning experiences though and believe me, that is what they are.
The brass pieces in the photo are from the brass plate the photo etched parts came from, I cut it up to make the longer straps. The glue is really hoding on the upper hinge so I may just leave it as is rather than risk breaking it, could probably release it using alcohol.
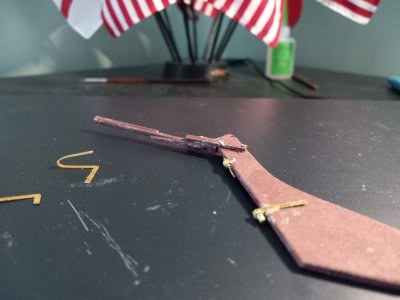
The brass pieces in the photo are from the brass plate the photo etched parts came from, I cut it up to make the longer straps. The glue is really hoding on the upper hinge so I may just leave it as is rather than risk breaking it, could probably release it using alcohol.


OK, the drill bits used with my model drill won.t cut into brass. What do you all use to drill the brass? have not tried the Dremel yet.
- Joined
- Jun 29, 2024
- Messages
- 1,508
- Points
- 438

I use HSS drill bits. HSS stand for high speed steel; a heat treated alloy steel. Using this type of bit it helps to first center punch the hole. The resulting little dimple seats the drill bits.
Roger
Roger
Make sure you anneal the brass to make it easier to drill into. Heat it until it turns red and let it cool.OK, the drill bits used with my model drill won.t cut into brass. What do you all use to drill the brass? have not tried the Dremel yet.
Rob
- Joined
- Jun 29, 2024
- Messages
- 1,508
- Points
- 438

I don’t anneal any of the brass that I work with and I am presently scratch building ALL of the fittings for a Great Lakes steamship using hard or half hard brass. An advantage of this material is that it provides clean crisp shapes and I don’t want to distort it by heating. Drills go through this stuff like it’s butter.
Check the drill that you are using under magnification to ensure that it isn’t broken or dull.
Roger
Check the drill that you are using under magnification to ensure that it isn’t broken or dull.
Roger


