
Hello Jan, Thank you for the good words and I am really happy you found it useful.Jimsky,
Great Tutorial, I think I can do this following your method. Looking forward to the soldering portion, I’ve never had much success with that type of work.
Jan

-

SUBSCRIBE TO SHIPS IN SCALE TODAY!
The beloved Ships in Scale Magazine is back and charting a new course for 2026!
Discover new skills, new techniques, and new inspirations in every issue.
NOTE THAT OUR NEXT ISSUE WILL BE July/August 2026 -

Win a Free Custom Engraved Brass Coin!!!
As a way to introduce our brass coins to the community, we will raffle off a free coin during the month of August. Follow link ABOVE for instructions for entering.
You are using an out of date browser. It may not display this or other websites correctly.
You should upgrade or use an alternative browser.
You should upgrade or use an alternative browser.
Making the Ringbolts - an introduction to metalsmith works


I am using the same technique with a small difference: instead of fretsawing the rings from the spiral I use one of those thin cutting disks (Dremel-accessory). It is less prone to damages on the finger. And, preventing the next step of the tutorial I am using a hard solder paste. This can be used more economically and with less hassle.
Janos
Janos
All hands on deck! We are ready for the third and final saga of making the ringbolts. In the past chapter (yesterday), we made eyebolts and rings and today we will assemble using soldering torch and silver solder.
 en.wikipedia.org
From Wikipedia: Soldering is a process in which two or more items are joined together by melting and putting a filler metal (solder) into the joint, the filler metal having a lower melting point than the adjoining metal. Unlike welding, soldering does not involve melting the workpieces. In brazing, the workpiece metal also does not melt, but the filler metal is one that melts at a higher temperature than in soldering. In the past, nearly all solders contained lead, but environmental and health concerns have increasingly dictated the use of lead-free alloys for electronics and plumbing purposes.
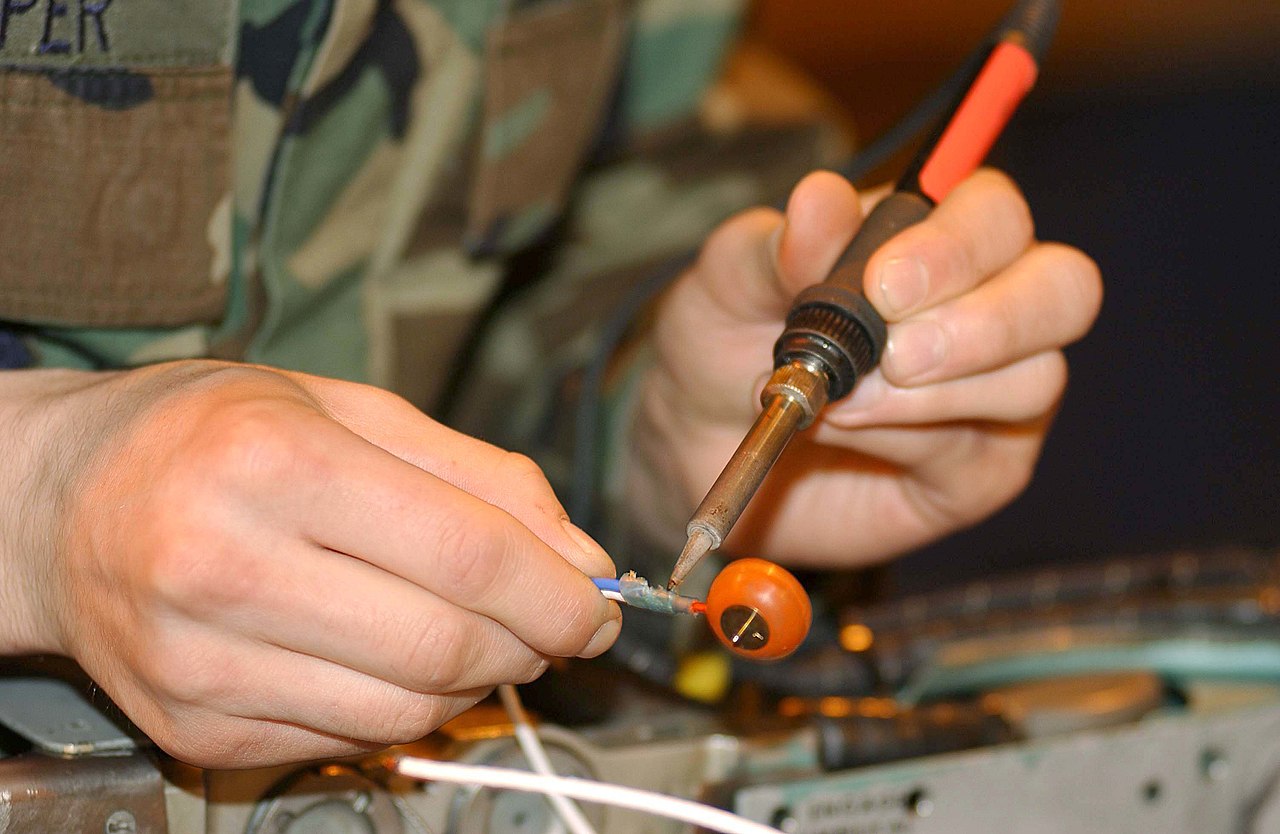
Fanny that the above article didn't mention jewelry manufacturing, only electronics, and plumbing. Before we will get to the actual soldering process, a word of caution: Make sure you fully understand you will deal with an open flame. Please remove all parts from the table which may accidentally cause a fire.
For the most part, a good understanding of the various temperature of the torch flame is the key. Take a look at my sketch #2: Flame has multiple 'hot points' the large (outer) and the inner (cone). We will use the inner flame specifically the sharpest point of the cone as it has the hottest temperature. Knowing the melting point of the solder and the way you will flow it - called The Art of Soldering")

Let's talk about the tools we will need: a butane torch, there are many on the market and plenty to choose from. The silver solder paste. Few words about solder: it comes as 'easy', 'medium', and 'hard'. Jewelers use all 3 as often times it requires to solder 3 different parts in a very small place. So the first part will be soldered with 'hard' as it will require high temperature to melt. The second part will be soldered with the 'medium' because it will require less temperature to melt as hard, and will not destroy the first part. The third will be soldered with 'easy', it will require less temperature than both 'hard' and 'medium'. For those types of solders, we use flux. It helps the solder to flow. Also, there is a soldering paste, it is premixed solder and flux together, a brilliant staff. It also comes as 'hard', 'medium' and 'easy'. We will be using 'easy' for our exercise.

Let's solder the eyebolt first. We'll need this part soldered before the ring assembly. I use the 'Thirdhand' tool to hold the part in a tweezer.
Some photos of the soldered eyebolt in Macro. I guess, they get better. What do you think?


Now we are ready to solder the ring. But first, we need to assemble. The same absolutely process as for the steel. I just realized that I have not photocopied this process for the steel part. I have to fix this mistake and present images of this process.


Now, we are ready to solder the ring. I have a bad and a piece of good news: what news should I start with? Alright, the bad news is.... somehow I lost recorded video process of soldering a ring. But the good news, I made a new video recording today. Many thanks for my Admiral Irina. This video showing the entire process of soldering both parts. All bullet points are the same as for the first soldering.


Take a look at the entire process. I hope it shows the key points.
Some macro images.


Pretty cool, right? It is not that difficult! The next step is to clean all the oxidized parts and prepare to blacken. First, I cut the desired size. As Janos @janos, I use a vinegar bath for about 30 minutes. Then, clean with water and use the 'Brass black' solution to make it look like a stele. This is how the ringbolts look after the bath.


Now it is 'Black Brass' bath. The concentration (how much to dilute with water) you have to experiment. I do 50/50 and it is still debatable. What works for one doesn't work for another. Another dilemma is how much time you should give for a bath? I have no definite answer. I use a few minutes, and then put them in cold water. Maybe that is why I have poor results? Your input will be beneficial.


After water evaporates, the final stage is to make brass ringbolts looks like steel. I have a polishing wheel made of felt, I rub lightly until the best result archived. The results deserve a full view and my Macro shooting - applaud

To complete this tutorial, I installed those rings on Pearwood just to show how they looking. On the right, is ringbolts made from steel, on the left made from brass wire. You are the judge. What do you like most?


bonus photo: ringbolt on the Costello boxwood

...and with this, the tutorial comes to the end. I really hope this will helps you with your modeling. Thank you All for your support and attention.
Happy Modeling!
Soldering - Wikipedia
From Wikipedia: Soldering is a process in which two or more items are joined together by melting and putting a filler metal (solder) into the joint, the filler metal having a lower melting point than the adjoining metal. Unlike welding, soldering does not involve melting the workpieces. In brazing, the workpiece metal also does not melt, but the filler metal is one that melts at a higher temperature than in soldering. In the past, nearly all solders contained lead, but environmental and health concerns have increasingly dictated the use of lead-free alloys for electronics and plumbing purposes.
Fanny that the above article didn't mention jewelry manufacturing, only electronics, and plumbing. Before we will get to the actual soldering process, a word of caution: Make sure you fully understand you will deal with an open flame. Please remove all parts from the table which may accidentally cause a fire.
For the most part, a good understanding of the various temperature of the torch flame is the key. Take a look at my sketch #2: Flame has multiple 'hot points' the large (outer) and the inner (cone). We will use the inner flame specifically the sharpest point of the cone as it has the hottest temperature. Knowing the melting point of the solder and the way you will flow it - called The Art of Soldering
Let's solder the eyebolt first. We'll need this part soldered before the ring assembly. I use the 'Thirdhand' tool to hold the part in a tweezer.
- put flame away from the main eye (ring), only on joint
- concentrate only on a gap - this is what needs to solder.
- Remember the solder will flow only where the hottest temperature will be!
- Use as little solder as you can. The smallest the gap the less solder you will require.
- Move the torch to control the temperature. Once you see solder melting put the torches 'cone' flame in the gap, kinda telling the solder 'go there'!
Now, we are ready to solder the ring. I have a bad and a piece of good news: what news should I start with? Alright, the bad news is.... somehow I lost recorded video process of soldering a ring. But the good news, I made a new video recording today. Many thanks for my Admiral Irina. This video showing the entire process of soldering both parts. All bullet points are the same as for the first soldering.
- make sure to close the ring as tight, as possible (minimize joint gap)
- use as little solder paste as you can, you will need an only a tiny bit
- put the solder paste behind the rings joint, Why? Exactly...you are correct...when we will heat the joint, melted solder will flow where the hottest temperature will be front of the joint, it will only feel the gap, make it nice and clean
- Use the 'cone' flame and control the temperature. Heat only the joint.
Take a look at the entire process. I hope it shows the key points.
Pretty cool, right?
It is not that difficult! The next step is to clean all the oxidized parts and prepare to blacken. First, I cut the desired size. As Janos @janos, I use a vinegar bath for about 30 minutes. Then, clean with water and use the 'Brass black' solution to make it look like a stele. This is how the ringbolts look after the bath. Now it is 'Black Brass' bath. The concentration (how much to dilute with water) you have to experiment. I do 50/50 and it is still debatable. What works for one doesn't work for another. Another dilemma is how much time you should give for a bath? I have no definite answer. I use a few minutes, and then put them in cold water. Maybe that is why I have poor results? Your input will be beneficial.
After water evaporates, the final stage is to make brass ringbolts looks like steel. I have a polishing wheel made of felt, I rub lightly until the best result archived. The results deserve a full view and my Macro shooting - applaud
To complete this tutorial, I installed those rings on Pearwood just to show how they looking. On the right, is ringbolts made from steel, on the left made from brass wire. You are the judge. What do you like most?
bonus photo: ringbolt on the Costello boxwood
...and with this, the tutorial comes to the end. I really hope this will helps you with your modeling. Thank you All for your support and attention.
Happy Modeling!
Thanks, Janosh for your input. I use a 'hard' solder paste as well. However, on the tiny brass wire as 0.5mm, I prefer using 'easy' (soft). Also, when I do mass production, use a self-made table saw with sawblade .010 thickness (Malco company) to cut spring, but it is a lesson for another time...I am using the same technique with a small difference: instead of fretsawing the rings from the spiral I use one of those thin cutting disks (Dremel-accessory). It is less prone to damages on the finger. And, preventing the next step of the tutorial I am using a hard solder paste. This can be used more economically and with less hassle.
Janos
")
What thickness of your Dremel disk?
Jim,
Thanks for this very detailed and correct tutorial. I would like to emphasize two additional points. One is that for hard soldering the two sides which have to be soldered together HAVE to touch each other, otherwise the connection won't happen. (At soft soldering the solder fills up the gap even if the sides do not touch, but not here!) The second: we have to keep a close eye on what is happening to the joint during soldering. The connection happens at the moment when the solder melts and this is when the appearance of the solder changes into a bright fluid for a second. After this the flame has to be quickly removed from the joint, otherwise the brass itself will melt (its colour changes to bright red) and the part goes into the rubbish bin.
Sorry, Jim, I don't want to take your thread over, just thought that these points might be worthwhile to emphasize.
Janos
Many thanks for your comments! You are not taking my thread, and I really grateful for your comments\additions. We learn from each other! We are SOS!Sorry, Jim, I don't want to take your thread over, just thought that these points might be worthwhile to emphasize.
Thanks, Janosh for your input. I use a 'hard' solder paste as well. However, on the tiny brass wire as 0.5mm, I prefer using 'easy' (soft). Also, when I do mass production, use a self-made table saw with sawblade .010 thickness (Malco company) to cut spring, but it is a lesson for another time...
What thickness of your Dremel disk?
Hi Jim,
The Dremel cutting blade is about 0.6 mm thick. I am using it for making rings from 0.4mm brass and up.
You're right, hard soldering is difficult around the 0.5 mm wire thickness range. The wire 'burns' very quickly, sometimes even earlier - or at the same time - as the solder melts.
To tell you one of my sins I sometimes leave out the soldering of the rings and of the eye bolts (when no or little strain will be there) ... laziness is half health...
Janos
Great Tutorial - well explained and good photos - Many Thanks
and also thanks for the additional comments from Janos!
and also thanks for the additional comments from Janos!
Great tutorial, Jim! This should be archived so everyone can have access any time. Great explanation of one of the trickier parts of model building. Good work!
Hello, Knut and thanks for your interest. Unfortunately, I had never had success using the soldering iron. This was the main reason I switched over silver soldering with a propane torch. I would love to learn myself and would be happy if someone shares the knowledge.Thanks for a great demonstration Jim, what about the regular soldering iron, are you going to show some of this and? exciting theme-
But... The principals soldering with regular iron is the same as for propane. The main difference is the soldering material. When soldered joints with a regular soldering iron you will use tin\lead solder. The melting point of this solder doesn't require high temperatures. However, you still need to heat the joints where the temperature should be higher than the melting point of lead solder, and this is what I never achieved to an acceptable point.
- joints must be extremely clean (lead will not flow on the dirty surface)
- joints should have the smallest gap possible (if not at all)
- use dedicated flux or flux paste to help flow melted lead
- various soldering material\jobs will require dedicated soldering iron e.g. small iron doesn't have enough capacity to heat fat wire
Happy soldering!
- Joined
- Dec 3, 2018
- Messages
- 2,450
- Points
- 538

Jim. Good explanation on this topic, I have such a gas burner as you show, I will try to do as you show on the video.
The solder paste you show, which brand it is, you have a link to where you buy this paste, can probably buy it locally,
but it would have been nice to see what types you can recommend, thanks-
The solder paste you show, which brand it is, you have a link to where you buy this paste, can probably buy it locally,
but it would have been nice to see what types you can recommend, thanks-
Excellent information. Thanks for taking the time to provide it. Will help a lot as I progress in my builds.

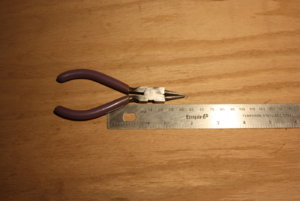
Very helpful. I have some fine tip pliers that I believe I can fashion to make the small ring bolts. Much appreciated!

II have found good wire-bending pliers at hobby shops such as AC Moore, Michaels and Hobby Lobby. Been using them since about 1958 for making fishing lures.
Attached is a photo of one of them. Now I can put them to use on ring bolts and such. Thanks for the excellent presentation! 
Happy Modeling.
Steven
Attached is a photo of one of them. Now I can put them to use on ring bolts and such. Thanks for the excellent presentation!
Happy Modeling.
Steven
Attachments

@Jim J, @Danno71 and @SAHaskell Jim, Daniel and Steven Many thanks for your comments, they are really valuable! I can honestly say - mission accomplished! I am more than happy to know that you found this information useful.