-

Win a Free Custom Engraved Brass Coin!!!
As a way to introduce our brass coins to the community, we will raffle off a free coin during the month of August. Follow link ABOVE for instructions for entering.
-

PRE-ORDER SHIPS IN SCALE TODAY!
The beloved Ships in Scale Magazine is back and charting a new course for 2026!
Discover new skills, new techniques, and new inspirations in every issue.
NOTE THAT OUR FIRST ISSUE WILL BE JAN/FEB 2026
You are using an out of date browser. It may not display this or other websites correctly.
You should upgrade or use an alternative browser.
You should upgrade or use an alternative browser.
MarisStella Ragusian Carrack by Signet [COMPLETED BUILD]
As I mentioned earlier, the Captain felt the ship did not respond to the helm and set of the sails the way she should. He felt it might be the fact that the lateen mizzen sail, used so much for steering, was further forward than its ideal position. So that last time in port, he had a bonaventure mast and spar fabricated, and the ship's carpenter and sailsmith went to work fabricating and mounting the necessary sail and associated equipment.
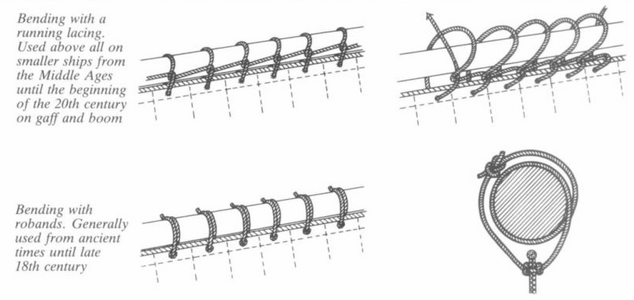
The sail was bent to the bonaventure mast using a running lacing, rather than the robands used elsewhere on the ship:
This allowed quick attachment and detachment of the sail for storage when the bonaventure sail was not required.
My implementation of this running lacing was done in this manner:
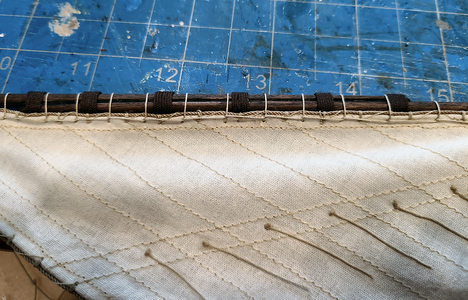
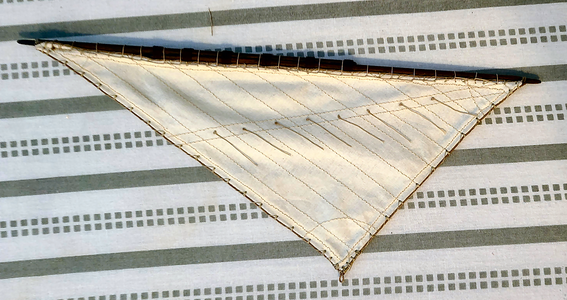
with the entire sail ready to mount as shown here:
While an aft boomkin was not required previously, after adding the bonaventure sail it was necessary that it be added:
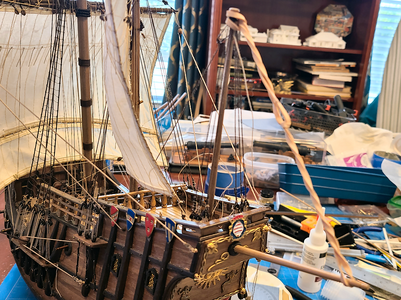
The small wooden structure near the bonaventure mast location was utilized to retain and hold down the boomkin:
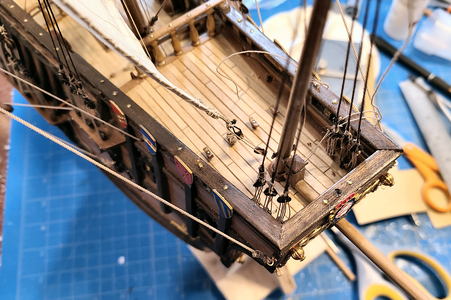
Most rigging attached to the bonaventure sail was attached prior to mounting, to make it easier to do. Too bad deck attachments weren't that easy.
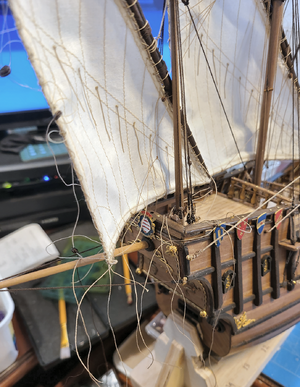
Partway through rigging of the sail:
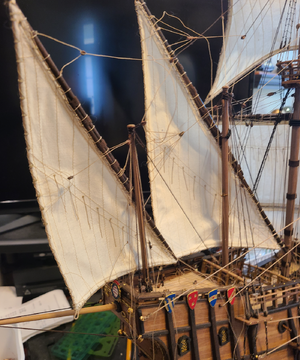
After completion of the required rigging and installation of the stern lantern:
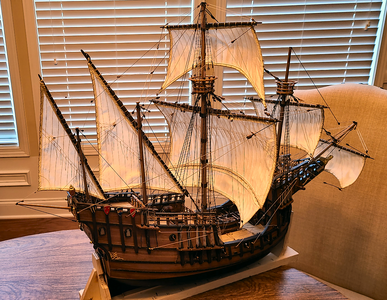
That completes the rigging. Yet to be done: mounting and rigging the anchors, rudder and flags.
The sail was bent to the bonaventure mast using a running lacing, rather than the robands used elsewhere on the ship:

This allowed quick attachment and detachment of the sail for storage when the bonaventure sail was not required.
My implementation of this running lacing was done in this manner:

with the entire sail ready to mount as shown here:

While an aft boomkin was not required previously, after adding the bonaventure sail it was necessary that it be added:

The small wooden structure near the bonaventure mast location was utilized to retain and hold down the boomkin:

Most rigging attached to the bonaventure sail was attached prior to mounting, to make it easier to do. Too bad deck attachments weren't that easy.

Partway through rigging of the sail:

After completion of the required rigging and installation of the stern lantern:


That completes the rigging. Yet to be done: mounting and rigging the anchors, rudder and flags.
 s were next. Not much to show there, just after mounted:
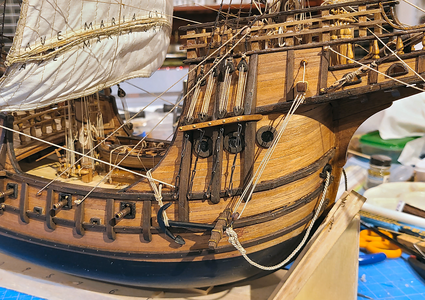
For the rudder, I didn't care that it worked, so went ahead and glued the hinges in place:
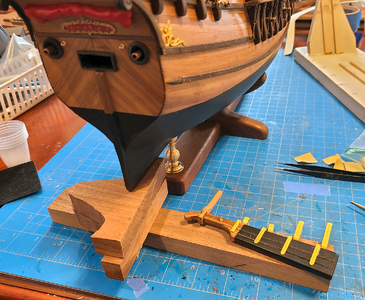
Using scrap blocks as a guide to keep the bottom of the rudder flush with the bottom of the keel, I applied gel CA to the hinges and slid the rudder in place:
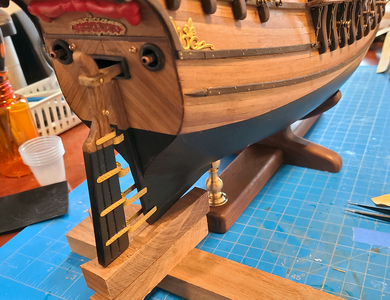
Which worked pretty well:
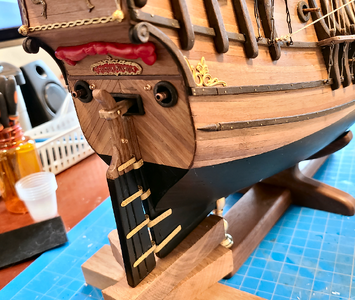
I next rigged the rudder retaining cables:
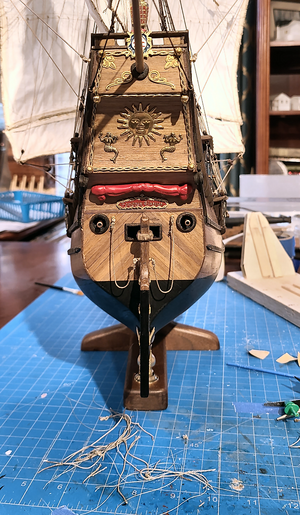
I began with what I thought was the best size for the cables - 0.6mm. Then, when trimming the surplus, accidentally cut the cables and found I had no more 0.6mm. So I made and mounted a new set at 0.5mm, but after completion felt they weren't substantial enough. Finally, went to 0.7mm and thought they looked okay, but again, accidentally cut one after completion, and had to redo it.
The result:
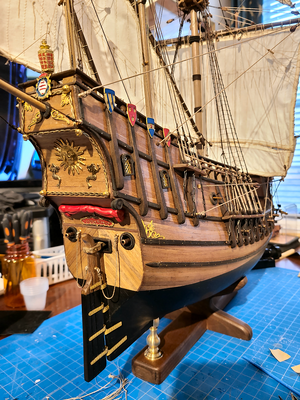
That completes everything except for the flags. I have to buy some hairspray to stiffen them (wife said NO to using hers), so that is next.
- Joined
- Jun 17, 2021
- Messages
- 3,202
- Points
- 588

What a gorgeous little model. Fun to look at, like fresh off the set of an Errol Flynn Swashbuckler! Aesthetically pleasing and beautifully crafted. Bravo 


Wow, thanks so much. I have to say I've enjoyed the build.What a gorgeous little model. Fun to look at, like fresh off the set of an Errol Flynn Swashbuckler! Aesthetically pleasing and beautifully crafted. Bravo

Beautiful model.s were next. Not much to show there, just after mounted:
View attachment 433901
For the rudder, I didn't care that it worked, so went ahead and glued the hinges in place:
View attachment 433903
Using scrap blocks as a guide to keep the bottom of the rudder flush with the bottom of the keel, I applied gel CA to the hinges and slid the rudder in place:
View attachment 433907
Which worked pretty well:
View attachment 433908
I next rigged the rudder retaining cables:
View attachment 433909
I began with what I thought was the best size for the cables - 0.6mm. Then, when trimming the surplus, accidentally cut the cables and found I had no more 0.6mm. So I made and mounted a new set at 0.5mm, but after completion felt they weren't substantial enough. Finally, went to 0.7mm and thought they looked okay, but again, accidentally cut one after completion, and had to redo it.
The result:
View attachment 433919
That completes everything except for the flags. I have to buy some hairspray to stiffen them (wife said NO to using hers), so that is next.
The ships of this time period are not my favourites - but your model I like to look at
Very good build - accurate, clean and a very good overall appearance
Very good work my friend
We can see, that there is somebody working, who loves this hobby
Very good build - accurate, clean and a very good overall appearance
Very good work my friend
We can see, that there is somebody working, who loves this hobby
Thanks so much for that, Uwek. Before I saw Olha's build, I too did not particularly like ships of that era. They looked like caricatures or comics to me. But I fell in love with this one during her build, and have enjoyed it during my build as well. Thank you so much for your encouragement along the way.The ships of this time period are not my favourites - but your model I like to look at
Very good build - accurate, clean and a very good overall appearance
Very good work my friend
We can see, that there is somebody working, who loves this hobby
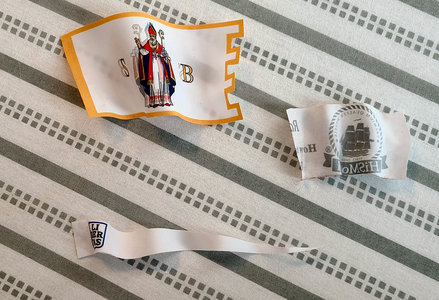
Well, it's Flag time. These are the flags I ordered and received from HiS in Czech Republic:

I'm very pleased with them. They're extremely clear and printed on very thin, fine material - a bargain at only 7.83 Euros, IMHO. As such, they are pretty limp, so following the HiS online instructions, my first step was to saturate them, before cutting, with hair spray. I bought the cheap 4X extreme hold pressurized non-brand from Walmart, and gave the sheet a good soaking (held up by a clip at the end). After it had dried (relatively quick considering how soaked it was), I sprayed another coat. The hairspray gives the material quite a bit more stiffness.
I then cut the flags out using a sharp Xacto blade knife. The hairspray helps prevent fraying at the edges, but I ended up later going over with Fray Check, which is used to prevent fabric from fraying. This was more necessary on slanted lines on the banner.
I started out with a scrap of fabric and used Olha's method of wrapping wire around a ruler and weaving the material between it:
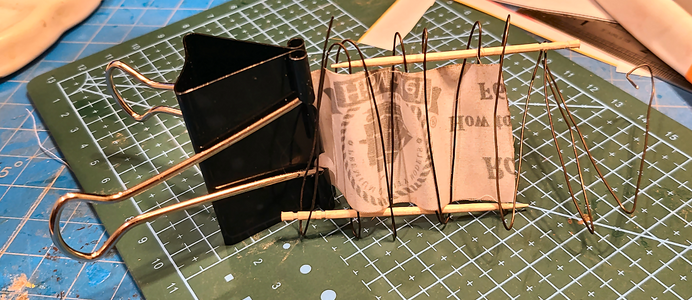
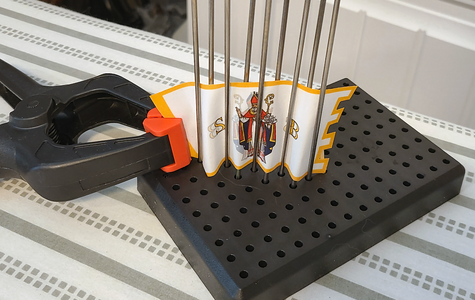
I found this method very difficult to use, even with such a small, short piece of material. So I went back to the Flag Instructions on HiS. They recommend using clamps to create curves in the flag, then misting them with water. This softens the hairspray, and allows it to set in the curved position, and works quite nicely:
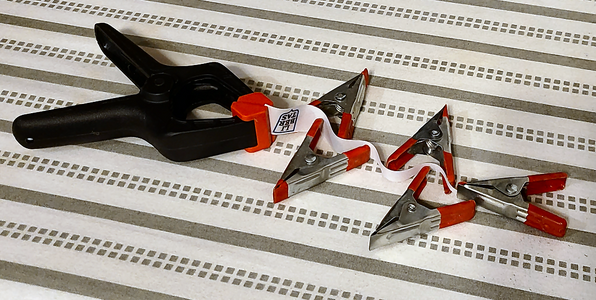
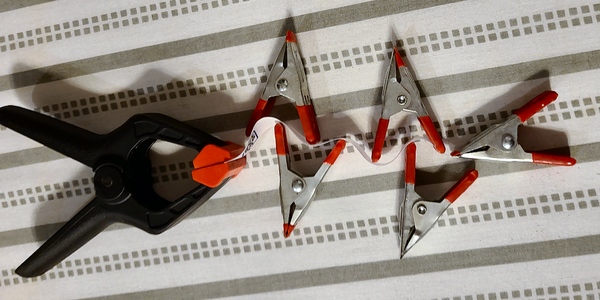
As I said, while the flags are held in this position, I mist them with water, which then makes the curves fairly permanent, once they're dry. This method is quite easy, so did the national flag that way:
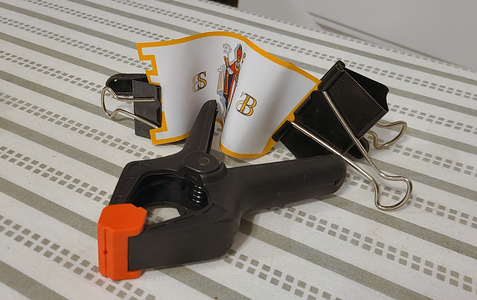
The results to this point:
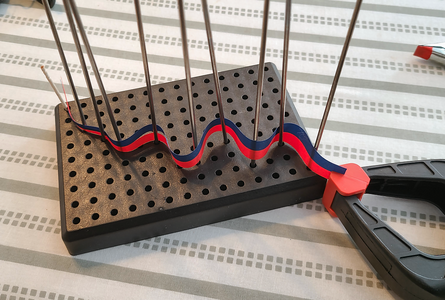
Since the red & blue banner is pretty long for this method, I tried another using a tool that didn't work all that well for its original purpose:
This worked quite nicely, so, since I received an extra set of flags, I tried the national flag using this method for more curves:
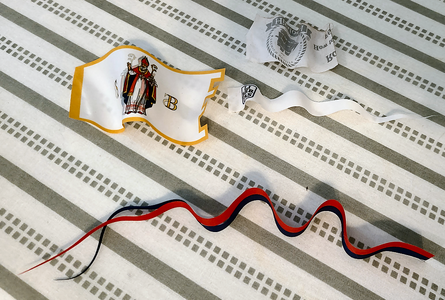
I ended up not liking this version as well, so my final three flags for the model ended up like this:
Next, to mount them.

I'm very pleased with them. They're extremely clear and printed on very thin, fine material - a bargain at only 7.83 Euros, IMHO. As such, they are pretty limp, so following the HiS online instructions, my first step was to saturate them, before cutting, with hair spray. I bought the cheap 4X extreme hold pressurized non-brand from Walmart, and gave the sheet a good soaking (held up by a clip at the end). After it had dried (relatively quick considering how soaked it was), I sprayed another coat. The hairspray gives the material quite a bit more stiffness.
I then cut the flags out using a sharp Xacto blade knife. The hairspray helps prevent fraying at the edges, but I ended up later going over with Fray Check, which is used to prevent fabric from fraying. This was more necessary on slanted lines on the banner.
I started out with a scrap of fabric and used Olha's method of wrapping wire around a ruler and weaving the material between it:

I found this method very difficult to use, even with such a small, short piece of material. So I went back to the Flag Instructions on HiS. They recommend using clamps to create curves in the flag, then misting them with water. This softens the hairspray, and allows it to set in the curved position, and works quite nicely:


As I said, while the flags are held in this position, I mist them with water, which then makes the curves fairly permanent, once they're dry. This method is quite easy, so did the national flag that way:

The results to this point:

Since the red & blue banner is pretty long for this method, I tried another using a tool that didn't work all that well for its original purpose:

This worked quite nicely, so, since I received an extra set of flags, I tried the national flag using this method for more curves:

I ended up not liking this version as well, so my final three flags for the model ended up like this:

Next, to mount them.
- Joined
- Jun 17, 2021
- Messages
- 3,202
- Points
- 588

Wow! Very instructive and helpful. 

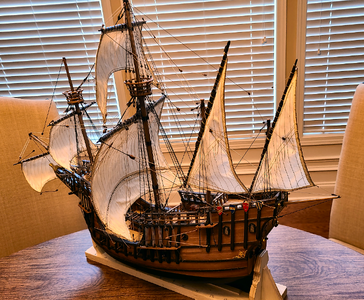
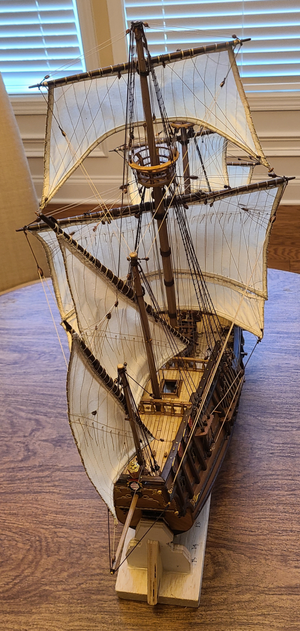
Well, I'm calling it complete. I added the flags (the pennant on the foremast is shielded from the wind by the mainmast sails, so isn't fluttering quite like I'd like for the photos) and the four swivel guns. And this is the final result:
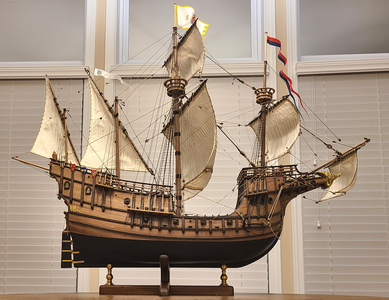
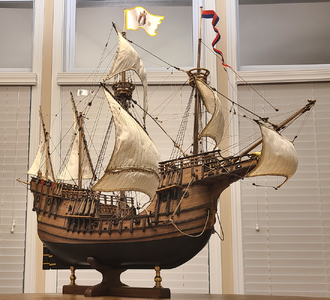
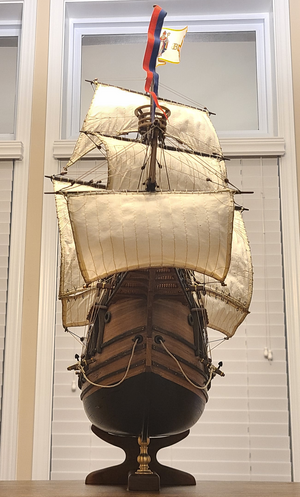
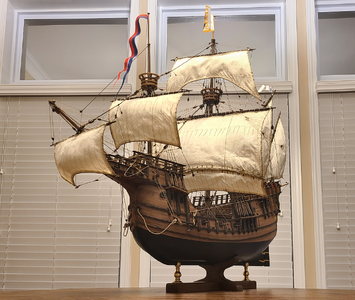
I see the anchor ropes got "bent" from their correct position, so I'll fix that.
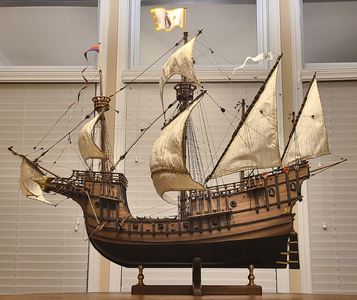
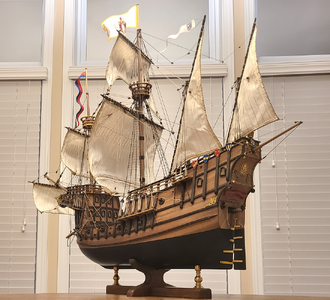
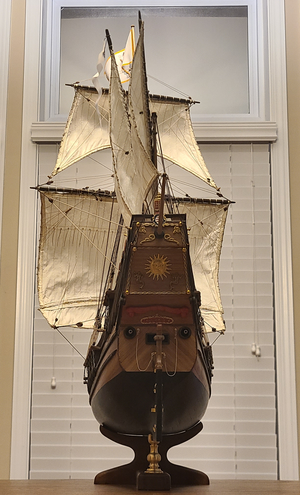
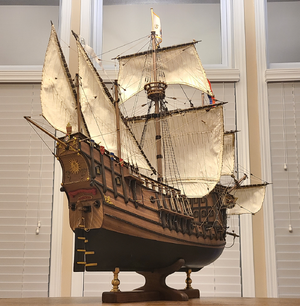
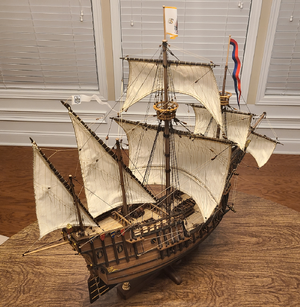
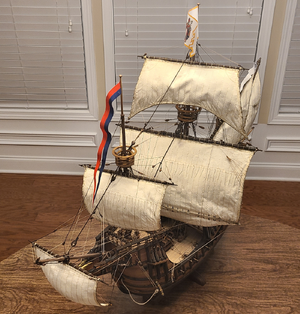
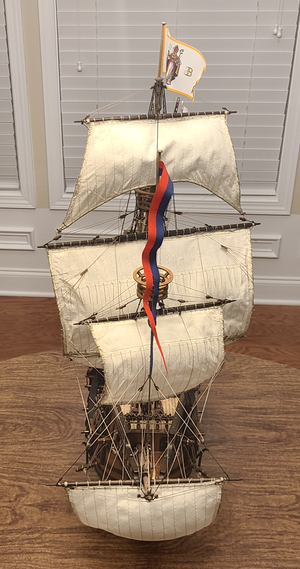
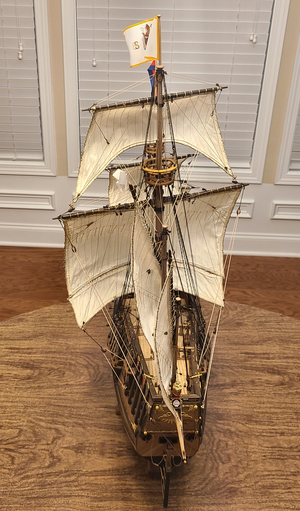
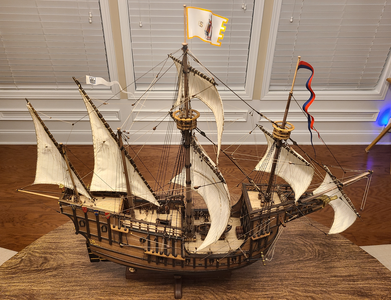
I will probably go back add rope loops to the cleats that don't have them, but that's about it. I will be placing the model in the area of the top two shelves of my bookcase, and placing 1/4" plexiglass over it to keep the dust out (the 3 rules of model shipbuilding: "Thou shalt not let dust fall upon it, Thou shalt not let dust fall upon it, and Thou shalt not let dust fall upon it.")
I've enjoyed this model immensely and would like to thank Zoran Pavlovich of MarisStella in Croatia for his quality kit, advice, clarifications and encouragement, Radimir Beseda of HiSModel in Czech Republic for his infinite patience in making improved rigging diagrams and changes as well as making quality blocks, flags and other parts, Olha Batchvarov for her wonderful build and videos of this model, without which I would never have attempted it, my son Chris for making 3D printed barrels, mice (mouses?), guns and stairs, and all of you at ShipsOfSail, for your ideas, encouragement, patience, suggestions, and guidance.
Now to clean up my den/workshop, my garage/powertool area, and do whatever the Admiral wants me to do prior to deciding on and ordering my next project.


I see the anchor ropes got "bent" from their correct position, so I'll fix that.


I will probably go back add rope loops to the cleats that don't have them, but that's about it. I will be placing the model in the area of the top two shelves of my bookcase, and placing 1/4" plexiglass over it to keep the dust out (the 3 rules of model shipbuilding: "Thou shalt not let dust fall upon it, Thou shalt not let dust fall upon it, and Thou shalt not let dust fall upon it.")
I've enjoyed this model immensely and would like to thank Zoran Pavlovich of MarisStella in Croatia for his quality kit, advice, clarifications and encouragement, Radimir Beseda of HiSModel in Czech Republic for his infinite patience in making improved rigging diagrams and changes as well as making quality blocks, flags and other parts, Olha Batchvarov for her wonderful build and videos of this model, without which I would never have attempted it, my son Chris for making 3D printed barrels, mice (mouses?), guns and stairs, and all of you at ShipsOfSail, for your ideas, encouragement, patience, suggestions, and guidance.
Now to clean up my den/workshop, my garage/powertool area, and do whatever the Admiral wants me to do prior to deciding on and ordering my next project.
Congratulations - I am very happy that you finished this model - very well done
You can be proud of
Very good model my friend
You can be proud of
Very good model my friend
Awesome! That's a fabulous result! Display her with pride!
Good afternoon. Wonderful. A model to be proudly displayed. Well done. Cheers GrantWell, I'm calling it complete. I added the flags (the pennant on the foremast is shielded from the wind by the mainmast sails, so isn't fluttering quite like I'd like for the photos) and the four swivel guns. And this is the final result:
View attachment 434625
View attachment 434626
View attachment 434627
View attachment 434628
I see the anchor ropes got "bent" from their correct position, so I'll fix that.
View attachment 434629
View attachment 434630
View attachment 434631
View attachment 434632
View attachment 434633
View attachment 434634
View attachment 434635
View attachment 434636
View attachment 434637
I will probably go back add rope loops to the cleats that don't have them, but that's about it. I will be placing the model in the area of the top two shelves of my bookcase, and placing 1/4" plexiglass over it to keep the dust out (the 3 rules of model shipbuilding: "Thou shalt not let dust fall upon it, Thou shalt not let dust fall upon it, and Thou shalt not let dust fall upon it.")
I've enjoyed this model immensely and would like to thank Zoran Pavlovich of MarisStella in Croatia for his quality kit, advice, clarifications and encouragement, Radimir Beseda of HiSModel in Czech Republic for his infinite patience in making improved rigging diagrams and changes as well as making quality blocks, flags and other parts, Olha Batchvarov for her wonderful build and videos of this model, without which I would never have attempted it, my son Chris for making 3D printed barrels, mice (mouses?), guns and stairs, and all of you at ShipsOfSail, for your ideas, encouragement, patience, suggestions, and guidance.
Now to clean up my den/workshop, my garage/powertool area, and do whatever the Admiral wants me to do prior to deciding on and ordering my next project.
Love the finished model, BRAVO!
- Joined
- Jun 17, 2021
- Messages
- 3,202
- Points
- 588

I love everything about this model! the whole is truly greater than the sum of its parts.


IT IS ONE OF THE BEST SALES I HAVE SEEN IN TIMES- WELL DONE MATEOn to the topsail. I decided to work on all three of the remaining sails at the same time. The sails included with the model have a border around the outside which is folded over:
View attachment 430268
The center sail is the bonaventure lateen sail, which was not included with the kit, but rather made by me using scrap sailcloth from the kit. The thread used is close to the same color as the rest, but is not as shiny or reflective as on the kit sails, so looks darker. The difference seems not that great in person. As before, I inserted #22 black annealed wire in the hem to help shape the sails, and then sewed the overlapping hems all around.
Using the larger lateen sail as an example, I first glue the boltrope in place and (sometimes) let the glue dry. Most often I don't wait, resulting in glue sticking to my fingers (which is satisfying to peel off over time), but it's best to wait, of course.
View attachment 430269
In process of sewing the boltrope in place:
View attachment 430270
I personally like this method of attachment. It is very close to what has been documented in the kit instructions as being used at the time, and I've seen similar methods published elsewhere, but rather than separate each triple stich being tied off and separated, the thread is pulled from back to front over the boltrope, further holding it in place, between each triple stitch. I like the appearance and to me, at least, it makes sense.
Continuing along the next sail edge, to encircle the sail:
View attachment 430271
The three remaining sails with boltrope in place, prior to attaching to the spars:
View attachment 430272
I won't bore you, nor expose my poor rigging workmanship any further, by posting in-process rigging photos, but here are a few views showing the topsail and rigging in place:
View attachment 430273
There isn't as much "bow" due to the wind on this sail, due to it being held more tightly by the violin blocks attached to the main course spar, it's smaller area and its severe arc in the sail foot. I have some fine-tuning of bending the wire a bit, but it will get mis-bent during construction, show I'll wait a bit.
View attachment 430274
View attachment 430275
This model is really testing my 80-year old fingers and agility (or lack of same) with the rigging, constantly not having enough room for hands and fingers, plucking other rigging, etc. This will be my one-and-only full rigged ship model (since I was in my teens, anyhow), and I'm glad it's not the more complex rigging of larger ships. I just marvel at Olha's videos, making knots and tying belaying pins like they were full size in front of her, but that's not happening here.
The mizzen lateen spar, sail and rigging are next. I'm hoping the rigging connections will be easier to reach with them. Until next time!
I'm putting this ship model in my bookcase, by taking out one shelf and adjusting another. It will be covered and protected by a piece of 1/4" acrylic that goes from the shelf it is on to the top.
My problem is that the only light in the bookcase is centered at the top, and shines directly on the Ragusian flag, illuminating it far greater than the rest of the ship:
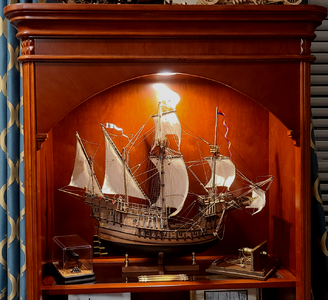
I would like the overall ship better illuminated, without over-lighting the flag. Searching, I've considered a longer light just inside the top all along the top, which would be hidden, and/or lighting along either side, which would be great but almost certainly visible. I thought a small spot of some type in the two upper corners might be good, but haven't found one yet. I can dim the existing central spot to allow some light on the flag, in addition to other lights, but don't think it should be the main light. I've also considered those LED strips on all 3 sides of the opening, but am certainly they would be visible and glare from the sides.
I was hoping that some of you may have had similar situations in lighting and might have some ideas on how best to go about it. Any ideas?
My problem is that the only light in the bookcase is centered at the top, and shines directly on the Ragusian flag, illuminating it far greater than the rest of the ship:

I would like the overall ship better illuminated, without over-lighting the flag. Searching, I've considered a longer light just inside the top all along the top, which would be hidden, and/or lighting along either side, which would be great but almost certainly visible. I thought a small spot of some type in the two upper corners might be good, but haven't found one yet. I can dim the existing central spot to allow some light on the flag, in addition to other lights, but don't think it should be the main light. I've also considered those LED strips on all 3 sides of the opening, but am certainly they would be visible and glare from the sides.
I was hoping that some of you may have had similar situations in lighting and might have some ideas on how best to go about it. Any ideas?
- Joined
- Jun 17, 2021
- Messages
- 3,202
- Points
- 588

Gorgeous model, beautiful display! 


