Ahh. That worked. Thank you Signet. I don't have a 3D printer yet, but maybe someday!!
-

Win a Free Custom Engraved Brass Coin!!!
As a way to introduce our brass coins to the community, we will raffle off a free coin during the month of August. Follow link ABOVE for instructions for entering.
-

PRE-ORDER SHIPS IN SCALE TODAY!
The beloved Ships in Scale Magazine is back and charting a new course for 2026!
Discover new skills, new techniques, and new inspirations in every issue.
NOTE THAT OUR FIRST ISSUE WILL BE JAN/FEB 2026
You are using an out of date browser. It may not display this or other websites correctly.
You should upgrade or use an alternative browser.
You should upgrade or use an alternative browser.
MarisStella Ragusian Carrack by Signet [COMPLETED BUILD]
Will ask @Philski Phill, as he just got his printerAhh. That worked. Thank you Signet. I don't have a 3D printer yet, but maybe someday!!
Yes thank you
Jimsky, I saw Philski's post and saved the link for future reference.
Jimsky, I saw Philski's post and saved the link for future reference.
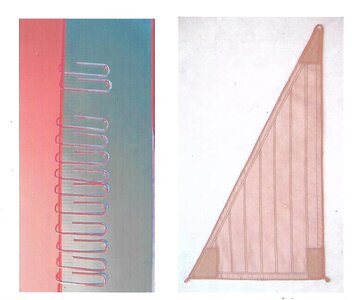
On to the sails. Sails are supplied with this kit, and they look good, to me. Two previous builds by Jack Aubrey here on SoS and GreatGalleons on MSW used the kit sails, so I thought I'd try them out. Olga made her own sails from scratch, BTW. I also considered, and am still considering, sails made by HiS in Czech Republic; these can come completely sewn (but without boltropes), and might be better than what I have or can do. I don't know. But I thought I at least try the kit ones first:
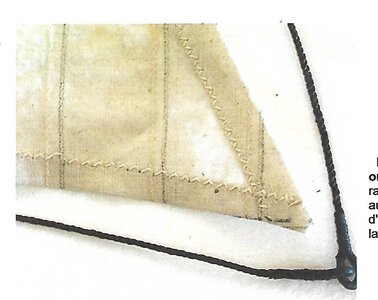
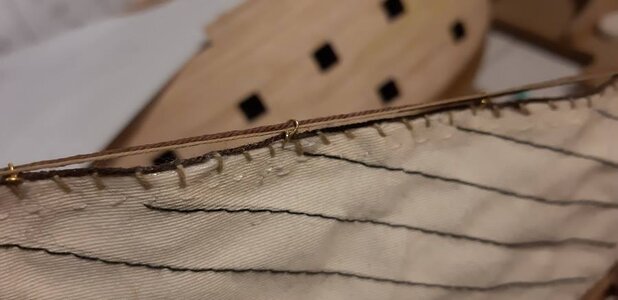
The kit sails have margins around the outside that are folded twice. The instructions say to put wire into the first fold, to help the sails conform to the correct shape, and then 1mm rope in the second fold. This shows the second fold:
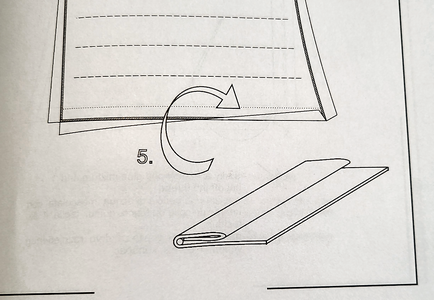
I thought it a bit strange to have such thick rope folded within the seams, but liked the idea of wire, so ended up using 22 gauge dark annealed steel wire, about 0.7mm in diameter, and which is very soft, in only the last fold.
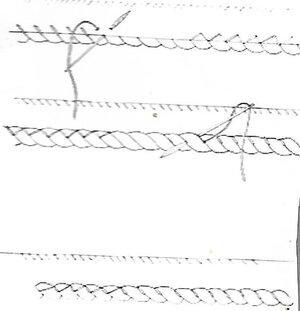
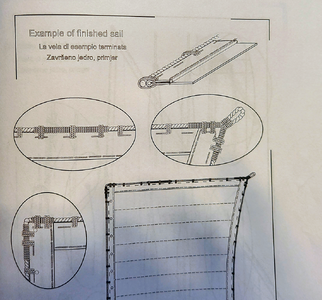
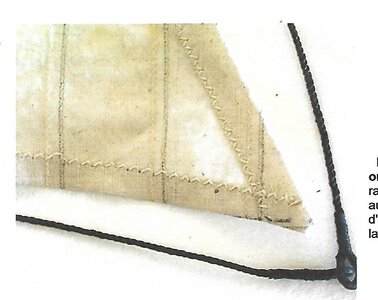
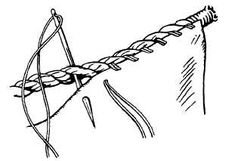
The instructions also show detailing for sewing the boltrope in place, which seems unique, hopefully accurate and appealing to me:
When cutting the sail outlines, most modelers use CA glue, but I found that Dritz Fray Check does a better job. It goes on easy, keeps fabric from fraying, but does not get too hard nor does it color the fabric like CA. I also tried iron-on adhesive strips to hold the folded seams tight:
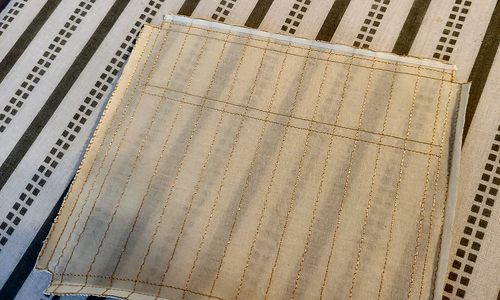
The Heat-n-Bond Lite Sewable iron-on adhesive worked well some of the time, less well at others, especially when inserting the wire.
After bonding the first seam, I ironed the second prior to inserting the wire:
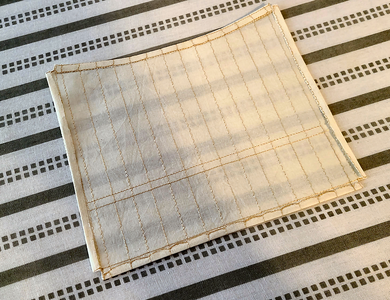
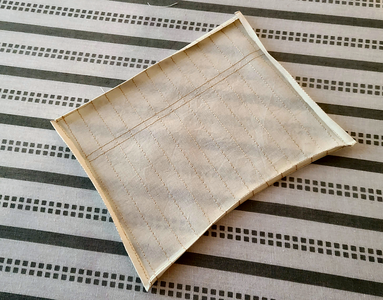
Having trouble with the iron-on adhesive when making the last fold with the wire, so mostly used Aleen's Fabric Fusion to secure the fold:
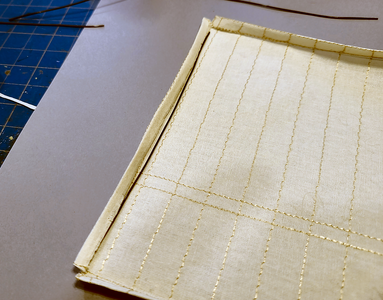
I then inserted reef points at this stage, and ironed them flat, then trimmed them to length, before gluing the boltrope partially in place prior to stitching:
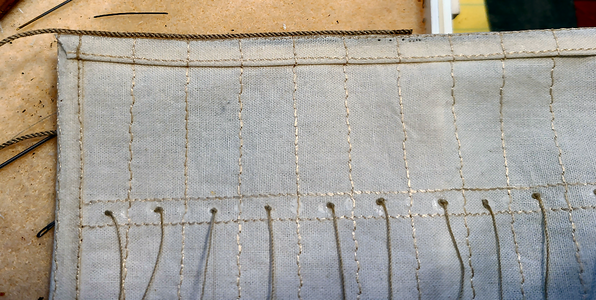
The stitching of the bolt rope was done more-or-less according to the plans above:
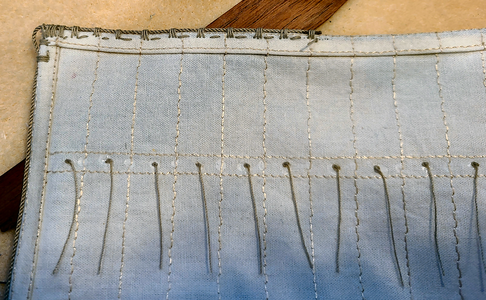
The stitches go over the inserted steel wire in the sail fold and over the boltrope, so it's quite secure that way. The stitch pattern appeals to me, and is hopefully accurate. You can see drops of the Fabric Fusion where the reef points were inserted, but these aren't very visible at normal distance. I originally thought they should be at the seams for strength, so put drops of glue there, but realized that apparently the reef points are at the center of sail panels.
I made the boltrope continuous around the outside of the sail. I started at the top mid-point, as I felt the rope seam would be least visible behind the mast and parrel.
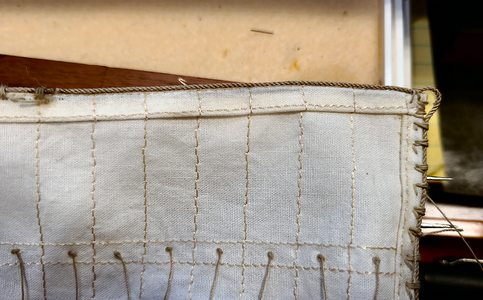
The front of the completed sail (the foresail on this model):
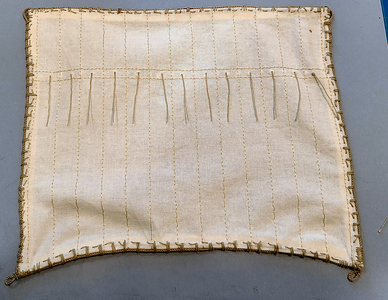
and the back:
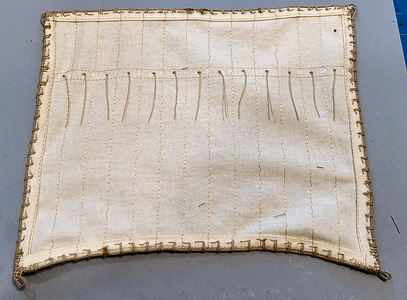
I don't much like the lapped seam around the back, as I don't think it's very accurate, but I've also seen many models done this way, including the two Carrack builds mentioned above.
Of course the soft steel wire is an advantage in shaping the sail the way you want to:
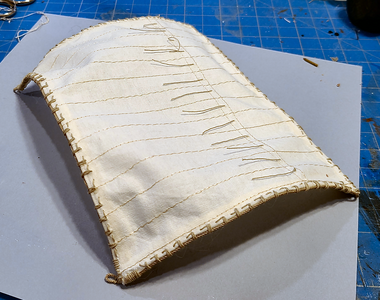
I still intend to make a mount for the sail and use sand in bags and potato starch to better form the sail, but the wire should help maintain the desired shape.
All in all, I think the sail looks okay, but probably not really accurate, with the large seam on the back. Making it better than that would require not using any stiffening wire, and I think I really like the idea of that wire. We'll see.
As this kit did not include the bonaventure sail I intend to include, I also had to make a new sail for it. Here, I've used a scrap portion of the sail cloth included to lay out and stitch the bonaventure sail:
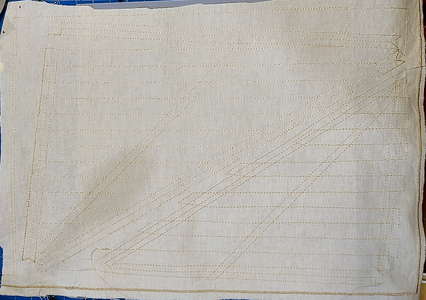
Here the included Mizzen sail is at the top, and my new bonaventure sail at the bottom. The thread color matches fairly well, but the sails were stitched with a thread that is much shinier than what I used. I actually prefer my thread, but that won't happen unless I remake everything, which I doubt is necessary.
I need to now decide if the sail above is good enough for me, or if I want to order new sails from HiS, or even make new ones from scratch (probably using darker material, if I did). As always, suggestions and thoughts are welcomed concerning this.
The kit sails have margins around the outside that are folded twice. The instructions say to put wire into the first fold, to help the sails conform to the correct shape, and then 1mm rope in the second fold. This shows the second fold:

I thought it a bit strange to have such thick rope folded within the seams, but liked the idea of wire, so ended up using 22 gauge dark annealed steel wire, about 0.7mm in diameter, and which is very soft, in only the last fold.
The instructions also show detailing for sewing the boltrope in place, which seems unique, hopefully accurate and appealing to me:

When cutting the sail outlines, most modelers use CA glue, but I found that Dritz Fray Check does a better job. It goes on easy, keeps fabric from fraying, but does not get too hard nor does it color the fabric like CA. I also tried iron-on adhesive strips to hold the folded seams tight:

The Heat-n-Bond Lite Sewable iron-on adhesive worked well some of the time, less well at others, especially when inserting the wire.
After bonding the first seam, I ironed the second prior to inserting the wire:


Having trouble with the iron-on adhesive when making the last fold with the wire, so mostly used Aleen's Fabric Fusion to secure the fold:

I then inserted reef points at this stage, and ironed them flat, then trimmed them to length, before gluing the boltrope partially in place prior to stitching:

The stitching of the bolt rope was done more-or-less according to the plans above:

The stitches go over the inserted steel wire in the sail fold and over the boltrope, so it's quite secure that way. The stitch pattern appeals to me, and is hopefully accurate. You can see drops of the Fabric Fusion where the reef points were inserted, but these aren't very visible at normal distance. I originally thought they should be at the seams for strength, so put drops of glue there, but realized that apparently the reef points are at the center of sail panels.
I made the boltrope continuous around the outside of the sail. I started at the top mid-point, as I felt the rope seam would be least visible behind the mast and parrel.

The front of the completed sail (the foresail on this model):

and the back:

I don't much like the lapped seam around the back, as I don't think it's very accurate, but I've also seen many models done this way, including the two Carrack builds mentioned above.
Of course the soft steel wire is an advantage in shaping the sail the way you want to:

I still intend to make a mount for the sail and use sand in bags and potato starch to better form the sail, but the wire should help maintain the desired shape.
All in all, I think the sail looks okay, but probably not really accurate, with the large seam on the back. Making it better than that would require not using any stiffening wire, and I think I really like the idea of that wire. We'll see.
As this kit did not include the bonaventure sail I intend to include, I also had to make a new sail for it. Here, I've used a scrap portion of the sail cloth included to lay out and stitch the bonaventure sail:

Here the included Mizzen sail is at the top, and my new bonaventure sail at the bottom. The thread color matches fairly well, but the sails were stitched with a thread that is much shinier than what I used. I actually prefer my thread, but that won't happen unless I remake everything, which I doubt is necessary.
I need to now decide if the sail above is good enough for me, or if I want to order new sails from HiS, or even make new ones from scratch (probably using darker material, if I did). As always, suggestions and thoughts are welcomed concerning this.
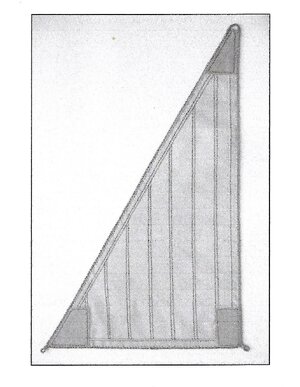
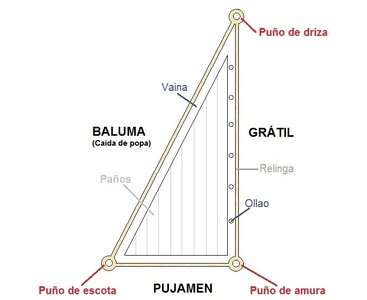
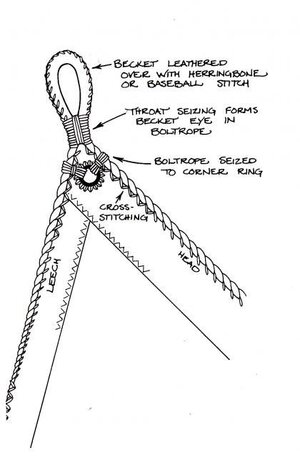
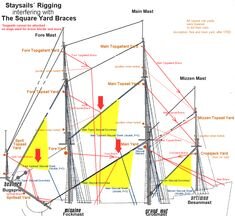
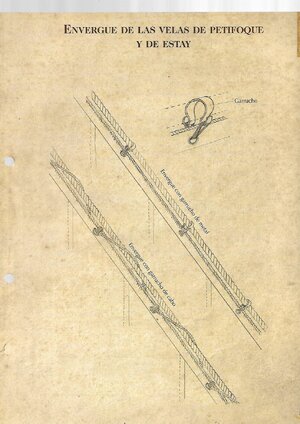
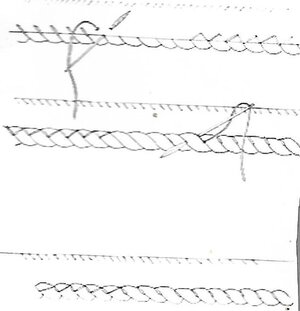
Hi, I will add some images of how to make sails correctly, Generally, you stay sail, most having a triangle form. then there are square sails- by far the biggest amount and finally, some stay square sails (between the fore and main mast; then between the main mast and mizzen.On to the sails. Sails are supplied with this kit, and they look good, to me. Two previous builds by Jack Aubrey here on SoS and GreatGalleons on MSW used the kit sails, so I thought I'd try them out. Olga made her own sails from scratch, BTW. I also considered, and am still considering, sails made by HiS in Czech Republic; these can come completely sewn (but without boltropes), and might be better than what I have or can do. I don't know. But I thought I at least try the kit ones first:
The kit sails have margins around the outside that are folded twice. The instructions say to put wire into the first fold, to help the sails conform to the correct shape, and then 1mm rope in the second fold. This shows the second fold:
View attachment 416792
I thought it a bit strange to have such thick rope folded within the seams, but liked the idea of wire, so ended up using 22 gauge dark annealed steel wire, about 0.7mm in diameter, and which is very soft, in only the last fold.
The instructions also show detailing for sewing the boltrope in place, which seems unique, hopefully accurate and appealing to me:
View attachment 416793
When cutting the sail outlines, most modelers use CA glue, but I found that Dritz Fray Check does a better job. It goes on easy, keeps fabric from fraying, but does not get too hard nor does it color the fabric like CA. I also tried iron-on adhesive strips to hold the folded seams tight:
View attachment 416794
The Heat-n-Bond Lite Sewable iron-on adhesive worked well some of the time, less well at others, especially when inserting the wire.
After bonding the first seam, I ironed the second prior to inserting the wire:
View attachment 416795
View attachment 416796
Having trouble with the iron-on adhesive when making the last fold with the wire, so mostly used Aleen's Fabric Fusion to secure the fold:
View attachment 416800
I then inserted reef points at this stage, and ironed them flat, then trimmed them to length, before gluing the boltrope partially in place prior to stitching:
View attachment 416797
The stitching of the bolt rope was done more-or-less according to the plans above:
View attachment 416799
The stitches go over the inserted steel wire in the sail fold and over the boltrope, so it's quite secure that way. The stitch pattern appeals to me, and is hopefully accurate. You can see drops of the Fabric Fusion where the reef points were inserted, but these aren't very visible at normal distance. I originally thought they should be at the seams for strength, so put drops of glue there, but realized that apparently the reef points are at the center of sail panels.
I made the boltrope continuous around the outside of the sail. I started at the top mid-point, as I felt the rope seam would be least visible behind the mast and parrel.
View attachment 416801
The front of the completed sail (the foresail on this model):
View attachment 416802
and the back:
View attachment 416803
I don't much like the lapped seam around the back, as I don't think it's very accurate, but I've also seen many models done this way, including the two Carrack builds mentioned above.
Of course the soft steel wire is an advantage in shaping the sail the way you want to:
View attachment 416804
I still intend to make a mount for the sail and use sand in bags and potato starch to better form the sail, but the wire should help maintain the desired shape.
All in all, I think the sail looks okay, but probably not really accurate, with the large seam on the back. Making it better than that would require not using any stiffening wire, and I think I really like the idea of that wire. We'll see.
As this kit did not include the bonaventure sail I intend to include, I also had to make a new sail for it. Here, I've used a scrap portion of the sail cloth included to lay out and stitch the bonaventure sail:
View attachment 416805
Here the included Mizzen sail is at the top, and my new bonaventure sail at the bottom. The thread color matches fairly well, but the sails were stitched with a thread that is much shinier than what I used. I actually prefer my thread, but that won't happen unless I remake everything, which I doubt is necessary.
I need to now decide if the sail above is good enough for me, or if I want to order new sails from HiS, or even make new ones from scratch (probably using darker material, if I did). As always, suggestions and thoughts are welcomed concerning this.
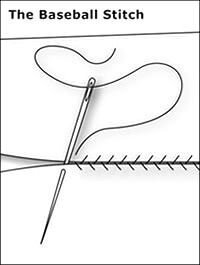
pay special attention to "how the Bold rope" is sewed by hand
Very nice work, Signet. I am always impressed by the work on the rigging.
those stitches are from me- El Capi. To add the Bold Rope is hell.happy new yearVery nice work, Signet. I am always impressed by the work on the rigging.
While I am sure that this information is correct, I believe it to be what was done in later years, and especially for British and western Continental ships. Stay square sails did not even exist in the 16th century, the time of this ship, nor did many of the other details shown on those drawings, and I have it on good authority from the researcher that the stitching on Ragusian and Dalmatian ships of the 16th century were done as outlined in the instructions above (and repeated here):Hi, I will add some images of how to make sails correctly, Generally, you stay sail, most having a triangle form. then there are square sails- by far the biggest amount and finally, some stay square sails (between the fore and main mast; then between the main mast and mizzen.
pay special attention to "how the Bold rope" is sewed by hand
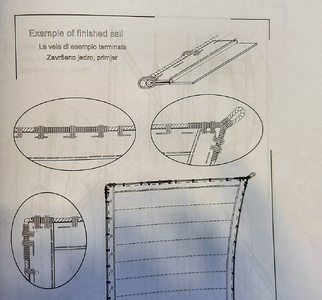
This method is in fact taught in the MarisStella model building school, which the drawings were adapted from.
My version posted above uses rope a bit too thick, and the spacing of the triple loops is generally too close and varies too much, so I am redoing it in a more correct manner. I do feel this is the appropriate method for this ship, however.
I re-did the connection of the bolt rope to the sails using smaller thread, and better spaced connections to the rope:
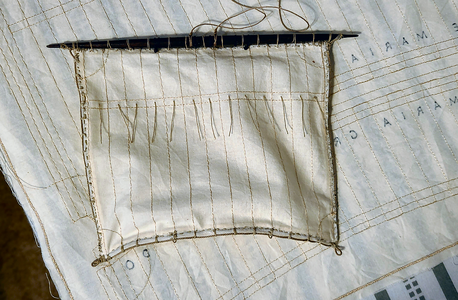
I've here connected the sail to the spar, with much of the spar rigging in place to make it easier to do. Now that I look at it from this side, I'm not sure I prefer it to the original above, but it's going to stay this way. It actually looks a bit better, I think, from the back side. Smaller thread is good, and more regular spacing of the stitching to the bolt rope, but my hand stitching in between is not good. Oh well, that's the way it is. That's the problem with good, clear photos: you see all your defects after it's done and too late to change.
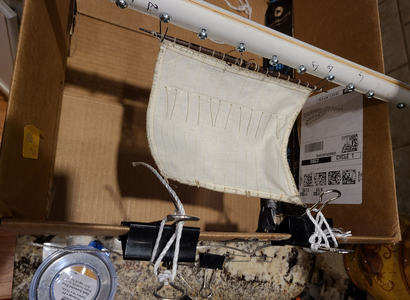
Here I've mounted the spar and sail for shaping using Olha's method with potato starch:
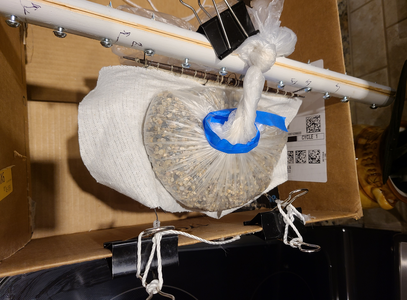
and after starch is applied, weight is added to form the sail's curve:
After forming, I'm actually pretty pleased with the result:
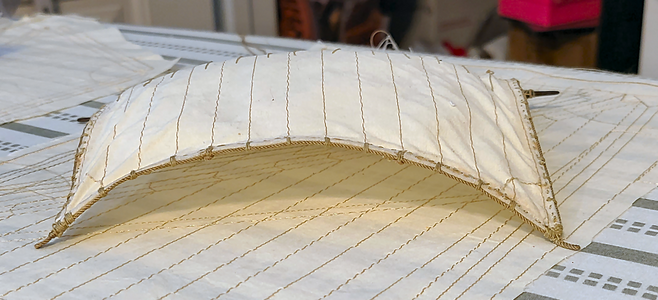
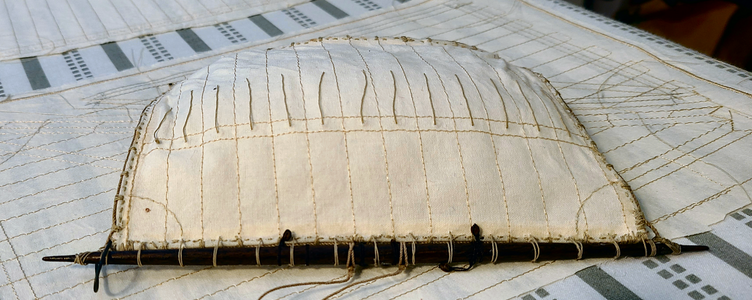
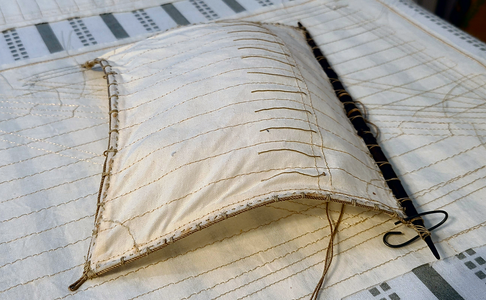
So, I guess I will continue along this line with the rest of the sails. Or rather, I continue next with the bowsprit sail, and probably rig each one in between. My resultant sail isn't quite what I'd like it to be, but I like the overall appearance and stitching design, so will use them.

I've here connected the sail to the spar, with much of the spar rigging in place to make it easier to do. Now that I look at it from this side, I'm not sure I prefer it to the original above, but it's going to stay this way. It actually looks a bit better, I think, from the back side. Smaller thread is good, and more regular spacing of the stitching to the bolt rope, but my hand stitching in between is not good. Oh well, that's the way it is. That's the problem with good, clear photos: you see all your defects after it's done and too late to change.
Here I've mounted the spar and sail for shaping using Olha's method with potato starch:

and after starch is applied, weight is added to form the sail's curve:

After forming, I'm actually pretty pleased with the result:


So, I guess I will continue along this line with the rest of the sails. Or rather, I continue next with the bowsprit sail, and probably rig each one in between. My resultant sail isn't quite what I'd like it to be, but I like the overall appearance and stitching design, so will use them.
THE PATOSTARCH I added here more than 20 years ago. I called it MY GRANDMOTHER methode, as she did on my grandfather's collars when he had to have a meeting with the OLD fellow from the Navy
On the other hand, the sails do not look bad. When adding the boltrope to the edge of the sails, I said it fast with paper clips, before the stitching
On the other hand, the sails do not look bad. When adding the boltrope to the edge of the sails, I said it fast with paper clips, before the stitching
That is a good idea. I had thought previously about placing small clamps to keep it in place.On the other hand, the sails do not look bad. When adding the boltrope to the edge of the sails, I said it fast with paper clips, before the stitching
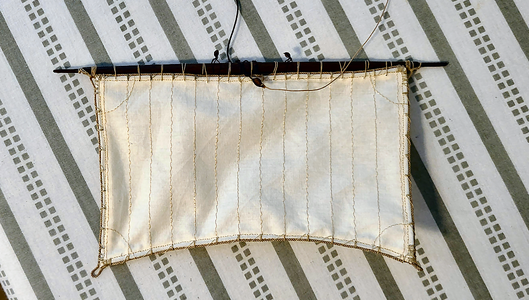
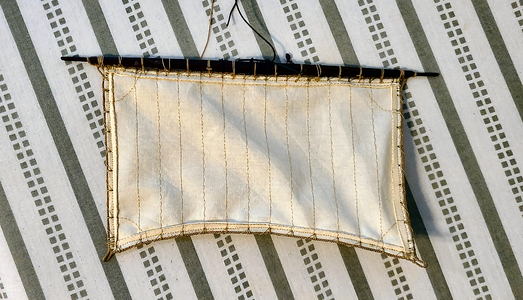
I finished the bowsprit sail in a similar manner, using a single strand of smaller rope for attaching the boltrope. I had also stitched an extra stitch around the outside, rather than use glue, to hold the fold in place, and prefer it this way. Close enough to the original plans, not that different from the foresail done above. Here it is attached to the spar:
And after shaping with potato starch:
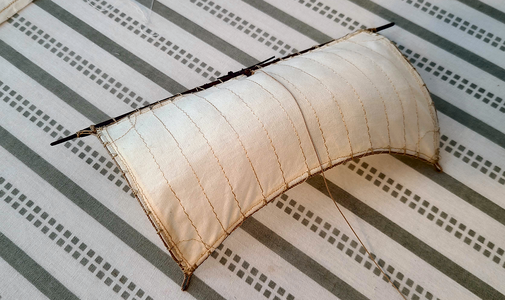
This works for me and I'm pretty happy with the result.
Speaking of potato starch, I've been having problems mixing up the starch and not having it clump, so after doing the above, took a scrap piece of sailcloth and put Woodland Scenics Scenic Cement , which is mostly thinned white glue, on it, and it did well. I don't know if the cloth I placed atop the sailcloth would have sticked to hard to it though, and wonder if others have tried thinned white glue on sails?


And after shaping with potato starch:

This works for me and I'm pretty happy with the result.
Speaking of potato starch, I've been having problems mixing up the starch and not having it clump, so after doing the above, took a scrap piece of sailcloth and put Woodland Scenics Scenic Cement , which is mostly thinned white glue, on it, and it did well. I don't know if the cloth I placed atop the sailcloth would have sticked to hard to it though, and wonder if others have tried thinned white glue on sails?
Oh, I also tried a running a running lacing on the foresail, which I thought looked neat and would be easier to do that a bunch of robands:
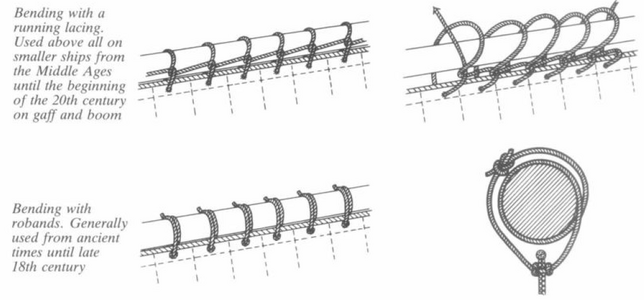
It was a failure for me. I just couldn't get the stitching right and taut and looking good, despite how easy it looks (and must be). In any event, it was not saving me any time, so went with the more common robands.

It was a failure for me. I just couldn't get the stitching right and taut and looking good, despite how easy it looks (and must be). In any event, it was not saving me any time, so went with the more common robands.
When using Potato Starch the water must be ISCOLD. The rest is OKOh, I also tried a running a running lacing on the foresail, which I thought looked neat and would be easier to do that a bunch of robands:
View attachment 422853
It was a failure for me. I just couldn't get the stitching right and taut and looking good, despite how easy it looks (and must be). In any event, it was not saving me any time, so went with the more common robands.
REMEMBER THAT WITHOUT FAILURE YOU WILL NEVER LEARN.
Olha's videos, and how I've used it, is to boil water, mix the starch with a bit of water separately, then add it to the boiling water, continuing boiling while using, which in general, works great. The only problem I had was if the added/mixed starch was too thick, or added too fast, it would separate into clumps or sink to the bottom as a layer. I'd not seen it used cold.When using Potato Starch the water must be ISCOLD. The rest is OK
REMEMBER THAT WITHOUT FAILURE YOU WILL NEVER LEARN.
Sails for the Pinky Schooner
I've finished mounting and rigging the bowsprit sail, so thought I'd post some pics:
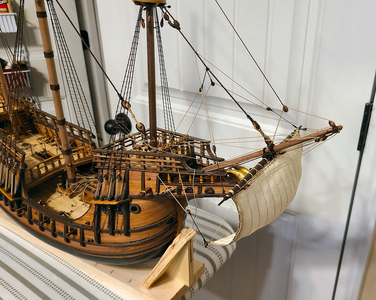
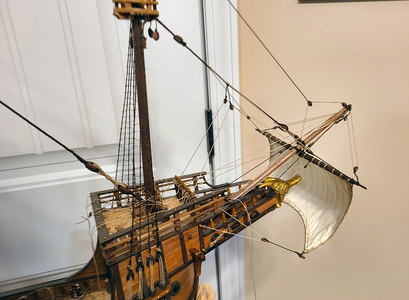
A lot of loose rope ends laying around yet; I'll coil them and trim them later. Some are for the halyards and parrel lifts attached ahead of time to the deck attachments. Of course the picture shows up a couple problems I missed, so will correct.


A lot of loose rope ends laying around yet; I'll coil them and trim them later. Some are for the halyards and parrel lifts attached ahead of time to the deck attachments. Of course the picture shows up a couple problems I missed, so will correct.
Rigging is now complete for the Foresail, so thought I'd take some pics:
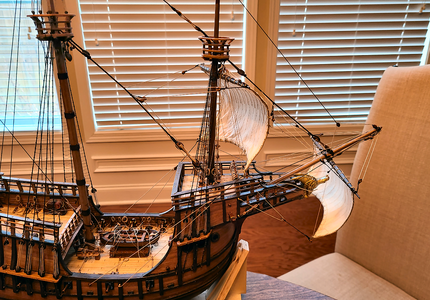
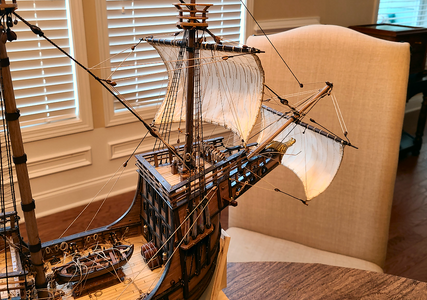
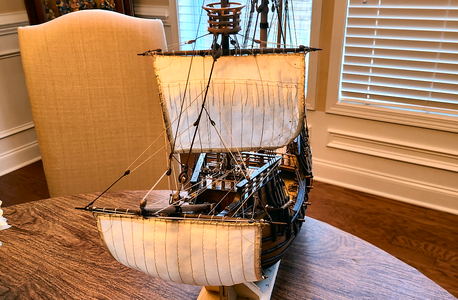
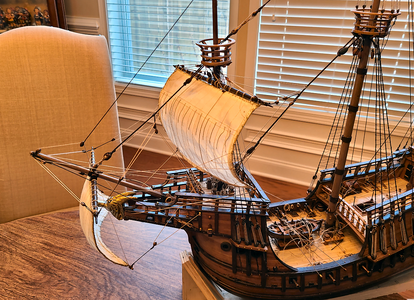
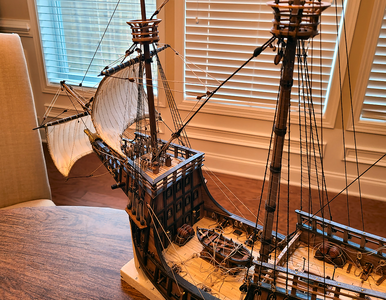
No rigging steps are shown. Olha and others show the correct way of doing things and I didn't do anything special, just tried to get it done.
I know my rigging is pretty sloppy. My hands just don't work quite the way I want them to. I know how to do the knots and all, but just can't seem to. So I'm satisfied if the rope is attached to the right place, and try to cover up my bad connections with badly made coils. I'm afraid it's the best I can do, reasonably. But I'm still happy with the overall appearance, and like the looks of the model.
Next on to the Mainsail, which due to its bonnet and all, will have some more complex sail assembly, so will probably post something on it.
The mainsail was quite the project for me. Again, for the most part I'm only showing the results; all of you know how to rig far better than I.
The mainsail and bonnet after sewing the boltrope in place:
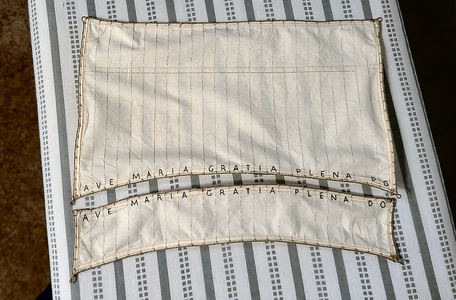
I figured that like most Catholic nations in the Mediterranean, the first few words of the "Ave Maria" would be lettered on the sail to help align the bonnet to the mainsail. I originally translated the words to Croatian, but then remembered that all nations would use Latin from the Catholic church.
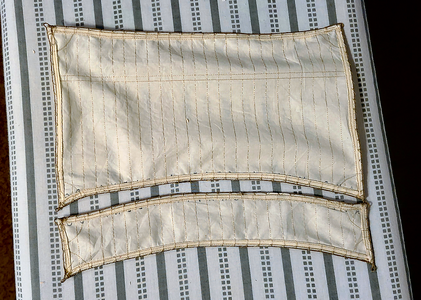
Here the bonnet has been attached to the mainsail (thank goodness for the "Ave Maria" or I'd probably have screwed that up.
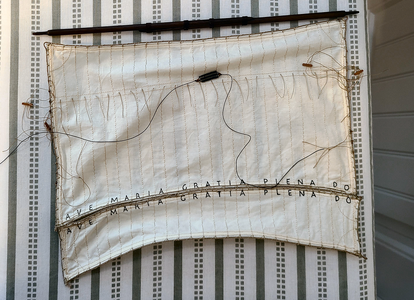
I went ahead an made up the parrel for mounting. I'm not certain that design parrel would have been used, but like the looks of it, so...
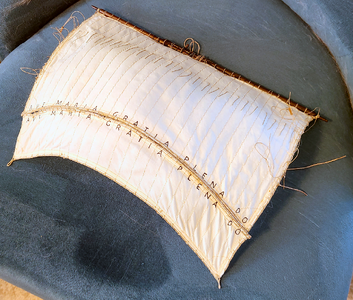
Using Olha's method for shaping and stiffening sails, this was the result:
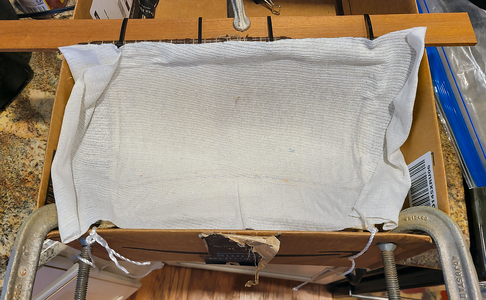
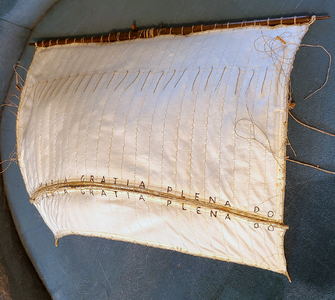
The edges had "crinkled" down some, so I re-wet them to activate the starch, and hung the sail by its edge using clamps for weights to take them out:
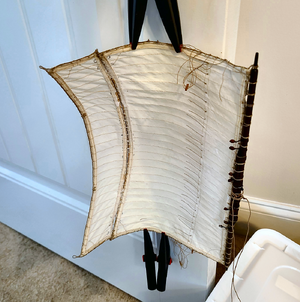
I think the curve came out pretty well:
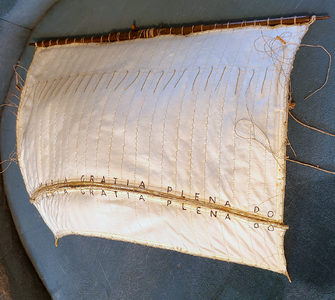
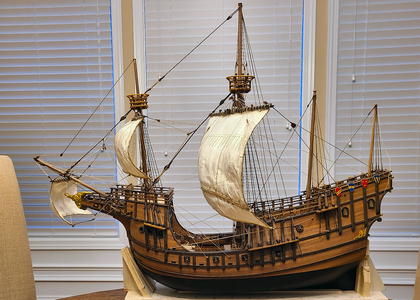
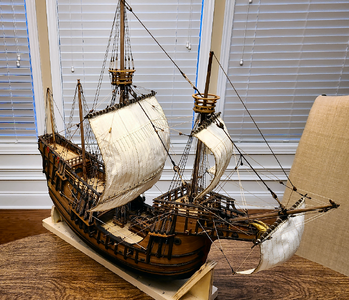
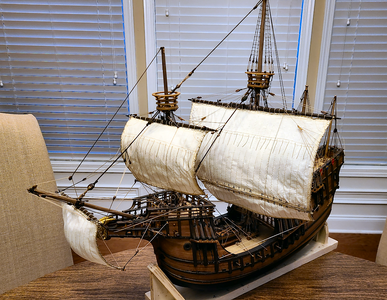
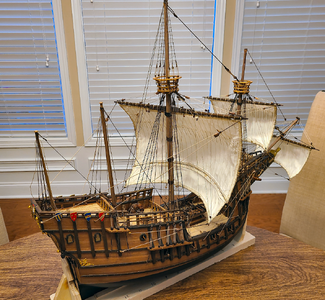
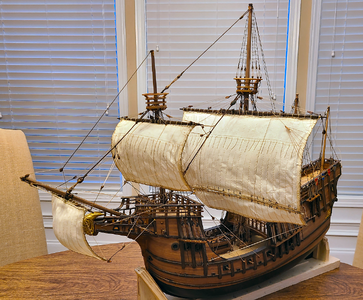
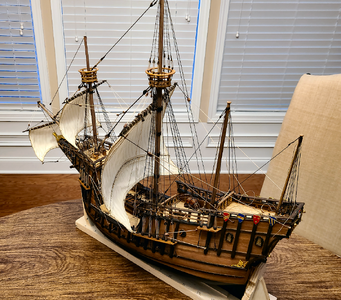
I mounted the sail using a pin for more strength, then attached the halyard and parrel lift, then the clewlines, slablines, lifts and leechlines, which did not depend on the angle or fore-to-aft placement of the sail. Finally, added the sheets, tacks, braces and bowlines, to determine the final location of the sail. And this is the result:
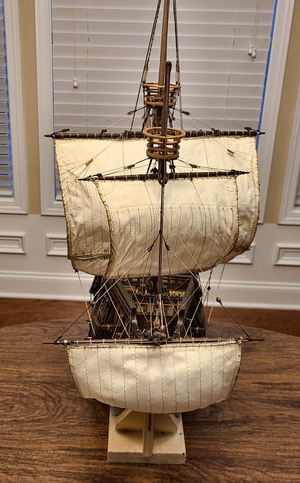
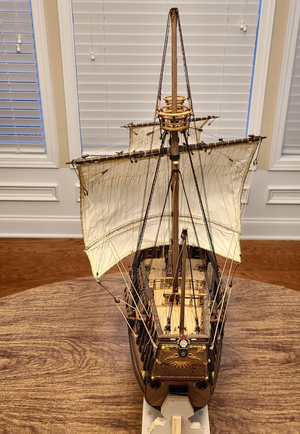
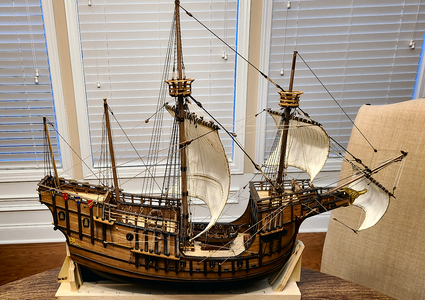
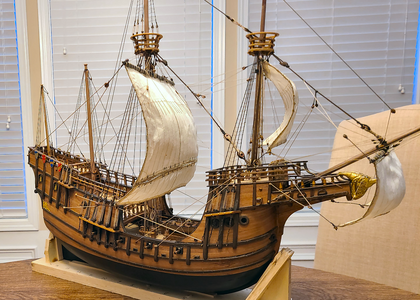
Next, the topsail...
The mainsail and bonnet after sewing the boltrope in place:

I figured that like most Catholic nations in the Mediterranean, the first few words of the "Ave Maria" would be lettered on the sail to help align the bonnet to the mainsail. I originally translated the words to Croatian, but then remembered that all nations would use Latin from the Catholic church.

Here the bonnet has been attached to the mainsail (thank goodness for the "Ave Maria" or I'd probably have screwed that up.

I went ahead an made up the parrel for mounting. I'm not certain that design parrel would have been used, but like the looks of it, so...
Using Olha's method for shaping and stiffening sails, this was the result:


The edges had "crinkled" down some, so I re-wet them to activate the starch, and hung the sail by its edge using clamps for weights to take them out:

I think the curve came out pretty well:

I mounted the sail using a pin for more strength, then attached the halyard and parrel lift, then the clewlines, slablines, lifts and leechlines, which did not depend on the angle or fore-to-aft placement of the sail. Finally, added the sheets, tacks, braces and bowlines, to determine the final location of the sail. And this is the result:


Next, the topsail...
- Joined
- Jun 17, 2021
- Messages
- 3,202
- Points
- 588

Your sails are exceptional. They give life and animation to your model. More like sculpture, very animated and aesthetically pleasing.


